Introduction
In today’s digital era, video conferencing platforms have become an essential tool for communication and collaboration. One popular platform that has gained immense popularity is Zoom. Offering a seamless and interactive virtual meeting experience, Zoom has become a go-to choice for businesses, educational institutions, and individuals alike.
While Zoom provides a range of features to enhance user experience, one key aspect that can greatly benefit participants is the addition of subtitles. Subtitles, also known as captions, are text-based representations of the audio content in a video or audio file. Adding subtitles to Zoom meetings and webinars can have a multitude of advantages.
First and foremost, subtitles help individuals with hearing impairments to fully participate and engage in the meeting. By providing a written version of the spoken content, those with hearing difficulties can follow the conversation more effectively and actively contribute to the discussion.
Furthermore, subtitles can also be beneficial for participants who are non-native English speakers or have difficulty understanding accents or unfamiliar terminology. By having real-time subtitles, they can refer to the text to ensure they comprehend the information accurately, improving overall comprehension and reducing the risk of miscommunication.
Additionally, subtitles can serve as a useful tool for note-taking and reference. Participants can easily capture key points, important details, or specific instructions by referring to the provided subtitles, thereby enhancing retention and facilitating knowledge transfer.
In this article, we will explore various methods through which you can add subtitles to your Zoom meetings and webinars. We will cover the automatic live transcription feature offered by Zoom itself, as well as using third-party apps and services to generate and display subtitles in real-time. Whether you are a meeting organizer or a participant, these methods will help to create a more inclusive and accessible virtual meeting environment.
Why Add Subtitles in Zoom?
Adding subtitles to your Zoom meetings and webinars brings several benefits and enhances the overall communication experience for all participants. Let’s delve into the key reasons why you should consider incorporating subtitles into your Zoom sessions:
Accessibility: The primary reason for adding subtitles is to make your meetings and webinars more accessible to individuals with hearing impairments. By providing real-time text-based translations of spoken content, you ensure that everyone can fully participate and engage in the discussion. Subtitles enable individuals who are deaf or hard of hearing to follow the conversation seamlessly, enhancing inclusivity in your virtual meetings.
Language Barriers: Subtitles are also invaluable for individuals who are non-native English speakers or have difficulty understanding particular accents or terminologies. By having live subtitles available, participants can refer to the written text for better comprehension and understanding. Subtitles bridge language gaps, ensuring that all attendees can fully grasp the information being shared.
Improved Attention and Retention: Adding subtitles to Zoom meetings can significantly enhance participants’ attention and retention. By providing a visual representation of the spoken content, subtitles help individuals stay focused and actively engaged throughout the session. Moreover, subtitles act as a valuable aid for note-taking, allowing attendees to capture important points accurately and refer back to them later.
Clarity and Clear Communication: In virtual meetings, audio quality can sometimes be compromised due to various factors like background noise or technical issues. Adding subtitles helps to overcome these challenges by ensuring that participants can understand the conversation even if the audio quality is not ideal. Subtitles provide a clear and concise representation of the spoken content, minimizing any potential misunderstandings or misinterpretations.
Compliance: Subtitles are essential for organizations and institutions that need to comply with accessibility guidelines and regulations. By incorporating subtitles into your Zoom meetings and webinars, you fulfill the requirements of accessibility standards, ensuring that your sessions are accessible to all individuals, regardless of their hearing capabilities.
By considering all these factors, it becomes evident that adding subtitles to your Zoom meetings and webinars is crucial for fostering inclusivity, improving comprehension, and enhancing overall communication. In the following sections, we will explore different methods to add subtitles using the automatic live transcription feature provided by Zoom and through the use of third-party apps and services, enabling you to choose the most suitable option for your needs.
Adding Subtitles Using the Automatic Live Transcription Feature
Zoom offers an automatic live transcription feature that allows you to add real-time subtitles to your meetings and webinars. This built-in feature uses advanced speech recognition technology to transcribe the spoken content and display it as subtitles for all participants. Here’s how you can enable and utilize this feature:
Enabling Automatic Live Transcription: To enable the automatic transcription feature, you need to ensure that your Zoom account has this feature enabled. Contact your Zoom account administrator or refer to Zoom’s official documentation to verify if automatic transcription is available for your account. If it is available, you can enable it for your meetings by navigating to your Zoom account settings and turning on the “Enable Automatic Transcripts” option.
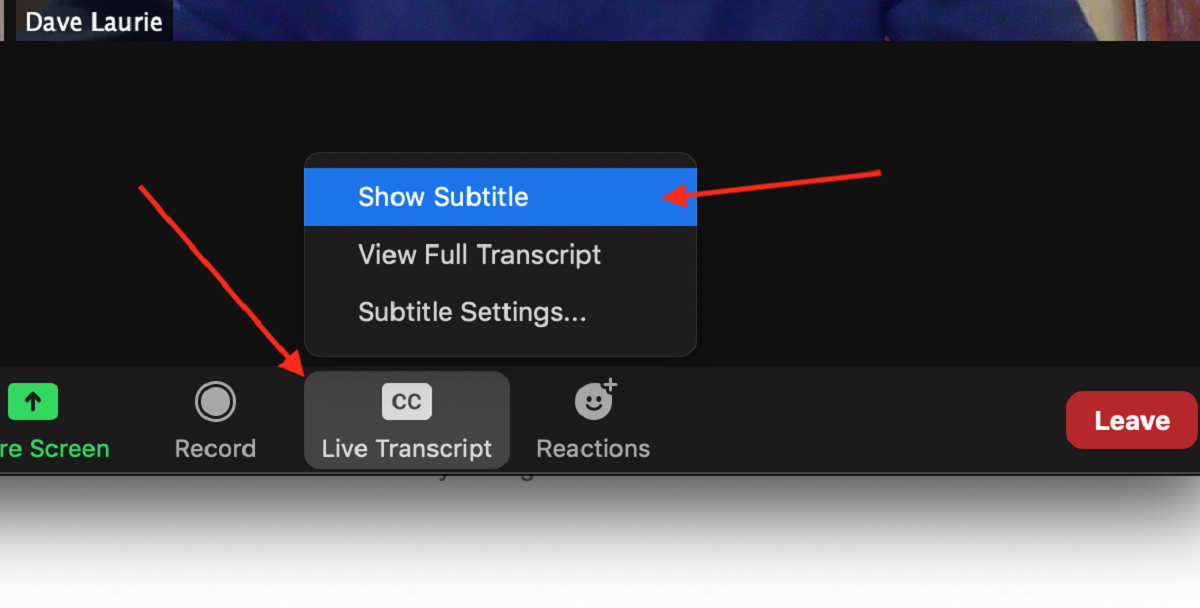
Utilizing Automatic Live Transcription: Once the automatic transcription feature is enabled, you can start using it in your Zoom meetings and webinars. During your session, click on the “Closed Caption” button in the Zoom toolbar and select the option to enable subtitles. The automatic transcription will then start generating real-time subtitles based on the spoken content. Participants can choose their preferred subtitle display format, such as scrolling or view-all, for an optimized viewing experience.
Benefits of Automatic Live Transcription: The automatic live transcription feature provided by Zoom offers numerous benefits. It enhances accessibility for individuals with hearing impairments by providing real-time subtitles. The transcription feature is also helpful for non-native English speakers who may struggle with understanding accents or specific terms. Moreover, the transcription acts as a visual aid, improving information retention and facilitating note-taking during meetings.
Note: Keep in mind that the accuracy of the automatic transcription feature can vary depending on factors like audio quality, accents, and background noises. While Zoom strives to provide accurate transcriptions, occasional errors or discrepancies may occur. It’s always a good practice to review and clarify any critical information to ensure accuracy.
With the automatic live transcription feature, Zoom simplifies the process of adding subtitles to your meetings, making it more inclusive and accessible to all participants. However, if you require more advanced options or personalized subtitle settings, you may consider utilizing third-party apps and services, which we will explore in the next section.
Steps to Enable Subtitles in Zoom Meetings and Webinars
Enabling subtitles in Zoom meetings and webinars is a straightforward process. Whether you are a meeting organizer or a participant, follow these simple steps to enable subtitles in your Zoom sessions:
1. Start or Join the Zoom Meeting: Begin by either starting a new Zoom meeting or joining an existing one. Ensure that you have the necessary permissions to make changes to the meeting settings if you are the organizer.
2. Access Meeting Controls: Once you are in the Zoom meeting room, locate the meeting controls toolbar at the bottom of the screen. The toolbar contains various options and settings that you can customize during the meeting.
3. Click on the “Closed Caption” Button: Within the meeting controls toolbar, look for the “Closed Caption” button. It is represented by an icon resembling a small dialogue box. Click on this button to access the closed caption settings.
4. Select the “Enable Closed Caption” Option: In the closed caption settings menu, you will find an option to enable closed captioning. Click on this option to activate closed captions for the meeting.
5. Choose Your Preferred Caption Display: After enabling closed captioning, you can customize the display settings according to your preferences. Zoom provides different caption display options, such as “Subtitles Only” or “Full Transcript.” Select the option that suits your needs by clicking on it.
6. View and Interact with the Subtitles: Once the closed captioning feature is enabled, subtitles will appear on the screen in real-time. Participants can view the captions and interact with them as necessary. Zoom allows users to resize and reposition the subtitle window through the “Caption Settings” menu, ensuring it does not obstruct the meeting content.
7. Disable Closed Captioning if Needed: If you no longer require closed captions during the meeting, you can easily disable the feature by returning to the closed caption settings menu and selecting the “Disable Closed Caption” option.
By following these simple steps, you can enable subtitles in your Zoom meetings and webinars, enhancing accessibility and improving the overall communication experience for all participants.
However, it is important to note that the availability of closed captioning and subtitle settings may vary depending on the version of Zoom you are using and your account permissions. If you are unable to locate the closed caption feature or encounter any difficulties, refer to Zoom’s official documentation or contact Zoom support for assistance.
Changing Subtitle Settings in Zoom
Zoom provides users with the flexibility to customize subtitle settings according to their preferences. By adjusting these settings, you can optimize the subtitle display and tailor it to meet your specific needs. Here are the steps to change subtitle settings in Zoom:
1. Access the Zoom Settings: Start by opening the Zoom desktop application or web portal and logging into your account. Once logged in, navigate to the settings menu by clicking on your profile picture or initials in the top right corner of the screen and selecting “Settings” from the dropdown menu.
2. Go to the Accessibility Settings: In the settings menu, locate and click on the “Accessibility” tab. This tab contains various settings related to accessibility features, including the subtitle settings.
3. Adjust Subtitle Display Options: Within the accessibility settings, you will find options to customize the subtitle display. Zoom provides settings such as font size, font style, and background color. Modify these settings according to your preferences to improve readability and visual appeal.
4. Choose Caption Position: Zoom allows you to select the position of the subtitle window on your screen. You can choose between the default position (usually at the bottom) or manually adjust the position by dragging and dropping the subtitle window to a different location.
5. Set Subtitle Language: If you require subtitles in a specific language, Zoom allows you to choose the desired subtitle language. Select the language from the available options in the subtitle settings menu.
6. Save Changes: Once you have adjusted the subtitle settings according to your preferences, click on the “Save” or “Apply” button to save the changes. The new settings will be applied to future Zoom meetings and webinars.
By changing the subtitle settings in Zoom, you can enhance the readability, visibility, and overall user experience when viewing subtitles. These customization options make it easier for individuals with hearing impairments or those who prefer subtitles to follow the conversation seamlessly.
Keep in mind that the availability of subtitle settings may vary depending on the version of Zoom you are using and your account permissions. If you are unable to locate the subtitle settings or have any difficulties, consult Zoom’s official documentation or reach out to Zoom support for assistance.
Using Third-Party Apps and Services for Subtitles in Zoom
In addition to Zoom’s built-in subtitle features, there are also third-party apps and services available that can enhance the subtitle capabilities in Zoom meetings and webinars. These apps and services offer advanced features and customization options to further optimize the subtitle experience. Here’s how you can leverage third-party tools for subtitles in Zoom:
1. Explore Subtitle Generator Apps: There are various subtitle generator apps available that can automatically transcribe and generate subtitles for your Zoom meetings. These apps utilize advanced speech recognition technology to accurately capture the spoken content and convert it into text-based subtitles. Some popular third-party subtitle generator apps include Otter.ai, Rev.com, and Sonix. Simply record your Zoom meeting and upload the recording to these apps to generate subtitles that can be played alongside the video.
2. Utilize Video Captioning Services: If you have pre-recorded videos that you want to add subtitles to before hosting your Zoom meeting, you can consider using video captioning services. These services offer professional human transcription and captioning services to ensure high accuracy and quality subtitles. You can upload your videos to these services, and they will provide you with subtitle files that can be embedded into your Zoom meetings. Examples of video captioning services include 3PlayMedia, Amara, and CaptionSync.
3. Display Subtitles via Screen Sharing: Another option for adding subtitles to Zoom meetings is to use screen sharing capabilities with subtitle software. This method involves using third-party subtitle software such as Subtitle Edit or Aegisub to create subtitles for your meetings. You can then share your screen during the meeting and display the subtitle software window alongside the Zoom meeting window. This allows participants to view the subtitles in real-time while the meeting is in progress.
4. Test and Evaluate Compatibility: Before utilizing any third-party app or service for subtitles in Zoom, it is essential to test and ensure compatibility between the chosen tool and Zoom. Check if the app or service offers features like live integration with Zoom, compatibility with your Zoom version, and support for the necessary subtitle file formats.
5. Follow App or Service Specific Instructions: Each third-party app or service may have its own set of instructions and guidelines for generating and displaying subtitles in Zoom. It is crucial to follow these instructions carefully to ensure seamless integration and optimal performance.
By utilizing third-party apps and services for subtitles in Zoom, you can leverage advanced features, transcription accuracy, and customization options that go beyond what Zoom’s built-in features offer. These tools can enhance the accessibility and inclusivity of your meetings, ensuring a more effective and engaging communication experience for all participants.
Conclusion
Adding subtitles to your Zoom meetings and webinars can greatly enhance accessibility, inclusivity, and overall communication effectiveness. Whether you choose to use Zoom’s automatic live transcription feature or explore third-party apps and services, subtitles provide numerous benefits for participants with hearing impairments, language barriers, and other unique needs.
By enabling automatic live transcription in Zoom, you can provide real-time subtitles to participants, improving their ability to actively engage in the conversation and comprehend the information being shared. This built-in feature simplifies the process of adding subtitles and ensures a more inclusive virtual meeting experience.
However, if you require more advanced customization options or personalized subtitle settings, third-party apps and services can be an excellent solution. These tools offer features like accurate speech recognition, subtitle generation, and compatibility with Zoom, allowing you to further enhance the accessibility and effectiveness of your meetings.
It is important to consider the needs and preferences of your participants when adding subtitles. Subtitles not only aid individuals with hearing impairments but also benefit non-native English speakers, improve attention and retention, and ensure clear communication in virtual meetings.
Remember to review and test the subtitle settings and tools you choose for compatibility with your Zoom version and meeting requirements. Familiarize yourself with the instructions provided by third-party apps and services to ensure a smooth integration and optimal performance.
By incorporating subtitles into your Zoom meetings and webinars, you create an inclusive and accessible virtual environment that fosters effective communication and engagement. As technology continues to advance, subtitles play a vital role in making virtual meetings more inclusive, accessible, and engaging for everyone involved.