Introduction
Welcome to this guide on how to download sounds from Splice! If you’re a music producer or a sound enthusiast, you’ve probably heard about Splice – a popular platform that offers a vast library of high-quality sounds, loops, and samples for your music production projects.
Whether you’re looking for drum samples, synth presets, vocal chops, or any other sound element to enhance your tracks, Splice Sounds has got you covered. With a subscription-based model, Splice provides an affordable and convenient way to access a wide range of professionally curated sounds from renowned artists and sound designers.
In this article, we’ll walk you through the step-by-step process of downloading sounds from Splice and integrating them into your digital audio workstation (DAW) of choice. Whether you’re a beginner or an experienced producer, this guide will help you make the most of the Splice platform and enhance your music production workflow.
From creating a Splice account to selecting and previewing sounds, to finally downloading and using them in your projects, we’ll cover everything you need to know. So, let’s dive in and get started with the first step – creating a Splice account!
Step 1: Create a Splice Account
The first step to start downloading sounds from Splice is to create an account. To do this, head over to the Splice website and click on the “Sign Up” button located at the top right corner of the page.
You’ll then be prompted to provide some basic information like your name, email address, and a password. Alternatively, you can also choose to sign up using your Google or Apple account for a quicker registration process.
After filling in the required details, click on the “Create Account” button to proceed. Splice will send a verification email to the address you provided. Check your inbox and click on the verification link to complete the sign-up process.
Once your account is verified, you’ll have full access to the Splice platform and its vast library of sounds. It’s important to note that while creating a Splice account is free, you’ll need a subscription plan to download sounds beyond the free trial options.
With your Splice account set up, you can now explore, discover, and download a wide variety of sounds to enhance your music production projects. Let’s move on to the next step, where we’ll discuss choosing a subscription plan that suits your needs.
Step 2: Choose a Subscription Plan
Once you have created your Splice account, it’s time to choose a subscription plan that fits your needs. Splice offers two main subscription options: the Free plan and the Sounds subscription plan.
The Free plan allows you to access a limited selection of sounds and samples each month. While this plan is a great way to explore the platform and get a feel for the available content, it has some restrictions on the number of sounds you can download and the frequency at which you can access new releases.
If you’re serious about music production and want unlimited access to a vast library of sounds, the Sounds subscription plan is recommended. With this plan, you get unlimited downloads, exclusive releases, and additional benefits like the ability to keep your sounds and project files in sync across multiple devices.
The Sounds subscription plan is available at a monthly or annual fee, allowing you flexibility based on your budget and usage. Additionally, Splice often runs promotions or offers discounts on their subscription plans, so keep an eye out for any ongoing deals that may help lower the cost.
Before making a decision, consider your production needs, the frequency with which you download sounds, and your budget. Take advantage of the free trial period to test out the subscription plan and see if it aligns with your workflow and musical requirements.
Once you’ve chosen your subscription plan, you’re ready to explore the extensive library of sounds available on Splice and start downloading the perfect elements to enhance your music production. In the next step, we’ll discuss how to navigate the Splice Sounds section and find the sounds you’re looking for.
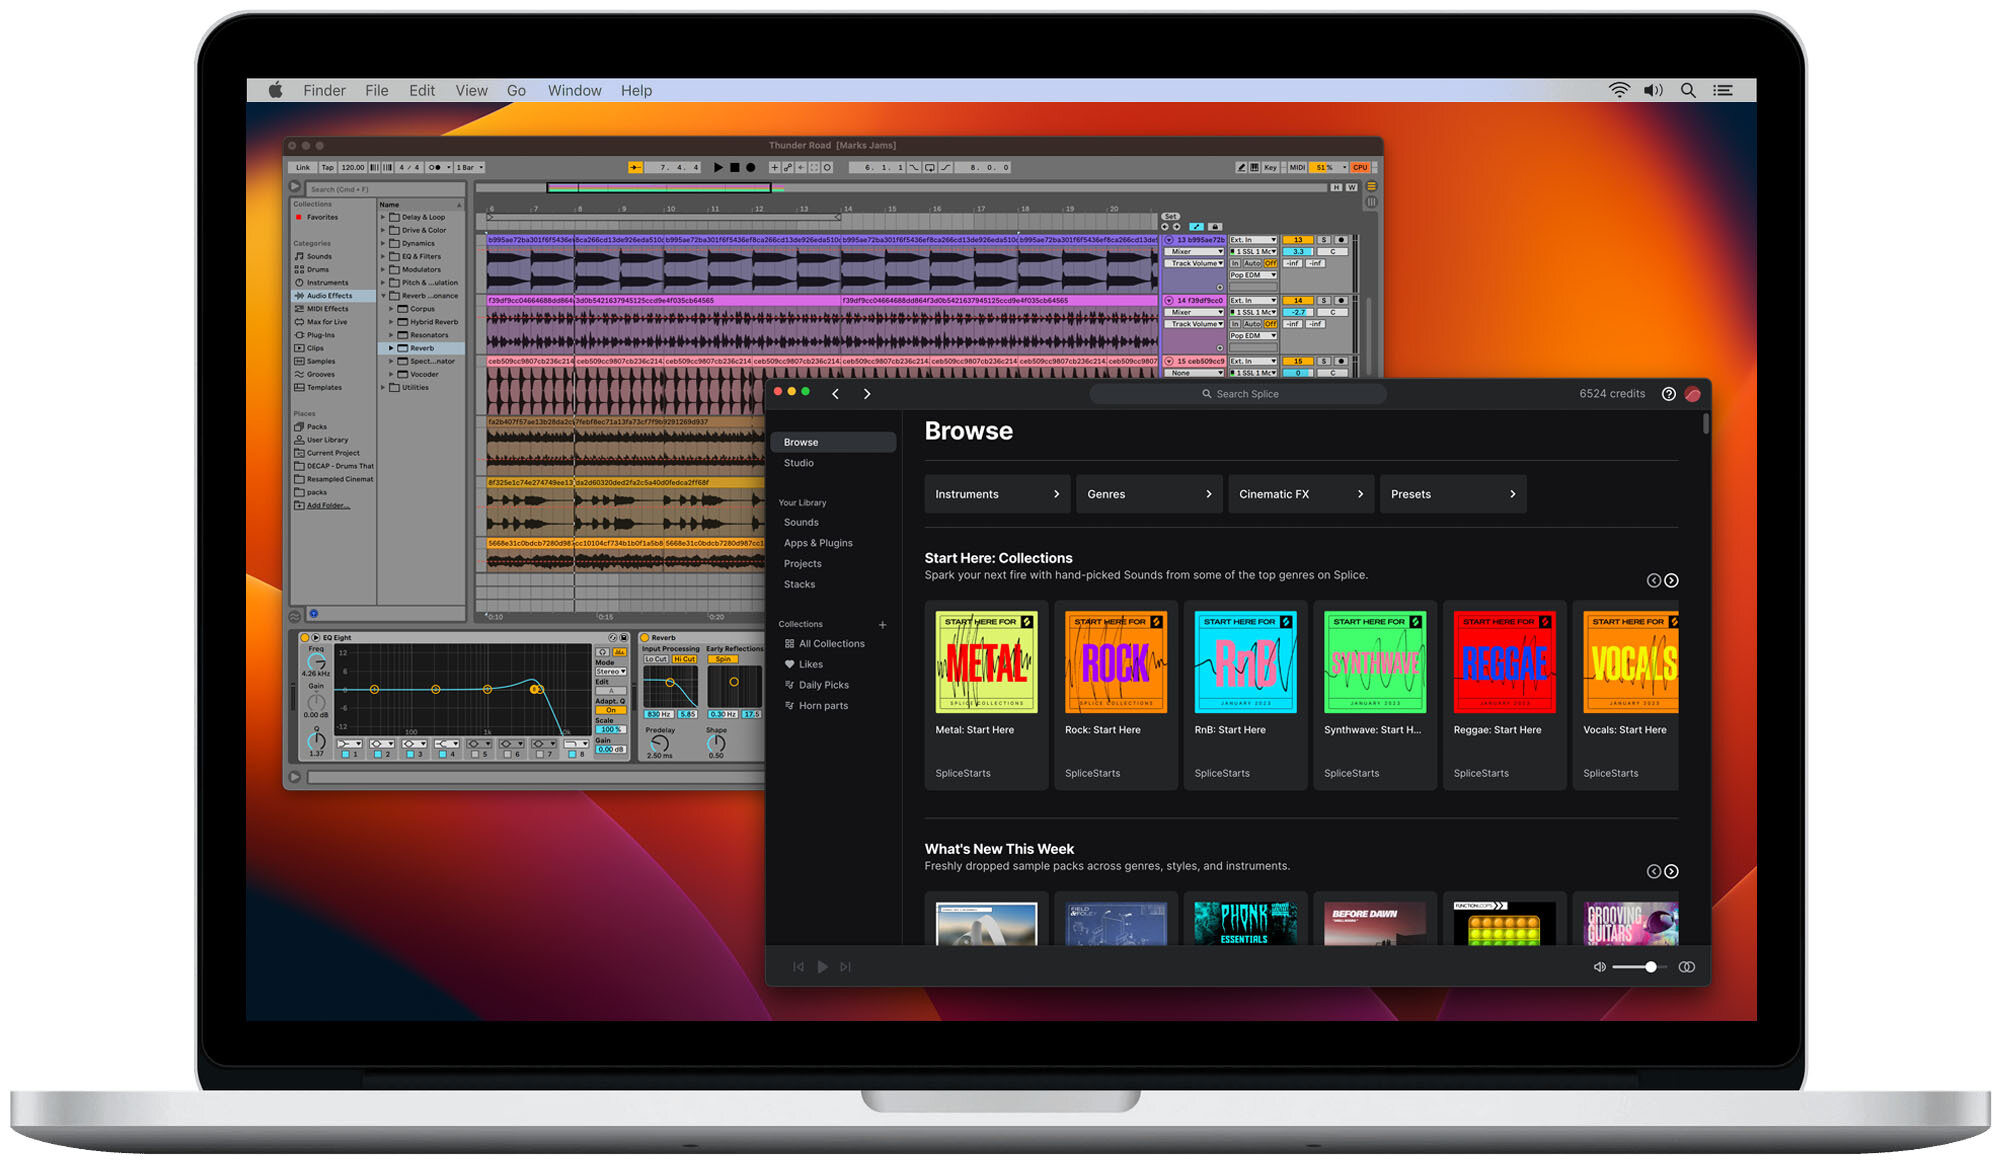
Step 3: Navigate to Splice Sounds
Now that you have your Splice account and subscription plan set up, it’s time to navigate to the Splice Sounds section where you’ll find an extensive collection of sounds to choose from.
To begin, log in to your Splice account and click on the “Sounds” tab located at the top of the website. This will take you to the dedicated section where you can explore and discover a wide range of sound categories and genres.
Once you’re on the Splice Sounds page, you’ll notice various browsing options to help you narrow down your search. You can explore featured sounds, top downloads, new releases, and curated sample packs from renowned artists and sound designers.
Additionally, you have the option to filter sounds based on different criteria such as genre, instrument, BPM, key, or even by specific sample packs or creators. This allows you to quickly find the sounds that align with your specific project needs and musical style.
Splice also provides a search bar where you can enter keywords related to the type of sound you’re looking for. For example, if you need a punchy kick drum or a melodic synth loop, simply type those keywords into the search bar, and Splice will display relevant results.
As you explore the Splice Sounds section, you’ll find a wealth of sounds to choose from. Take your time to listen to the previews, read the descriptions, and check the additional details provided for each sound. This will help you make informed decisions and select the sounds that best complement your music production projects.
Once you’ve found the perfect sounds, it’s time to preview and select them. In the next step, we’ll guide you through the process of previewing and choosing sounds on Splice.
Step 4: Browse and Search for Sounds
Now that you’ve reached the Splice Sounds section, it’s time to browse and search for the perfect sounds to enhance your music production projects. Splice offers a user-friendly interface and various browsing options to help you find the sounds you need.
One way to browse is to explore the featured sounds, top downloads, and new releases sections. Here, you’ll find a curated selection of sounds that are popular and trending among Splice users. This is a great way to discover new and exciting sounds that can add a unique touch to your productions.
Another way to browse is by using the genre, instrument, BPM, and key filters. These filters allow you to narrow down your search and find specific types of sounds that match the vibe and style of your project. Whether you’re looking for electronic drum samples, ambient pads, or orchestral strings, you’ll find a wide variety of options to choose from.
If you have a particular sample pack or creator in mind, you can use the search bar to find them directly. Simply enter the name of the sample pack or creator, and Splice will display the relevant results. This is useful if you want to explore a specific artist’s collection or if you already know the name of the sample pack you’re interested in.
As you browse and search for sounds, take advantage of the sound previews. Splice allows you to listen to a short preview of each sound directly on the website. This helps you get a sense of the sound’s quality, timbre, and suitability for your project. If you like what you hear, you can proceed to select and download the sound.
Remember to take your time during the browsing and searching process. Listening to multiple previews, exploring different genres, and experimenting with various sound combinations can lead to unique and inspiring musical ideas. Once you’ve found the sounds that resonate with you, it’s time to move on to the next step – previewing and selecting your chosen sounds for download.
Step 5: Preview and Select Sounds
After browsing and searching for sounds on Splice, it’s time to preview and select the ones that best fit your music production project. Previewing sounds allows you to ensure they match your desired style and sound quality before committing to the download.
To preview a sound, simply click on the play button or the preview icon that accompanies each sound. This will play a short snippet of the sound, giving you an idea of its character, tone, and musical elements. Listening to the preview helps you assess whether the sound aligns with your creative vision.
While previewing sounds, you may come across different variations or options within a specific sound category. For example, a sample pack might include different drum loops, each with a unique groove or variation. Take the time to explore these options and consider how they can enhance your music.
As you preview sounds, you can also read the description and additional details provided for each sound. This information can help you better understand the context and intended use of the sound, allowing you to make more informed decisions during the selection process.
Once you’ve found sounds that resonate with you, it’s time to select them for download. To do this, click on the “Add to Library” or “Download” button that accompanies each sound. This action adds the sound to your Splice library, making it accessible for download at any time.
If you’re not ready to download the sound immediately, you can add it to a collection or playlist within your Splice account. This allows you to categorize and organize the sounds effectively, making it easier to locate them later when you’re ready to download and use them in your music production projects.
Remember, the selection process is subjective, and it’s essential to trust your creative instincts. Choose the sounds that excite and inspire you, as they are the ones that will bring your music to life in a unique and exciting way.
With your selected sounds added to your Splice library, you’re one step closer to incorporating them into your music. In the next step, we’ll guide you through the process of downloading the sounds to your computer.
Step 6: Download Sounds to Your Computer
Once you have selected the sounds you want to use in your music production project, it’s time to download them to your computer. Splice makes the downloading process straightforward and convenient.
To download a sound, go to your Splice library where you added the selected sounds. You can access your library by clicking on your profile picture or avatar on the Splice website and selecting “Library” from the drop-down menu.
Within your library, you will see all the sounds you have added. To download a sound, simply click on the “Download” button associated with it. Splice will initiate the download process, and a progress indicator will show the status of the download.
The downloaded sounds will be saved to your computer in a specified folder or location, depending on the settings you have configured. By default, most web browsers save downloaded files to the “Downloads” folder on your computer.
Once the download is complete, you can navigate to the folder where the sounds are saved on your computer. Take some time to organize the downloaded sounds into appropriate folders or categorize them according to their genre, type, or project they’re intended for. Proper organization will help you locate the sounds easily when you are ready to use them in your digital audio workstation (DAW).
It’s important to note that the downloaded sounds from Splice are typically delivered in a compressed format, such as .zip or .rar. You will need to extract or unzip these files to access the individual sound files within. Most operating systems provide built-in tools for unzipping files, or you can use third-party software like WinRAR or 7-Zip.
With the sounds successfully downloaded and extracted, you’re now ready to incorporate them into your digital audio workstation (DAW) and unleash your creativity. In the next step, we’ll discuss how to access the downloaded sounds within your DAW.
Step 7: Access Downloaded Sounds in Your DAW
Now that you’ve downloaded and organized your sounds from Splice, it’s time to access them within your digital audio workstation (DAW) and start incorporating them into your music production project.
The process of accessing downloaded sounds in your DAW may vary depending on the software you’re using. However, the general steps remain consistent across most DAWs.
First, open your DAW and create a new project or open an existing one. Next, locate the folder or location on your computer where you saved the downloaded sounds from Splice.
Within your DAW, there are a few common methods to import or load the downloaded sounds. One way is to simply drag and drop the sound file directly from its folder into the DAW’s arrangement or timeline window. Another method is to use the DAW’s built-in file browser or sample browser to locate and import the sound file.
Once the sound file is imported into your DAW, it will appear as a new audio track or instrument track, depending on the type of sound you’ve downloaded. You can then manipulate, edit, or layer the sound as desired to suit your creative vision.
If you’ve downloaded a sample pack that contains multiple sounds, you may want to organize them within your DAW. Create folders or groups within your project to keep similar sounds together, making it easier to navigate and locate the specific sounds you want to use.
It’s important to mention that some DAWs provide additional features or integration with Splice, allowing for a more seamless workflow. For instance, certain DAWs may provide a Splice plugin or integration where you can directly access and preview sounds from the Splice library within your DAW’s interface.
Furthermore, to keep your downloaded sounds in sync across multiple devices, make sure to use Splice’s Cloud Sync feature if it is available for your specific DAW. This enables you to access your downloaded sounds from any computer or device with your Splice account.
With your downloaded sounds now accessible within your DAW, you can freely experiment, arrange, and create music by leveraging the high-quality sounds from Splice. Let your creativity flow and use the downloaded sounds as building blocks to craft your unique musical compositions.
Congratulations! You have successfully completed the process of downloading and accessing sounds from Splice in your DAW. Happy music-making!
Conclusion
Downloading sounds from Splice is a fantastic way to enhance your music production projects. With a wide range of high-quality samples, loops, and presets, Splice provides an extensive library of sounds to suit every genre and style.
In this guide, we have walked you through the step-by-step process of downloading sounds from Splice. From creating your Splice account to browsing and searching for sounds, to finally downloading and accessing them in your digital audio workstation (DAW), we hope you found this guide helpful.
Remember to take advantage of the various browsing options and search filters offered by Splice to find the sounds that inspire you. Previewing sounds and reading their descriptions can also help you make informed decisions during the selection process.
Once you have downloaded your chosen sounds, organize them within your DAW to streamline your workflow and easily locate specific sounds when needed. Don’t hesitate to explore the additional features and integration options available in your DAW to further enhance your Splice experience.
With Splice, the possibilities are endless for creating unique and dynamic music. Use the downloaded sounds as building blocks to unleash your creativity and bring your musical ideas to life.
So go ahead, dive into the world of Splice, and let your imagination soar. Happy producing!