Introduction
When your trusty game controller wire becomes frayed or damaged, it can be frustrating and disruptive to your gaming experience. However, with the right tools and a little know-how, you can easily fix the wire and get back to gaming in no time. In this guide, we'll walk you through the step-by-step process of repairing a game controller wire, so you can continue enjoying your favorite games without any interruptions.
A damaged game controller wire can manifest in various ways, such as exposed wires, intermittent connectivity, or complete failure to transmit signals. Regardless of the specific issue, addressing the problem promptly is essential to prevent further damage and ensure the longevity of your controller.
By following the instructions outlined in this guide, you'll learn how to assess the damage, gather the necessary materials, prepare the wire for repair, splice the wire, insulate the splice, and test the controller to ensure it's functioning properly. With a bit of patience and attention to detail, you'll be able to restore your game controller wire to its former reliable state.
Whether you're an avid gamer or simply enjoy the occasional gaming session, having a functional game controller is crucial to your overall gaming experience. By mastering the art of repairing a game controller wire, you'll not only save money on replacement controllers but also gain a valuable skill that can be applied to various other electronic devices.
So, grab your tools and let's dive into the process of fixing your game controller wire. With a little effort and the guidance provided in this article, you'll soon be back in the game, ready to conquer new virtual worlds.
Step 1: Assess the Damage
Before embarking on the journey of repairing your game controller wire, it’s crucial to assess the extent of the damage. This initial step will help you determine the best course of action and prepare you for the repair process.
Start by visually inspecting the entire length of the controller wire, paying close attention to any visible signs of wear and tear. Look for areas where the outer insulation may be compromised, exposing the internal wires. Additionally, gently flex the wire along its length to identify any weak spots or areas of increased flexibility, which could indicate internal wire damage.
Next, plug the controller into a gaming console or computer and test its functionality. Take note of any intermittent connectivity issues, signal disruptions, or complete failure to respond. These observations will provide valuable insights into the specific nature of the damage and guide your subsequent repair efforts.
If the damage is limited to a small section of the wire, you may be able to pinpoint the exact location of the issue. However, if the damage is more widespread or the controller exhibits erratic behavior, a comprehensive assessment of the entire wire is necessary to ensure all potential problem areas are identified.
By thoroughly assessing the damage, you’ll be better equipped to proceed with the subsequent repair steps, knowing exactly what needs to be addressed. Remember, a meticulous evaluation at this stage can significantly impact the success of the repair process and the overall longevity of your game controller wire.
Step 2: Gather Materials
Once you’ve assessed the damage to your game controller wire, it’s time to gather the necessary materials for the repair process. Having the right tools and supplies at hand will streamline the repair and ensure a successful outcome.
Here’s a list of materials you’ll need:
- Wire Strippers: Essential for safely removing the outer insulation of the wire without damaging the internal conductors.
- Electrical Tape: Used for insulating and protecting the spliced wires to prevent short circuits.
- Heat-Shrink Tubing: An alternative to electrical tape, heat-shrink tubing provides a more secure and professional-looking insulation for the spliced wires.
- Soldering Iron and Solder: If the damage to the wire requires a more robust repair, a soldering iron and solder will be necessary to create a secure connection between the spliced wires.
- Wire Connectors: In some cases, using wire connectors may be preferred for splicing the wires, offering a convenient and reliable way to join the conductors without soldering.
- Scissors or Wire Cutters: Used for cutting and trimming the wire and insulation materials during the repair process.
- Multi-meter: Optional but useful for testing the continuity and integrity of the repaired wire before reassembling the controller.
Before starting the repair, ensure that you have a clean and well-lit workspace, as precision and attention to detail are crucial during the repair process. Additionally, familiarize yourself with the proper usage of the tools and materials to promote safety and efficiency.
By gathering the necessary materials beforehand, you’ll be fully prepared to tackle the repair process with confidence, knowing that you have everything you need to restore your game controller wire to optimal condition.
Step 3: Prepare the Wire
Before proceeding with the actual repair of the game controller wire, it’s essential to properly prepare the damaged section to ensure a secure and durable splice. This step involves carefully stripping the insulation and preparing the conductors for the subsequent splicing process.
Begin by identifying the damaged section of the wire, ensuring that it is disconnected from the gaming console or computer. Use wire strippers to gently remove the outer insulation, exposing the internal conductors. Exercise caution to avoid damaging the delicate wires within.
Once the internal conductors are exposed, carefully inspect them for any signs of damage, such as fraying or breakage. If the conductors appear compromised, it may be necessary to trim the damaged portions using wire cutters, ensuring that only the intact and undamaged wires are retained for the splice.
After trimming any damaged sections, gently twist the individual conductors to ensure they are neatly bundled and free from any stray wire strands. This step is crucial for creating a secure and reliable connection during the splicing process.
With the conductors neatly prepared, it’s important to ensure that they are of equal length and cleanly stripped to facilitate a uniform and stable splice. This attention to detail will contribute to the overall integrity and longevity of the repaired wire.
By taking the time to meticulously prepare the wire before proceeding to the splicing stage, you’ll lay the groundwork for a successful repair that restores the functionality and reliability of your game controller. Proper preparation sets the stage for a seamless splicing process and ensures that the repaired wire will withstand the rigors of gaming without compromising performance.
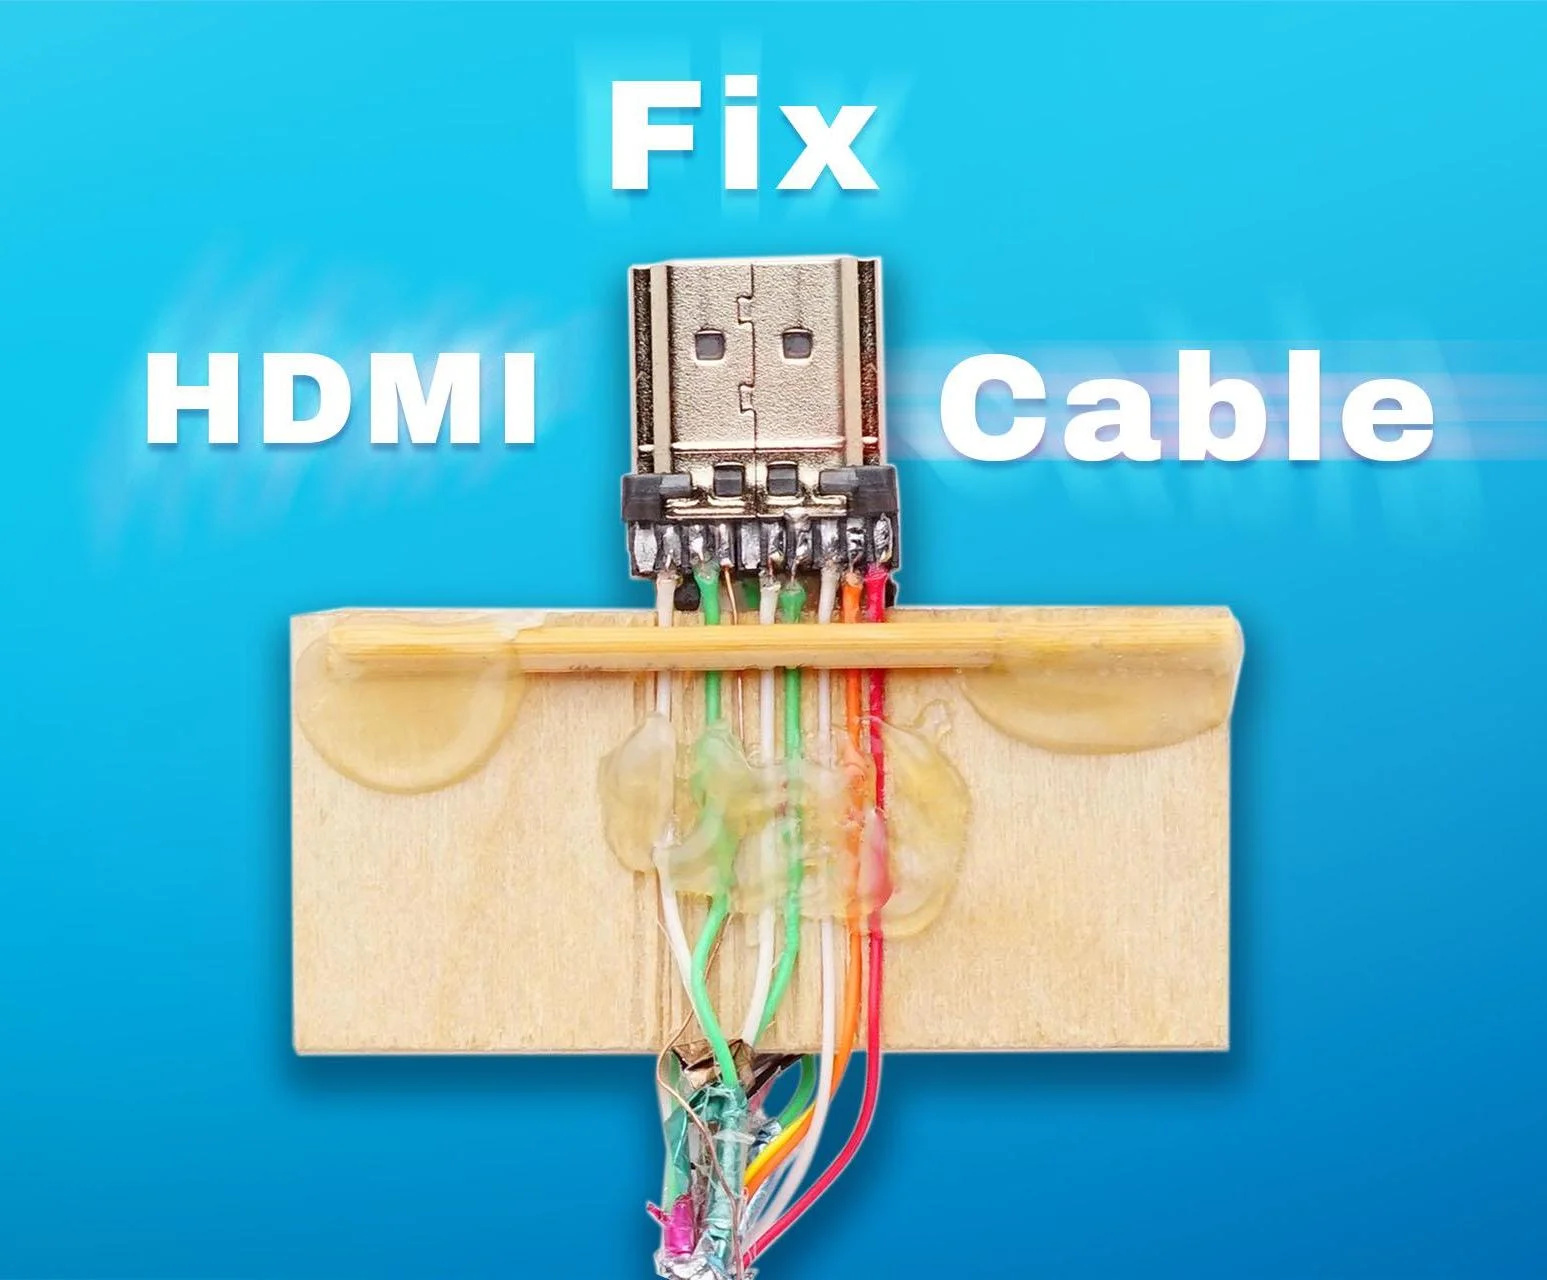
Step 4: Splice the Wire
With the damaged section of the game controller wire properly prepared, the next critical step in the repair process is to splice the conductors, creating a secure and reliable connection that restores the integrity of the wire. Whether you opt for soldering or using wire connectors, precision and attention to detail are paramount during this stage.
If you choose to solder the wires, carefully align the prepared conductors and apply a small amount of solder to the junction, ensuring a strong and durable bond. Exercise caution to avoid excessive heat that could damage the delicate conductors, and allow the soldered connection to cool and solidify before proceeding.
Alternatively, if you opt for wire connectors, carefully insert the prepared conductors into the respective terminals of the connector and secure them in place according to the manufacturer’s instructions. Ensure that the connection is snug and free from any exposed wires to prevent potential short circuits.
Whichever method you choose, it’s essential to verify that the spliced connection is stable, secure, and free from any loose or protruding wires. This meticulous approach will guarantee the longevity and reliability of the repaired wire, ensuring that it can withstand the demands of gaming without compromising performance.
Throughout the splicing process, maintain a steady hand and a keen eye for detail, as precision is key to creating a seamless and durable connection. Take the time to verify the integrity of the splice, as a well-executed splicing process is the cornerstone of a successful repair.
By completing this crucial step with precision and care, you’ll be one step closer to restoring your game controller wire to full functionality, setting the stage for uninterrupted gaming sessions and a reliable gaming experience.
Step 5: Insulate the Splice
After successfully splicing the damaged section of the game controller wire, the next vital step is to insulate the splice, safeguarding the repaired connection against environmental factors and preventing potential short circuits. Proper insulation is crucial for ensuring the longevity and reliability of the repair.
If you’ve opted for soldering, carefully apply electrical tape or heat-shrink tubing over the soldered connection, ensuring that the entire splice is thoroughly covered and insulated. Pay close attention to any exposed wires or gaps, as a comprehensive and secure insulation is essential for preventing electrical issues and maintaining the integrity of the repair.
Alternatively, if you’ve used wire connectors for the splice, ensure that the connectors are equipped with their respective insulating covers or sleeves. Verify that the connectors are securely fastened and that the entire splice is shielded from external elements that could compromise its functionality.
Throughout the insulation process, prioritize precision and thoroughness, as a well-insulated splice is the final line of defense against potential damage and electrical hazards. Take the time to verify that the entire repaired section of the wire is uniformly and securely insulated, leaving no room for exposure or vulnerability.
By completing this crucial step with diligence and attention to detail, you’ll ensure that the repaired wire is fully protected and capable of withstanding the demands of gaming without compromising its performance. A well-insulated splice not only safeguards the repair but also contributes to the overall safety and reliability of the game controller wire.
With the splice securely insulated, you’re one step closer to completing the repair process and restoring your game controller wire to its former reliable state, ready to deliver uninterrupted gaming experiences for many sessions to come.
Step 6: Test the Controller
With the game controller wire repaired and the splice thoroughly insulated, it’s time to proceed to the final and crucial step: testing the controller to ensure that the repair has been successful. This step is essential for verifying the functionality and reliability of the repaired wire before reassembling the controller and resuming your gaming sessions.
Begin by carefully reconnecting the game controller to the gaming console or computer, ensuring that the wire is securely plugged in and that the repaired section is free from any tension or strain that could compromise the splice. Once the controller is connected, power it on and initiate a test to evaluate its responsiveness and connectivity.
During the testing phase, pay close attention to any signs of intermittent connectivity, signal disruptions, or irregular behavior that may indicate underlying issues with the repaired wire. Test the controller across various functions and movements, thoroughly assessing its performance to ensure that it operates seamlessly without any hitches.
If the controller exhibits consistent and reliable functionality across all tested parameters, it’s a strong indication that the repair has been successful, and the wire is ready for regular use. However, if any issues persist or if you notice recurring connectivity issues, it may be necessary to revisit the repaired section and verify the integrity of the splice.
For a more comprehensive assessment of the repaired wire, consider using a multi-meter to test the continuity and integrity of the spliced connection. This additional step can provide valuable insights into the stability of the repair and ensure that the wire meets the necessary standards for reliable gaming performance.
By thoroughly testing the controller after the repair, you’ll gain confidence in the functionality and reliability of the repaired wire, knowing that it has been meticulously restored to its optimal state. This final step sets the stage for uninterrupted gaming experiences, free from the disruptions caused by a damaged controller wire.