Introduction
Welcome to the world of 3D printing! If you’re a hobbyist or a professional using a 3D printer, you may have encountered a common challenge – running out of filament in the middle of a print. This can be frustrating, especially when you’re working on a time-sensitive project. But fear not, there is a solution – filament splicing.
So what exactly is filament splicing? It is the process of joining two pieces of filament together to create a continuous length for uninterrupted printing. By splicing filament, you can seamlessly continue your print job without any noticeable interruptions or inconsistencies. This technique is particularly useful when you have a small amount of filament left on a spool or when you need to combine two different colors or materials.
In this article, we will guide you through the process of splicing filament, step by step. We will also discuss the reasons why you may want to splice filament, the tools and materials you will need, and provide tips and troubleshooting advice to ensure successful splicing.
Whether you’re a seasoned 3D printing enthusiast or just getting started, learning how to splice filament can save you time, materials, and frustration. So let’s dive in and explore this useful technique that will elevate your 3D printing experience.
What is filament splicing?
Filament splicing is a technique used in 3D printing to join two separate pieces of filament together into one continuous strand. This process eliminates the need to pause a print job, change spools, or waste leftover filament. By seamlessly joining the filaments, you can achieve uninterrupted printing without any visible seams or weak points in the final printed object.
There are several methods of splicing filament, including overlap splicing, heat splicing, and mechanical splicing. The method you choose will largely depend on the type of filament you are using and the tools available to you.
Overlap splicing is the most common technique used for filament splicing. It involves manually cutting the end of the first filament and then overlapping it with the beginning of the second filament. The two ends are then heated or melted slightly to fuse them together. This method is simple and requires minimal tools, making it accessible to most 3D printing enthusiasts.
Heat splicing, on the other hand, involves using a heat source to melt the ends of the filaments and then pressing them together to create a strong bond. This method is commonly used with materials like ABS or PLA, which have a lower melting point and can be easily fused together with heat. Heat splicing ensures a secure connection between the filaments, resulting in a smooth transition and a sturdy printed object.
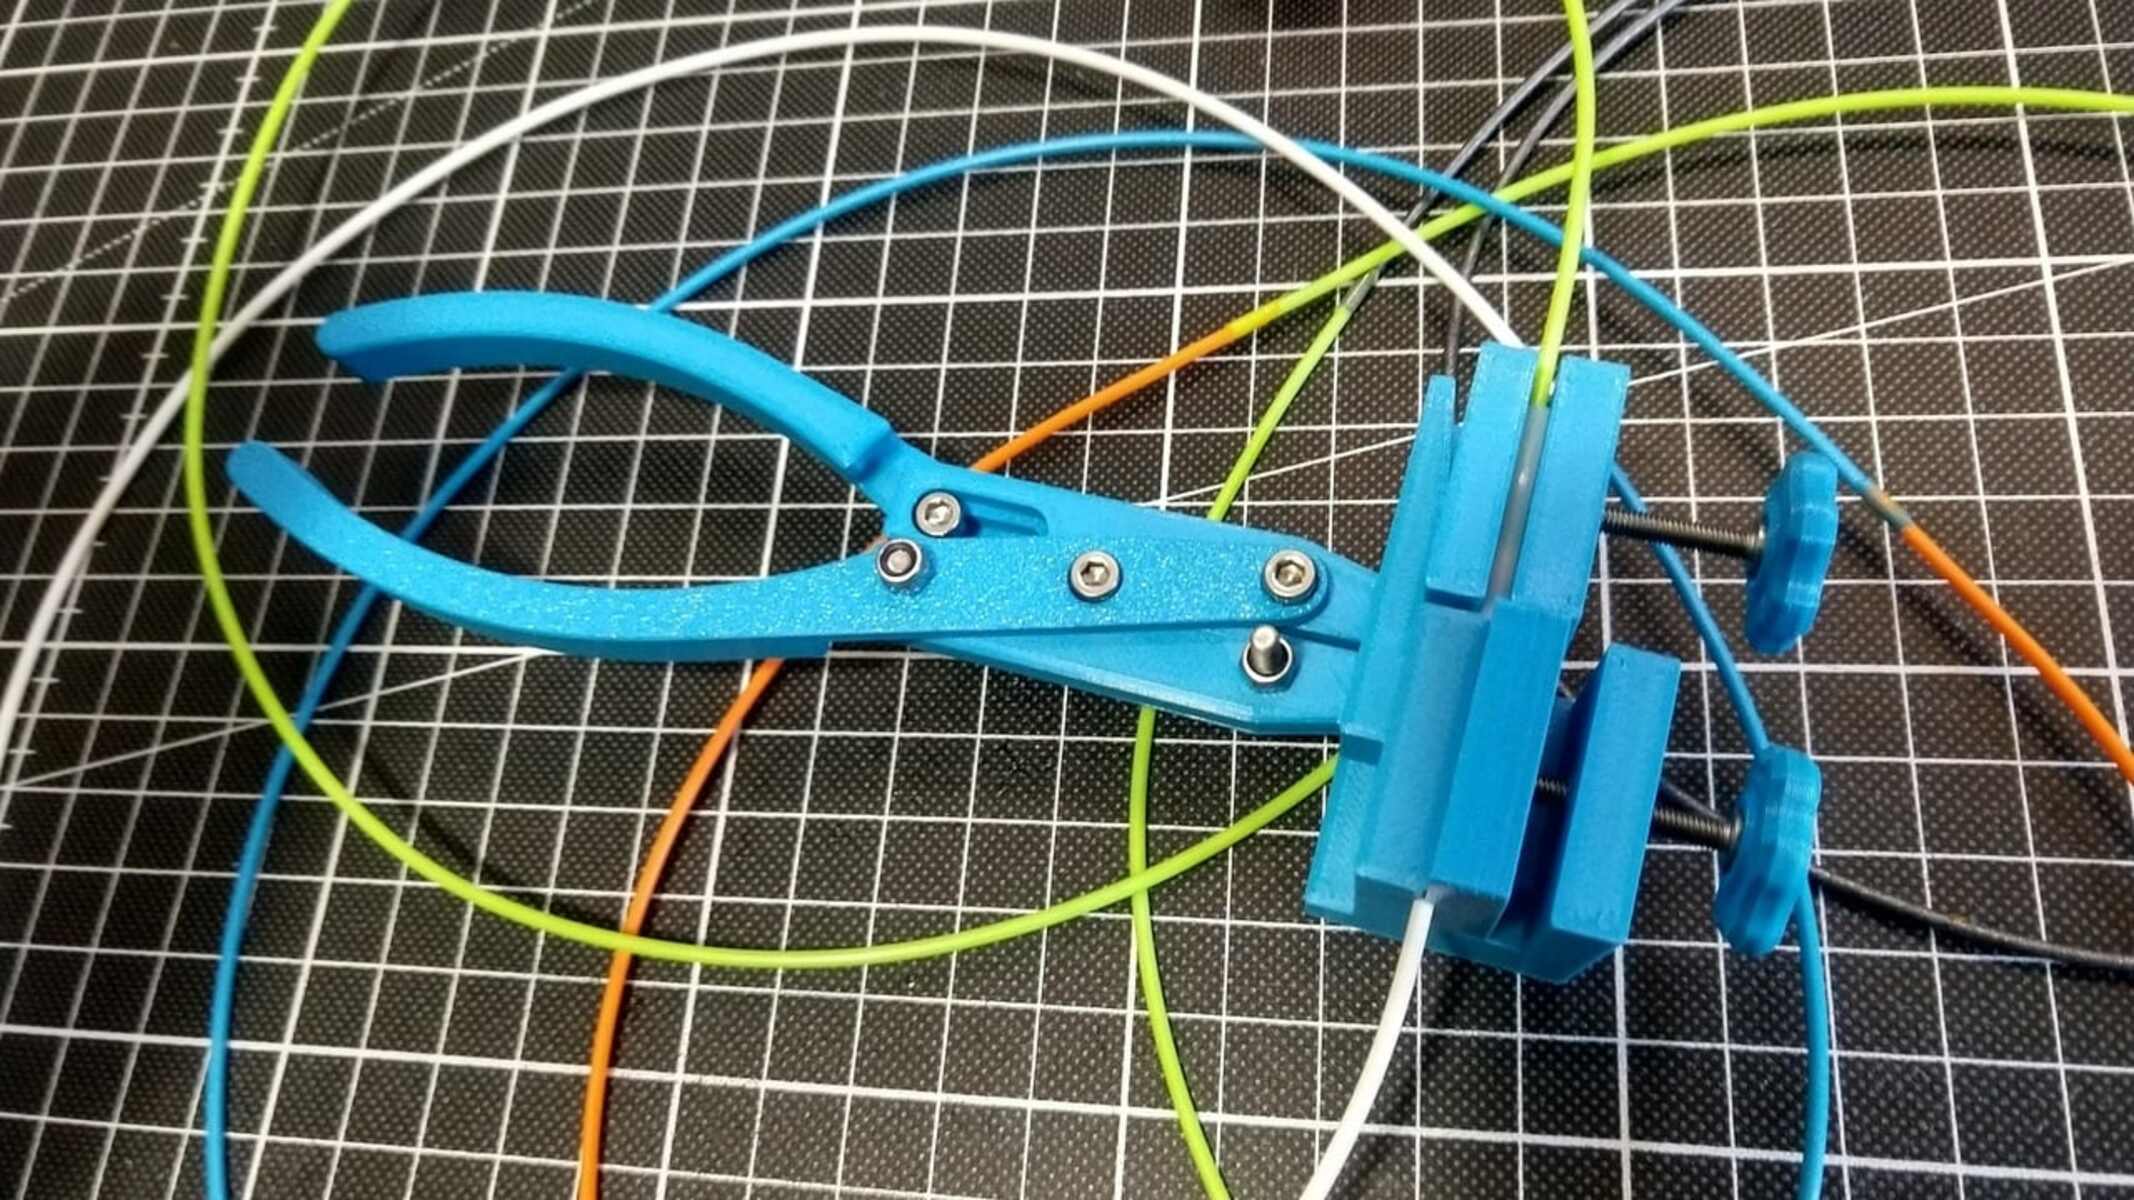
Mechanical splicing, as the name suggests, involves using a mechanical device to join the filaments. This method typically requires specialized tools such as filament splicers or connectors. Mechanical splicing provides a reliable and durable connection between the filaments, ensuring optimal printing performance.
Regardless of the method you choose, filament splicing offers a practical solution to various challenges faced during 3D printing. Whether it’s running out of filament, blending colors or materials, or simply reducing waste, filament splicing allows you to make the most out of your printing materials and achieve high-quality prints.
Now that we understand what filament splicing is, let’s explore why you would want to utilize this technique in your 3D printing endeavors.
Why would you want to splice filament?
Filament splicing offers a range of benefits that can enhance your 3D printing experience. Here are some reasons why you may want to consider splicing filament:
- Uninterrupted Printing: One of the primary reasons to splice filament is to ensure uninterrupted printing. When you run out of filament in the middle of a print job, it can be frustrating to start over or pause the print until you can replace the spool. By splicing the filament, you can seamlessly continue the print without any noticeable interruptions or inconsistencies.
- Combine Different Colors or Materials: Filament splicing allows you to combine different colors or materials within a single print job. This opens up a world of creative possibilities, enabling you to create unique and visually striking objects. Whether you want to create a multi-colored model or experiment with different material properties, filament splicing provides the flexibility to bring your ideas to life.
- Cost and Waste Reduction: Splicing filament can help reduce costs and minimize waste. Instead of discarding small leftover pieces of filament, you can splice them together and utilize them for smaller print jobs. This not only saves money but also reduces plastic waste, promoting a more sustainable approach to 3D printing.
- Convenience and Availability: Filament splicing ensures you can make the most out of your available filament supply. If you have multiple spools with small amounts of filament, splicing them together allows you to fully utilize each spool without switching between them. This convenience saves time and effort, ensuring a smooth printing experience.
- Customization and Gradual Color Transitions: Filament splicing enables you to create gradual color transitions in your prints. By carefully aligning and blending different colored filaments, you can achieve stunning gradient effects or create unique patterns in your objects. This level of customization adds depth and visual interest to your 3D prints.
These are just a few examples of the advantages that filament splicing offers in the world of 3D printing. Whether you’re looking to streamline your printing process, unleash your creativity, or reduce waste, splicing filament provides a practical solution that can enhance the quality and versatility of your prints.
Tools and materials needed
Before you can start splicing filament, it’s important to gather the necessary tools and materials. Here’s what you’ll need:
- Filament: You’ll need the filaments that you want to splice together. Ensure that the filaments are of the same diameter and compatible with your 3D printer. It’s also helpful to have a bit of extra length for overlapping and securing the splice.
- Sharp scissors or cutting tool: To cut the filament cleanly and create a precise and smooth end for splicing, it’s important to have a sharp pair of scissors or a cutting tool specifically designed for filament cutting.
- Heat source: If you’re using the overlap or heat splicing methods, you’ll need a heat source. This can be a heat gun, a soldering iron, a lighter, or a similar tool that can provide controlled heat for melting the filament ends. It’s essential to use caution and follow safety guidelines when working with heat sources.
- Splicing tool (optional): While not necessary, a splicing tool can make the process easier and more precise. There are various splicing tools available on the market, ranging from manual splicers to automated devices that aid in joining filaments together.
- Tweezers or pliers: Tweezers or pliers can be useful for handling the filament while it’s hot or for pressing the filaments together during the splicing process. These tools provide a better grip and minimize the risk of accidental burns.
- Heat-resistant surface: It’s advisable to work on a heat-resistant surface such as a silicone mat or a ceramic tile. This will protect your work surface from damage caused by heat and hot filament.
- Safety equipment: Whenever you’re working with heat or sharp tools, it’s important to prioritize safety. Consider using heat-resistant gloves, safety goggles, and adequate ventilation in your workspace to protect yourself from potential hazards.
By having these tools and materials ready, you’ll be well-prepared to start splicing filament and enjoy a smooth and successful process. Now let’s move on to the step-by-step guide on how to splice filament.
Step by step guide to splicing filament
Splicing filament may seem daunting at first, but with the right technique and a little practice, it can become a seamless part of your 3D printing workflow. Here is a step-by-step guide to help you splice filament:
- Prepare the filaments: Ensure that both filaments are clean and free from dust or debris. Cut off any damaged or uneven sections of the filaments to create a clean and straight end for splicing.
- Overlap the filaments: Take the first filament and cut it at a slight angle. Take the second filament and cut it in a complementary angle to match the first. This will create a larger surface area for the filaments to overlap.
- Heat the filament ends: Use a heat source, such as a heat gun or soldering iron, to gently heat the filament ends. Be cautious not to overheat the filament, as this can lead to deformities or weak spots. The goal is to soften the filament ends, making them malleable for the next step.
- Press the filaments together: While the filament ends are still hot and pliable, press them together firmly. Hold the overlapping section of the filaments for a few seconds to ensure a strong bond. Be careful not to burn your fingers, and consider using tweezers or pliers for added safety.
- Cool and solidify the splice: Allow the splice to cool and solidify before testing it. This usually takes a few seconds. Ensure that the filaments are securely fused together by gently tugging on the splice. If it holds without separating, the splice is successful. If not, repeat the process with extra care.
- Trim the excess: Once the splice has cooled and hardened, use scissors or a cutting tool to trim any excess filament from the splice. Aim for a clean and smooth surface to avoid any disruptions during printing.
- Test the splice: Before resuming your print job, it’s advisable to perform a test extrusion to ensure that the spliced filament is feeding smoothly through your printer. This will help identify any potential issues and allow you to make adjustments if needed.
Remember, practice makes perfect, so don’t be discouraged if your first few splices aren’t flawless. With experience, you’ll become more proficient in creating seamless filament joins. Now, let’s move on to some tips and tricks for successful filament splicing.
Tips and tricks for successful splicing
While filament splicing can be a straightforward process, there are a few tips and tricks that can help ensure successful results. Here are some key tips to keep in mind:
- Use filament of the same diameter: For a seamless splice, it’s crucial to use filaments of the same diameter. Mismatched filament sizes can result in an uneven join or difficulties in feeding the filament through the printer.
- Choose the right method for the filament: Different filaments may require different splicing methods. Research and understand the properties of the filament you’re using, as well as the recommended splicing techniques for that specific material.
- Practice consistency: Aim for consistency in the angle and length of the filament cuts when overlapping them. This will create a smoother transition and a stronger splice.
- Experiment with heat levels: Finding the right heat level for your filament can make a significant difference in the success of the splice. Too much heat can deform the filament, while too little may result in a weak bond. Experiment with different heat settings or techniques to find the ideal balance.
- Ensure proper cooling: Allow the splice to cool and solidify completely before handling or testing it. Rushing this step can lead to premature breakage or a weaker splice.
- Inspect the splice: After cooling, visually inspect the splice for any signs of weakness, gaps or visible seams. If necessary, reheat the splice and press it together again to address any imperfections.
- Keep spare filament nearby: Have extra filament ready in case you need to perform a backup splice or adjust the splice during a print job. This will prevent any delays or interruptions in the printing process.
- Practice and patience: Filament splicing can take some practice to master. Be patient, learn from each attempt, and don’t be discouraged by initial challenges. With experience, your splicing skills will improve, leading to more seamless joins.
By implementing these tips and tricks, you’ll increase your chances of achieving successful filament splices. Remember, every filament and printer setup may have slightly different requirements, so don’t be afraid to experiment and refine your techniques to achieve the best results.
Now, let’s move on to the next section, where we’ll discuss some common issues that you may encounter during filament splicing and how to troubleshoot them.
Troubleshooting common issues
While filament splicing is a useful technique, it doesn’t always go smoothly. Here are some common issues you may encounter during filament splicing and tips to troubleshoot them:
- Weak splice: If your splice keeps breaking or feels weak, it may be due to insufficient heat or pressure during the splicing process. Ensure that you are applying enough heat to fully melt the filament ends and press them together firmly. You can also try increasing the overlap length for a stronger bond.
- Seam or visible line: If you notice a visible line or seam in your print where the filaments were spliced, it could be due to an uneven splice or a slight variation in the diameter of the filaments. To address this issue, ensure that the filament ends are cut cleanly and evenly, and that they align properly during the splicing process. Additionally, you can sand or smooth the surface of the splice to minimize the appearance of the seam.
- Extrusion problems: If you’re experiencing issues with filament feeding or extrusion after a splice, it could be due to a clogged nozzle. Check for any obstructions or debris in the nozzle and clean it if necessary. Additionally, make sure that the spliced filament is free from any irregularities or bumps that could impact the extrusion flow.
- Filament diameter inconsistency: If the filaments you’re splicing have slightly different diameters, it can lead to difficulty in feeding or uneven extrusion. To address this issue, consider using a filament diameter measurement tool to identify and separate filaments with varying sizes. You can then splice together filaments that have a more consistent diameter.
- Overheating/deformation: Overheating the filament during the splicing process can lead to deformation or weak spots in the splice. Be mindful of the heat source you’re using and monitor the temperature closely. It’s better to heat the filament gradually and steadily rather than applying too much heat too quickly.
- Filament compatibility: Different filaments have varying melting points and properties. Ensure that the filaments you’re splicing together are compatible and melt at similar temperatures. If you’re splicing filaments with significantly different melting points, consider using a specialized filament connector or exploring alternative methods of joining the filaments.
These troubleshooting tips should help you overcome common issues encountered during filament splicing. Remember to be patient, take your time, and adjust your technique as needed. With practice, you’ll gain confidence in splicing filament and achieve consistent and successful results.
Now that we’ve covered troubleshooting, let’s conclude the article with a brief recap and final thoughts.
Conclusion
Filament splicing is a valuable technique that allows 3D printing enthusiasts to overcome challenges, unleash their creativity, and optimize their printing experience. By seamlessly joining two filament pieces together, you can achieve uninterrupted printing, combine different colors or materials, reduce waste, and customize your prints.
In this article, we explored the concept of filament splicing and learned about the different methods available, such as overlap splicing, heat splicing, and mechanical splicing. We also discussed the reasons why you would want to splice filament, including uninterrupted printing, color/material blending, cost reduction, convenience, and customization.
To successfully splice filament, we outlined the essential tools and materials needed, including filament of the same diameter, sharp scissors or cutting tools, a heat source, and optional tools like splicers, tweezers, and pliers. We then provided a step-by-step guide on how to splice filament, offering tips for consistency, heat levels, cooling, and trimming.
Additionally, we shared some tips and tricks to ensure successful filament splicing, such as using filaments of the same diameter, selecting the right method for the filament, practicing consistency, experimenting with heat levels, ensuring proper cooling, inspecting the splice, and maintaining spare filament.
We also addressed common issues encountered during filament splicing, including weak splices, visible lines or seams, extrusion problems, filament diameter inconsistency, overheating, and filament compatibility. We provided troubleshooting tips for each of these issues to help you overcome them and achieve better results.
By incorporating filament splicing into your 3D printing workflow, you can optimize your printing process, reduce waste, and unlock new possibilities for creativity and customization in your prints. As with any new technique, practice and patience are key to mastering filament splicing.
So, take your time, experiment with different methods, and don’t be afraid to refine your techniques. With time and experience, you’ll become more proficient in successfully splicing filament and enhancing your 3D printing projects.


