Introduction
Are you looking for a way to enhance your Kodi streaming experience? If so, then you’re in luck! In this article, we’ll show you how to download and install Salts (Stream All The Sources) on Kodi. Salts is a popular add-on that allows you to access a vast library of movies and TV shows, making it a must-have for any Kodi user.
Before diving into the step-by-step guide, let’s briefly discuss what Kodi is. Kodi is an open-source media player that allows you to stream content from various sources, including local files, online streams, and add-ons. It provides a user-friendly interface and supports a wide range of devices, such as computers, smartphones, and streaming boxes.
Salts, on the other hand, is an add-on specifically designed for Kodi. It scours the internet for high-quality sources and provides you with an extensive selection of movies and TV shows to choose from. With Salts, you can enjoy the latest releases, binge-watch your favorite TV series, and even find obscure titles that are otherwise hard to find.
Now that you have a general understanding of Kodi and Salts, let’s move on to the step-by-step guide on how to download and install Salts on Kodi. Rest assured, the process is straightforward and can be completed in just a few minutes, even if you’re new to Kodi.
Step 1: Install Kodi on your device
Before you can begin enjoying Salts on Kodi, you’ll need to have Kodi installed on your device. Follow these simple steps to install Kodi:
1. Go to the official Kodi website at https://kodi.tv/download and select the appropriate version for your operating system. Kodi is compatible with Windows, Mac, Linux, Android, iOS, and more.
2. Once you’ve downloaded the installation file, run it to start the installation process. Follow the on-screen instructions to complete the installation setup.
3. After the installation is complete, launch Kodi on your device. You’re now ready to proceed to the next step!
It’s important to note that while Kodi is a free and open-source media player, it’s always recommended to download it from the official website to ensure you’re getting the latest and most secure version.
Kodi’s versatility and compatibility with various operating systems make it accessible to a wide range of users. Whether you’re using a Windows PC, Macbook, Android phone, or even a Raspberry Pi, you can enjoy the benefits of Kodi and explore its vast library of add-ons, including Salts.
Now that you have Kodi installed on your device, you’re one step closer to accessing the exciting world of Salts. Let’s move on to the next step and set up a repository source for Kodi.
Step 2: Set up a repository source for Kodi
In order to download Salts on Kodi, we need to add a repository source. A repository source is like a digital library that holds various add-ons, including Salts. Setting up a repository source is essential for accessing and installing Salts on your Kodi device. Follow these steps to set up a repository source:
1. Open Kodi on your device and navigate to the Home Screen.
2. Click on the gear icon at the top-left corner of the screen to enter the Settings menu.
3. In the Settings menu, select “File Manager.”
4. On the next screen, double-click on “Add source.”
5. A dialogue box will appear asking you to enter the source URL. Type in the URL for the repository source. For example, if you’re using the popular repository source SuperRepo, the URL would be “http://srp.nu/”. Make sure to double-check the accuracy of the URL before proceeding.
6. After entering the URL, you’ll be prompted to name the repository source. Choose a name that is easy to remember, such as “SuperRepo” or “Salts Repository”.
7. Click “OK” to save the repository source. Kodi will now add the source to its list of available repositories.
Adding a repository source allows Kodi to access a collection of add-ons, including Salts. By setting up a repository source, you’re opening up a world of possibilities for expanding your Kodi experience beyond the default options.
Now that you’ve successfully set up a repository source, you’re ready to move on to the next step and install the repository that contains Salts.
Step 3: Install the repository
After setting up a repository source, the next step is to install the repository that contains Salts. The repository serves as a gateway to the add-on and houses all the necessary files and updates. Follow these steps to install the repository:
1. Open Kodi on your device and navigate to the Home Screen.
2. Click on the gear icon at the top-left corner of the screen to enter the Settings menu.
3. In the Settings menu, select “Add-ons”.
4. On the next screen, click on “Install from zip file”.
5. A list of available repositories will be displayed. Locate and select the repository source that you set up in the previous step. For example, if you set up the SuperRepo source, find and click on “SuperRepo”.
6. Inside the selected repository source, you will typically find a folder named “repo” or “repository”. Navigate into this folder.
7. Look for the repository file, which usually has a “.zip” extension. Click on the file to begin the installation process.
8. After a few seconds, you will receive a notification confirming the successful installation of the repository.
Installing the repository grants Kodi access to the add-ons within that repository. By following these steps and successfully installing the repository, you’re on your way to unlocking the power of Salts.
Now that you have the repository installed, let’s move on to the next step and configure the repository settings before installing Salts.
Step 4: Configure the repository settings
Before installing Salts, it’s important to configure the repository settings to ensure a smooth installation process. Follow these steps to configure the repository settings:
1. Open Kodi on your device and navigate to the Home Screen.
2. Click on the gear icon at the top-left corner of the screen to enter the Settings menu.
3. In the Settings menu, select “Add-ons”.
4. On the next screen, click on “Install from repository”.
5. You will see a list of available repositories. Look for and select the repository you installed in the previous steps.
6. Inside the repository, you will find a variety of add-ons. Locate and select the “Settings” or “Configure” option.
7. This will open the repository’s settings menu, where you can customize various options according to your preferences. Take some time to explore the settings and make any desired adjustments.
Configuring the repository settings allows you to customize the behavior and functionality of Salts and other add-ons within the repository. It’s worth noting that not all repositories will have extensive settings options, but it’s still a good idea to check and make any necessary configurations before proceeding.
With the repository settings configured, you’re now ready to move on to the next step and install Salts, the add-on that will revolutionize your Kodi streaming experience.
Step 5: Install Salts from the repository
Now that you have set up the repository and configured its settings, it’s time to install Salts on Kodi. Salts is a powerful add-on that allows you to stream a wide range of movies and TV shows. Follow these steps to install Salts from the repository:
1. Open Kodi on your device and navigate to the Home Screen.
2. Click on the gear icon at the top-left corner of the screen to enter the Settings menu.
3. In the Settings menu, select “Add-ons”.
4. On the next screen, click on “Install from repository”.
5. Locate and select the repository that you installed in the previous steps.
6. Inside the repository, browse through the available add-ons until you find Salts. It is often located in a category labeled as “Video Add-ons” or “Movies & TV”.
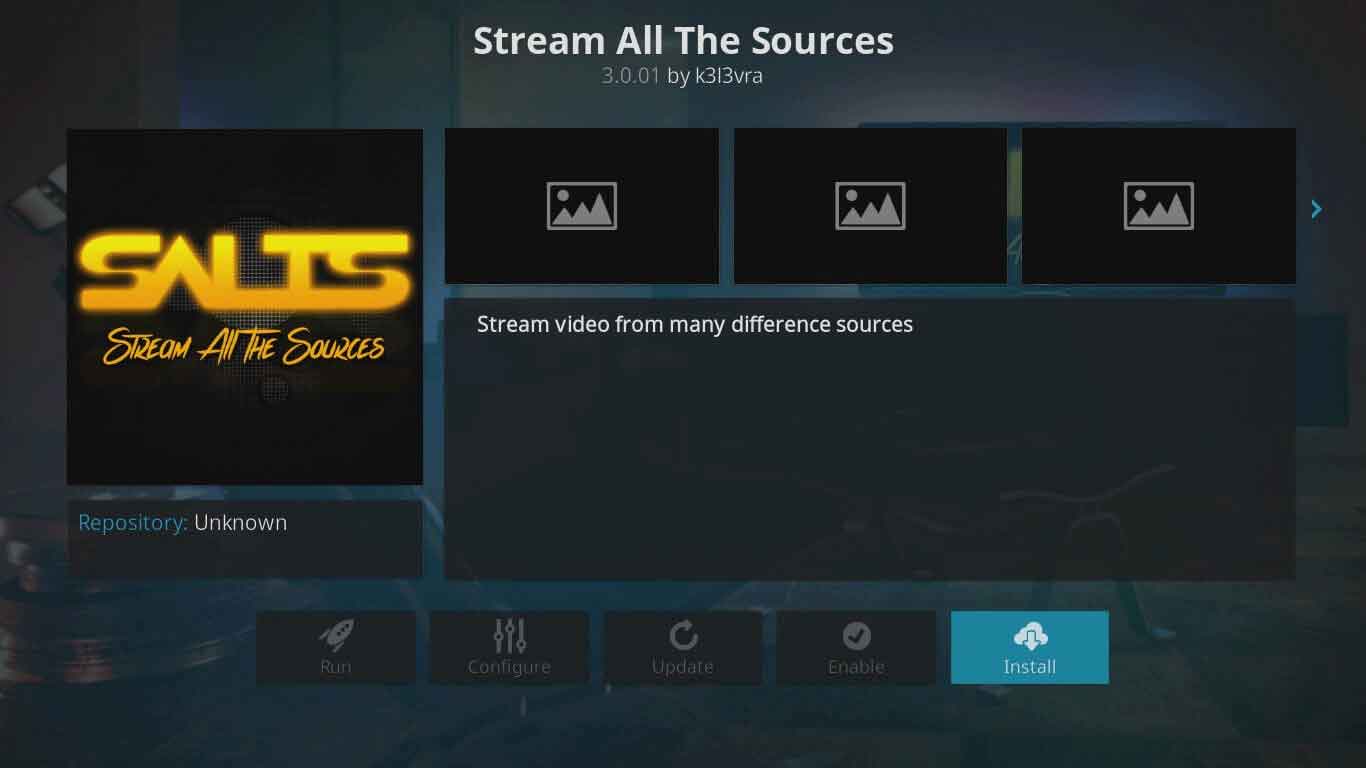
7. Click on Salts to open its information page.
8. On the information page, click on the “Install” button to initiate the installation process.
9. Wait for the notification confirming the successful installation of Salts.
Once Salts is successfully installed, you can access it by going to the Kodi Home Screen, selecting “Add-ons”, and locating Salts in the list. Click on Salts to launch the add-on and start exploring its vast collection of movies and TV shows.
With Salts installed, you now have an incredible streaming resource at your fingertips. Enjoy the convenience and variety that Salts brings to your Kodi experience.
Now that you have successfully installed Salts, let’s move on to the final step and learn how to access and use Salts on Kodi.
Step 6: Accessing and using Salts on Kodi
Now that you have installed Salts on your Kodi device, it’s time to learn how to access and use this powerful add-on. Follow these steps to get started:
1. Open Kodi on your device and navigate to the Home Screen.
2. Click on “Add-ons” in the navigation menu.
3. Locate and click on “Salts” in the list of installed add-ons.
4. Upon opening Salts, you will be presented with a user-friendly interface. Take a moment to explore the different sections and options available.
5. To search for a specific movie or TV show, use the search bar provided. Simply enter the title and Salts will display the available sources.
6. Salts also offers various filtering options to help you refine your search. You can filter results by genre, release year, popularity, and more.
7. Once you’ve found the desired content, click on it to view additional information such as plot summary, cast, and available sources.
8. Select a source and Salts will automatically begin streaming the content for you to enjoy.
9. You can customize Salts’ settings by accessing the settings menu within the add-on. Here, you can modify various options, such as language preferences, download directory, and playback settings.
By following these steps, you can easily access and use Salts to enjoy a vast selection of movies and TV shows through Kodi. With its intuitive interface and powerful features, Salts provides a seamless streaming experience for all your entertainment needs.
Congratulations! You are now fully equipped to make the most of Salts on Kodi. Explore, discover, and indulge in a world of endless entertainment right at your fingertips.
Happy streaming!
Conclusion
In this article, we have covered the step-by-step process of downloading and installing Salts on Kodi. Salts is a popular add-on that expands your streaming capabilities, providing access to a vast library of movies and TV shows. By following the instructions outlined in this guide, you can enhance your Kodi experience and unlock a world of entertainment.
We began by installing Kodi on your device, which serves as the foundation for accessing and utilizing Salts. Then, we set up a repository source to enable the installation of add-ons. After that, we installed the repository that contains Salts and configured its settings to ensure a smooth installation process. Finally, we installed Salts itself, giving you access to its diverse collection of streaming content.
Once Salts is installed, you can easily access and use it through the Kodi interface. By utilizing the search and filtering options within Salts, you can discover movies and TV shows of your choice and enjoy them with just a few clicks. Customizing Salts’ settings allows you to personalize your streaming experience and adjust it to your preferences.
We hope that this guide has provided you with the necessary information and instructions to successfully install and use Salts on Kodi. The combination of Kodi’s powerful media player capabilities and Salts’ extensive streaming library opens up endless possibilities for your entertainment needs. Now, sit back, relax, and enjoy the seamless streaming experience that Salts on Kodi brings.
Remember to always use Kodi and its add-ons responsibly and respect copyright laws and content licensing agreements. Happy streaming!