Introduction
Listening to music on the go has become an essential part of our daily lives. Whether you’re heading to the gym, embarking on a road trip, or simply enjoying a leisurely walk, having your favorite tunes with you is a must. While streaming services have gained popularity, many individuals still prefer to own their music collection and listen to it offline. Apple’s iTunes has long been a go-to platform for purchasing and downloading music.
However, if you own an MP3 player and want to enjoy your iTunes music on it, you may be faced with a challenge. iTunes songs are usually stored in a format that is not compatible with most MP3 players. But fret not! This article will guide you through the process of downloading iTunes music and converting it to a compatible MP3 format, so you can listen to your favorite tracks on your MP3 player.
Before we delve into the steps, it’s important to note that the process may vary depending on the specific MP3 player you have and the version of iTunes you are using. However, the basic principles presented here should work for most devices and software versions.
So, if you’re ready to rock out to your iTunes collection on your MP3 player, let’s get started!
Step 1: Check Compatibility
Before you can begin the process of downloading iTunes music to your MP3 player, it’s crucial to ensure that the two are compatible. Different MP3 players have varying compatibility with iTunes, so it’s important to check if your specific device supports the iTunes music format.
Start by identifying the manufacturer and model of your MP3 player. Visit the manufacturer’s website and look for information about the supported audio formats. Most MP3 players support the MP3 format, but some may also support additional formats like WAV or WMA.
Next, check if your MP3 player has any proprietary software that is required for transferring music from iTunes. Some devices come with their own applications that need to be installed on your computer for seamless synchronization.
In addition to the MP3 player requirements, it’s essential to ensure that your version of iTunes is up to date. Apple regularly releases updates to enhance compatibility with various devices and software. Update your iTunes software to the latest version by opening iTunes and navigating to the “Help” or “About” section. From there, you can check for updates and follow the instructions to install the latest version.
Once you’ve verified the compatibility between your MP3 player and iTunes, you’re ready to move on to the next step of converting the iTunes music to a format that is compatible with your device.
Step 2: Convert iTunes Music to MP3 Format
Converting your iTunes music to the widely supported MP3 format is essential for playback on most MP3 players. Luckily, there are several methods you can use to accomplish this.
Method 1: Using iTunes:
If you prefer to stick with iTunes for the conversion process, follow these steps:
- Open iTunes on your computer.
- Go to the “Preferences” menu and click on the “General” tab.
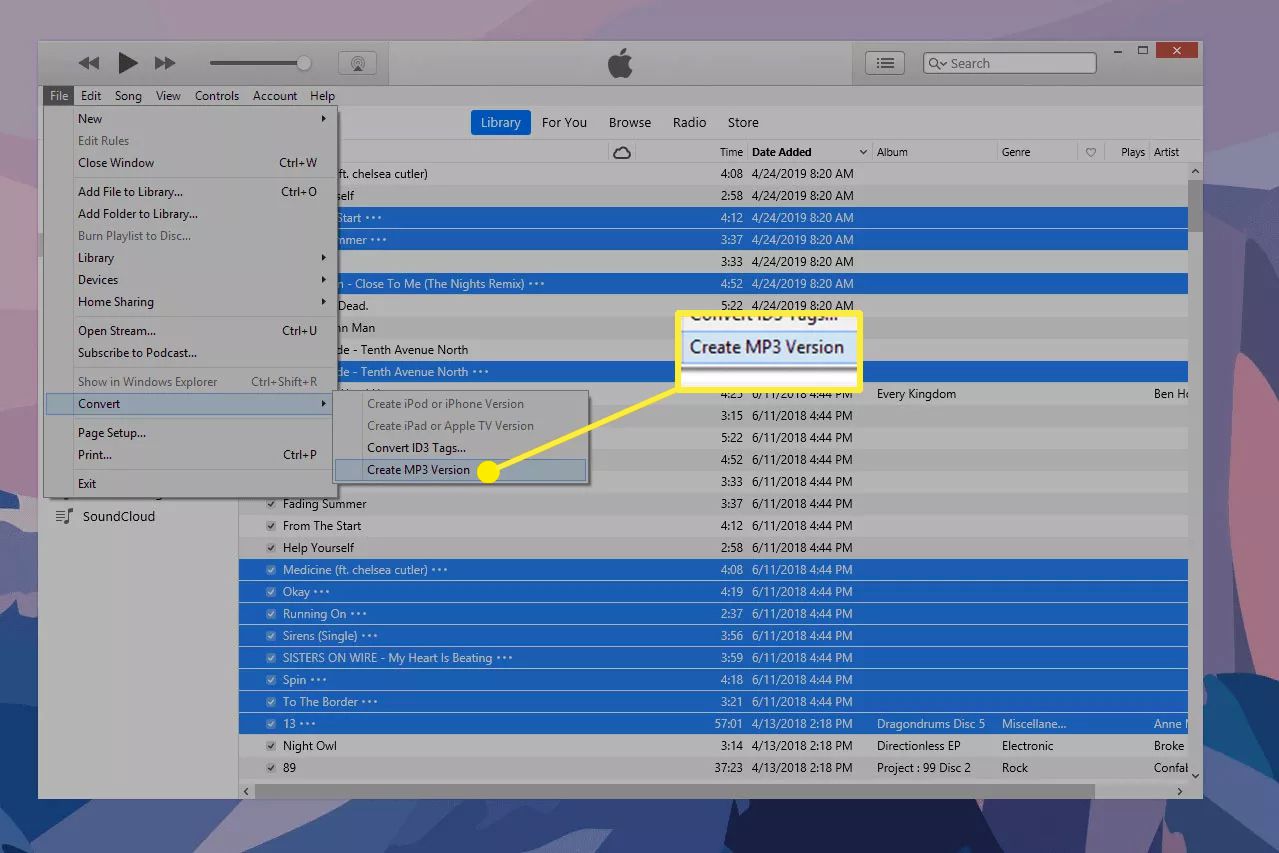
- Click on the “Import Settings” button and select “MP3 Encoder” from the drop-down menu.
- Click “OK” to save the changes.
- Go to your iTunes library and select the songs you want to convert.
- Right-click on the selected songs and choose “Create MP3 Version.”
- Wait for the conversion process to complete. The newly converted MP3 files will appear alongside the original files in your iTunes library.
Method 2: Using Third-Party Software:
If you prefer a simpler and faster alternative to iTunes, you can use third-party software specifically designed for converting audio files. Some popular options include:
- XLD (X Lossless Decoder)
- Freemake Audio Converter
- MediaHuman Audio Converter
Download and install the software of your choice, then follow the instructions provided by the program to convert your iTunes music to the MP3 format.
Method 3: Online Conversion Tools:
If you don’t want to install any additional software, you can opt for online conversion tools. Websites like Online Audio Converter, Zamzar, and Convertio allow you to convert your iTunes music files to MP3 without the need for software installation. Simply upload your files, select the MP3 format as the output, and download the converted files to your computer.
After converting your iTunes music to MP3 format, you’re ready to transfer the files to your MP3 player. Keep reading to discover the next steps.
Step 3: Transfer Music to MP3 Player
Now that you have successfully converted your iTunes music to the MP3 format, it’s time to transfer the files to your MP3 player. The exact process may vary depending on the brand and model of your device, but here are some general steps to follow:
Method 1: Using USB Connection:
- Connect your MP3 player to your computer using a USB cable.
- Wait for your computer to detect the MP3 player and assign it a drive letter.
- Open the drive assigned to your MP3 player. This is usually labeled with the device’s name or model number.
- Locate the folder or directory on your MP3 player where you want to transfer the music.
- In another window, navigate to the folder on your computer where the converted MP3 files are stored.
- Select the MP3 files you want to transfer and drag them into the folder on your MP3 player.
- Wait for the transfer to complete. Once finished, safely disconnect your MP3 player from your computer.
Method 2: Using Synchronization Software:
- If your MP3 player comes with proprietary synchronization software, install it on your computer.
- Open the synchronization software and connect your MP3 player to your computer via USB cable.
- Follow the software’s instructions to sync the converted MP3 files from your computer to your MP3 player.
- Wait for the synchronization process to complete and disconnect your MP3 player from your computer.
Method 3: Using SD Card or Memory Card:
- If your MP3 player has a removable SD card or memory card, remove it from the device.
- Insert the SD card or memory card into a card reader connected to your computer.
- Navigate to the folder where the converted MP3 files are stored.
- Select the files you want to transfer and copy them to the SD card or memory card.
- Insert the SD card or memory card back into your MP3 player.
Once the music transfer is complete, safely disconnect your MP3 player from your computer or remove the memory card, if applicable. Now you can enjoy your iTunes music collection directly from your MP3 player!
Step 4: Organize and Enjoy Your Music on the MP3 Player
Now that you have successfully transferred your converted iTunes music to your MP3 player, it’s time to organize your music library and start enjoying your favorite tunes on the go. Follow these steps to optimize your music experience:
1. Create Folders or Playlists:
Consider organizing your music into folders or playlists for easier navigation. Create folders based on genres, artists, albums, or any other category that suits your preference. Alternatively, many MP3 players allow you to create playlists directly on the device, allowing you to curate a customized selection of songs.
2. Update Metadata:
Metadata provides important information about your music, such as the song title, artist, album, and genre. Ensure that the metadata for each song is accurate and complete. You can use media management software, such as iTunes or dedicated MP3 player software, to edit and update the metadata of your music files.
3. Adjust Settings:
Explore the settings on your MP3 player to customize your listening experience. You may have options to adjust the equalizer settings, playback modes, shuffle, and repeat functions. Experiment with these settings to find the sound that suits your preferences.
4. Remove Unwanted Files:
Regularly go through your music library on the MP3 player and remove any unwanted or duplicate files. This will help keep your library organized and make it easier to navigate through your collection.
5. Keep Your MP3 Player Updated:
Check for firmware updates for your MP3 player regularly. Firmware updates often include bug fixes, performance improvements, and new features that can enhance your music experience. Visit the manufacturer’s website or refer to the user manual for instructions on updating the firmware of your specific MP3 player model.
With your music organized and your MP3 player fully optimized, you’re ready to enjoy your favorite tunes wherever you go. Take the time to explore your device’s features, experiment with different playlists, and immerse yourself in the joy of portable music.
Conclusion
Downloading iTunes music to an MP3 player may initially seem like a daunting task, given the differences in file formats and compatibility. However, with the right methods and tools, you can easily convert your iTunes music to MP3 format and transfer it to your MP3 player for maximum convenience and enjoyment.
In this guide, we explored the four key steps to successfully download iTunes music to your MP3 player. We started by checking compatibility between your device and iTunes, ensuring that both are capable of working together seamlessly. Next, we discussed the process of converting iTunes music to the universally accepted MP3 format, offering multiple options depending on preference and software availability. Then, we provided guidelines for transferring the converted music files to your MP3 player using various methods, such as USB connection or synchronization software.
Finally, we touched upon the importance of organizing your music library on the MP3 player, updating metadata, adjusting settings, and keeping your device up to date to optimize your overall music experience.
Now that you have the knowledge and tools necessary to download iTunes music to your MP3 player, you can enjoy your favorite tracks no matter where you are. Whether it’s during your daily workout routine, a long commute, or simply relaxing at home, having your music collection readily available on your MP3 player adds a whole new level of convenience and enjoyment to your life.
So, get started today and embark on a musical journey with your MP3 player filled with your all-time favorite tunes. Happy listening!


