Introduction
Welcome to our guide on how to authorize your MacBook to download music from the iTunes Store. If you’ve recently purchased a new MacBook or if you’re using a different device to access your iTunes account, you may need to authorize it in order to download and play your purchased music. This authorization process ensures that only authorized devices can access and play your purchased content, providing an extra layer of security for your music library.
Authorizing your MacBook is a straightforward process that requires just a few simple steps. In this guide, we will walk you through the process, ensuring that you are able to enjoy your favorite tunes on your newly acquired MacBook in no time.
Before we dive into the step-by-step instructions, it’s important to note that you will need an active Apple ID and a compatible version of iTunes installed on your MacBook. Additionally, ensure that you have a stable internet connection for the authorization process.
Now, let’s get started with the first step: signing in to the iTunes Store.
Step 1: Sign in to the iTunes Store
The first step to authorize your MacBook to download music is to sign in to the iTunes Store. Launch the iTunes application on your MacBook by clicking on the iTunes icon in your Dock or by searching for it in Spotlight. Once the application is open, follow these steps:
- Click on the “Account” tab in the menu bar at the top of the screen.
- A drop-down menu will appear. Select “Sign In” from the menu.
- Enter your Apple ID and password in the respective fields and click “Sign In”. If you don’t have an Apple ID, click on the “Create New Apple ID” button and follow the prompts to create one.
After signing in, you will have access to your personal library, where you can browse and download music, movies, TV shows, podcasts, and more. However, before you can start downloading music, you’ll need to authorize your MacBook. Let’s move on to the next step.
Step 2: Go to Account Settings
Now that you’re signed in to the iTunes Store, the next step is to navigate to your account settings. Follow these simple instructions:
- With iTunes open, click on the “Account” tab in the menu bar at the top of the screen.
- From the drop-down menu, select “View My Account”. You may be prompted to enter your password again for security.
- A new window will appear, displaying your account information and settings. This is where you can manage various aspects of your iTunes account, including authorizing your MacBook.
By accessing your account settings, you have the ability to customize your preferences, update payment information, and manage authorized devices. In our case, we’re interested in authorizing your MacBook to download music, so let’s move on to the next step.
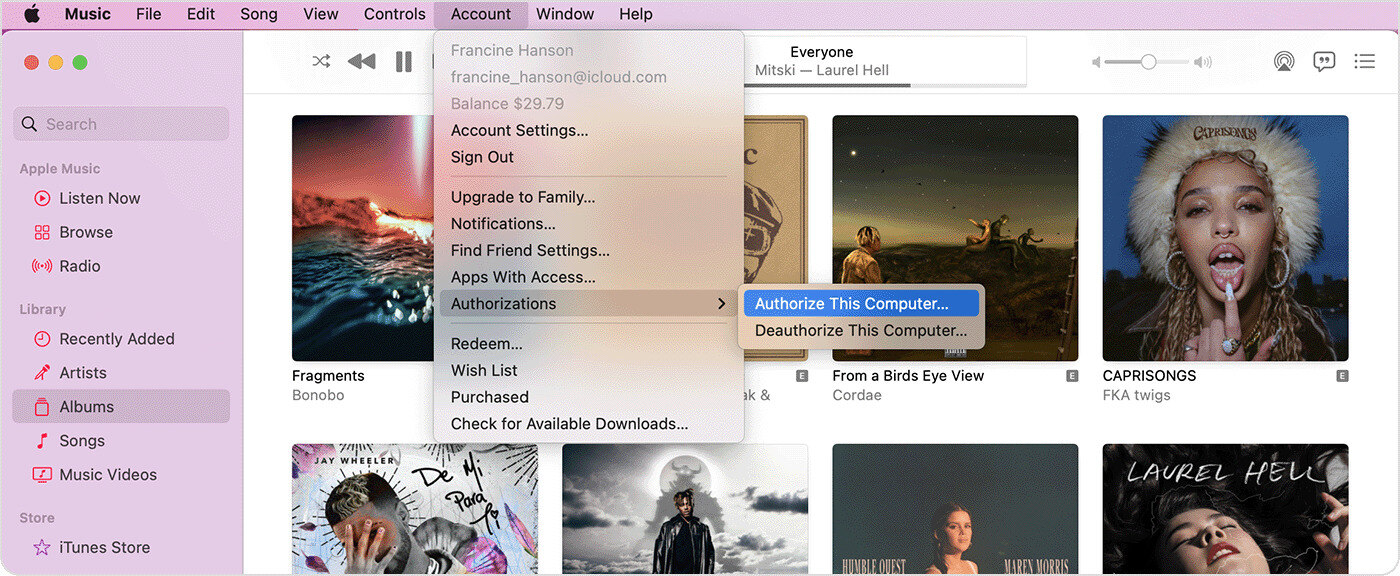
Step 3: Authorize This Computer
Now that you’re in your account settings, it’s time to authorize your MacBook to download music. Follow these steps:
- In the “Account Information” section, scroll down until you find the “Computer Authorizations” section.
- Click on the “Authorize This Computer” button next to the “Authorized Computers” label.
By authorizing your MacBook, you’re granting it permission to access and play your purchased content from the iTunes Store. This ensures that only trusted devices are able to access your account and protect your digital media.
Note that each Apple ID can authorize up to five computers. If you’ve reached your authorization limit, you can deauthorize an old or unused computer to free up space for your MacBook. Simply click on the “Deauthorize All” button to remove all authorized devices and then authorize your MacBook specifically.
Now that you’ve clicked on the “Authorize This Computer” button, you’re one step closer to downloading and enjoying your favorite music on your MacBook. Next, we’ll guide you through the process of entering your Apple ID and password.
Step 4: Enter Apple ID and Password
Now that you’ve initiated the authorization process, you will be prompted to enter your Apple ID and password. Follow these steps to complete the authorization:
- A pop-up window will appear, asking you to enter your Apple ID and password.
- Enter your Apple ID, which is usually your email address, in the designated field.
- Enter your corresponding Apple ID password in the second field.
- Double-check the information you’ve entered to ensure accuracy.
- Click on the “Authorize” or “OK” button to proceed.
By entering your Apple ID and password, you are confirming that you are the authorized user of the account and granting permission for your MacBook to access your purchased content.
It’s important to note that you should only enter your Apple ID and password on trusted devices and secure networks to protect your account and personal information.
Once you’ve entered your Apple ID and password correctly, you’re just one step away from completing the authorization process. Let’s move on to the next step, where we confirm the authorization.
Step 5: Confirm Authorization
After entering your Apple ID and password, it’s time to confirm the authorization of your MacBook. Follow these simple steps to finalize the process:
- Once you’ve entered your Apple ID and password, the authorization process will automatically begin.
- A progress indicator or loading icon may appear, indicating that your MacBook is being authorized.
- After a few moments, a notification will appear confirming that your computer has been successfully authorized.
Confirming the authorization ensures that your MacBook is now enabled to download and play music from the iTunes Store. It’s an essential step to ensure seamless access to your purchased content.
If, for any reason, the authorization process fails or encounters an error, double-check your internet connection and ensure that you’ve entered the correct Apple ID and password. If the issue persists, you may need to contact Apple Support for further assistance.
With the authorization successfully confirmed, you’re ready to dive into the world of music on your MacBook. Next, we’ll guide you through the process of downloading music from the iTunes Store.
Step 6: Download Music from iTunes
Now that your MacBook is authorized, you can start downloading music from the iTunes Store and enjoy it anytime, anywhere. Follow these steps to download music:
- In iTunes, click on the “Music” tab located at the top of the window. This will take you to the music section of the iTunes Store.
- Browse through the wide selection of music genres, charts, and new releases to find the songs or albums you wish to download.
- Once you’ve found the music you want, click on the price button or the “Buy” button next to the respective song or album. If the item is free, click on the “Get” button instead.
- If prompted, enter your Apple ID password to complete the purchase. Some purchases may require additional verification or payment information.
- After your purchase is complete, the music will begin downloading to your iTunes library. You can monitor the progress of the download in the iTunes status bar.
Once the download is complete, you can access your downloaded music by going to the “Music” or “Library” tab in iTunes. From there, you can create playlists, organize your music, and enjoy your favorite tunes on your MacBook.
Remember, with your MacBook authorized, you can download music and other content from the iTunes Store whenever you want. It’s a simple process that allows you to expand your music collection and enjoy a personalized music experience on your MacBook.
Congratulations! You have successfully authorized your MacBook to download music from the iTunes Store and learned how to download your favorite tunes. Now you can sit back, relax, and enjoy the melodies from your favorite artists.
Conclusion
By following the step-by-step guide outlined in this article, you have successfully authorized your MacBook to download music from the iTunes Store. This simple process ensures that you have access to your purchased content and can enjoy your favorite tunes on your MacBook whenever you want.
We started by signing in to the iTunes Store using your Apple ID and navigating to the account settings. From there, we authorized your MacBook, entered your Apple ID and password, and confirmed the authorization. Finally, we explored how to download music from the iTunes Store and enjoy it on your MacBook.
Remember, authorizing your MacBook is not only about downloading and playing music—it also provides an extra layer of security for your iTunes account. By authorizing only trusted devices, you can protect your purchased content from unauthorized access.
Now that your MacBook is authorized, feel free to browse the extensive library of music, discover new artists, and download your favorite songs to create personalized playlists. Whether you’re a music enthusiast, casual listener, or simply looking to enhance your MacBook experience, iTunes provides a vast collection of music for every taste.
Thank you for following this guide. We hope you found it helpful and that you enjoy your music-filled journey on your newly authorized MacBook!