Introduction
Are you tired of using the same old fonts in Google Docs for your documents? Do you want to spice up your text with unique and stylish fonts? Look no further! In this article, we will guide you on how to download and use custom fonts in Google Docs, so you can add that extra flair to your documents.
Google Docs is a widely used web-based productivity tool, which offers a range of fonts to choose from. However, these pre-installed fonts may not always meet your creative needs. Thankfully, Google allows you to access a vast library of downloadable fonts, expanding your options and enabling you to make your documents stand out.
By downloading fonts, you can add a personal touch to your work, whether it’s for a professional document, a school project, or a creative endeavor. Custom fonts can help create a visually appealing and unique document that captures the reader’s attention and holds it until the very end. So, let’s dive in and learn how to access and utilize this valuable resource.
How to Access the Fonts Menu in Google Docs
Before you can start downloading and using custom fonts in Google Docs, you need to know how to access the fonts menu. Here’s a step-by-step guide to get you started:
- Open Google Docs and create a new document or open an existing one.
- In the menu bar, click on “Format” and select “Paragraph styles” from the dropdown menu.
- A pane will appear on the right side of the screen. At the top of the pane, you will see a section labeled “Font”.
- Click on the arrow next to the font name to expand the font selection menu. This will display a variety of font options.
- Scroll through the list of fonts or use the search bar at the top to find a specific font.
- Click on the font you want to use, and it will be applied to your selected text or the entire document, depending on your selection.
This simple process allows you to access the fonts menu in Google Docs, giving you the ability to choose from a wide range of fonts to enhance the visual appeal of your documents. Remember, the font selection you make will only apply to the specific text or document section you have highlighted at the time.
Now that you know how to access the fonts menu, let’s move on to the next step: how to browse and select fonts from the extensive library available in Google Docs.
How to Browse and Select Fonts
Once you have accessed the fonts menu in Google Docs, you can browse and select from a wide variety of fonts to suit your document’s style and tone. Here’s how you can find the perfect font:
- Open Google Docs and create a new document or open an existing one.
- In the menu bar, click on “Format” and select “Paragraph styles” from the dropdown menu.
- Expand the font selection menu by clicking on the arrow next to the font name.
- Scroll through the list of fonts or use the search bar at the top to find a specific font.
- As you browse through the fonts, the selected text or highlighted section of your document will update in real-time to show how the font looks.
- Click on a font to apply it to your selected text or the entire document. You can experiment with different fonts until you find the perfect one.
- If you want to sample a font without applying it directly to your document, hover over a font name. A preview window will appear, showcasing how the font looks.
Browsing through the fonts gives you the freedom to explore different styles and choose the one that aligns with your document’s purpose and design. Whether you’re looking for a classic serif font for formal documents or a playful script font for creative projects, Google Docs provides a wide range of options to cater to your preferences.
Now that you know how to browse and select fonts in Google Docs, let’s move on to the next step: how to download fonts for offline use.
How to Download Fonts for Offline Use
Downloading fonts for offline use in Google Docs allows you to access and use your preferred fonts even when you’re not connected to the internet. Here’s how you can download fonts:
- Open Google Docs and create a new document or open an existing one.
- In the menu bar, click on “Format” and select “Paragraph styles” from the dropdown menu.
- Expand the font selection menu by clicking on the arrow next to the font name.
- Scroll through the list of fonts or use the search bar to find the font you want to download.
- Hover over the desired font, and a small pop-up window will appear with an “Add” button.
- Click on the “Add” button next to the font you wish to download. The font will be added to your Google Docs font collection.
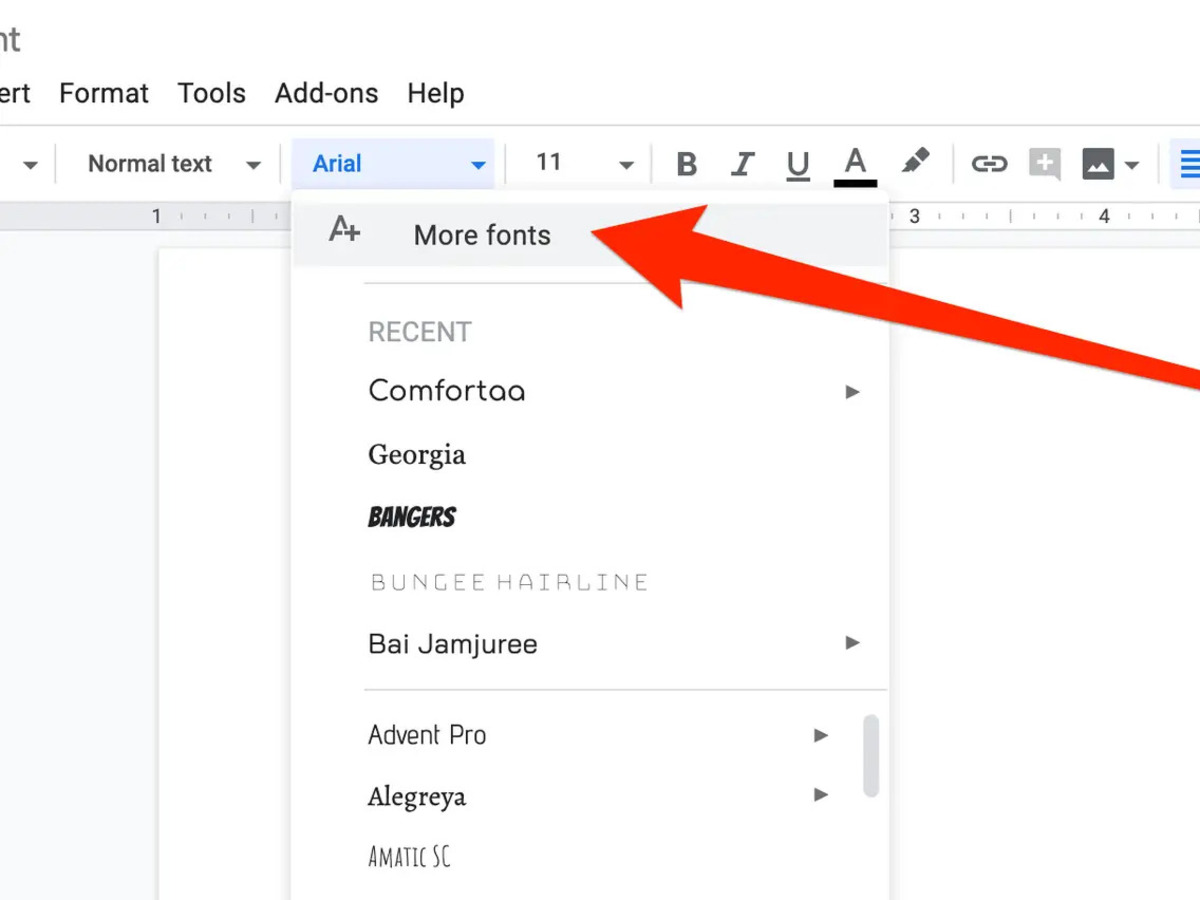
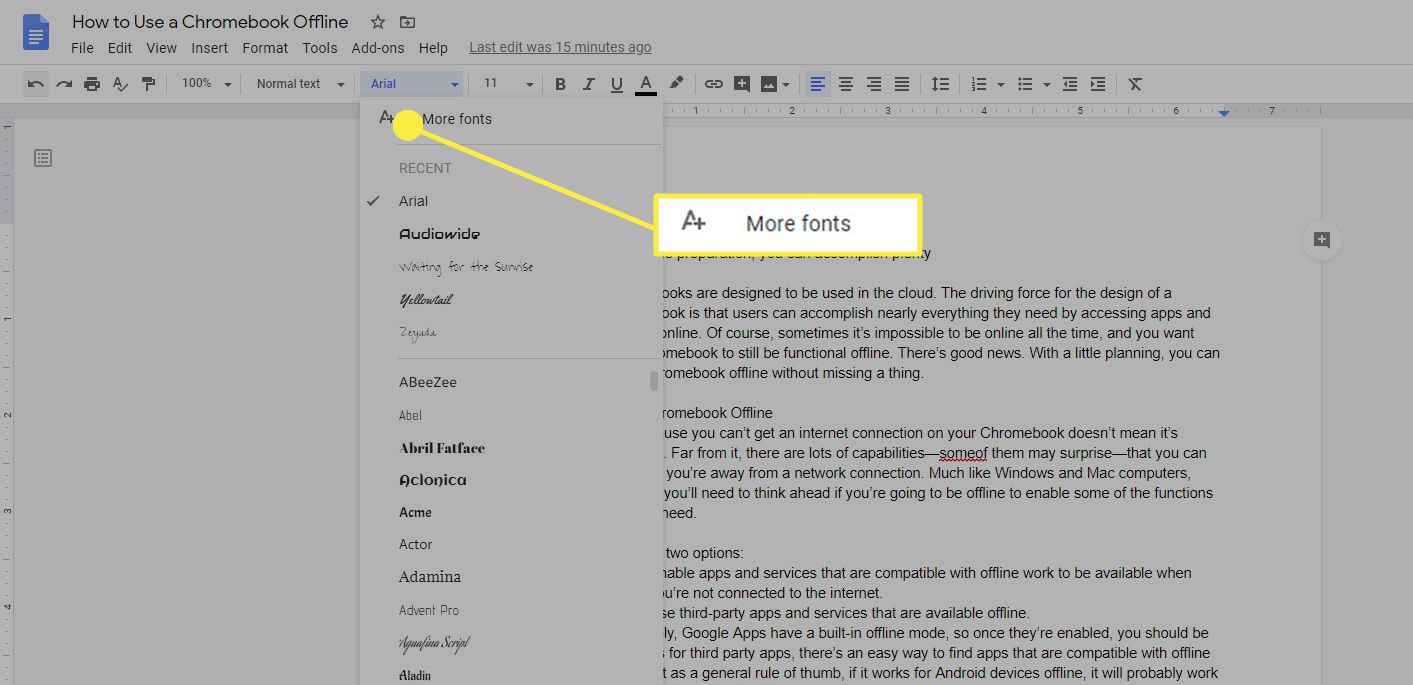
- To access the downloaded fonts offline, go to the “More fonts” option at the bottom of the font selection menu.
- In the “More fonts” window, you will find a section labeled “Offline”. Here, you can see a list of the fonts you have downloaded for offline use.
- Click on the toggle switch next to the font name to enable or disable the font for offline use.
By downloading fonts for offline use, you can have your preferred fonts available at all times, ensuring consistency and convenience when working on your documents, even when an internet connection is not accessible. This feature is particularly useful for working on the go or in areas with limited internet connectivity.
Now that you know how to download fonts for offline use in Google Docs, let’s move on to the next step: how to use the downloaded fonts in your documents.
How to Use the Downloaded Fonts in Google Docs
After downloading fonts for offline use in Google Docs, you can easily access and apply them to your documents. Here’s how you can use the downloaded fonts:
- Open Google Docs and create a new document or open an existing one.
- In the menu bar, click on “Format” and select “Paragraph styles” from the dropdown menu.
- Expand the font selection menu by clicking on the arrow next to the font name.
- Scroll down to the “Offline” section in the “More fonts” window.
- Select the downloaded font that you want to use in your document by clicking on it.
- The selected font will now be available in the font selection menu of Google Docs.
- Apply the downloaded font to your selected text or the entire document by clicking on it.
- You can also change the font size, color, and other formatting options to further customize your text.
- When you share the document with others, they will be able to view the document with the downloaded font, even if they don’t have the font installed on their device.
Using downloaded fonts in Google Docs allows you to add a personal touch to your documents and make them stand out. Whether it’s for professional reports, school assignments, or creative projects, the right font choice can greatly enhance the visual appeal and impact of your work.
Now that you know how to use the downloaded fonts in Google Docs, let’s move on to some troubleshooting tips to help you overcome any issues you may encounter during the process.
Troubleshooting Tips
While using custom fonts in Google Docs can be a seamless experience, you may encounter some challenges along the way. Here are a few troubleshooting tips to help you overcome common issues:
- Font not displaying correctly: If the font you have downloaded is not displaying properly in your document, try refreshing your browser or closing and reopening the document. This can help resolve any temporary display issues.
- Font not available in the font selection menu: Ensure that you have properly downloaded the font and enabled it for offline use. If the font is still not showing up in the font selection menu, try signing out of your Google account and signing back in or clearing your browser cache.
- Document not opening correctly on other devices: If you share a document with downloaded fonts with others, they may not be able to view the document exactly as you intended if they don’t have the font installed on their device. In such cases, consider using standard system fonts or converting the document to PDF to ensure consistent formatting across devices.
- Slow performance: Having too many downloaded fonts for offline use can slow down the performance of Google Docs. To improve performance, disable fonts that you rarely use or no longer need. You can always enable them later when required.
By following these troubleshooting tips, you can overcome common challenges and ensure a smooth experience when using custom fonts in Google Docs. Remember, patience and a willingness to experiment and adapt are key to resolving any font-related issues you may encounter.
Now that you have these troubleshooting tips in your toolkit, you are ready to explore the world of custom fonts in Google Docs with confidence and creativity.
Conclusion
Custom fonts can greatly enhance the visual appeal of your documents in Google Docs, allowing you to make a lasting impression on your readers. In this article, we walked you through the process of accessing the fonts menu, browsing and selecting fonts, downloading fonts for offline use, and using the downloaded fonts in your documents. We also provided troubleshooting tips to help you overcome any challenges you may encounter.
By following the steps outlined in this article, you can unlock a whole new world of creativity and customization in Google Docs. Whether you’re working on professional documents, academic projects, or personal endeavors, the ability to choose from a wide range of fonts can elevate the impact and engagement of your work.
Remember to be mindful of not overusing custom fonts, as they should complement the content and not distract or hinder readability. Additionally, consider the accessibility aspect, ensuring that the font you choose is legible for all readers, including those with visual impairments.
Now it’s time to unleash your creativity, experiment with different fonts, and bring your documents to life in Google Docs. Don’t be afraid to step out of the comfort zone and explore various font styles to find the perfect match for your content.
So go ahead, download fonts, express your unique style, and make your documents shine with personality and professionalism in every word.


