Introduction
Welcome to the world of Diablo 4! The highly anticipated action role-playing game is the latest installment in the beloved Diablo series developed by Blizzard Entertainment. As a fan of the franchise, you’re probably eager to get your hands on the Diablo 4 Beta and experience the thrilling gameplay, stunning visuals, and immersive storyline firsthand.
Downloading the Diablo 4 Beta for PC is a straightforward process, but it’s essential to follow the correct steps to ensure a smooth installation and launch. In this guide, we’ll walk you through the process step by step, from preparing your PC to accessing the official Diablo 4 Beta page and downloading the client.
Before we dive into the details, let’s take a moment to familiarize ourselves with the minimum system requirements for running the Diablo 4 Beta. This way, you can ensure that your PC meets the necessary specifications for a seamless gaming experience.
Now, let’s embark on this adventure together and get ready to delve into the dark and treacherous world of Diablo 4!
System Requirements
Before you download and install the Diablo 4 Beta, it’s crucial to ensure that your PC meets the minimum system requirements. This will ensure smooth gameplay and prevent any performance issues. Here are the minimum specifications for running the Diablo 4 Beta:
- Operating System: Windows 10 or later / macOS 10.13 or later
- Processor: Intel Core i5-3450 or AMD FX 8350
- Memory: 8 GB RAM
- Graphics: NVIDIA GeForce GTX 660 or AMD Radeon HD 7850
- Storage: 30 GB available space
- Internet Connection: Broadband internet connection
Note that these are the minimum requirements and may not provide the best performance. To fully enjoy the Diablo 4 Beta, it’s recommended to have a PC that exceeds the minimum specifications. Additionally, make sure your graphics drivers are up to date to avoid any compatibility issues.
If your PC meets the minimum requirements, you’re ready to proceed with downloading and installing the Diablo 4 Beta. If not, it might be worth considering upgrading your hardware to fully immerse yourself in this epic adventure.
Now that you know the system requirements, let’s move on to the next step – preparing your PC for the Diablo 4 Beta!
Step 1: Preparing Your PC
Before you embark on your journey in the Diablo 4 Beta, it’s essential to ensure that your PC is prepared for the adventure. Here are a few steps you can take to optimize your PC for the best gaming experience:
1. Update your operating system: Make sure your PC is running on the latest version of Windows or macOS. Keeping your operating system updated will ensure compatibility with the Diablo 4 Beta and provide access to the latest features and security patches.
2. Clear up disk space: Check your hard drive’s available space and free up enough storage to accommodate the Diablo 4 Beta installation. It’s recommended to have at least 30 GB of free space to ensure a smooth download and installation process.
3. Close unnecessary applications: To optimize your PC’s performance while playing the Diablo 4 Beta, close any unnecessary applications or processes running in the background. This will free up system resources and ensure a smoother gaming experience.
4. Update graphics drivers: Outdated graphics drivers can cause compatibility issues and impact game performance. Visit the website of your graphics card manufacturer (such as NVIDIA or AMD) and download the latest drivers for your specific graphics card model.
5. Install DirectX: DirectX is a collection of APIs that helps render graphics and handle multimedia tasks in games. Ensure that you have the latest version of DirectX installed on your PC to ensure optimal performance in the Diablo 4 Beta.
6. Check your internet connection: A stable and reliable internet connection is essential for a seamless gaming experience in the Diablo 4 Beta. Make sure you have a broadband connection that can handle the demands of online gameplay.
By following these steps to prepare your PC, you’ll be ready to embark on your adventure in the Diablo 4 Beta. Now that your PC is optimized, let’s move on to the next step – choosing the right platform to access the Diablo 4 Beta!
Step 2: Choosing the Right Platform
When it comes to accessing the Diablo 4 Beta, you have a few different platform options to choose from. Let’s explore the available choices and help you decide which one is the right fit for you:
1. PC (Windows or macOS): The Diablo 4 Beta is available for both Windows and macOS operating systems. If you have a PC or Mac that meets the minimum system requirements, this is a great option. The PC platform offers a wide range of customization options and is the traditional choice for many gamers.
2. Console (PlayStation or Xbox): If you prefer gaming on a console, you’ll be pleased to know that Diablo 4 will also be available on PlayStation and Xbox. This is an excellent option if you prefer playing games on a larger screen and using console-specific controllers for a more immersive experience.
When choosing the right platform, consider factors such as comfort, familiarity, and personal preference. If you’re already a PC gamer, sticking with the PC version might be the best choice. Conversely, if you’re a console gamer and enjoy playing from the comfort of your couch, opting for the PlayStation or Xbox version might be more suitable.
It’s important to note that cross-platform play may or may not be available, depending on the developer’s decision. Before making your final decision, check official sources or announcements from Blizzard Entertainment to confirm whether cross-platform play is supported in the Diablo 4 Beta.
Now that you’ve chosen the platform that best suits your gaming style, it’s time to move on to the next step – visiting the official Diablo 4 website and accessing the Diablo 4 Beta page.
Step 3: Visiting the Official Diablo 4 Website
Before you can download and access the Diablo 4 Beta, you need to visit the official Diablo 4 website. Follow these steps to navigate to the website:
1. Open your web browser: Launch your preferred web browser and ensure you have a stable internet connection.
2. Search for the official Diablo 4 website: Type “Diablo 4 official website” into the search bar of your web browser. The search results will display the official website as one of the top results.
3. Click on the official website link: Look for the link that leads to the official Diablo 4 website and click on it. This will take you directly to the official homepage.
4. Explore the website: Once you’re on the official Diablo 4 website, take some time to explore the available content and gather information about the game. You can find details about the story, gameplay features, character classes, and much more.
5. Locate the Diablo 4 Beta page: Within the official website, search for the specific section dedicated to the Diablo 4 Beta. This page will provide you with all the necessary information and links related to the beta testing phase of the game.
6. Proceed to the Diablo 4 Beta page: Click on the designated link or button that leads to the Diablo 4 Beta page. This is where you’ll find more information about the beta testing process and how to participate.
Visiting the official Diablo 4 website ensures that you have accurate and up-to-date information about the game and its beta testing phase. Now that you’ve accessed the Diablo 4 Beta page, let’s move on to the next step – creating a Battle.net account.
Step 4: Creating a Battle.net Account
To participate in the Diablo 4 Beta, you’ll need to create a Battle.net account. Battle.net is Blizzard Entertainment’s gaming platform that allows players to access their games, interact with friends, and participate in online communities. Follow these steps to create your Battle.net account:
1. Visit the Battle.net website: Open your web browser and search for “Battle.net” or directly enter “www.battle.net” in the address bar.
2. Click on “Create Account”: Locate the “Create Account” button on the Battle.net homepage and click on it. This will take you to the account creation page.
3. Fill in the required information: On the account creation page, you’ll be asked to provide some personal information. This may include your email address, password, date of birth, and country of residence. Fill in the required fields accurately.
4. Agree to the terms of service and privacy policy: Read through the terms of service and privacy policy provided by Blizzard Entertainment. If you agree to the terms, check the box indicating your acceptance.
5. Complete the captcha verification: In order to verify that you’re a real person and not a bot, you may be required to complete a captcha. Follow the instructions and complete the captcha verification process.
6. Verify your email address: After completing the registration process, an email will be sent to the address you provided. Open the email and click on the verification link to confirm your email address.
Once you’ve successfully completed these steps, congratulations! You now have a Battle.net account, which will allow you to access the Diablo 4 Beta and other Blizzard Entertainment games. With your Battle.net account ready, let’s move on to the next step – accessing the Diablo 4 Beta page on Battle.net.
Step 5: Accessing the Diablo 4 Beta Page
Now that you have your Battle.net account created, it’s time to access the Diablo 4 Beta page. Here’s how you can do it:
1. Open your web browser: Launch your preferred web browser and ensure that you are signed in to your Battle.net account.
2. Visit the Battle.net website: Type “www.battle.net” in the address bar of your web browser and press Enter to navigate to the Battle.net homepage.
3. Navigate to the Diablo 4 Beta page: On the Battle.net homepage, look for the “Games” tab or a similar section that lists the available games. Click on it to access the game selection page.
4. Select Diablo 4 Beta: Look for the Diablo 4 Beta option among the list of games on the game selection page. Click on it to proceed to the Diablo 4 Beta page.
5. Access the Diablo 4 Beta page: On the Diablo 4 Beta page, you will find information about the beta testing program, updates, and announcements related to the beta version of the game.
Ensure that you follow any specific instructions mentioned on the Diablo 4 Beta page regarding the beta testing program, including dates and eligibility requirements.
Now that you’ve successfully accessed the Diablo 4 Beta page on Battle.net, let’s move on to the next step – opting in for beta testing and securing your spot in the Diablo 4 Beta!
Step 6: Opting In for Beta Testing
Opting in for beta testing is an important step to secure your spot in the Diablo 4 Beta. Follow these steps to ensure that you’re considered for beta testing:
1. Review the requirements: Before opting in for beta testing, carefully read and understand the requirements outlined on the Diablo 4 Beta page. These requirements may include age restrictions, regional restrictions, or other eligibility criteria.
2. Agree to the terms: Blizzard Entertainment may have specific terms and conditions for beta testing. Make sure to read and understand these terms and click on the checkbox to indicate your agreement.
3. Provide necessary information: On the beta testing page, you may be asked to provide additional information, such as your system specifications and preferences. Fill in these details accurately so that Blizzard has the requisite information for the beta selection process.
4. Submit your request: Once you have reviewed the requirements, agreed to the terms, and provided the necessary information, click on the “Submit” or “Opt-In” button. This will officially submit your request for beta testing.
It’s important to note that opting in for beta testing does not guarantee access to the Diablo 4 Beta. Blizzard Entertainment typically receives a large number of requests, and the selection process is based on various factors, including system compatibility, regional distribution, and random selection.
If you are selected for beta testing, Blizzard Entertainment will notify you through your registered email address or through the Battle.net launcher. Keep an eye on your inbox and ensure that Blizzard Entertainment emails are not being filtered out as spam.
Now that you have opted in for beta testing, it’s time to move on to the next step – downloading the Diablo 4 Beta client!
Step 7: Downloading the Diablo 4 Beta Client
After completing the opt-in process for the Diablo 4 Beta, it’s time to download the beta client. Follow these steps to get started:
1. Check your email: Keep an eye on your registered email address for any notifications from Blizzard Entertainment regarding your selection for beta testing. If you receive an email notifying you of your selection, it will likely contain instructions on how to download the beta client.
2. Visit the official website: If you haven’t received an email notification but still have access to the Diablo 4 Beta, visit the official Diablo 4 website and navigate to the beta testing page. Look for the specific instructions on how to download the beta client.
3. Click on the download link: Once you’ve accessed the appropriate webpage, click on the download link for the Diablo 4 Beta client. This will initiate the download process.
4. Choose the installation location: When prompted, select the location on your PC where you want to install the Diablo 4 Beta client. It’s recommended to choose a location with sufficient disk space and a stable internet connection for a smooth installation process.
5. Wait for the download to complete: The download time will vary depending on your internet connection speed and the size of the beta client. Be patient and wait for the download to finish before proceeding to the next step.
6. Verify the authenticity: Before launching the beta client, ensure that the downloaded file is from an official source. Double-check the file’s name, size, and digital signatures to confirm its authenticity and avoid any potential security risks.
Now that you have successfully downloaded the Diablo 4 Beta client, you’re one step closer to experiencing the dark and thrilling world of Diablo 4! In the next step, we’ll walk you through the installation process to get the beta client up and running on your PC.
Step 8: Installing the Diablo 4 Beta
Now that you have downloaded the Diablo 4 Beta client, it’s time to install it on your PC. Follow these steps to get the beta client up and running:
1. Locate the downloaded file: Navigate to the location on your PC where you saved the downloaded Diablo 4 Beta client file. It is typically in your Downloads folder or the location you specified during the download process.
2. Run the installer: Double-click on the downloaded file to run the installer. This will start the installation process for the Diablo 4 Beta.
3. Follow the on-screen instructions: The installer will guide you through the installation process. Follow the on-screen instructions, including reviewing and agreeing to any terms and conditions presented to you.
4. Choose the installation location: During the installation process, you may be prompted to choose the location where you want to install the Diablo 4 Beta files. Select a location with sufficient disk space and note the path for future reference.
5. Wait for the installation to complete: The installation process may take some time, depending on your PC specifications and the size of the beta client. Be patient and wait for the installation to finish.
6. Launch the Diablo 4 Beta: Once the installation is complete, you’ll usually find a desktop shortcut or a program icon for the Diablo 4 Beta. Double-click on it to launch the game and start your adventure in the dark world of Diablo 4!
It’s important to note that the installation process may vary slightly depending on the specific beta client version and any updates provided by Blizzard Entertainment. Make sure to follow any additional instructions and alerts that may appear during the installation process.
Congratulations! You have now successfully installed the Diablo 4 Beta on your PC. In the next step, we’ll guide you through running the Diablo 4 Beta and diving into the exciting gameplay.
Step 9: Running the Diablo 4 Beta
Now that you have installed the Diablo 4 Beta on your PC, it’s time to run the game and begin your thrilling adventure. Follow these steps to start playing:
1. Launch the Battle.net launcher: Open the Battle.net launcher on your PC. You can usually find it on your desktop or in your list of installed programs. If you don’t have the launcher installed, you can download it from the official Battle.net website.
2. Sign in to your Battle.net account: Enter your Battle.net account credentials to sign in to the launcher. This will give you access to your games and Blizzard Entertainment services.
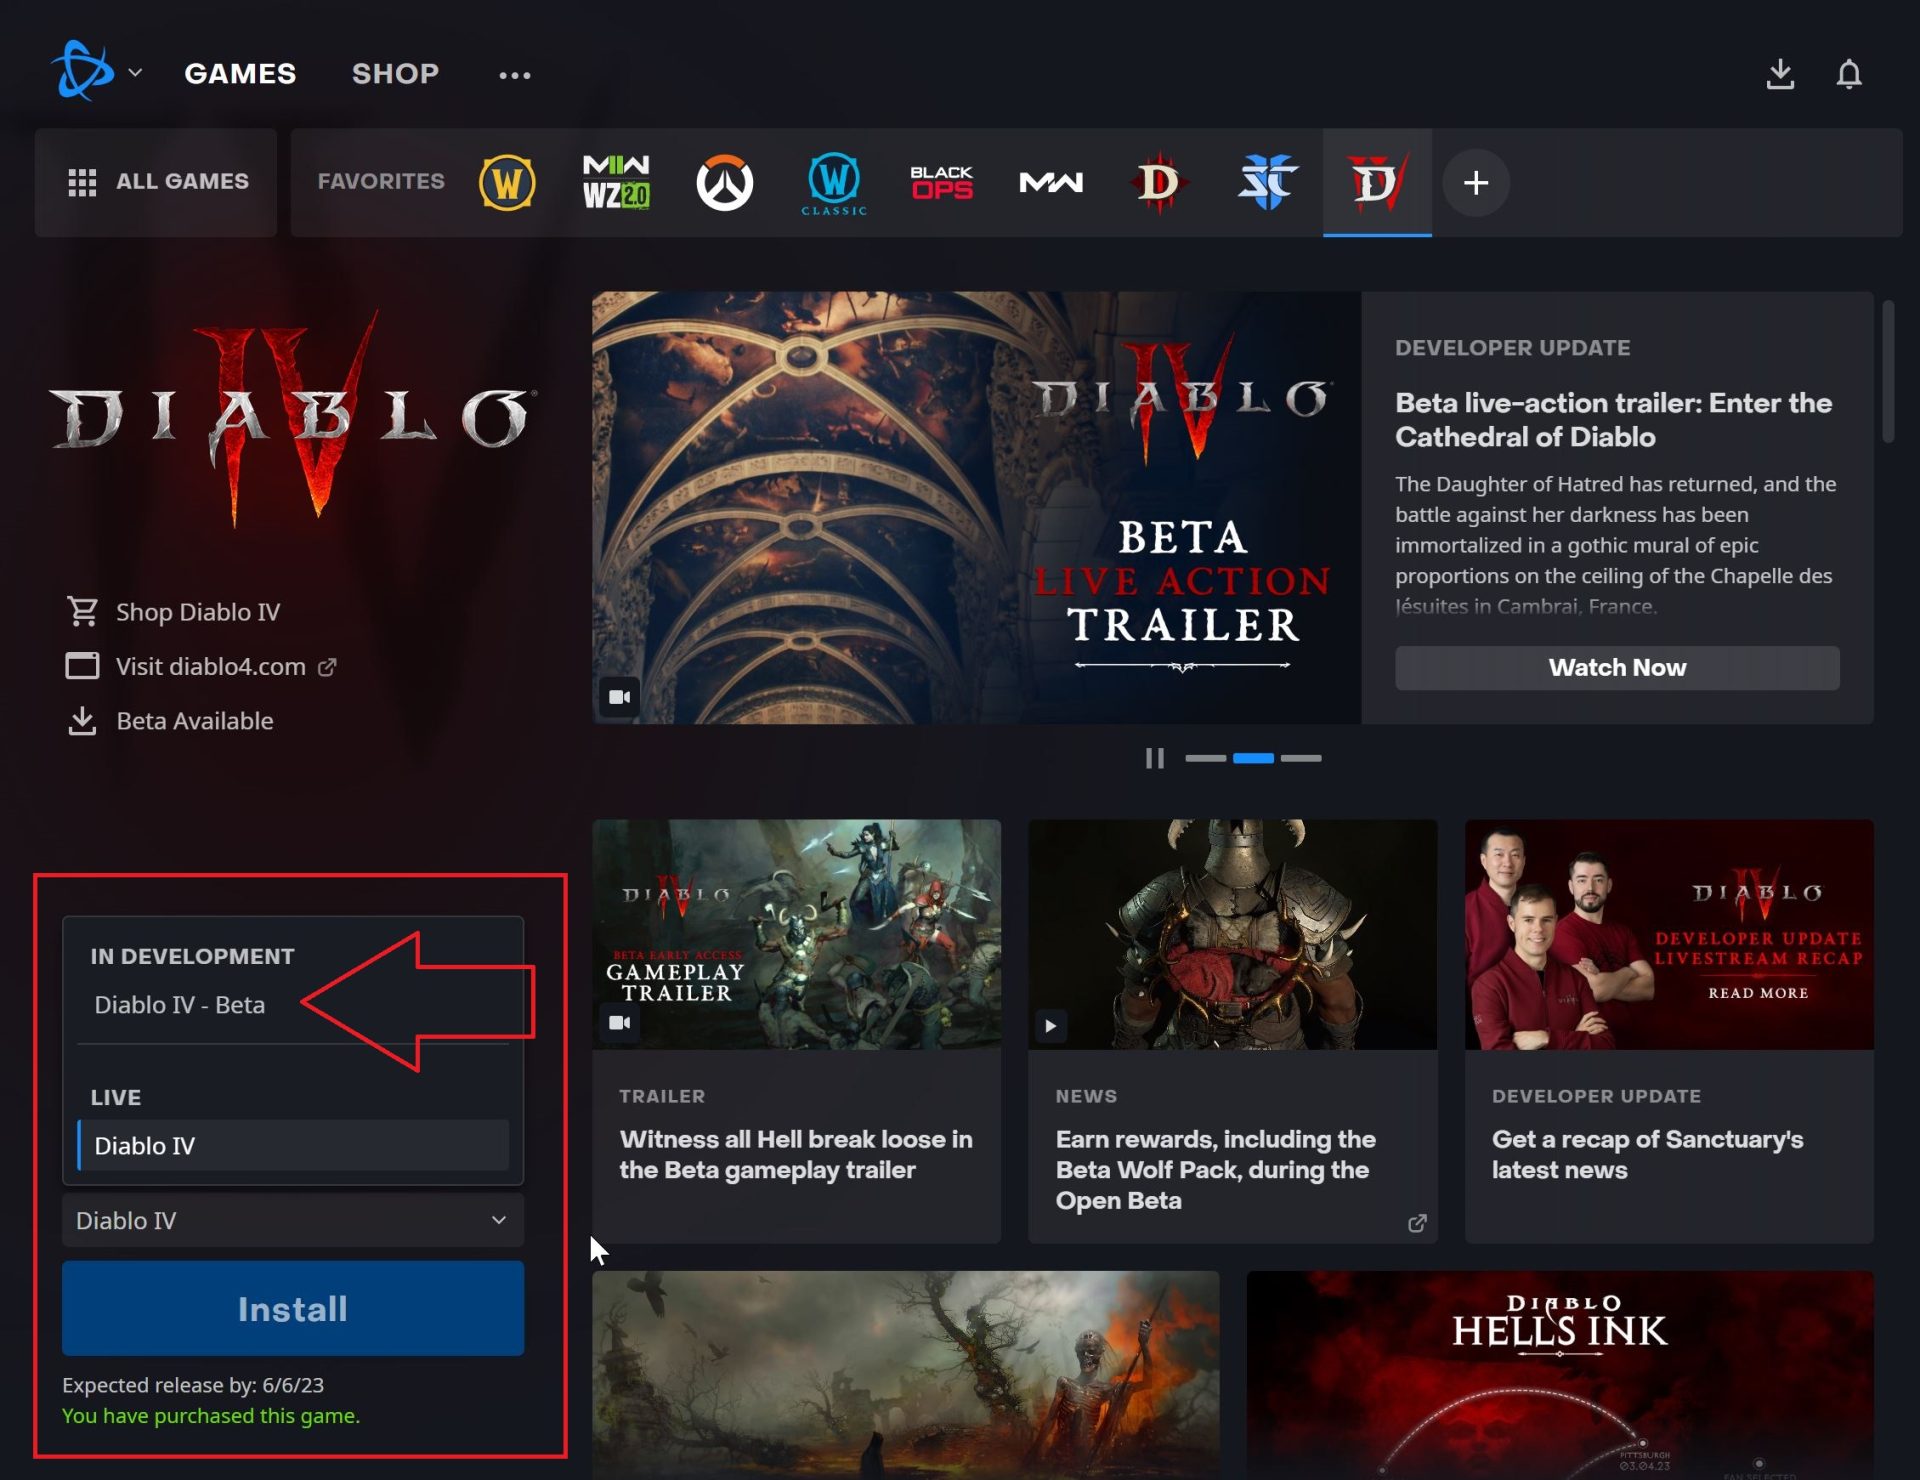
3. Locate the Diablo 4 Beta: Look for the Diablo 4 Beta within the list of available games or in the “Games” tab of the Battle.net launcher. Click on it to select it as the game you want to launch.
4. Click on “Play” or “Install”: Depending on the status of your Diablo 4 Beta installation, you will either see a “Play” button indicating that the game is already installed or an “Install” button if the game needs to be installed. If you need to install the game, follow the prompts to complete the installation process.
5. Run the Diablo 4 Beta: Once the installation is complete or if the game is already installed, click on the “Play” button to launch the Diablo 4 Beta. This will start the game and take you to the character selection screen or the beginning of the game, depending on the beta version.
6. Follow in-game prompts: Pay attention to any in-game prompts or tutorial messages to familiarize yourself with the controls, mechanics, and features of the Diablo 4 Beta. Take your time to explore the world, develop your character, and enjoy the gameplay experience.
Remember, the Diablo 4 Beta is a testing phase, and as a beta participant, your feedback is valuable to the development team. If you encounter any bugs, issues, or have suggestions to improve the game, make sure to provide feedback through the appropriate channels specified by Blizzard Entertainment.
Now that you’re running the Diablo 4 Beta, it’s time to dive into the dark and dangerous world of Sanctuary. Enjoy the game and have an incredible adventure!
Conclusion
Congratulations on successfully downloading, installing, and running the Diablo 4 Beta on your PC! You’re now one step closer to experiencing the thrilling world of Diablo 4 and embarking on epic adventures as you battle against the forces of darkness.
In this guide, we covered the step-by-step process to prepare your PC, choose the right platform, visit the official Diablo 4 website, create a Battle.net account, access the Diablo 4 Beta page, opt-in for beta testing, download the beta client, install the game, and finally, run the Diablo 4 Beta.
By following these steps, you’ve demonstrated your passion for gaming and your dedication to immersing yourself in the Diablo 4 universe. Remember to check your email for potential updates and notifications from Blizzard Entertainment regarding beta testing or future game releases.
Keep in mind that the Diablo 4 Beta is a testing phase, and your participation is highly valued by the development team. Make sure to provide feedback on any issues or bugs you encounter, as your input will help shape the final version of the game. Additionally, explore the game’s features, classes, and mechanics to fully experience everything Diablo 4 has to offer.
We hope that this guide has been helpful in assisting you throughout the process of downloading and installing the Diablo 4 Beta. Enjoy your time exploring the dark and treacherous world of Diablo 4, and may your adventures be filled with excitement and triumph!