Introduction
Have you ever found yourself in a situation where you needed access to maps but didn’t have an internet connection? Whether you’re hiking in remote areas, traveling to foreign countries, or simply facing a spotty network, having the option to download maps offline can be a lifesaver. With Apple Maps, you can easily save maps to your device and access them whenever you need, even without an internet connection.
Apple Maps is a powerful tool that provides detailed maps, directions, and location information. By downloading maps offline, you can navigate with ease and confidence, regardless of the availability of internet connectivity. In this article, we will guide you through the step-by-step process of downloading Apple Maps offline, so you’ll always have access to maps when you need them the most.
Before we dive into the steps, it’s important to note that the offline maps feature is available on devices running iOS 13 or later. If you have an older version of iOS, it’s recommended to update your device to the latest operating system to take advantage of this functionality.
In the following sections, we will walk you through the process of downloading Apple Maps offline, providing clear and concise instructions along the way. So let’s get started and learn how to download Apple Maps offline to ensure you’re always prepared, no matter where your adventures take you!
Step 1: Open the Apple Maps app
The first step to downloading Apple Maps offline is to open the Apple Maps app on your iOS device. Look for the familiar icon that resembles a map with a white arrowhead on a green background. Tap on the icon to launch the app.
Upon opening the app, you will be greeted with a map view showcasing your current location or the last location you searched for. Take a moment to familiarize yourself with the interface, as we will be navigating through it to download the maps.
It’s worth mentioning that if you have previously used Apple Maps and have a saved search or favorite locations, they will be displayed in the form of icons on the map. This can be helpful for quick access to frequently visited areas.
If you haven’t used the Apple Maps app before, don’t worry! It’s user-friendly and easy to navigate. The map will be zoomed in on your current location by default. You can zoom in or out by pinching your fingers together or apart on the screen, or use the familiar gestures to pan and navigate around the map.
If you want to search for a specific location or zoom to a different area, you can do so by using the search bar located at the top of the screen. Simply tap on the search bar, enter the name or address of the location you want to find, and tap “Search” on the keyboard. The map will then navigate to the desired location.
Now that you’ve opened the Apple Maps app and familiarized yourself with the interface, you’re ready to move on to the next step: searching for a location to download for offline use.
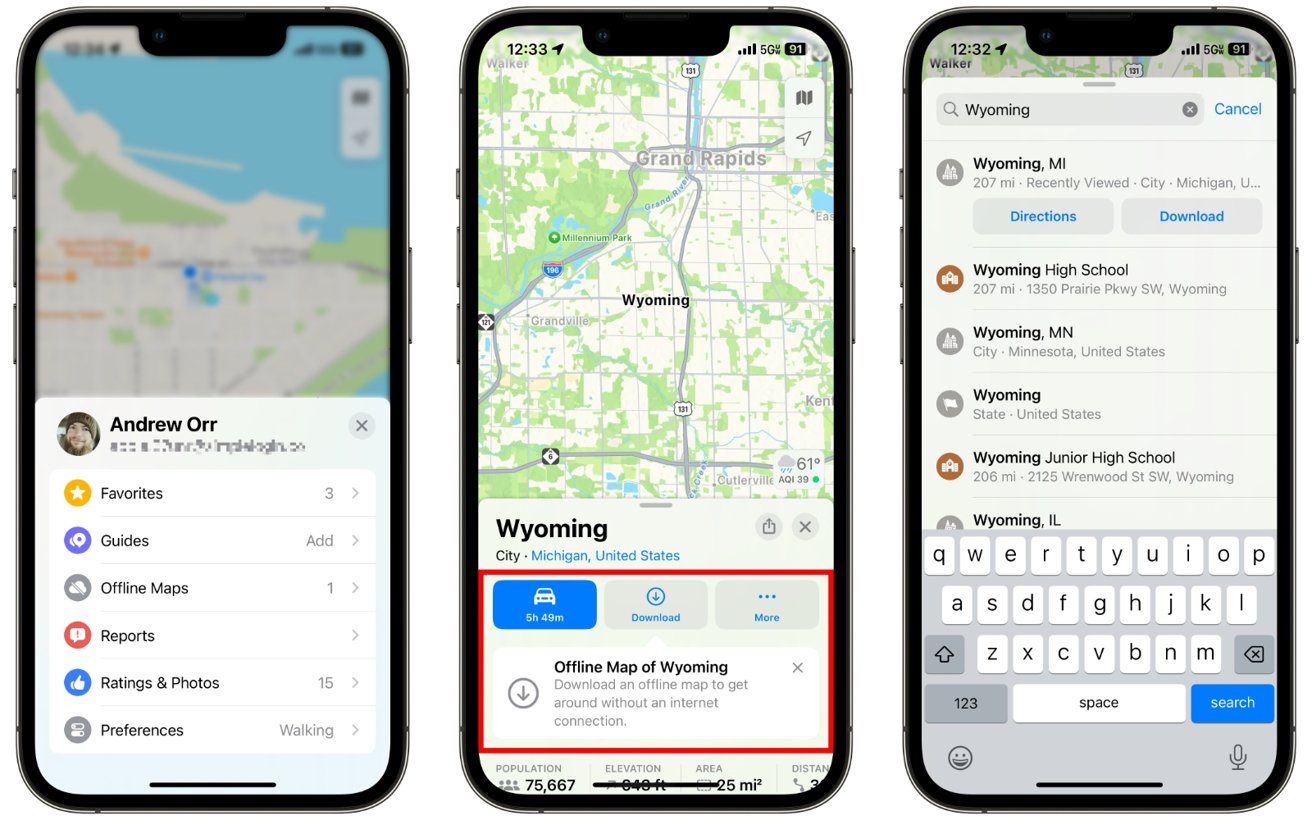
Step 2: Search for the location
Once you have opened the Apple Maps app, the next step is to search for the location you want to download for offline use. Whether it’s a specific destination, a city, or a particular area, Apple Maps makes it easy to find the location you need.
To search for a location, tap on the search bar at the top of the screen. This will activate the keyboard, allowing you to enter the name or address of the location you are looking for.
As you start typing, Apple Maps will automatically suggest locations based on what you’ve entered. The suggestions can be based on recent searches, popular places, or landmarks in the area. This feature can be quite handy if you want to quickly find a well-known location or landmark.
If you see the location you want in the suggestions, simply tap on it to select it. Apple Maps will then show the location on the map, along with additional information such as nearby attractions, ratings, and reviews.
If the location you want to download for offline use is not listed in the suggestions, you can continue typing the full name or address. As you type, Apple Maps will display a list of search results that match your query. You can scroll through the list and tap on the correct location to select it.
Once you have selected the location you want to download, Apple Maps will display it on the map, centered around the chosen location. You can now proceed to the next step to access the details of the location.
Step 3: Select the location
After searching for a location in the Apple Maps app, the next step is to select the specific location you want to download for offline use. This step is essential as it allows you to access all the relevant details and options associated with the chosen location.
Once the search results or suggestions are displayed on the screen, take a moment to review them and identify the correct location. The search results will typically include the name of the location, its address, and sometimes additional information like ratings and reviews.
To select a location, simply tap on the desired result from the list. This will bring up a more detailed view of the location, complete with its position on the map and various options to explore.
When you select a location, Apple Maps will center the map view around it, giving you a better understanding of its surroundings. At this point, you can use gestures such as pinch-to-zoom or two-finger pan to navigate and explore the area in more detail.
Within the detailed view of the location, you will find important information such as the address, contact details, website, and opening hours (if applicable). This information can be invaluable when you are offline and need to access it quickly.
In addition to the basic details, Apple Maps also provides relevant images, ratings, and reviews from other users. This can give you a better idea of the quality and popularity of the location.
Take your time to familiarize yourself with all the available information and options related to the selected location. This will help you make informed decisions and maximize the utility of the downloaded map when you are offline.
Now that you have selected a location and have access to its details, it’s time to move forward and learn how to enable the “Download” feature to save the map for offline use.
Step 4: Access the details of the location
Once you have selected a location in the Apple Maps app, it’s time to access the detailed information and options associated with that location. This step allows you to gather all the necessary details and make informed decisions when downloading the map for offline use.
When you select a specific location, Apple Maps will display a comprehensive view that includes various details and options. At the top of the screen, you will find the name of the location and its address. This information serves as a quick reference when you need to navigate offline.
Beneath the name and address, you will find additional options and features related to the location. These can include contact information, website links, ratings, reviews, and even photos. This wealth of information helps you gauge the quality and relevance of the location.
If you want to explore more options and details about the location, simply scroll down within the detailed view. You may find additional sections such as “Photos” that showcase user-contributed images, “Reviews” that provide insights from past visitors, or “Related Places” that suggest similar locations nearby.
By accessing these details, you can get a better understanding of what the location offers and what to expect when you visit. This information is invaluable when you are offline and need to rely on pre-downloaded maps for guidance and reference.
Additionally, if you need to contact the location or visit their website for more information, the contact information and website options are easily accessible within this view. This allows you to save the information or access it directly when you are offline without the need for an internet connection.
Now that you’ve accessed the details of the location, it’s time to move on to the next step: enabling the “Download” feature to save the map offline.
Step 5: Enable “Download”
Once you have accessed the detailed information and options of a location in the Apple Maps app, the next step is to enable the “Download” feature. Enabling this feature allows you to save the map for offline use, ensuring that you can access it even without an internet connection.
To enable the “Download” feature, locate the “Download” button or option within the detailed view of the location. It is usually represented by an icon that resembles a cloud with an arrow pointing downward.
Tap on the “Download” button to initiate the download process. Apple Maps will prompt you with a confirmation message, notifying you about the size of the download and the amount of storage space it will occupy on your device.
At this point, you may want to ensure that your device has sufficient storage space to accommodate the downloaded map. If necessary, you can free up storage space by deleting unnecessary apps, photos, or files.
Once you have confirmed that you have enough storage space, proceed with the download by tapping on the confirmation button. Apple Maps will then start downloading the map for offline use.
The time it takes to download the map will depend on the size of the area you selected and the speed of your internet connection. It is recommended to be on a stable and reliable Wi-Fi network to ensure a smooth and uninterrupted download process.
During the download, you can monitor the progress by checking the status bar or spinner displayed on the screen. Once the download is complete, you will receive a notification confirming that the map is now available offline.
Enabling the “Download” feature effectively saves the selected location and its surrounding area as a downloadable map on your device. This ensures that you can access the map and all its details even when you are offline or in areas with limited or no internet connectivity.
Now that you have enabled the “Download” feature and successfully saved the map for offline use, you can proceed to the next step to select the specific area you want to download.
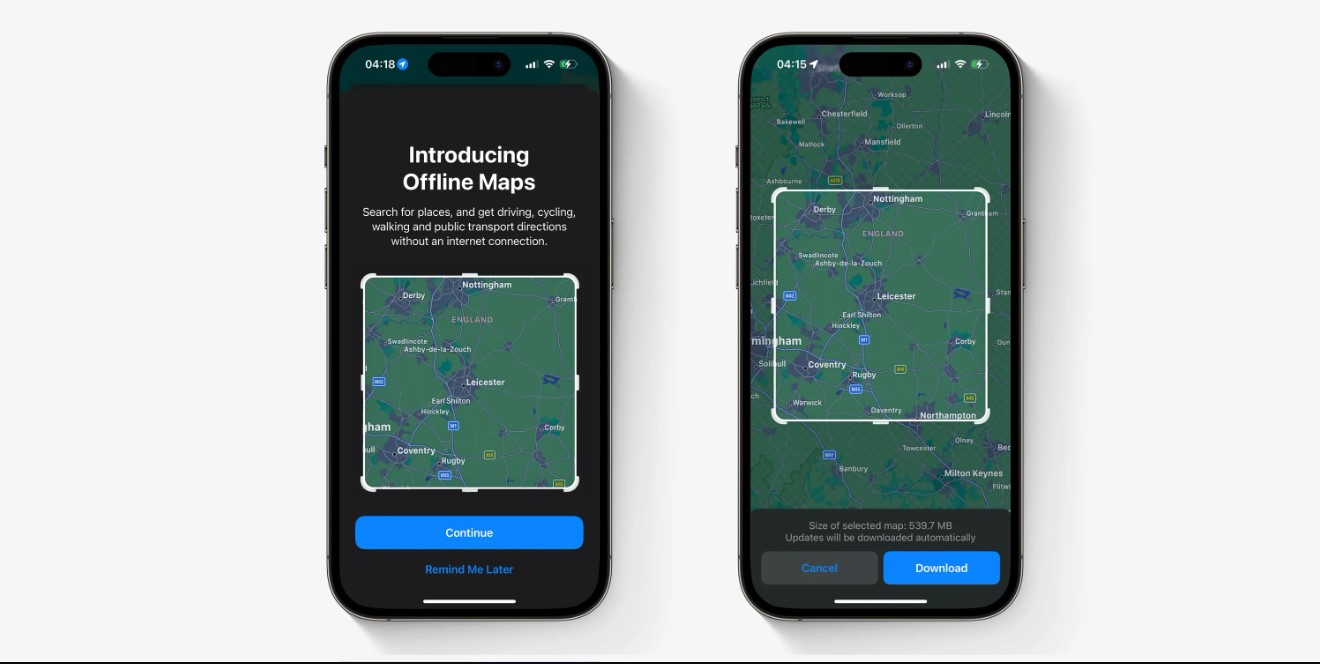
Step 6: Select the area to download
After enabling the “Download” feature for a location in the Apple Maps app, the next step is to select the specific area that you want to download for offline use. This allows you to choose the extent of the map coverage based on your needs and available storage space.
To select the area to download, tap on the “Download” button or option again within the detailed view of the location. This will bring up a map view with a square overlay that you can adjust to define the area of the map you want to download.
Using gestures such as pinch-to-zoom and two-finger pan, you can adjust the size and position of the square overlay to cover the desired area. The map within the square overlay represents the portion that will be downloaded to your device for offline access.
It’s important to strike a balance between the coverage area and the available storage space on your device. A larger area will require more storage, so consider your storage limitations and the importance of having a wider coverage when making your selection.
As you adjust the size and position of the square overlay, Apple Maps will dynamically update the size of the download and the available storage space required. This helps you make an informed decision and avoid exceeding your device’s storage capacity.
Once you are satisfied with the area selected, tap on the “Download” button or option to initiate the download process. Apple Maps will begin downloading the map data for the chosen area and store it on your device for offline use.
Depending on the size of the selected area and the speed of your internet connection, the download may take several minutes or longer to complete. During this time, you can monitor the progress through a status bar or spinner displayed on the screen.
Once the download is finished, you will receive a notification confirming the successful completion of the download. The selected area is now available offline, and you can access it at any time, even without an internet connection.
Now that you have selected the area to download, you can proceed to the next step to confirm the download and finalize the process of accessing downloaded maps offline.
Step 7: Confirm the download
After selecting the area to download in the Apple Maps app, the next step is to confirm the download. This final step ensures that the chosen map area is securely saved to your device, allowing you to access it offline whenever needed.
To confirm the download, you will be prompted with a confirmation screen displaying the details of the selected area and the amount of storage space it will occupy on your device. Review this information carefully to ensure that you have enough available storage for the downloaded map.
If you are satisfied with the selected area and have sufficient storage space, proceed by tapping on the confirmation button to finalize the download. The Apple Maps app will start the process of saving the map data to your device for offline use.
During the confirmation and saving process, it’s important to maintain a stable internet connection. The download may take some time depending on the size of the selected area and the speed of your internet connection.
You can monitor the progress of the download through a status bar or spinner displayed on the screen. This gives you an indication of how much of the map data has been downloaded and how much is remaining.
Once the download is complete, you will receive a notification confirming the successful download of the map area. At this point, the selected area is now accessible offline, even when you don’t have an internet connection available.
Confirming the download of the selected map area ensures that you have a reliable and up-to-date map available whenever you need it, regardless of your internet connectivity. This can be especially useful when traveling to areas with limited or no network coverage.
Now that you have confirmed the download, you are ready to access the downloaded maps offline. This is the final step in ensuring that you have access to maps whenever and wherever you need them, without relying on an internet connection.
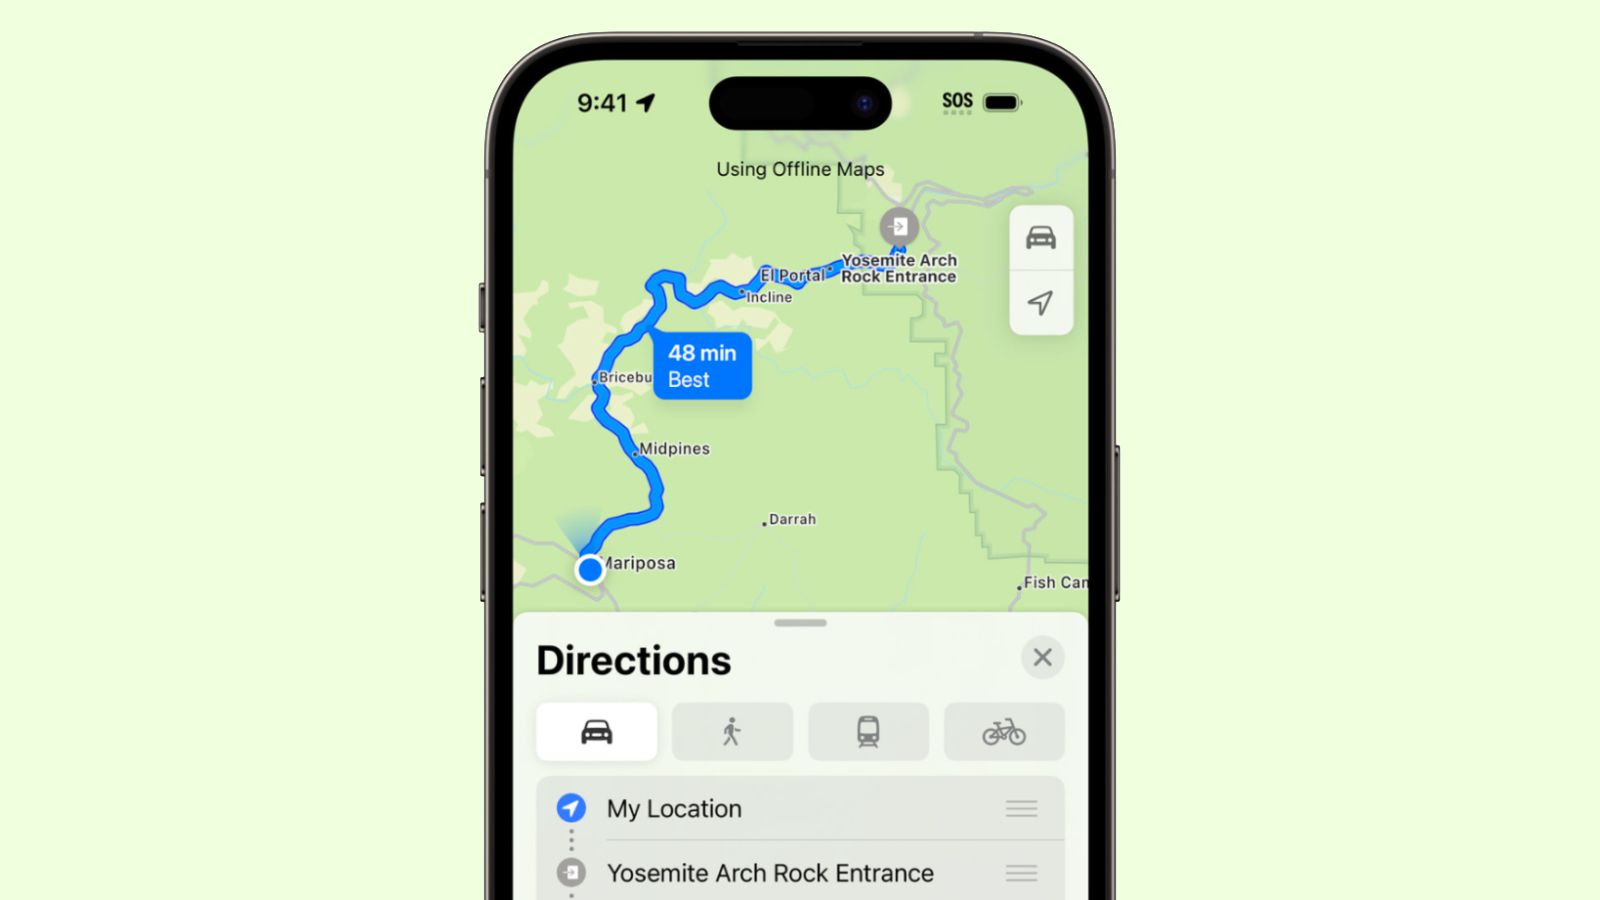
Step 8: Access downloaded maps offline
After successfully downloading maps for offline use in the Apple Maps app, the final step is to access these downloaded maps when you are offline. This ensures that you can still navigate and explore the chosen areas even without an internet connection.
To access downloaded maps offline, open the Apple Maps app on your device. Since you have already downloaded the maps, you can use the app without an internet connection.
Once you open the app, you will be able to see the downloaded maps, which are indicated by a grayed-out icon or a shaded overlay. These are the areas that you have specifically selected and saved for offline use.
Simply tap on any of the downloaded map areas to view them in detail. You will be able to see roads, landmarks, and any other information that was included in the original map download. It’s important to note that the level of detail may vary depending on the size and complexity of the downloaded area.
Navigate through the downloaded map by using familiar gestures such as pinch-to-zoom and two-finger pan. You can explore the map, find your current location, search for specific points of interest, or plan routes offline.
Since the downloaded maps are stored directly on your device, you won’t need an internet connection to access or interact with them. This makes it particularly useful when you are in remote locations or areas with limited network coverage.
Keep in mind that while you can view and navigate the downloaded maps offline, certain features like real-time traffic updates and online search may not be available without internet connectivity. However, the basic map data and your selected areas will still be accessible.
With the ability to access downloaded maps offline, you can confidently explore your chosen areas, stay oriented, and find your way even in situations where an internet connection is unreliable or unavailable.
Congratulations! You have successfully completed the process of accessing downloaded maps offline in the Apple Maps app. Now you can enjoy the convenience and peace of mind that comes with having offline access to maps whenever and wherever you need them.
Conclusion
Having the ability to download Apple Maps for offline use can be incredibly useful in various situations. Whether you’re traveling to remote areas, facing limited or no network coverage, or simply looking for a more reliable way to navigate, downloading maps offline ensures that you can access them even without an internet connection.
In this article, we walked through the step-by-step process of downloading Apple Maps offline. We began by opening the Apple Maps app and searching for a specific location. Then, we selected the desired location and accessed its detailed information. From there, we enabled the “Download” feature and chose the specific area we wanted to download.
After confirming the download, we learned how to access the downloaded maps offline. We discussed the importance of maintaining a stable internet connection throughout the process and noted that certain features like real-time traffic updates may not be available without internet connectivity.
By following these steps, you can ensure that you always have access to maps, regardless of your location or network availability. Downloading Apple Maps offline provides peace of mind and empowers you to navigate with confidence in unfamiliar areas.
Remember to regularly update your offline maps to ensure that you have the most accurate and up-to-date information. It’s also important to be mindful of your device’s available storage capacity and manage it accordingly to accommodate the downloaded maps.
So the next time you find yourself in a situation where you need access to maps without an internet connection, don’t worry. With Apple Maps offline, you can navigate and explore with ease, wherever your adventures take you.