Introduction
Google Drive is a popular cloud storage service that allows you to store and access your files from anywhere. It provides a convenient way to store documents, photos, videos, and other files online, eliminating the need for physical storage devices. While Google Drive offers features to share and collaborate on files, there may be instances where you need to download all the files in your Google Drive account.
Downloading all the files from Google Drive can be particularly useful when you want to create a local backup, migrate to a different cloud storage service, or simply want to have offline access to your files. In this article, we will guide you through the process of downloading all the files in your Google Drive account, ensuring that you have a local copy of your important data.
Whether you have a small collection of files or a vast library, the process of downloading them all can seem daunting. However, with the right steps and a little patience, you’ll be able to download your files efficiently and effortlessly. We will walk you through each step, from accessing Google Drive to organizing and renaming the downloaded files.
Note that this guide focuses on downloading files from your individual Google Drive account. If you are a Google Workspace user and want to download files from a shared drive, the process may vary. Now, let’s dive into the steps and get you started on downloading all your files from Google Drive.
Step 1: Accessing Google Drive
To begin the process of downloading all your files from Google Drive, you first need to access your Google Drive account. Follow these simple steps to get started:
- Open a web browser on your computer or a mobile device.
- Go to the Google Drive website by typing “drive.google.com” in the address bar.
- If you are not already signed in to your Google account, enter your credentials and sign in.
- Once you are signed in, you will be taken to the Google Drive home page.
From this point, you have successfully accessed your Google Drive account and are ready to proceed to the next step of selecting the files you want to download. Remember to use a web browser that supports Google Drive and has a stable internet connection for optimal performance.
If you prefer to access Google Drive from a mobile device, you can download and install the Google Drive app from the App Store or Google Play Store. Once installed, open the app and sign in using your Google account credentials. The app provides a user-friendly interface that allows you to easily navigate and manage your files on the go.
Now that you have accessed your Google Drive account, let’s move on to the next step of selecting the files you want to download.
Step 2: Selecting the Files
After accessing your Google Drive account, the next step is to select the files you want to download. Here’s how you can do it:
- Navigate to the folder or location where the files you want to download are stored. You can do this by clicking on the folders displayed on the left-hand side of the Google Drive interface.
- If you want to download all the files in your entire Google Drive account, you can skip this step. However, if you only want to download specific files or folders, navigate to the desired location and open the folder containing those files.
- To select multiple files or folders at once, hold down the “Ctrl” key (Windows) or “Command” key (Mac) while clicking on each file or folder. Alternatively, you can click on the first file or folder, hold down the “Shift” key, and then click on the last file or folder to select a range of items.
- If you want to select all the files and folders in the current location, you can use the shortcut “Ctrl+A” (Windows) or “Command+A” (Mac) to select everything.
Once you have selected the files or folders you want to download, they will be highlighted in blue. Double-check to make sure you have selected the correct items before proceeding to the next step.
Note that if you are downloading a large number of files or folders, it may be more efficient to organize them into a single folder before initiating the download. This will help keep your downloads organized and make it easier to manage the downloaded files later on.
Now that you have selected the files you want to download, let’s move on to the next step of actually downloading them to your computer or device.
Step 3: Downloading the Files
Once you have selected the files or folders you want to download from Google Drive, it’s time to initiate the download process. Follow these steps to download the selected files to your computer or device:
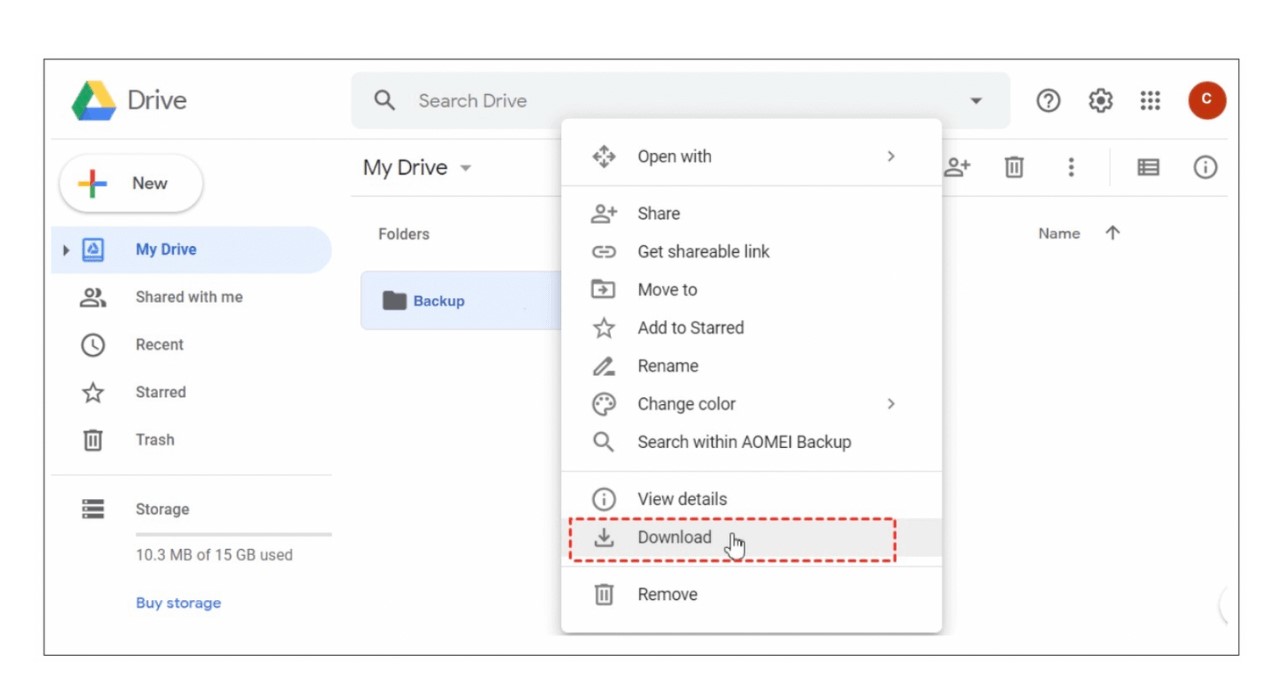
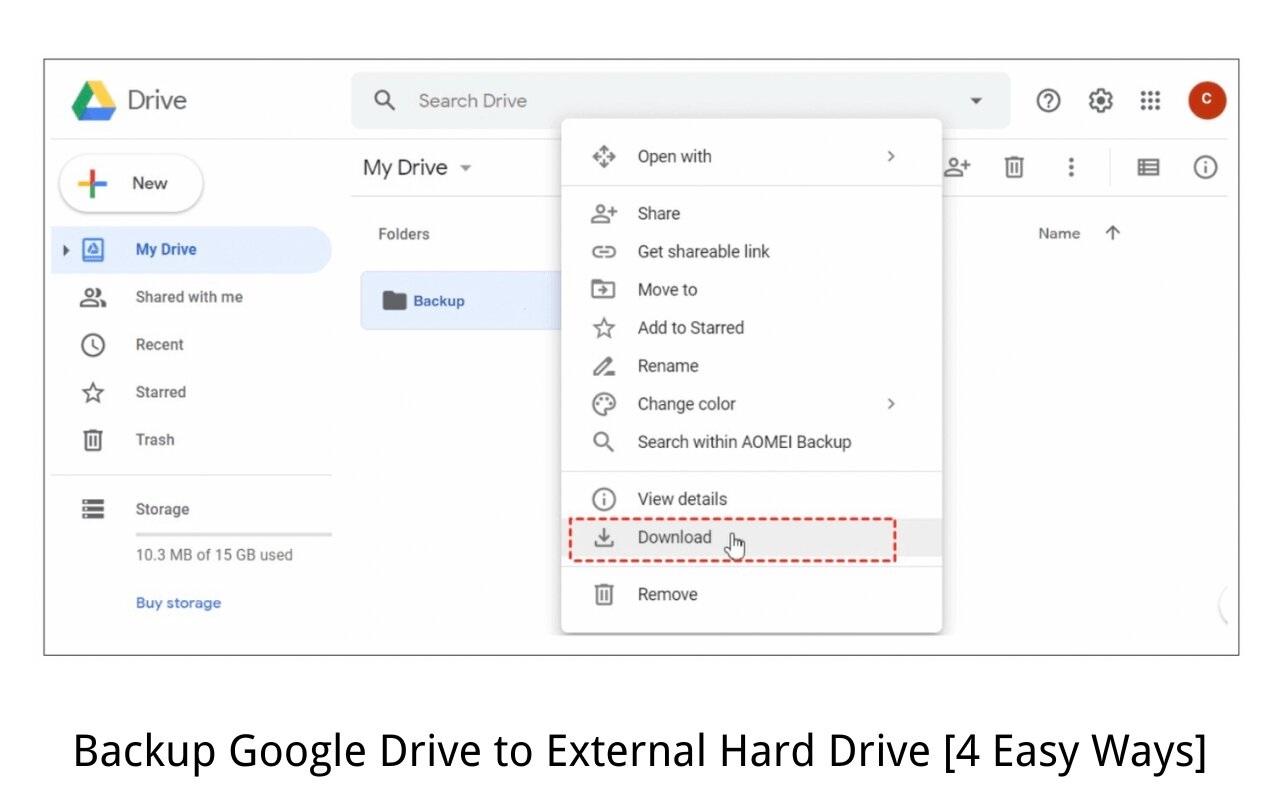
- Right-click on one of the selected files or folders to open the context menu.
- In the context menu, click on the “Download” option. Alternatively, you can also click on the download icon located at the top of the Google Drive interface.
- A pop-up window will appear, confirming that Google Drive is preparing the selected files for download. Depending on the size and number of files, this may take some time.
- Once the preparation is complete, a download prompt will appear. Choose a location on your computer or device where you want to save the downloaded files.
- Click on the “Save” or “Download” button to initiate the download. Google Drive will start downloading the selected files to the chosen location.
The download speed and time may vary depending on the size of the files and your internet connection speed. It is recommended to have a stable and reliable internet connection to ensure a smooth downloading process.
If you are downloading a large number of files or folders, Google Drive will automatically create a ZIP file containing all the selected items. This helps streamline the download process by reducing the number of individual download requests.
Once the download is complete, you can access the downloaded files from the location you specified. It is important to note that if you are downloading a large amount of data, make sure you have sufficient storage space available on your computer or device to accommodate the files.
Now that you have successfully downloaded the files, let’s move on to the next step of choosing a download location for your files.
Step 4: Choosing a Download Location
After initiating the download process for the selected files from Google Drive, you have the option to choose a specific location on your computer or device where you want the files to be saved. Here’s how you can choose a download location:
- When the download prompt appears after initiating the download, click on the “Save” or “Download” button.
- A file explorer or save dialog box will open, allowing you to browse your computer or device’s file system.
- Navigate to the desired folder or directory where you want the downloaded files to be saved.
- Click on the “Save” or “OK” button to confirm the download location and start the download process.
It is important to choose a download location that has sufficient free space to accommodate the downloaded files. If the selected location does not have enough storage space, the download process may fail or be incomplete.
By default, the downloaded files will be saved in the specified download location, preserving their original file names and file formats. However, if you prefer to organize or rename the downloaded files, you can do so in the next step of organizing and renaming the files.
Now that you have chosen a download location for your files, let’s move on to the next step of monitoring the download progress to ensure the successful completion of the downloads.
Step 5: Monitoring the Download Progress
After initiating the download of your selected files from Google Drive and choosing a download location, it is essential to monitor the download progress to ensure a successful and complete download. Here’s how you can easily monitor the download progress:
- Depending on the web browser you are using, you may see a downloads bar or a downloads window pop up. This will show you the progress of the downloads, including the number of files downloaded and the remaining files to be downloaded.
- Alternatively, you can access the downloads page or downloads history in your web browser by clicking on the menu button (usually represented by three horizontal lines or dots) and selecting “Downloads.”
- On the downloads page or window, you will notice the list of current and recently completed downloads. The progress of each download will be displayed, indicating the amount of data downloaded and the estimated time remaining.
- Keep an eye on the download progress and ensure that it is proceeding smoothly. If you notice any issues or errors, such as interrupted downloads or slow speeds, you may need to troubleshoot your internet connection or the download settings.
- Once the download progress reaches 100% for all the selected files, the downloads are complete. You can then proceed to the next step of organizing and renaming the downloaded files.
Monitoring the download progress allows you to track the status of your downloads and ensure that they are being downloaded without any interruptions. It provides valuable information on the remaining time and helps you estimate when the downloads will be completed.
If you encounter any issues or errors during the download process, such as a failed download or an incomplete file, you can try restarting the download or checking your internet connection. It is also important to ensure that you have enough storage space on your computer or device for the downloaded files.
Now that you have successfully monitored the download progress, let’s move on to the next step of organizing and renaming the downloaded files for better file management.
Step 6: Organizing and Renaming Downloaded Files
Once the downloading process is complete and you have all the selected files from Google Drive saved to your computer or device, it is a good practice to organize and rename the files for better file management. Follow these steps to organize and rename your downloaded files:
- Create a new folder on your computer or device to store all the downloaded files. This will help keep them organized and easily accessible.
- Open the folder where you downloaded the files and carefully review the content. Make sure all the files you intended to download are present.
- If desired, you can further organize the files within the folder by creating subfolders based on file types, dates, or any other criteria that suits your needs.
- For better file identification, consider renaming the files with descriptive names. This can be particularly helpful when dealing with files that have generic or auto-generated names.
- To rename a file, right-click on it, select “Rename,” and enter the new desired name. Alternatively, you can select the file and press the “F2” key on your keyboard to initiate the renaming process.
- Repeat the renaming process for each file to ensure a clear and organized file naming system.
Organizing and renaming your downloaded files will make it easier to locate and access them in the future. It enables you to quickly identify the contents of each file without having to open them individually. This is particularly beneficial when dealing with a large number of files or when you need to find specific information quickly.
Consider adding additional file metadata or tags to further enhance file organization and searchability. Most operating systems provide options to add tags or labels to files, allowing you to categorize them based on specific attributes or characteristics.
By taking the time to organize and rename your downloaded files, you can maintain a neat and logical file structure, improve your overall file management, and enhance productivity.
Now that you have successfully organized and renamed your downloaded files, you have completed the process of downloading and managing your files from Google Drive! Congratulations!
Conclusion
Downloading all your files from Google Drive can be a straightforward and essential process to ensure you have a local backup or offline access to your data. By following the steps outlined in this guide, you can easily download, organize, and manage your files from Google Drive.
We started by accessing Google Drive and navigating to the files or folders you wish to download. Then, we selected the files and initiated the download process. Next, we chose a download location and monitored the download progress to ensure a successful completion. Finally, we learned how to organize and rename the downloaded files for better file management.
Remember to have a stable internet connection and sufficient storage space on your computer or device during the download process. Additionally, consider organizing and renaming the files to maintain a well-structured file system for easy access in the future.
Downloading files from Google Drive provides the convenience of having a local copy of your important data, whether for backup purposes, migration to another storage service, or offline accessibility. With this guide, you have the knowledge and tools to download all your files from Google Drive efficiently and securely.
We hope this guide has been helpful in assisting you with downloading your files from Google Drive. If you have any further questions or need additional assistance, feel free to consult the official Google Drive documentation or reach out to their support team. Happy downloading!