Introduction
Welcome to the world of Apple Maps, where you can explore the world and navigate through various locations with ease. Whether you’re planning a trip or simply want to have access to maps offline, Apple Maps has got you covered. In this article, we will guide you through the steps on how to download a map on Apple Maps, allowing you to access it offline anytime, anywhere.
Apple Maps is a powerful navigation tool that comes pre-installed on Apple devices, such as iPhone, iPad, and Mac. It offers detailed maps, real-time traffic updates, and integration with Siri for voice navigation. One of the standout features of Apple Maps is the ability to download maps for offline use. This means that even if you don’t have access to the internet, you can still view and navigate through the downloaded maps.
Downloading maps on Apple Maps is not only convenient but also beneficial when you’re traveling to areas with limited or no internet connectivity. It allows you to save mobile data and ensures that you always have access to accurate directions. So, whether you’re exploring a new city or heading to a remote location, having offline maps at your fingertips can be a lifesaver.
In order to download a map on Apple Maps, you’ll need to follow a few simple steps. Don’t worry, it’s a straightforward process that anyone can do. So, grab your Apple device and let’s get started on downloading maps on Apple Maps!
Step 1: Open Apple Maps
To begin the process of downloading a map on Apple Maps, you first need to open the application on your Apple device. Look for the familiar map icon, which features a stylized map with a location pin. Tap on it to launch Apple Maps.
Apple Maps can be found on the home screen or in the app drawer, depending on how you have organized your device. If you’re unsure where it is located, you can use the search function on your device to quickly locate and open the app.
Once you’ve found the Apple Maps icon, tap on it to open the application. You will be greeted with a stunning map interface, ready to guide you to your desired location. Take a moment to familiarize yourself with the various features and options available within Apple Maps.
Apple Maps provides a range of useful tools, such as search functionality, directions, and the ability to view different map types (such as standard, satellite, and hybrid). These features will come in handy as you navigate through the process of downloading a map and exploring new locations.
Now that you have successfully opened Apple Maps, it’s time to move on to the next step: searching for the desired location.
Step 2: Search for the Desired Location
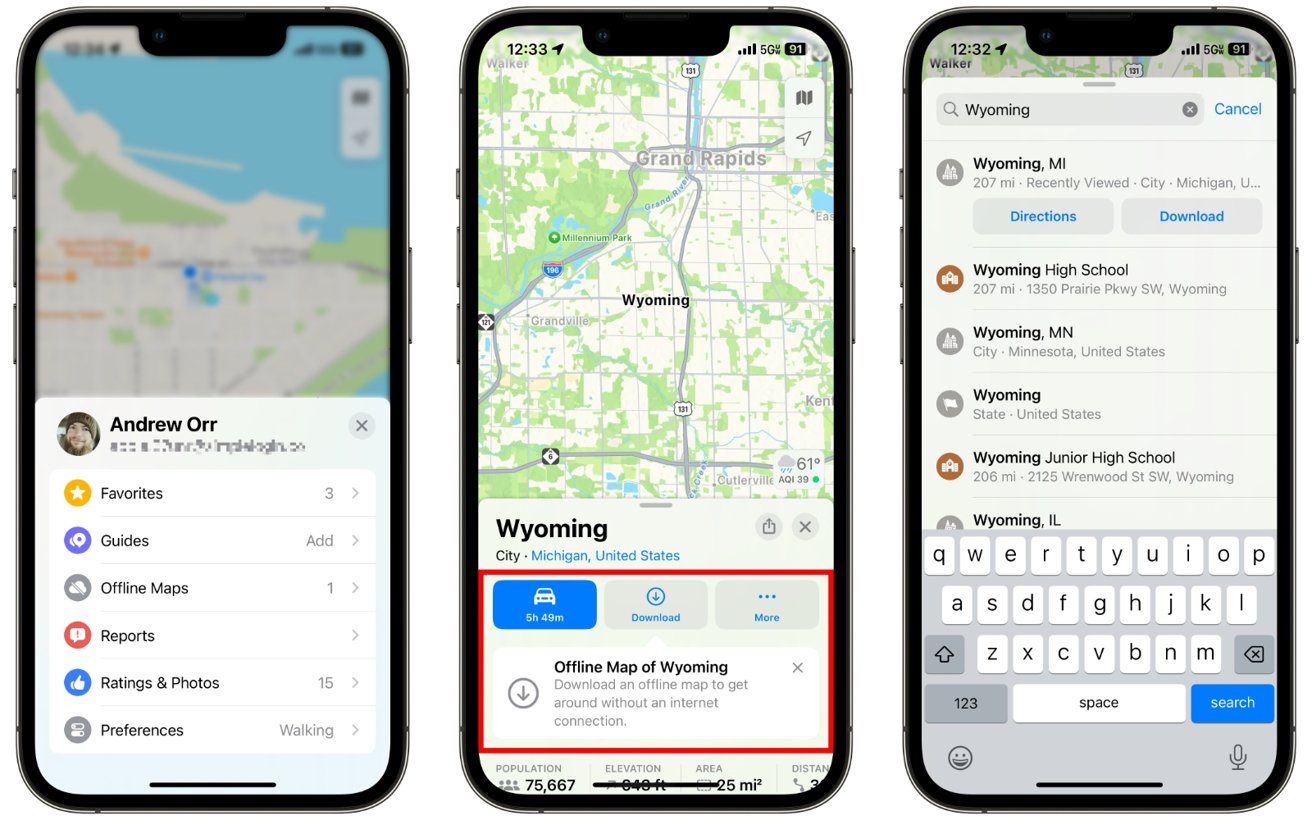
Once you have opened Apple Maps, the next step is to search for the desired location that you want to download on the map. Apple Maps makes it easy to search for specific addresses, landmarks, or even businesses.
To search for a location, you can simply tap on the search bar located at the top of the screen. This will activate the keyboard, allowing you to enter the name or address of the location you wish to find. As you start typing, Apple Maps will provide suggestions and auto-complete options to help you find the right location quickly.
If you’re unsure of the exact name or address, you can also use broader terms such as the name of a city or a general landmark. Apple Maps will display relevant results based on your search query. Once you see the location you’re looking for in the search results, tap on it to view the details.
Upon selecting a specific location, Apple Maps will zoom in on the map to show you the exact spot. You will also see additional details about the location, such as its address, contact information, and ratings if it’s a business or point of interest.
Take your time to review the information and make sure it is indeed the location you want to download on the map. If it’s the correct location, proceed to the next step. However, if you need to search for a different location, simply go back to the search bar and repeat the process.
Now that you have successfully searched for the desired location, it’s time to move on to the next step: zooming in to the desired area on the map.
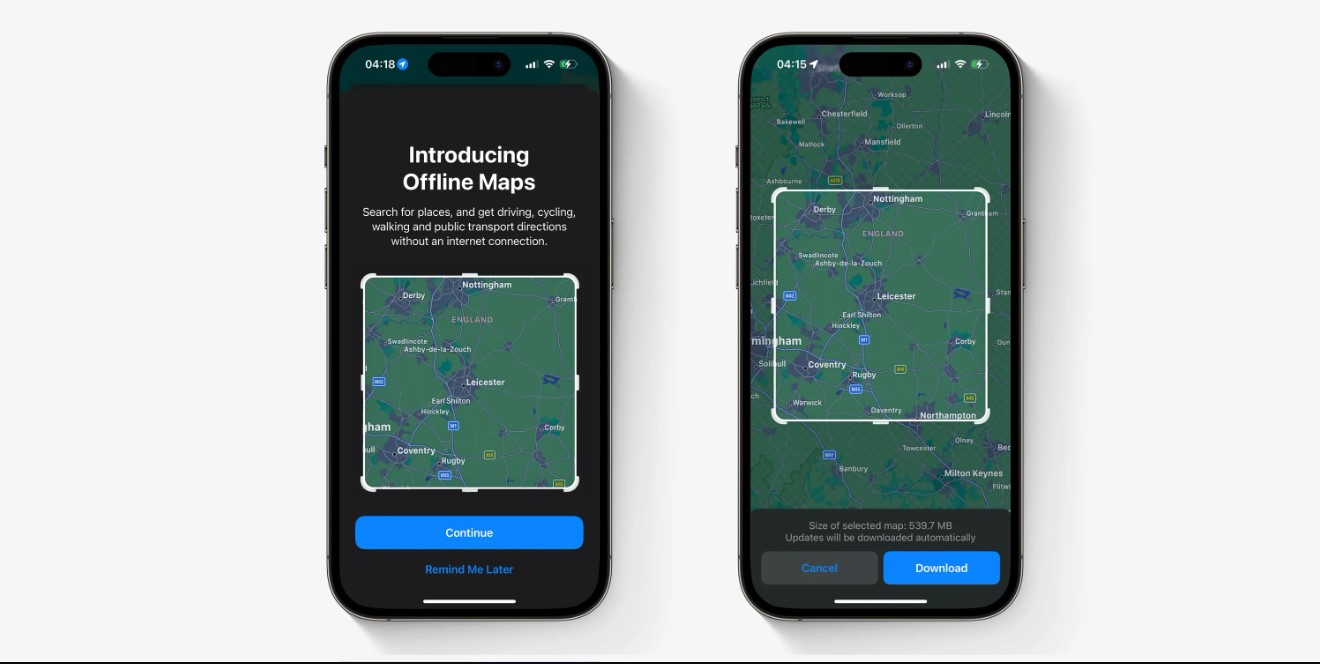
Step 3: Zoom in to the Desired Area
After searching for the desired location on Apple Maps, the next step is to zoom in to the specific area that you want to download on the map. This allows you to have a more detailed view of the location and ensure that you capture the exact area you need.
To zoom in on Apple Maps, you can use two common gestures: pinch-to-zoom or double-tap. Pinch-to-zoom involves placing two fingers (usually the thumb and index finger) on the screen and then spreading them apart. This gesture will zoom in, making the map objects appear larger and more detailed.
Alternatively, you can also double-tap on the screen to zoom in quickly. Double-tapping will automatically zoom in on the area where you tapped, centering the map on that location. This gesture is especially useful if you want to focus on a specific point or landmark within the desired area.
Continue zooming in until you have reached the desired level of detail for the area you want to download. Remember to keep the desired area within the boundaries of the screen, as you won’t be able to download a map that extends beyond the visible area on the map screen.
As you zoom in, Apple Maps will provide more detailed information such as street names, landmarks, and points of interest. This will help you ensure that you have selected the correct area for your map download.
Once you are satisfied with the zoom level and the area you have selected, it’s time to move on to the next step: tapping on the location info card to access further options.
Step 4: Tap on the Location Info Card
After zooming in to the desired area on Apple Maps, the next step is to tap on the location info card for the specific location you want to download. The location info card contains detailed information about the selected location, as well as additional options and actions you can take.
To access the location info card, simply tap on the pin or icon that represents the location on the map. This will bring up a card at the bottom of the screen, showcasing the name of the location, its address, and other relevant details.
The location info card also provides various options to interact with the selected location. For example, you may see buttons or icons for getting directions, saving the location to your favorites, or sharing it with others. These additional actions can be useful if you want to explore more options or perform specific tasks related to the location.
Take a moment to review the information on the location info card and ensure that it corresponds to the area you want to download. You can also use this opportunity to explore other options and features available in Apple Maps, such as checking the opening hours of a business or reading reviews from other users.
If everything looks correct and you’re ready to proceed, continue to the next step. However, if you realize that you’ve selected the wrong location or need to make adjustments, you can simply go back to the map screen and repeat the previous steps to search for and locate the correct area.
Now that you’ve successfully tapped on the location info card, it’s time to move on to the next step: tapping on the “Download” button to initiate the map download process.
Step 5: Tap on the “Download” Button
Once you have accessed the location info card on Apple Maps, the next step is to tap on the “Download” button to initiate the map download process. This button allows you to save the selected area for offline access, ensuring that you can view and navigate through the map even without an internet connection.
On the location info card, you will typically find a button or option specifically labeled as “Download” or “Download Map”. It may be represented by an icon of a cloud with a downward arrow or a similar symbol, indicating the action of downloading data. Tap on this button to proceed.
After tapping on the “Download” button, Apple Maps will begin preparing the selected area for download. This process may take a few moments, depending on the size and complexity of the area you have chosen. During this time, you may see a progress bar or an indication that the download is in progress.
It’s worth noting that Apple Maps allows you to download multiple maps for offline use, so you can repeat steps 2 to 5 to add more areas if desired. This is particularly useful if you plan to travel to different locations or need access to maps in various areas without an internet connection.
Once the download is complete, you will receive a notification or a confirmation message from Apple Maps. The selected area is now available for offline use, and you can access it at any time, even without an internet connection.
Now that you have successfully tapped on the “Download” button and initiated the map download, you’re one step closer to having offline access to the selected area. However, the download process is not yet complete. In the next step, we will cover how to wait for the map to finish downloading.
Step 6: Wait for the Map to Download
After tapping on the “Download” button in Apple Maps, the next step is to patiently wait for the selected map to finish downloading. The time it takes for the map to download will depend on the size of the area you have chosen and the speed of your internet connection.
During the download process, Apple Maps will display a progress indicator to keep you informed of the status. You may see a progress bar, a percentage completed, or a loading symbol indicating that the download is in progress.
It’s important to note that you need to have a stable internet connection throughout the download process. If the connection is lost or interrupted, the download may fail or be delayed. Therefore, ensure that you have a reliable internet connection before initiating the download.
While waiting for the map to finish downloading, you can continue to use other features of Apple Maps, such as searching for additional locations, browsing through points of interest, or even getting directions. The download process will continue in the background, allowing you to multitask within the app.
Once the map download is complete, you will receive a notification or a confirmation message from Apple Maps. This indicates that the selected area is now available for offline use. You can now explore the downloaded map even without an internet connection.
It’s important to note that the downloaded map will remain accessible for offline use until you manually remove it. This means that even if you close the Apple Maps app or restart your device, you can still access the offline map as long as it has been downloaded and saved.
Now that you have successfully initiated the map download and patiently waited for it to finish, you’re ready to move on to the next step: accessing the downloaded map offline.
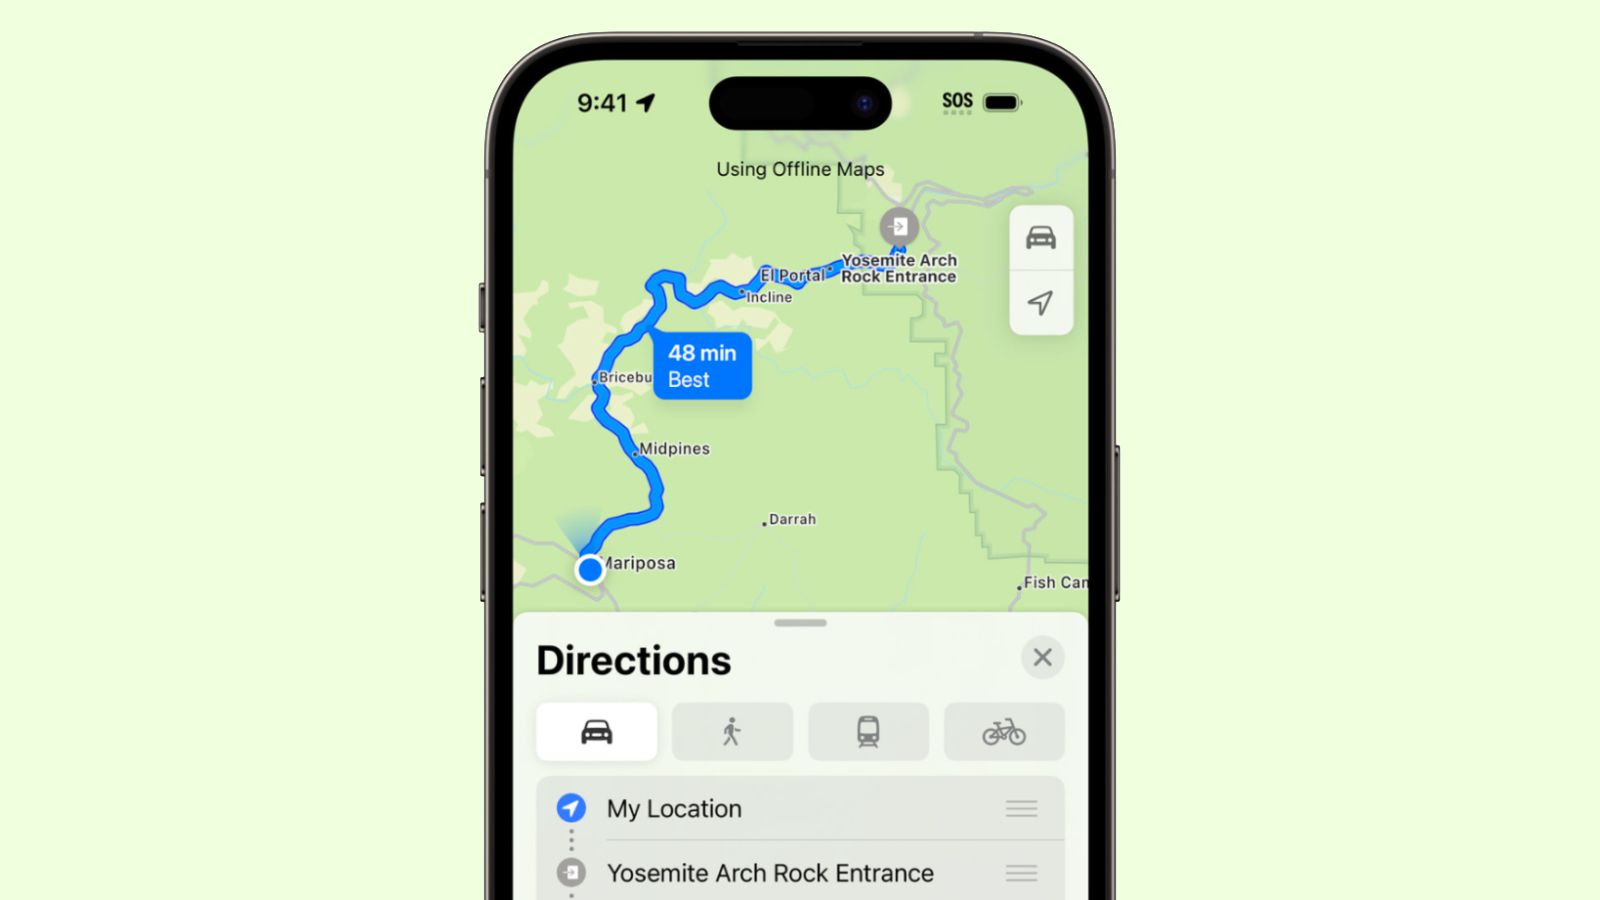
Step 7: Access the Downloaded Map Offline
After the map has finished downloading in Apple Maps, you can now access it offline and use it whenever you need it, even without an internet connection. This allows you to navigate through the downloaded map without relying on cellular data or Wi-Fi.
To access the downloaded map offline, simply open the Apple Maps app on your device. Even if you’re in an area with no internet connection, the app will automatically detect the downloaded map and load it for you.
You will see the downloaded map displayed on the screen, showing the area you selected during the download process. You can zoom in and out, pan across the map, and explore different locations within the downloaded area just like you would with an online map.
While using the downloaded map offline, keep in mind that real-time updates, traffic information, and other dynamic features may not be available. However, you can still view streets, landmarks, and points of interest, making it useful for basic navigation and exploration.
If you have downloaded multiple maps, you can switch between them by accessing the map settings or by tapping on the designated map icon or list. This allows you to quickly switch between different downloaded areas based on your current location or travel needs.
Additionally, you can still search for specific addresses or points of interest within the downloaded map. Apple Maps will use the downloaded data to provide you with results even when offline, making it easier to find specific locations within the area you downloaded.
Now that you have successfully accessed the downloaded map offline, you can confidently navigate, explore, and plan your adventures without worrying about internet connectivity. However, it’s important to know how to manage and remove the downloaded maps, which we will cover in the next step.
Step 8: Manage Downloaded Maps
After downloading maps on Apple Maps, it’s important to know how to manage and keep track of the maps you have saved for offline use. This includes the ability to update, remove, or add new areas as needed.
To manage your downloaded maps, open the Apple Maps app on your device and navigate to the settings or preferences section. This can usually be accessed by tapping on the profile icon or the menu icon, depending on the version of Apple Maps you are using.
Within the settings or preferences, look for the “Offline Maps” or “Downloaded Maps” option. Tapping on this option will show you a list of the maps you have downloaded.
From this list, you can perform various actions depending on your needs:
1. Update: If you have downloaded a map and want to ensure that you have the latest data, you can select the map from the list and choose the update option. This will check for any available updates and download them if necessary. Keeping your downloaded maps updated is important to have the most accurate information.
2. Remove: If you no longer need a downloaded map or want to free up storage space on your device, you can select the map from the list and choose the remove option. This will delete the map from your device, freeing up storage space. Note that you can always re-download the map later if needed.
3. Add new areas: If you want to download additional maps for offline use, you can select the “Add New Area” or a similar option. This will allow you to repeat the process of searching for a location, zooming in, and downloading the desired area. You can download multiple maps to have offline access to different locations.
By managing your downloaded maps, you can ensure that you have the most up-to-date maps and control the amount of storage space they occupy on your device. Regularly checking for updates and removing maps you no longer need will help optimize your experience with Apple Maps offline.
Now that you know how to manage your downloaded maps, feel free to explore and utilize Apple Maps to its fullest potential, even without an internet connection.
Conclusion
Congratulations! You have successfully learned how to download maps on Apple Maps and access them offline. This powerful feature allows you to explore new locations, plan your trips, and navigate with ease, even when you don’t have access to the internet.
Apple Maps provides a user-friendly interface and intuitive steps to download maps. By simply opening the app, searching for your desired location, zooming in to the desired area, tapping on the location info card, and tapping the “Download” button, you can have offline access to detailed maps.
Waiting for the map to download may take some time, but the result is worth it. Once the download is complete, you can access the map offline by simply opening the Apple Maps app. Explore the downloaded area, search for specific addresses or points of interest, and enjoy basic navigation functionality without relying on an internet connection.
Remember to manage your downloaded maps, keeping them updated and removing unnecessary ones to optimize your offline navigation experience. Through the settings or preferences of Apple Maps, you can easily update, remove, or add new areas as needed.
With these steps and tips in mind, you’re ready to embark on your adventures armed with offline maps. Whether you’re traveling to remote areas with limited connectivity or simply want to save on mobile data, Apple Maps’ offline map feature has got you covered.
So, continue to explore new places, navigate unfamiliar territories, and confidently find your way with Apple Maps offline. Happy travels!