Introduction
Welcome to this tutorial on how to download a Word document as a PDF. Converting a Word document to a PDF file format is a common need for many users. PDFs are widely recognized and can be easily viewed on different devices without any formatting issues. Whether you need to share a document securely, preserve the formatting, or prevent others from editing your content, saving a Word document as a PDF is a simple and effective solution.
In this step-by-step guide, you’ll learn how to convert a Word document to a PDF using Microsoft Word, the most popular word processing software. You don’t need any specialized software or technical skills to accomplish this task. Just follow along with the instructions, and you’ll have your Word document transformed into a PDF file in no time.
In addition to providing the necessary guidance, this tutorial will explain each step in detail, ensuring you understand the process thoroughly. By the end of this tutorial, you’ll be able to confidently save your Word documents as PDFs, giving you the flexibility and convenience you require for your document sharing needs.
Now, let’s get started with the first step: opening the Word document in Microsoft Word.
Step 1: Open the Word document in Microsoft Word
The first step in converting a Word document to PDF is to open the document in Microsoft Word. Make sure you have Microsoft Word installed on your computer before proceeding with this step. Here’s how you can open the Word document:
- Locate the Word document on your computer.
- Double-click on the document to open it.
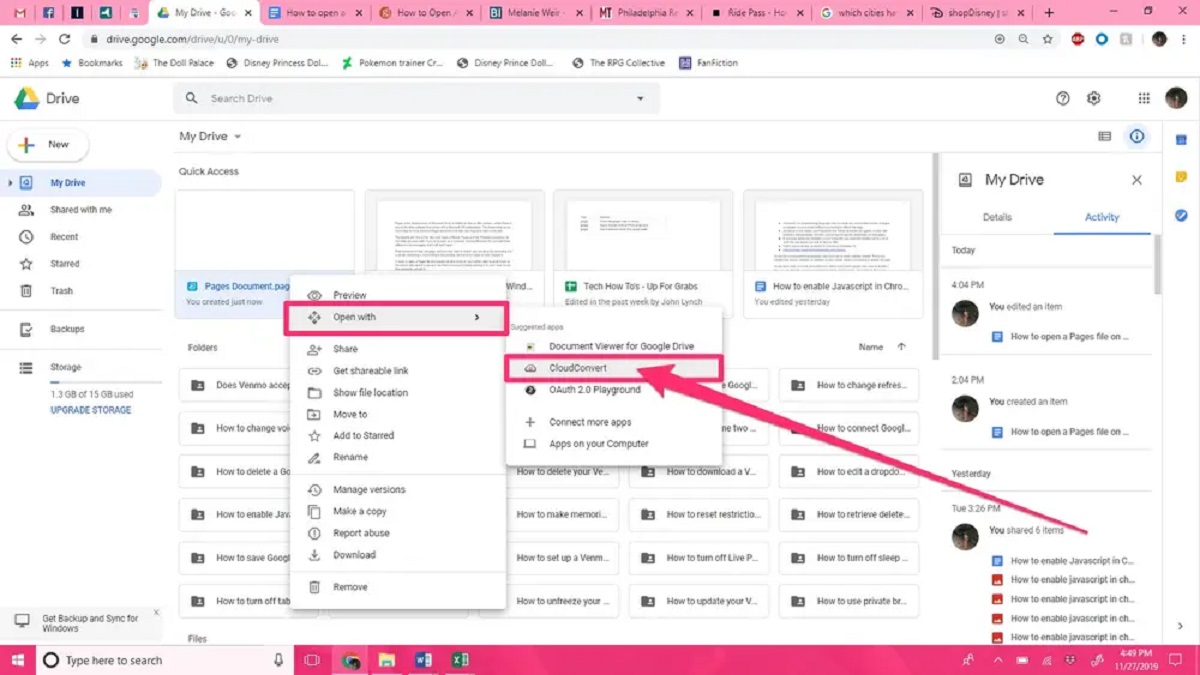
- If you have Microsoft Word as your default program for opening Word documents, the document will open automatically in Word. If it doesn’t, you can right-click on the document, select “Open with,” and choose Microsoft Word from the list of options.
Once the document is open in Microsoft Word, you can proceed to the next step to save it as a PDF. It’s important to note that the steps provided in this tutorial are based on Microsoft Word 2016, but they should be similar for other versions of the software as well.
If you don’t have Microsoft Word installed on your computer, you can use alternative word processing software or online tools to open the Word document. However, the specific steps for saving the document as a PDF may vary depending on the software or tool you use.
Now that you have the Word document open in Microsoft Word, let’s move on to the next step of converting it to a PDF file.
Step 2: Click on the “File” tab
Now that you have your Word document open in Microsoft Word, it’s time to proceed with the next step of saving it as a PDF. In this step, you will locate and click on the “File” tab, which contains the necessary options for saving and managing your document.
- In the upper left corner of the Microsoft Word window, you will see the “File” tab. It is usually represented by an icon with a folder or a piece of paper.
- Click on the “File” tab to access a dropdown menu with various options related to your document.
- Upon clicking the “File” tab, a new screen will appear with additional options and settings. This is commonly known as the “Backstage” view.
The “File” tab is where you can find essential document management functions, including saving, sharing, printing, and more. In the “Backstage” view, you will have access to various commands and settings that allow you to customize and control your document.
It’s worth noting that the location and appearance of the “File” tab may differ slightly between different versions of Microsoft Word. However, the general principle remains the same, and you can typically find the “File” tab in the top left corner of the Word window.
Now that you have located and clicked on the “File” tab, you are ready to move on to the next step, where you will find the option to save your document as a PDF.
Step 3: Choose “Save As” from the left-hand menu
After clicking on the “File” tab in Microsoft Word, you will be presented with a dropdown menu containing various options. In this step, you will choose the “Save As” option from the left-hand menu. This will allow you to specify the format and location for saving your Word document as a PDF.
- Once the “File” tab is clicked, the “Backstage” view will appear.
- Look towards the left-hand side of the screen, where you will see a list of commands and navigation options.
- Scroll down the left-hand menu until you locate the “Save As” option.
- Click on the “Save As” option to proceed.
Choosing the “Save As” option is crucial for converting your Word document to PDF because it allows you to define the specific format and filename for the saved file. Through this option, you can customize various settings related to the document before saving it in PDF format.
It is important to note that the layout and arrangement of options in the left-hand menu may vary slightly depending on the version of Microsoft Word you are using. However, you can generally find the “Save As” option in proximity to other related commands.
By choosing “Save As” from the left-hand menu, you are taking an important step towards saving your Word document as a PDF. In the next step, we will discuss how to specify the location where you want to save the PDF file.
Step 4: Select the location where you want to save the PDF file
After choosing the “Save As” option from the left-hand menu in Microsoft Word, you will be presented with a dialog box where you can specify the location on your computer where you want to save the PDF file. This step allows you to navigate through your folders and select the desired destination for the saved file.
- Once you have clicked on “Save As,” a dialog box will appear.
- Browse through your computer’s folders to find the location where you want to save the PDF file.
- If you have a specific folder in mind, you can navigate directly to that folder.
- If you want to create a new folder for your PDF file, you can do so within the dialog box.
- Once you have selected or created the desired location, click on the “Save” button to proceed.
Choosing the location where you want to save the PDF file is crucial for easy retrieval and organization. It’s a good practice to save your files in logical and easily accessible locations, such as the “Documents” folder or a folder specific to the project or document type.
By selecting the appropriate location for your PDF file, you ensure that it will be saved in the desired directory on your computer. This step also allows you to organize your files systematically, making it easier to locate them in the future.
Once you have chosen the location for saving the PDF file, you are ready to move on to the next step, where you will select the PDF format for saving your Word document.
Step 5: Choose “PDF” from the “Save as type” drop-down menu
After specifying the location where you want to save the PDF file, the next step is to choose the PDF format from the “Save as type” drop-down menu. This step ensures that your Word document is converted and saved in the appropriate format, allowing it to be viewed and accessed as a PDF file.
- In the “Save As” dialog box, locate the “Save as type” drop-down menu.
- Click on the drop-down menu to expand it and view the available options.
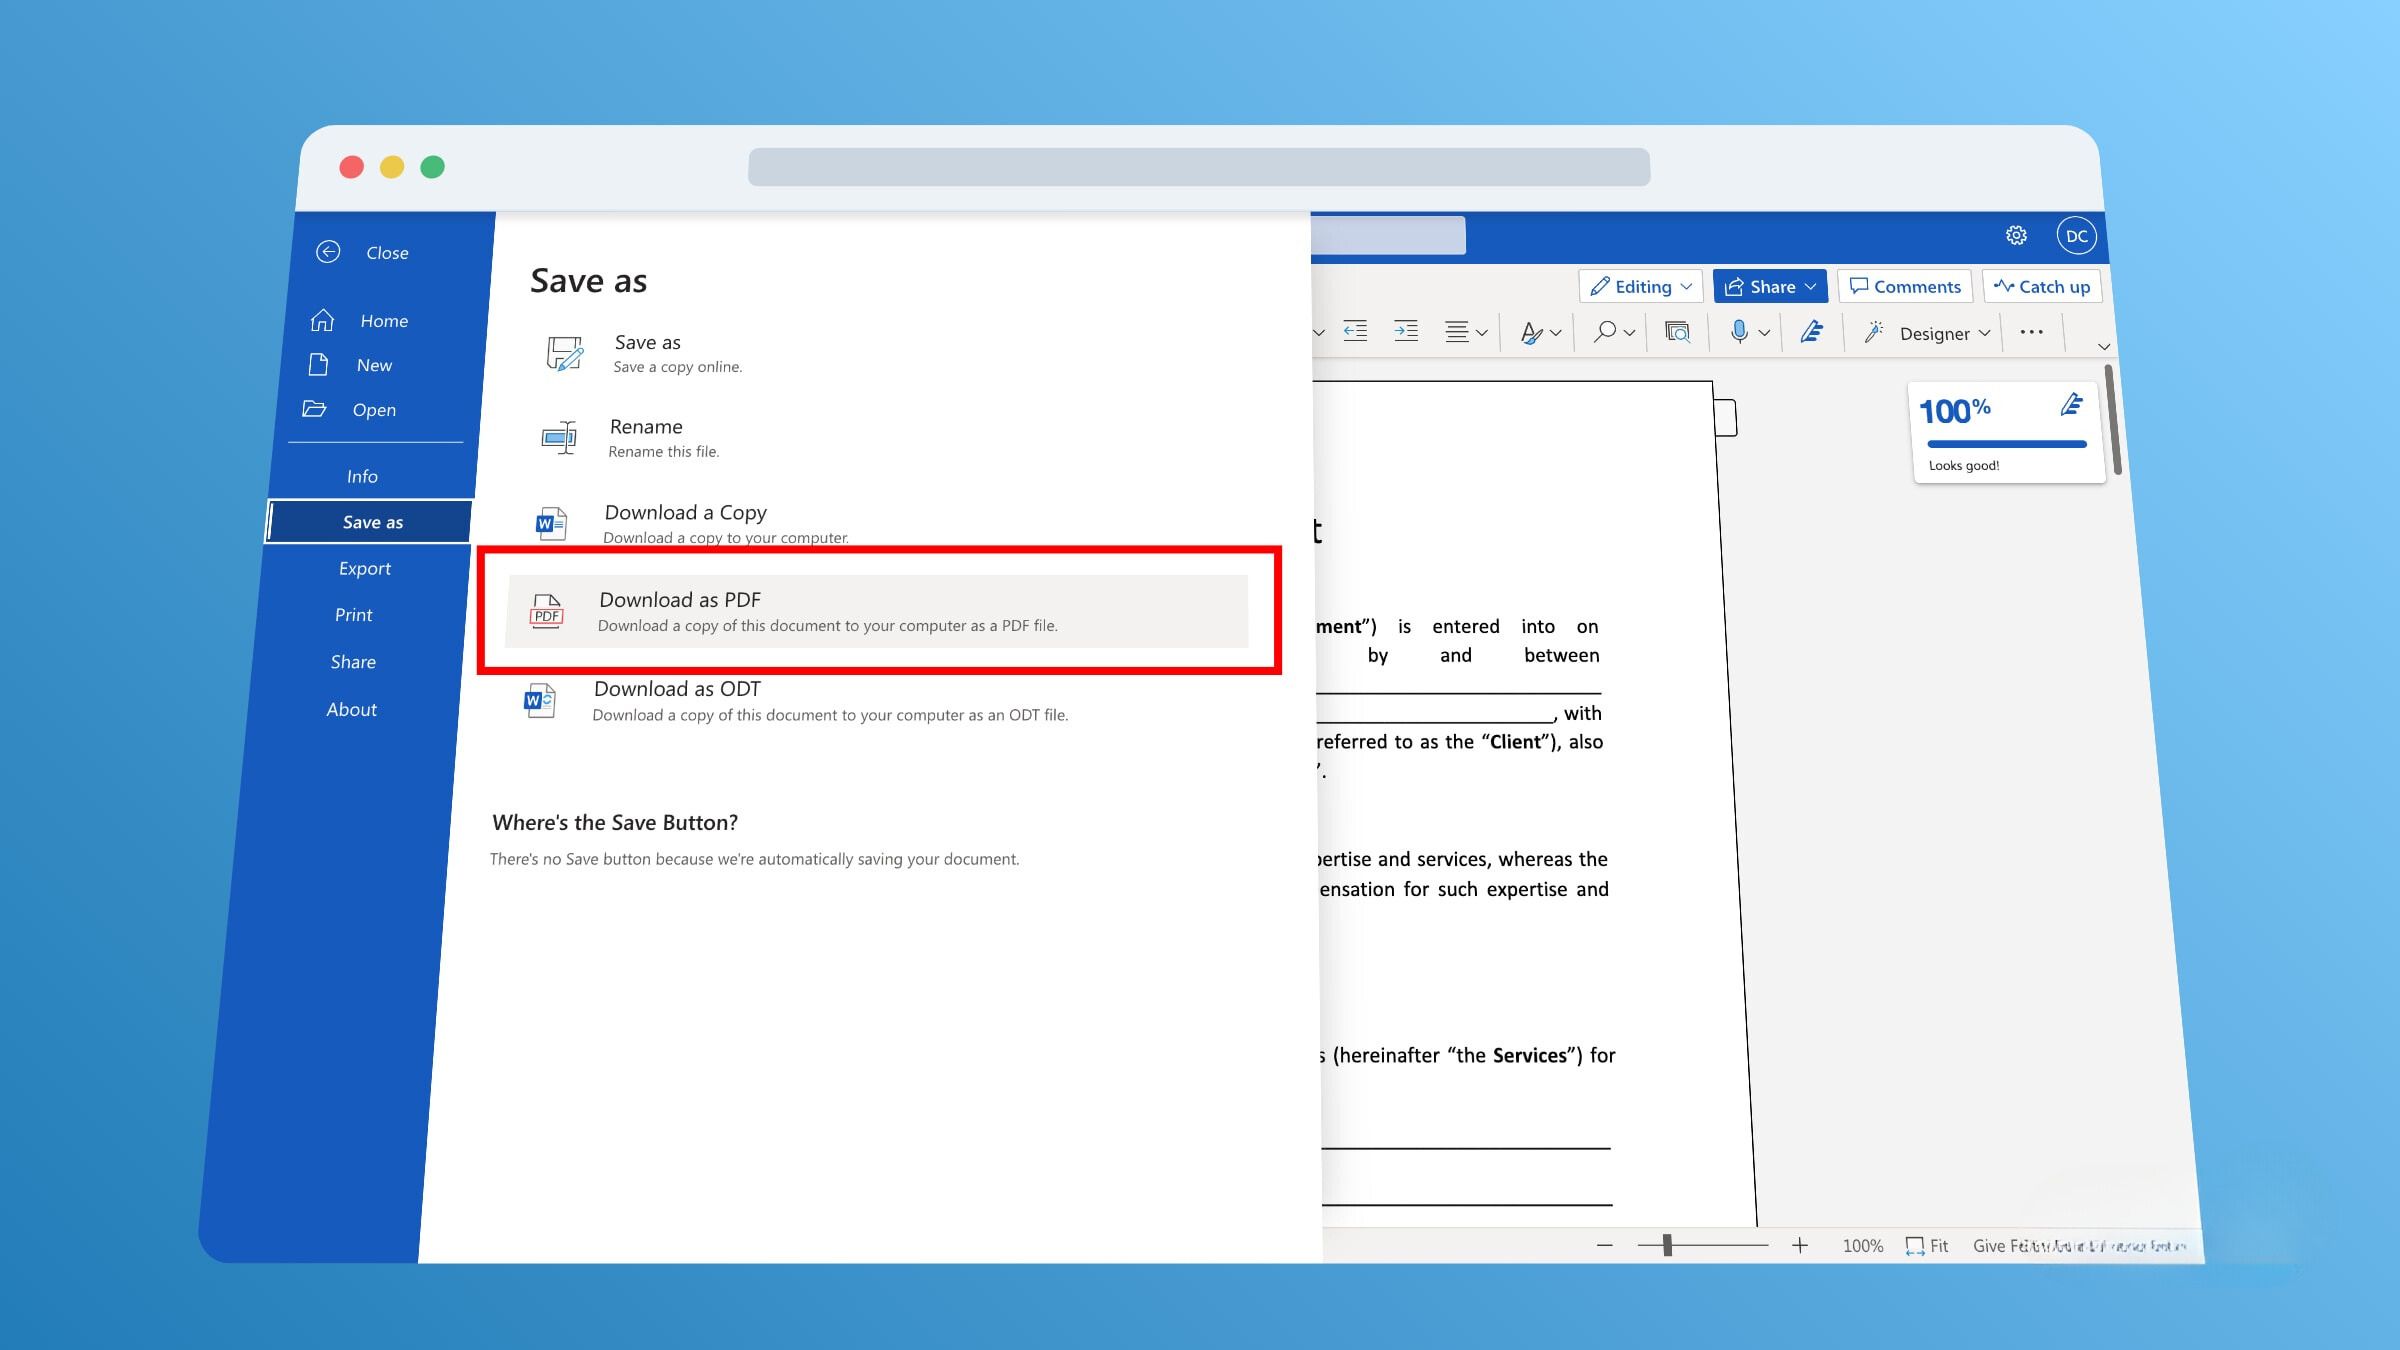
- From the list of options, select “PDF” or “PDF (*.pdf)” to indicate that you want to save the document in PDF format.
Choosing the PDF format is crucial to ensure that your Word document is saved with the necessary file extension (.pdf) and compatible formatting for viewing as a PDF file. Converting your document to PDF enables it to be easily viewed and shared on different devices and platforms without any issues.
The specific options and appearance of the “Save as type” drop-down menu may vary depending on the version of Microsoft Word you are using. However, the option to save the document as a PDF should be readily available in the menu.
By selecting the PDF format from the “Save as type” drop-down menu, you are one step closer to successfully converting your Word document to a PDF file. In the next step, you will save the document and wait for the PDF file to be created.
Step 6: Click on the “Save” button
Once you have selected the PDF format from the “Save as type” drop-down menu, the next step is to click on the “Save” button. This action will save your Word document as a PDF file in the chosen location on your computer.
- With the “Save As” dialog box still open, locate the “Save” button.
- Click on the “Save” button to initiate the conversion process and save your Word document as a PDF.
Clicking on the “Save” button is the final step required to create the PDF file. Once you click the button, Microsoft Word will convert the Word document into a PDF format and save it in the specified location on your computer.
It’s important to note that the time it takes to convert and save the document as a PDF may vary depending on the size and complexity of the Word document. Larger documents with extensive formatting and graphics may take longer to convert. Be patient and avoid interrupting the process.
After clicking the “Save” button, it’s recommended to wait for the process to complete and avoid closing Microsoft Word or performing any other actions until the conversion is finished. Once the process is complete, you will have a newly created PDF file ready for use.
Now that you have successfully saved your Word document as a PDF by clicking on the “Save” button, you can move on to the next step, where you will verify that the PDF file was created correctly.
Step 7: Wait for the PDF file to be created
After clicking the “Save” button to convert your Word document into a PDF format, it’s important to be patient and allow sufficient time for the conversion process to complete. The duration of this step may vary depending on the size and complexity of your document.
Microsoft Word will now proceed with converting your Word document to a PDF file based on the selected format and location. During this process, you may notice a progress indicator or status bar, which indicates the progress of the conversion.
It’s important not to interrupt or interfere with the conversion process while it’s underway. Closing Microsoft Word or performing other actions during this time may result in an incomplete or corrupted PDF file. It’s recommended to wait until the process is fully completed.
The time required for the conversion process can vary. Smaller documents with simple formatting may convert quickly, while larger files with complex graphics and formatting elements may take longer. It’s best to let the process run in the background while focusing on other tasks.
Once the conversion process is finished, you will have a fully created PDF file based on your original Word document. At this point, you can proceed to the final step, where you will open the saved PDF file to ensure that it has been created correctly.
Remember to exercise patience during this step and avoid any actions that may disrupt or interrupt the conversion process. By allowing sufficient time for the PDF file to be created, you ensure a successful outcome and a fully functional PDF version of your Word document.
Step 8: Open the PDF file to make sure it saved correctly
Now that the PDF conversion process is complete, it’s important to verify that the file saved correctly and can be opened and accessed as intended. In this final step, you will open the saved PDF file to ensure its accuracy and functionality.
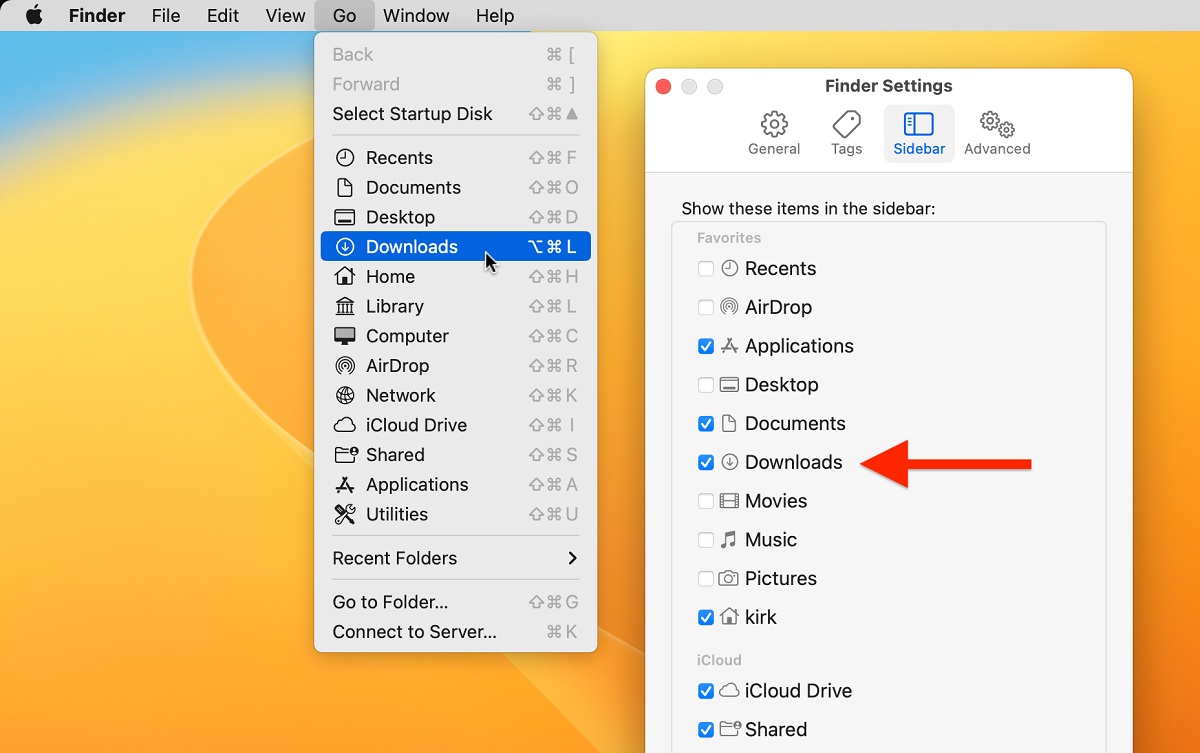
- Navigate to the location where you saved the PDF file on your computer.
- Locate the PDF file and double-click on it to open it.
By opening the PDF file, you will be able to confirm that the conversion process was successful and that the document appears as you expect. Take a moment to review the contents of the PDF, paying attention to the formatting, graphics, and overall appearance.
If the PDF file opens smoothly and all the content is displayed correctly, it indicates that the Word-to-PDF conversion was successful. You can now feel confident that the document can be shared, printed, or viewed on various devices without any compatibility issues.
However, if you encounter any issues during this step, such as missing elements, distorted formatting, or other discrepancies, consider rechecking the earlier steps in this tutorial. Pay attention to the settings and options you selected during the conversion process to ensure they were set correctly.
If you find any issues with the PDF file, you may need to repeat the conversion process, double-checking the settings and options to achieve the desired outcome. Additionally, make sure you have the latest version of Microsoft Word or consider using an alternative method to convert the Word document to PDF.
By opening the PDF file and confirming its accuracy, you can ensure that the converted document meets your expectations and requirements. Congratulations! You have completed the process of converting a Word document to a PDF file.
Conclusion
Converting a Word document to a PDF file is a simple and essential task that allows you to share and distribute your documents securely and professionally. With the help of Microsoft Word, you can easily save your documents as PDFs with just a few simple steps. By following this step-by-step guide, you are now equipped with the knowledge to convert your Word documents into PDF files successfully.
We started by opening the Word document in Microsoft Word and accessing the “File” tab. Then, we chose the “Save As” option from the left-hand menu and selected the desired location where the PDF file would be saved. After that, we chose the “PDF” format from the “Save as type” drop-down menu and clicked on the “Save” button to initiate the conversion process.
Throughout the conversion process, patience is important as Microsoft Word creates the PDF file from the Word document. Once the process is completed, it’s crucial to open the saved PDF file to ensure that it has been converted accurately and all the content appears as intended.
Remember, while the steps outlined in this tutorial are based on Microsoft Word, the general principles can be applied to other word processing software or online tools. Always double-check the specific steps and options of the software or tool you are using for saving a Word document as a PDF.
By converting your Word documents to PDF format, you can ensure that they retain their formatting, are viewable on different devices and platforms, and are protected from unauthorized editing. Whether you need to share important reports, business documents, or educational materials, saving them as PDFs is a reliable and professional choice.
Now that you have mastered the process of converting Word documents to PDF, you can confidently convert and distribute your documents in a versatile and widely accepted format. Enjoy the convenience and flexibility that saving your Word documents as PDFs provides!