Introduction
Netflix, the popular streaming platform, has revolutionized the way we watch our favorite TV shows and movies. With the introduction of the Netflix download feature, subscribers can now enjoy their favorite content on the go, without needing an internet connection. However, it’s important to make sure that the download quality is set to your preference, to ensure a smooth and enjoyable viewing experience.
In this article, we will guide you through the process of changing the Netflix download quality across various devices, including mobile devices, computers, smart TVs, and streaming devices like Roku and Fire Tablet. Whether you want to conserve storage space or prioritize video quality, we’ve got you covered.
Before we dive into the step-by-step instructions, it’s worth noting that adjusting the download quality will affect the amount of storage space required and the time it takes to complete downloads. Lower quality settings will take up less space and download faster, while higher quality settings will deliver a more immersive viewing experience but consume more storage space.
Now, let’s explore the different methods you can use to change the download quality on your preferred devices and platforms.
How to Change Netflix Download Quality on Mobile Devices
If you enjoy watching Netflix on your mobile device, whether it’s an iPhone or an Android phone, you have the option to adjust the download quality settings. This can be useful if you’re running low on storage space or if you want to ensure smooth playback without any buffering issues.
Here’s a step-by-step guide on how to change the Netflix download quality on mobile devices:
- Launch the Netflix app on your mobile device and sign in to your account.
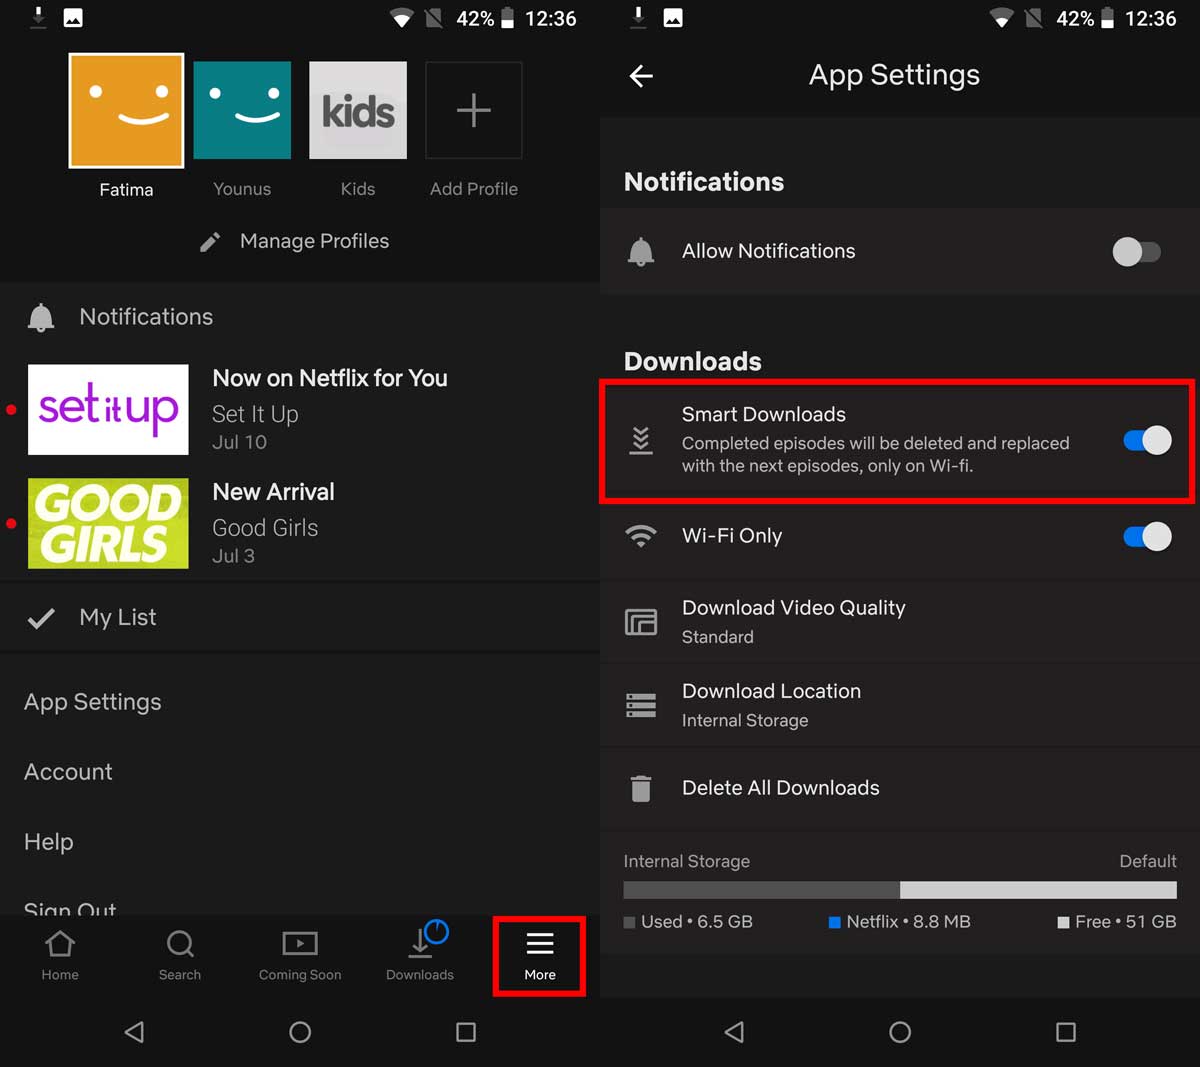
- Tap on the “More” tab, which is usually located at the bottom right corner of the screen.
- Scroll down and tap on “App Settings.”
- Under the “Downloads” section, tap on “Video Quality.”
- You will see three options: Standard, Medium, and High. Select the option that best suits your preferences.
- Once you’ve made your selection, exit the settings and navigate to the content you would like to download.
- Tap on the download button (usually represented by a downward arrow) next to the title to start downloading it.
- Your chosen download quality will be applied to all future downloads. Note that changing the download quality setting will not affect the quality of the content you have already downloaded.
Keep in mind that higher quality settings will require more storage space, so make sure you have sufficient space available on your device.
Now, you can enjoy your downloaded Netflix content with the modified quality settings that best suit your needs and preferences on your mobile device.
How to Adjust Netflix Download Quality on Windows 10
If you’re using Netflix on your Windows 10 computer or laptop, you have the ability to adjust the download quality to optimize your viewing experience. Whether you want to conserve storage space or enjoy high-definition content, here’s how you can adjust the Netflix download quality on your Windows 10 device:
- Open the Netflix app or visit the Netflix website in your preferred web browser.
- Sign in to your Netflix account.
- Click on the “Menu” icon (represented by three horizontal lines) in the upper-left corner of the screen to expand the side menu.
- Scroll down and click on “App Settings.”
- Under the “Downloads” section, you will find the “Video Quality” option. Click on it.
- A drop-down menu will appear with three options: Standard, Medium, and High. Choose the option that suits your preferences.
- Once you’ve made your selection, click on the “Save” or “Apply” button to save the changes.
- You can now start downloading your favorite Netflix content with the adjusted download quality settings.
It’s important to note that changing the download quality setting will affect future downloads. The quality of the content you have already downloaded will remain the same.
Remember, higher quality settings will require more storage space and might take longer to download, so ensure that you have sufficient space available on your Windows 10 device.
By following these simple steps, you can customize your Netflix download quality on your Windows 10 device and enjoy your favorite shows and movies in the desired level of quality.
How to Modify Netflix Download Quality on Mac
Netflix offers a flexible option to modify the download quality on your Mac, allowing you to tailor your viewing experience to your preferences. Whether you want to prioritize storage space or enjoy high-resolution videos, here’s how you can modify the Netflix download quality on your Mac:
- Open the Netflix app or visit the Netflix website using your preferred web browser on your Mac.
- Sign in to your Netflix account.
- Click on the down arrow icon located next to your profile picture in the top-right corner of the screen to access the account menu.
- From the dropdown menu, select “Account” to navigate to your account settings.
- Scroll down to the “My Profile” section and click on the “Playback settings” link.
- You will be directed to a page where you can control the playback settings for your Netflix account.
- Under the “Playback settings” section, you will find a “Data usage per screen” option.
- Click on the arrow next to “Data usage per screen” to expand the dropdown menu.
- You will see four options: Automatic, Low, Medium, and High.
- Select the desired option based on your preferences. Keep in mind that Low uses the least data, while High provides the highest video quality.
- Make sure to click on the “Save” button to apply the changes.
It’s worth noting that changing the download quality setting on your account will affect all devices associated with your Netflix account, including your Mac.
Now you can enjoy your downloaded Netflix content on your Mac with the modified download quality settings that align with your preferences.
How to Change Netflix Download Quality on Smart TVs
If you frequently watch Netflix on your smart TV, you may want to adjust the download quality to optimize your viewing experience. Whether you want to conserve internet bandwidth or enjoy high-definition content, here’s how you can change the Netflix download quality on your smart TV:
- Turn on your smart TV and ensure it is connected to the internet.
- Launch the Netflix app on your smart TV.
- If you are not already signed in, enter your Netflix account credentials.
- Using your TV remote, navigate through the Netflix app to find the “Settings” or “Account” option. The exact location may vary depending on your smart TV brand and model.
- Select the “Settings” or “Account” option to access the Netflix settings menu.
- Look for an option related to “Video Quality,” “Playback Settings,” or similar wording.
- Once you find the appropriate setting, select it.
- You will likely see options such as “Auto,” “Standard,” “Medium,” and “High.” Choose the option that suits your preferences.
- Save the changes and exit the settings menu.
Keep in mind that adjusting the download quality on your smart TV will affect the Netflix app on that particular device. If you use Netflix on multiple devices, such as your smartphone or computer, you will need to adjust the settings individually on each device.
It’s also worth mentioning that higher quality settings may require a faster internet connection and consume more internet data. If you have a limited data plan, consider using the “Standard” or “Medium” options to reduce data usage.
With these simple steps, you can change the Netflix download quality on your smart TV and enjoy your favorite shows and movies in the desired quality.
How to Set Netflix Download Quality on Roku
If you’re using a Roku device to watch Netflix on your TV, you have the ability to set the download quality to match your preferences. Whether you prefer faster downloads or higher video quality, here’s how you can set the Netflix download quality on your Roku:
- Turn on your TV and Roku device, and ensure they are properly connected.
- Navigate to the Roku home screen by pressing the Home button on your Roku remote.
- Scroll through the available channels and locate the Netflix channel.
- Press the asterisk (*) button on your Roku remote to open the options menu for the Netflix channel.
- From the options menu, select “Settings.”
- In the Settings menu, you will find various options for the Netflix channel. Look for “Download Quality” or a similar option.
- Once you find the “Download Quality” option, select it.
- You will typically see three options: Standard, High, or Automatic. Standard offers faster downloads with lower video quality, while High delivers higher video quality with potentially longer download times. Automatic adjusts the quality based on your internet connection speed.
- Select the download quality option that suits your preferences.
- Exit the settings menu and navigate to the content you want to download from Netflix.
Keep in mind that choosing higher download quality settings may require a faster internet connection and consume more storage space on your Roku device.
If you use Netflix on multiple devices, such as your smartphone or computer, you will need to adjust the download quality settings individually on each device.
By following these steps, you can easily set the Netflix download quality on your Roku and enjoy your favorite shows and movies with the desired video quality.
How to Adjust Netflix Download Quality on Fire Tablet
If you’re using a Fire Tablet to watch Netflix on the go, you have the option to adjust the download quality to enhance your viewing experience. Whether you want to conserve storage space or enjoy high-definition content, here’s how you can adjust the Netflix download quality on your Fire Tablet:
- Unlock your Fire Tablet and ensure it is connected to the internet.
- Open the Netflix app on your Fire Tablet.
- If you’re not signed in to your Netflix account, enter your login credentials to access your account.
- Tap on the “Menu” icon (usually represented by three horizontal lines) in the upper-left corner of the screen to open the side menu.
- Scroll down and tap on “App Settings.”
- Under the “Downloads” section, you will find the “Video Quality” option. Tap on it.
- You will see three options: Standard, Medium, and High. Choose the option that suits your preferences.
- After selecting the desired option, exit the settings menu and navigate to the content you would like to download.
- Tap on the download button (usually represented by a downward arrow) next to the title to initiate the download.
- It’s important to note that changing the download quality setting will only impact future downloads. Content that you have already downloaded will not be affected.
Keep in mind that higher quality settings require more storage space on your Fire Tablet. Ensure that you have sufficient space available before initiating the download.
Now you can enjoy your downloaded Netflix content on your Fire Tablet with the adjusted download quality settings that align with your preferences.
How to Change Netflix Download Quality on Android TV
If you’re using an Android TV to stream Netflix on your television, you have the ability to change the download quality to suit your preferences. Whether you want to minimize data usage or enjoy higher video quality, here’s how you can change the Netflix download quality on your Android TV:
- Turn on your Android TV and ensure it is connected to the internet.
- Launch the Netflix app on your Android TV.
- Sign in to your Netflix account.
- Using your TV remote, navigate through the Netflix app to find the “Settings” option. This is usually represented by a gear icon.
- Select “Settings” from the options available.
- Look for an option related to “Video Quality,” “Download Quality,” or similar wording.
- Click on the option to access the download quality settings.
- You will typically see different options for download quality, such as “Standard,” “Medium,” or “High.” Choose the option that best fits your preferences.
- Save the changes and exit the settings menu.
It’s important to note that changing the download quality setting on your Android TV will affect the Netflix app on that specific device. If you use Netflix on other devices, such as your smartphone or tablet, you will need to adjust the settings on those devices individually.
Higher download quality settings typically require a faster and more stable internet connection. If you have any issues with buffering or playback, you may want to consider lowering the download quality setting to improve performance.
By following these steps, you can easily change the Netflix download quality on your Android TV and enjoy your favorite shows and movies with the desired video quality.
Troubleshooting Netflix Download Quality Issues
While Netflix provides an excellent platform for downloading and streaming content, you may occasionally encounter issues with the download quality. If you’re experiencing problems with the download quality, here are some troubleshooting steps you can take to resolve them:
- Check your internet connection: A stable and reliable internet connection is essential for downloading Netflix content at the desired quality. Make sure your device is connected to a strong Wi-Fi network or has a stable cellular data connection.
- Restart your device: Sometimes, simply restarting your device can resolve temporary glitches that may be affecting the download quality. Restart your device and try downloading the content again.
- Update the Netflix app: Outdated versions of the Netflix app can sometimes have compatibility issues that affect the download quality. Check for any available updates in your device’s app store and install them if necessary.
- Clear app cache: If you’re using a mobile device, clearing the cache of the Netflix app can help resolve any caching issues that may be causing download quality problems. Go to your device’s app settings, locate the Netflix app, and clear its cache.
- Check your device storage: Insufficient storage space can cause download quality issues. Ensure that you have enough storage available on your device for the content you want to download.
- Try a different device: If the download quality issues persist on a specific device, try using a different device to download the content. This can help determine if the issue is device-specific or network-related.
- Reset Netflix settings: In some cases, resetting the settings of the Netflix app can resolve download quality problems. Check the app settings for an option to reset or restore default settings and try downloading the content again.
If you’ve tried all the troubleshooting steps and are still experiencing issues with the download quality, it’s recommended to reach out to Netflix support for further assistance. They have dedicated support teams that can help resolve any technical issues you may be facing.
By following these troubleshooting steps, you can resolve common download quality issues and enjoy your favorite Netflix content without any disruptions.
Conclusion
Adjusting the Netflix download quality is a useful feature that allows you to customize your viewing experience based on your preferences and device capabilities. Whether you want to save storage space or indulge in high-definition content, being able to modify the download quality ensures that you get the best out of your Netflix experience.
In this article, we covered various methods to change the Netflix download quality on different devices, including mobile devices, Windows 10, Mac, smart TVs, Roku, Fire Tablets, and Android TVs. By following the step-by-step instructions provided, you can easily adjust the download quality to suit your needs.
Remember, while higher download quality provides a more immersive viewing experience, it also requires more storage space and a stable internet connection. Consider your device capabilities and available storage when selecting the appropriate download quality.
Additionally, we provided troubleshooting tips to address any download quality issues that may arise. By following these troubleshooting steps, you can effectively resolve common problems and enjoy uninterrupted streaming.
Now that you have all the knowledge you need to change the Netflix download quality and troubleshoot any issues, you can enhance your Netflix experience and enjoy your favorite shows and movies with the desired video quality.
So, go ahead and unlock the full potential of Netflix by adjusting the download quality to suit your preferences. Happy streaming!