Introduction
If you're an avid typist or a gaming enthusiast, you likely understand the importance of a mechanical keyboard. The satisfying click of each keystroke and the tactile feedback are essential for a superior typing or gaming experience. However, over time, the switches in your mechanical keyboard may start to show signs of wear and tear, leading to issues such as unresponsiveness or inconsistent actuation. When this occurs, it may be necessary to open up the keyboard switches to clean or replace them.
Understanding how to open mechanical keyboard switches is a valuable skill for any keyboard enthusiast or professional who wants to maintain their equipment. Whether you're a DIY enthusiast looking to customize your keyboard with different switches or simply seeking to prolong the lifespan of your current keyboard, knowing how to access and replace the switches is essential.
In this guide, we'll walk you through the step-by-step process of opening mechanical keyboard switches. From gathering the necessary tools and materials to carefully disassembling and reassembling your keyboard, you'll gain valuable insights into the inner workings of your beloved mechanical keyboard. By the end of this tutorial, you'll feel confident in your ability to maintain, repair, or customize the switches in your mechanical keyboard, ensuring that it continues to deliver a satisfying typing or gaming experience for years to come.
So, let's roll up our sleeves and dive into the world of mechanical keyboard maintenance and customization. Whether you're a seasoned keyboard enthusiast or a newcomer to the world of mechanical keyboards, this guide will equip you with the knowledge and skills needed to open and work on your keyboard switches effectively. Let's get started!
Tools and Materials Needed
Before embarking on the process of opening your mechanical keyboard switches, it’s essential to gather the necessary tools and materials. Having the right equipment at your disposal will ensure a smooth and efficient disassembly and reassembly process. Here’s a comprehensive list of the tools and materials you’ll need:
- Keycap Puller: This tool is essential for safely removing the keycaps from your keyboard. It helps prevent damage to the keycaps or the keyboard housing during the disassembly process.
- Flat-Head Screwdriver: A small flat-head screwdriver is useful for prying open the housing of the keyboard and accessing the switches. Make sure to use a screwdriver with a narrow tip to avoid damaging the keyboard.
- Tweezers: Precision tweezers are handy for handling small components, such as switch clips or springs, during the disassembly and reassembly process.
- Switch Puller (Optional): If you plan to replace the switches in your keyboard, a switch puller can be immensely helpful for safely removing the switches from their sockets without causing damage.
- Isopropyl Alcohol: A gentle cleaning solution, such as isopropyl alcohol, can be used to clean the switches and remove any dirt or debris that may be affecting their performance.
- Cotton Swabs: These are useful for applying the cleaning solution to the switches and for gently wiping away any grime or residue.
- Replacement Switches (If Needed): If you’re planning to replace the switches in your keyboard, make sure to have the new switches on hand before beginning the disassembly process.
- Workspace: Ensure you have a clean, well-lit workspace to carry out the disassembly and reassembly process. A clutter-free environment will help prevent the loss of small components and make it easier to keep track of the disassembled parts.
By gathering these tools and materials, you’ll be well-prepared to tackle the task of opening and working on your mechanical keyboard switches. Having the right equipment at your disposal will make the entire process more manageable and help ensure that your keyboard remains in optimal condition throughout the maintenance or customization process.
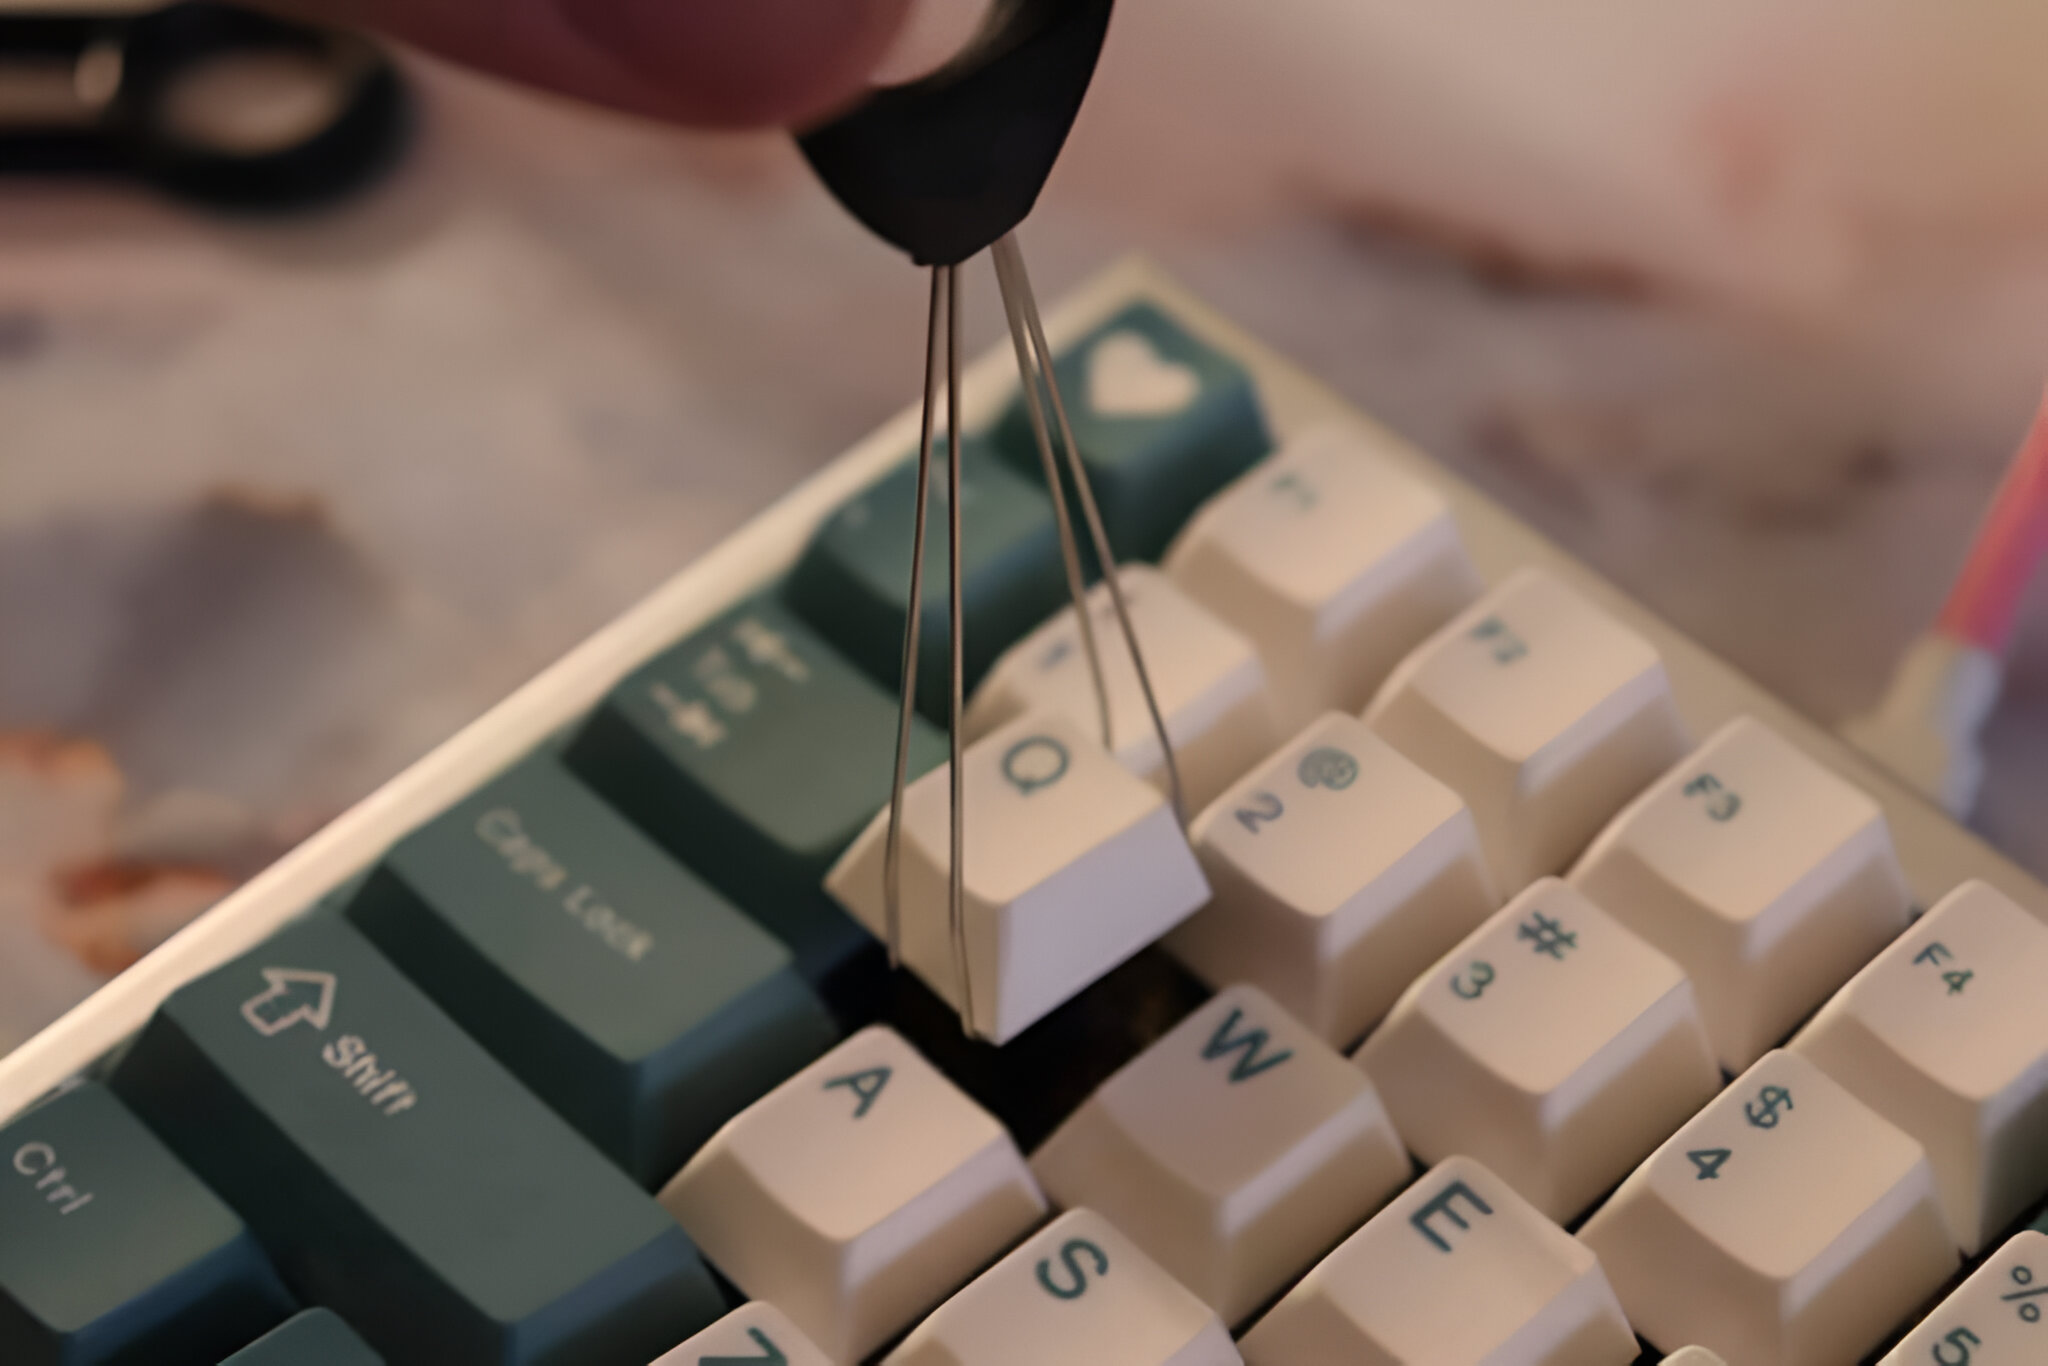
Step 1: Removing Keycaps
Before delving into the internal components of your mechanical keyboard, it’s essential to begin the disassembly process by removing the keycaps. This step requires precision and care to avoid damaging the keycaps or the underlying switches. Here’s a systematic approach to safely remove the keycaps from your keyboard:
- Prepare Your Workspace: Find a clean, well-lit area to work on your keyboard. Having a clutter-free workspace will make it easier to keep track of the removed keycaps and prevent the loss of small components.
- Use a Keycap Puller: Utilize a keycap puller to gently and evenly remove the keycaps from the switches. Position the keycap puller over the keycap and apply even pressure to pull it straight up. Avoid using excessive force, as this can lead to keycap breakage or damage to the switches.
- Work Methodically: Start by removing the keycaps in a systematic manner, such as from left to right or top to bottom. This approach will help you keep track of the removed keycaps and make the reassembly process more straightforward.
- Handle with Care: Be gentle when removing the keycaps to prevent any bending or warping. If a keycap feels particularly snug, gently wiggle it from side to side while applying upward pressure to release it from the switch.
- Organize the Keycaps: As you remove the keycaps, consider organizing them in a segmented container or using a labeled keycap map to keep track of their original positions. This will streamline the reassembly process and ensure that each keycap is returned to its correct location.
By following these steps, you can safely remove the keycaps from your mechanical keyboard, setting the stage for the subsequent phases of the disassembly process. Taking the time to approach this step meticulously will help preserve the integrity of the keycaps and facilitate a smooth reassembly process once the internal maintenance or customization work is complete.
Step 2: Opening the Keyboard Housing
Once the keycaps have been removed, the next step in the process of accessing the mechanical keyboard switches involves opening the keyboard housing. This step requires careful handling to avoid damaging the internal components and the outer casing of the keyboard. Here’s a detailed guide on how to open the keyboard housing:
- Locate the Screws or Latches: Examine the underside of the keyboard to identify any screws or latches securing the housing. In some cases, the screws may be hidden under rubber pads or stickers, so thorough inspection is necessary.
- Use the Correct Tools: If the housing is secured with screws, use the appropriate screwdriver to carefully remove them. Be mindful of the size and type of screws to avoid stripping them or causing damage to the screw heads.
- Apply Gentle Pressure: If the housing is secured with latches or clips, use a flat-head screwdriver or a plastic opening tool to gently pry open the casing. Work methodically around the edges, applying even pressure to release the latches without exerting excessive force.
- Handle with Care: As you begin to separate the housing, be mindful of any cables or ribbon connectors that may be attached to the keyboard’s internal circuitry. Avoid abruptly pulling the housing apart to prevent damage to these delicate components.
- Keep Track of Components: As the housing is opened, take note of the arrangement of internal components and the placement of any cable connections. Keeping mental or written notes can aid in reassembling the keyboard correctly later on.
By following these steps, you can safely open the housing of your mechanical keyboard, gaining access to the internal components, including the switches. It’s crucial to approach this phase with patience and precision to ensure that the keyboard housing is opened without causing any damage or misalignment of internal components. With the housing removed, you’re one step closer to accessing and working on the keyboard switches.
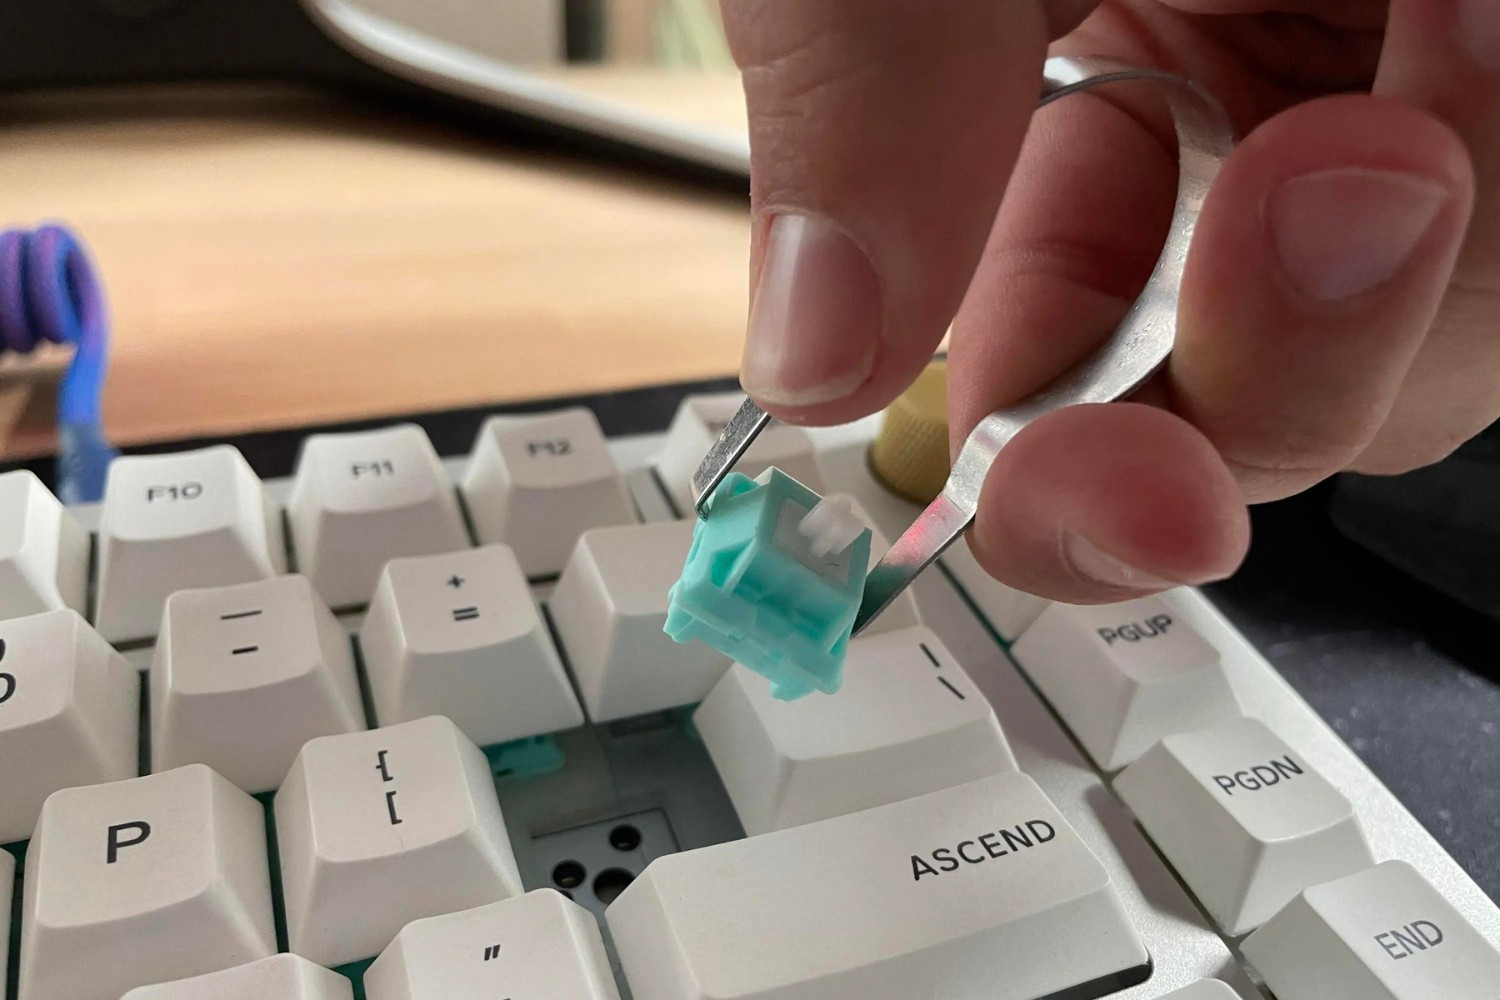
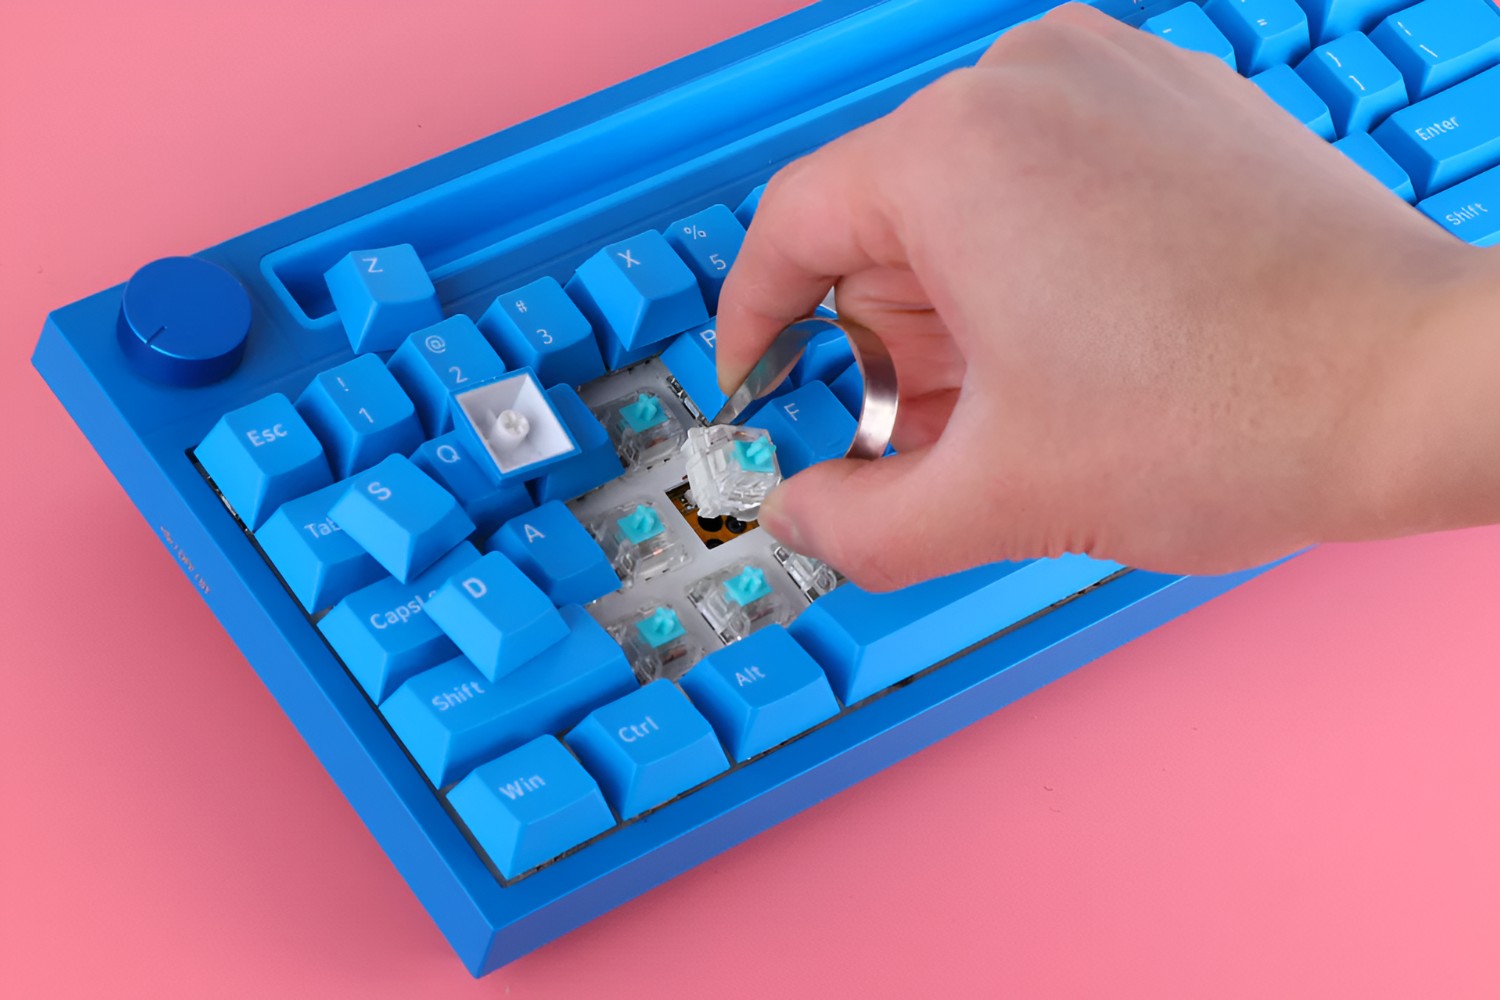
Step 3: Accessing the Switches
With the keyboard housing opened, you’re now ready to access the switches, the critical components responsible for the tactile feedback and actuation of each keystroke. Gaining direct access to the switches is a pivotal stage in the maintenance or customization process, and it requires a methodical approach to ensure that the switches are handled with care. Here’s how to access the switches in your mechanical keyboard:
- Identify the Switches: Take a moment to familiarize yourself with the layout of the switches and the corresponding key positions. This will help you navigate the internal structure of the keyboard and locate the switches that require attention.
- Observe the Switch Mounting: Note how the switches are mounted within the keyboard housing. Depending on the keyboard model, the switches may be secured using clips, screws, or a plate-mounted configuration. Understanding the mounting method will guide you in safely removing the switches.
- Exercise Caution: When handling the switches, be mindful of the delicate internal components and the soldered connections on the printed circuit board (PCB). Avoid applying excessive force or bending the switch pins to prevent damage to the switches or the PCB.
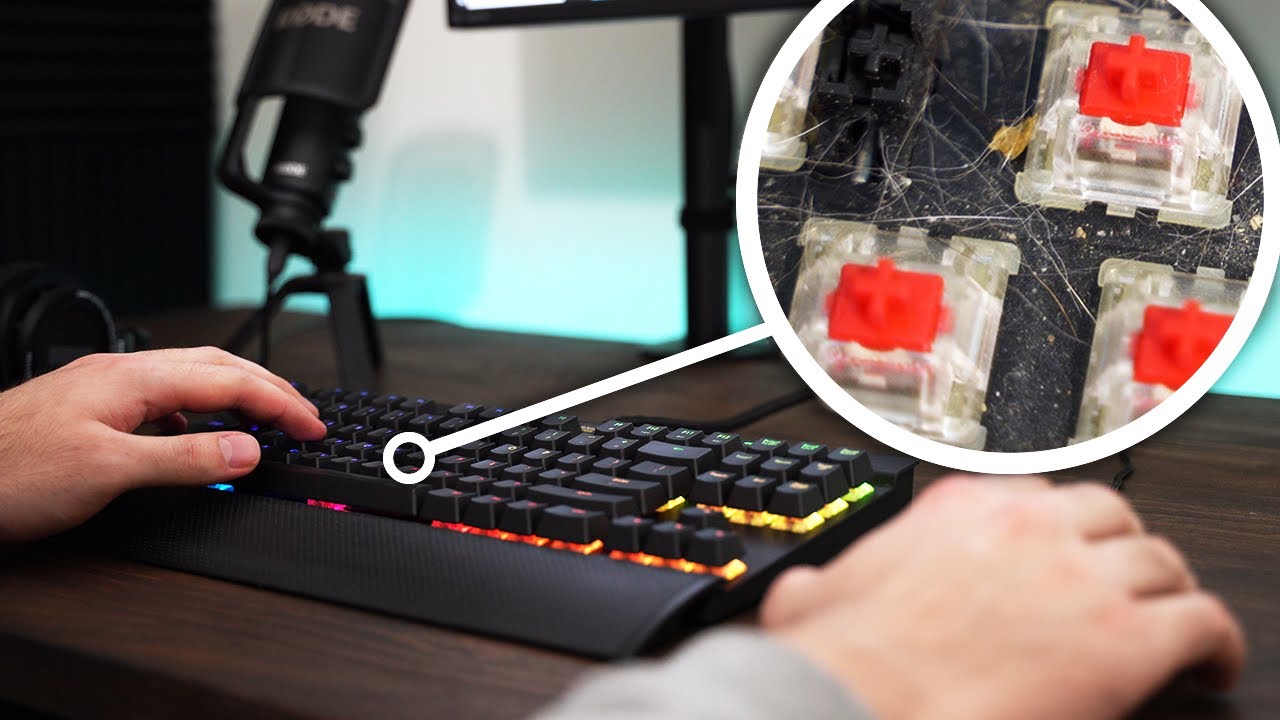
- Inspect for Debris: While accessing the switches, take the opportunity to inspect the surrounding area for any debris, dust, or residue that may be affecting the switch performance. Use compressed air or a gentle brush to remove any foreign particles from the switch assembly.
- Document the Layout: Consider documenting the layout and orientation of the switches before removing them. This can be particularly helpful if you plan to replace the switches or need to troubleshoot any issues with specific keys.
By following these steps, you can effectively access the switches within your mechanical keyboard, setting the stage for potential cleaning, maintenance, or replacement. Taking a methodical and cautious approach during this phase will help preserve the integrity of the switches and ensure that they can be reinstalled or replaced without complications.
Step 4: Removing and Replacing Switches
Whether you’re performing maintenance, customization, or troubleshooting on your mechanical keyboard, the ability to remove and replace switches is a valuable skill. This step requires attention to detail and a steady hand to ensure that the switches are handled with care and precision. Here’s a comprehensive guide on how to effectively remove and replace switches in your mechanical keyboard:
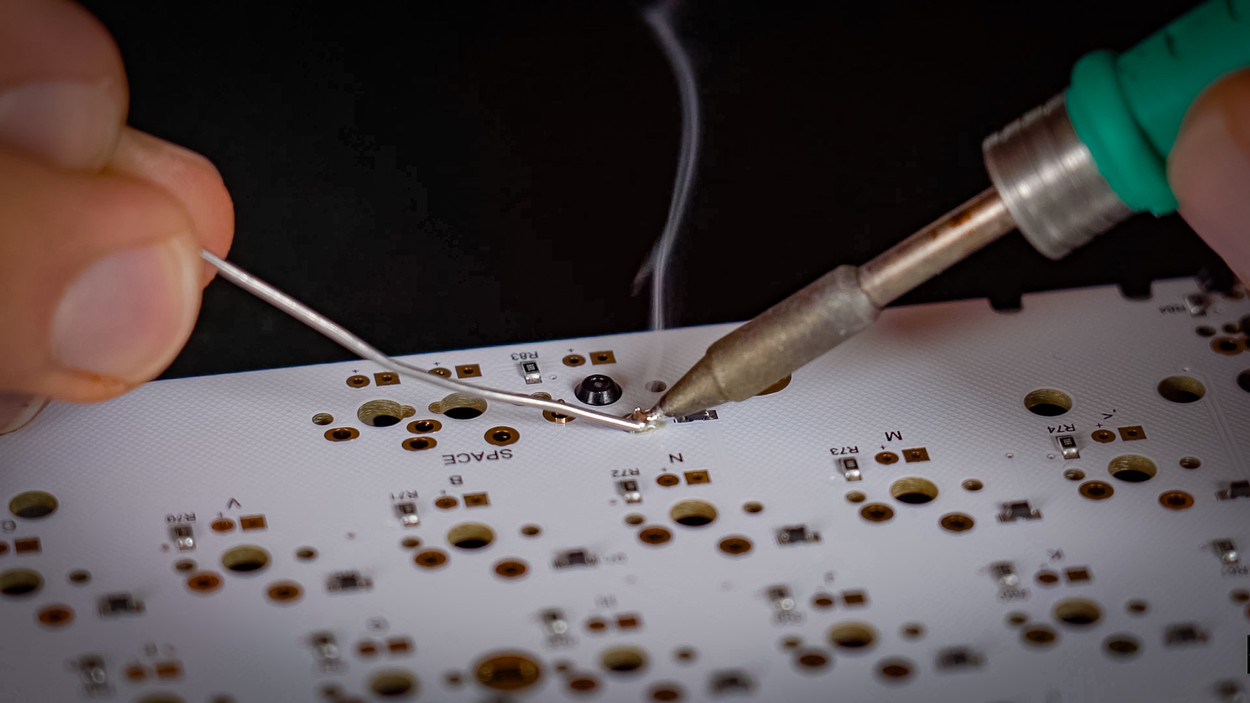
- Removing the Switches: If you’re removing the switches for maintenance or replacement, begin by carefully desoldering the switch connections from the PCB. Use a soldering iron and desoldering pump or wick to remove the solder and release the switch pins from the PCB. Exercise caution to avoid damaging the PCB or adjacent components during the desoldering process.
- Handle with Care: Once the switches are desoldered, gently remove them from the keyboard housing, taking care not to bend or damage the switch pins or the surrounding components. Utilize a switch puller or tweezers to lift the switches from their sockets with precision.
- Inspect the PCB: While the switches are removed, take the opportunity to inspect the PCB for any signs of damage, such as lifted pads or traces. Address any PCB issues before proceeding with the installation of new switches.
- Replacing the Switches: If you’re replacing the switches, carefully align the new switches with the corresponding positions on the PCB. Gently press the switches into place, ensuring that the pins are fully inserted into the PCB and the switch housings are flush with the mounting surface.
- Soldering the New Switches: Once the new switches are in position, solder the switch pins to the PCB using a soldering iron and fresh solder. Apply solder to the switch pins and the corresponding pads on the PCB, ensuring a secure and reliable connection.
By following these steps, you can confidently remove and replace switches in your mechanical keyboard, whether for maintenance, repair, or customization purposes. The precision and attention to detail applied during the removal and replacement process are crucial for ensuring that the switches function optimally and contribute to a superior typing or gaming experience.
Step 5: Reassembling the Keyboard
After completing the necessary maintenance, customization, or repair work on the switches in your mechanical keyboard, the final phase involves reassembling the keyboard to restore it to full functionality. This step requires careful attention to detail and a methodical approach to ensure that all components are reassembled correctly. Here’s a comprehensive guide on how to effectively reassemble your mechanical keyboard:
- Organize the Components: Before reassembling the keyboard, take stock of all the components, including the switches, keycaps, and housing. Organize the components in a clean and orderly manner to facilitate a smooth reassembly process.
- Align the Switches: If you’ve replaced the switches, ensure that they are correctly aligned and securely seated in their respective positions on the PCB. Check for any obstructions or misalignments that may hinder the proper functioning of the switches.
- Attach the Keyboard Housing: Carefully position the keyboard housing over the internal components, ensuring that any cables or ribbon connectors are properly aligned and secured. If the housing is secured with screws, tighten them evenly to secure the housing in place.
- Reinstall the Keycaps: Begin reattaching the keycaps to the switches, ensuring that each keycap is aligned with its corresponding switch and pressed firmly into place. Refer to your organized layout or keycap map to ensure that each keycap is returned to its original position.
- Test for Functionality: Once the keyboard is reassembled, test each key to ensure that the switches are functioning correctly and that the keycaps register keystrokes accurately. Verify that all keys exhibit the expected tactile feedback and actuation.
By following these steps, you can successfully reassemble your mechanical keyboard, culminating in a fully restored and functional typing or gaming device. The attention to detail and precision applied during the reassembly process are essential for ensuring that the keyboard operates optimally and delivers the satisfying tactile experience that mechanical keyboards are renowned for.
Conclusion
Congratulations! You’ve now gained valuable insights into the intricate process of opening, accessing, and working on the switches in a mechanical keyboard. By following the step-by-step guide outlined in this tutorial, you’ve equipped yourself with the knowledge and skills needed to maintain, repair, or customize your beloved mechanical keyboard with confidence and precision.
Understanding the inner workings of your mechanical keyboard and knowing how to open the switches is a valuable asset for any keyboard enthusiast, DIY enthusiast, or professional seeking to optimize their typing or gaming experience. Whether you’re exploring switch customization options, troubleshooting switch-related issues, or simply performing routine maintenance, the ability to access and work on the switches empowers you to tailor your keyboard to your specific preferences and requirements.
As you navigate the process of opening mechanical keyboard switches, it’s essential to approach each step with patience, precision, and a keen eye for detail. From removing the keycaps and accessing the switches to the meticulous task of reassembling the keyboard, your commitment to careful handling and methodical execution will ensure that your mechanical keyboard continues to deliver the exceptional tactile feedback and performance you’ve come to appreciate.
Whether you’re a seasoned keyboard enthusiast or a newcomer to the world of mechanical keyboards, the knowledge and skills acquired in this tutorial will serve you well as you embark on your journey of keyboard maintenance, repair, and customization. With your newfound expertise, you’ll be well-prepared to tackle the intricacies of mechanical keyboard switches, unlocking a world of possibilities for enhancing your typing or gaming experience.
So, as you apply the techniques and insights gained from this guide to your own mechanical keyboard, embrace the opportunity to explore the inner workings of this beloved input device. By doing so, you’ll not only enhance your keyboard’s performance but also deepen your appreciation for the craftsmanship and engineering that make mechanical keyboards a cherished companion for enthusiasts and professionals alike.