Introduction
Welcome to the world of Splitwise! This popular expense-sharing platform brings ease and convenience to managing finances with friends, family, and colleagues. By creating groups on Splitwise, you can keep track of shared expenses, simplify bill payments, and ensure everyone’s contributions are accounted for.
However, there may come a time when you no longer wish to be a part of a particular group on Splitwise. Whether it’s due to a change in circumstances, personal preference, or simply wanting to declutter your account, opting out of a group is a straightforward process that can be done in just a few steps.
In this article, we will guide you through the process of how to opt out of a group in Splitwise. We’ll provide step-by-step instructions to help you navigate the platform effortlessly and smoothly leave any group that you no longer wish to be a member of.
So, if you’re ready to regain control of your Splitwise groups and streamline your financial management, let’s get started on the journey to opting out!
Step 1: Access your Splitwise account
The first step to opting out of a group in Splitwise is to access your Splitwise account. You can do this by visiting the Splitwise website or by using the Splitwise mobile app, available on both iOS and Android platforms.
If you’re using the website, open your preferred web browser and navigate to www.splitwise.com. On the other hand, if you prefer using the app, launch it on your mobile device and log in to your Splitwise account.
If you don’t have a Splitwise account yet, you’ll need to create one. Simply click on the “Sign Up” or “Join Splitwise” option and follow the prompts to enter your personal details and create your account.
Once you’ve successfully logged in to your Splitwise account, you’ll have access to all the features and functionalities offered by the platform.
Now that you’re all set, we can move on to the next step of the process: navigating to the group page.
Step 2: Navigate to the group page
After accessing your Splitwise account, the next step is to navigate to the group page of the specific group you want to opt out of. The group page contains all the relevant information and settings for that particular group.
To do this, look for the “Groups” tab or icon in the navigation menu, usually located at the top or side of the Splitwise website or app. Click or tap on it to access the list of all the groups you are currently a member of.
Scroll through the list of groups until you find the one you want to leave. Once you locate the group, click or tap on its name to enter the group’s dedicated page.
On the group page, you’ll find details about the group, including its members, expenditures, and any pending balances. This page is where you’ll find the necessary settings to proceed with opting out of the group.
It’s important to double-check that you have selected the correct group before proceeding further to ensure that you don’t accidentally leave any groups that you wish to remain a part of.
Now that you’ve successfully navigated to the group page, we can move on to the next step: accessing the settings.
Step 3: Go to the settings
Now that you’re on the group page, it’s time to access the settings for that specific group. The settings page allows you to make changes and adjustments to the group’s preferences and configurations, including the option to leave the group.
To find the settings, look for a gear or three-dot icon on the group page. This icon typically represents the settings or options menu for the group. Click or tap on this icon to open the settings menu, which will provide you with a list of different actions you can take within the group.
The settings menu may differ slightly depending on the platform you’re using, whether it’s the Splitwise website or mobile app. However, regardless of the platform, you’ll find the option to leave the group within the settings menu.
Take a moment to explore the other options and settings available in the menu. While you’re opting out of the group now, there may be other features or preferences that you may want to edit or adjust in the future.
Once you’ve located the settings menu and are ready to proceed with leaving the group, let’s move on to the next step: locating the “Leave Group” button.
Step 4: Locate the “Leave Group” button
Within the settings menu of the group page, your next task is to locate the “Leave Group” button. This button allows you to initiate the process of opting out of the group.
Depending on the Splitwise platform you’re using, the “Leave Group” button may be labeled differently or represented by an icon. Look for any options related to leaving or exiting the group.
In most cases, you’ll find the “Leave Group” button located towards the bottom of the settings menu. It may be displayed as a prominent button or as a link. Clicking or tapping on this button will prompt a confirmation pop-up to ensure you want to proceed with leaving the group.
It’s important to note that once you leave a group, you will no longer have access to any future expenses or updates within that group. Additionally, any pending balances or debts associated with your account in relation to that group will still need to be resolved.
Now that you’ve located the “Leave Group” button, we can move on to the next step: confirming your decision to opt out of the group.
Step 5: Confirm your decision
After locating the “Leave Group” button, the next step is to confirm your decision to opt out of the group. This confirmation is necessary to ensure that you intentionally want to leave the group and understand the implications of doing so.
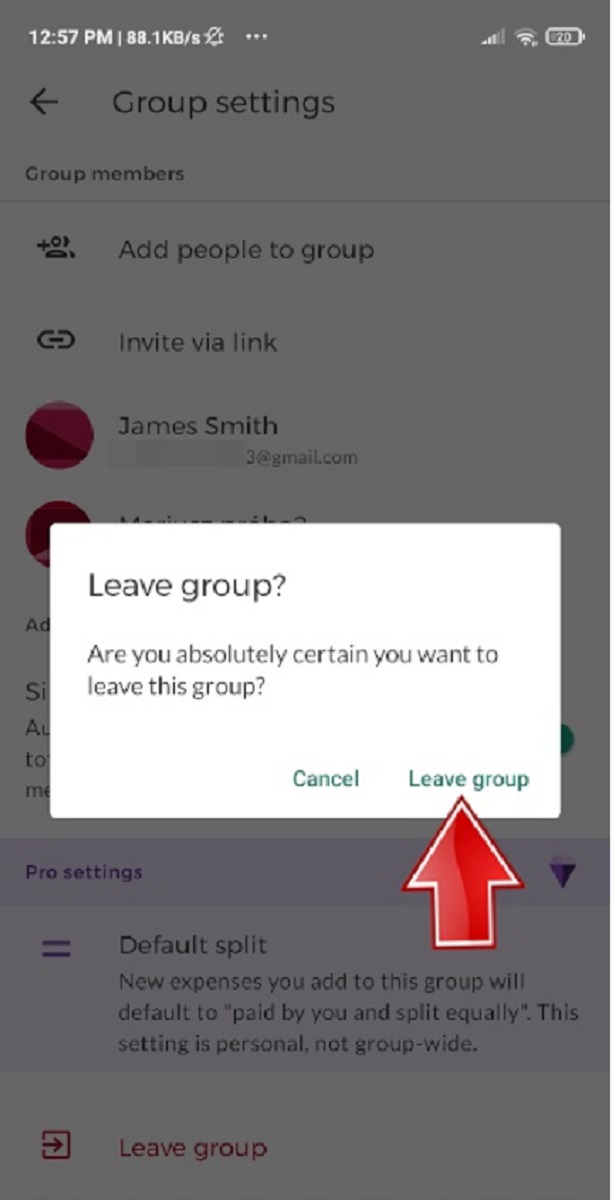
When you click or tap on the “Leave Group” button, a confirmation pop-up will appear. This pop-up will typically provide a brief message reminding you that leaving the group means you won’t have access to any future expenses or updates related to that group.
Read the confirmation message carefully and take a moment to consider whether you really want to proceed with leaving the group. If you’re certain about your decision, click or tap on the “Leave Group” or “Confirm” button within the pop-up to finalize your choice.
Once you confirm your decision to leave the group, Splitwise will process your request, and you will be immediately removed as a member of that group. You will no longer see the group listed in your groups section, and you won’t receive any further notifications or updates from that group.
Remember that leaving a group does not automatically resolve any outstanding balances or debts you may have within the group. You will need to settle any financial obligations separately with the other group members.
Now that you’ve confirmed your decision, we can move on to the next step: communicating with other group members.
Step 6: Communicate with other group members
After leaving the group, it’s a good practice to communicate with the other group members to inform them about your decision and any outstanding balances or debts that need to be settled. Clear communication ensures that everyone involved is on the same page and can take the necessary steps to resolve any financial obligations.
You can reach out to the group members through various means such as a group chat within Splitwise, direct messaging, or any other preferred communication channel that the group uses. Be open and transparent about your decision to leave the group and provide any necessary details regarding outstanding balances.
If there are pending payments or expenses that need to be settled, discuss with the group members on how to proceed. Splitwise provides features and tools to track and settle balances, making it easier for everyone to reconcile any financial matters.
Additionally, it’s important to maintain an amicable and understanding attitude throughout the communication process. Remember that Splitwise is designed to promote fairness and transparency in sharing expenses, and open communication plays a crucial role in ensuring a positive experience for all group members.
By communicating effectively, you can address any concerns or questions that may arise from your departure and work together with the other group members to find mutually agreeable solutions. This will help maintain healthy relationships and financial accountability within the group.
Congratulations! You’ve successfully gone through the process of opting out of a group in Splitwise. By following these steps and communicating with the other group members, you’ve taken control of your Splitwise account and can now focus on managing your finances in the way that best suits your needs.
If you ever decide to join a group again in the future, you can always create or join a new group using the same Splitwise account.
Conclusion
Opting out of a group in Splitwise is a simple and straightforward process that allows you to regain control over your financial management. By following the steps outlined in this article, you can easily leave a group that no longer aligns with your needs or preferences.
We started by accessing your Splitwise account, either through the website or the mobile app. From there, we navigated to the specific group page and accessed the settings. Within the settings, we located the “Leave Group” button and confirmed our decision to opt out of the group.
After leaving the group, it’s important to communicate with the other group members to inform them about your decision and settle any outstanding balances or debts. Clear communication fosters transparency and ensures a smooth financial management process for all parties involved.
Remember that Splitwise is designed to simplify expense-sharing and promote fairness among group members. By utilizing the platform’s features and communicating openly, you can maintain positive relationships and financial accountability within your groups.
If you ever decide to join a group again in the future, the process remains just as straightforward, allowing you to create or join a new group using your existing Splitwise account.
By opting out of groups that no longer serve your needs and managing your finances proactively, you can enjoy the benefits of Splitwise while maintaining control over your financial well-being.
So, take charge of your Splitwise account, explore the possibilities, and continue to manage your shared expenses with ease and efficiency.