Introduction
Welcome to the world of Splitwise, a popular platform designed to simplify splitting bills and keeping track of expenses among friends, roommates, and groups. Dealing with recurring bills can often be a hassle, but Splitwise provides a convenient solution to manage them effortlessly and efficiently.
Whether you’re sharing costs for rent, utilities, or subscription services, Splitwise’s recurring bill feature enables you to set up and track these expenses with ease. By automating the process of creating and managing recurring bills, Splitwise saves you time and ensures that everyone in your group stays on the same page.
In this article, we will walk you through the process of setting up and managing recurring bills in Splitwise. From creating a group to specifying the frequency and start date of the bill, we’ll cover all the necessary steps to make your recurring bill management a breeze. So, let’s dive in and discover how Splitwise can revolutionize the way you handle your shared expenses.
Why use Splitwise for recurring bills?
Splitwise offers several advantages when it comes to managing recurring bills. Here are some compelling reasons why you should consider using Splitwise:
1. Convenience: Splitwise streamlines the process of managing recurring bills by automating the creation and tracking of expenses. With just a few simple steps, you can set up your bills and let Splitwise handle the rest. No more manual calculations or reminders – Splitwise does it all for you.
2. Accuracy: Splitwise ensures accuracy in expense tracking. By using the platform, you eliminate the possibility of human error when dividing bills among multiple participants. Splitwise calculates each person’s share based on the specified split method, whether it’s an equal split, percentage, or custom ratios, providing transparent and accurate results.
3. Transparency: Splitwise keeps everyone in the loop by providing real-time updates on bill payments. Each participant can view the status of their payments and see who has paid their portion and who still needs to contribute. This transparency promotes accountability and ensures that everyone is aware of their financial responsibilities.
4. Communication: Splitwise includes a built-in chat feature, allowing group members to communicate and discuss bill-related matters directly within the app. This feature eliminates the need for separate communication channels, making it easier to address any questions or concerns that may arise.
5. Flexibility: Splitwise offers flexibility in managing recurring bills. You can customize the frequency of the bills, whether they occur monthly, weekly, or on a specific day of the month. This flexibility allows you to adapt to different billing cycles and ensures that your bills align with your specific needs and preferences.
6. Expense summaries: Splitwise provides comprehensive expense summaries for each participant. You can easily view a breakdown of your shared expenses, including how much you owe and how much others owe you. These summaries help you keep track of your financial commitments and simplify the process of settling up.
With these benefits in mind, Splitwise emerges as an excellent tool for managing recurring bills. Its convenience, accuracy, transparency, communication features, flexibility, and expense summaries make it a reliable platform for streamlining shared expenses. Now that you understand the advantages, let’s delve into how to set up recurring bills in Splitwise.
Setting up recurring bills in Splitwise
Setting up recurring bills in Splitwise is a straightforward process that ensures you never miss a payment and makes managing your shared expenses a breeze. Follow these steps to get started:
Step 1: Create a group
To begin, create a group within Splitwise that includes all the participants involved in the recurring bill. This could be your roommate, friends, or any group you want to share expenses with. Give the group a name that reflects the purpose or nature of the shared expenses to easily identify it.
Step 2: Add participants to the group
Once the group is created, add the individuals involved in the recurring bill to the group. Splitwise allows you to easily search and add your contacts, or you can manually enter their names and email addresses. Adding participants ensures that everyone receives notifications and can actively contribute to the bill’s management.
Step 3: Add the recurring bill
Within the group, navigate to the “Expenses” tab and select the option to add a new expense. Specify that it is a recurring bill by selecting the appropriate option.
Step 4: Specify the frequency and start date
Choose the frequency at which the bill recurs, whether it’s monthly, weekly, or a specific day of the month. Select the start date from which the bill cycle begins.
Step 5: Enter the bill details
Enter the relevant details of the recurring bill, such as the bill name, total amount, split method, and any notes or descriptions that may be helpful for the participants. You can also attach receipts or invoices to provide additional documentation.
Step 6: Confirm and save the recurring bill
Review the entered information and make any necessary adjustments. Once everything is in order, confirm and save the recurring bill. Splitwise will automatically generate the appropriate bill entries based on the specified frequency and start date.
By following these steps, you can easily set up recurring bills within Splitwise, ensuring seamless management and collaboration within your group. But what if you need to make changes to a recurring bill or delete it? Read on to learn how to manage recurring bills in Splitwise.
Step 1: Create a group
The first step in setting up recurring bills in Splitwise is to create a group. A group serves as the container for all the shared expenses and participants involved in the recurring bill. Creating a group not only organizes your expenses but also enables seamless communication and collaboration within the group members. Follow these steps to create a group:
1. Log in to Splitwise: Open the Splitwise app or visit the Splitwise website in your preferred browser. Sign in to your Splitwise account using your credentials.
2. Access the “Groups” section: Once you are logged in, navigate to the “Groups” section of the app or website. This section is typically located in the main navigation menu.
3. Click on “Create a group”: Within the “Groups” section, look for the option to create a new group. Click on this option to begin the group creation process.
4. Provide group details: In the group creation form, enter the necessary details for your new group. This includes the name of the group, a short description or purpose of the group, and any additional settings you may want to configure, such as privacy settings or group visibility.
5. Add group members: After entering the group details, you will have the option to add members to the group. You can search for existing Splitwise users by name or email address, or you can manually add members by entering their details.
6. Save the group: Once you have added all the desired participants and reviewed the group details, click on the “Save” or “Create” button to finalize the group creation process. Splitwise will create the group and notify all the added members.
7. Customize the group: After creating the group, you have the flexibility to customize it further. You can modify the group settings, invite additional members, or adjust other settings to fit your specific requirements.
Creating a group in Splitwise is the first step to organizing and managing your recurring bills. By following these steps, you can easily set up a group and begin streamlining your shared expenses with ease. Now that you have a group, let’s move on to the next step: adding participants to the group.
Step 2: Add participants to the group
After creating a group for your recurring bills in Splitwise, the next step is to add participants to the group. Adding participants ensures that everyone involved in the shared expenses is included and can actively contribute to the bill management. Follow these steps to add participants to your group:
1. Access the group: Log in to your Splitwise account and navigate to the “Groups” section of the app or website. Locate the group that you created for your recurring bills and click on it to access the group page.
2. Click on “Add a member”: On the group page, look for the option or button to add a new member. This option is usually displayed prominently and labeled as “Add a member” or similar.
3. Search for existing Splitwise users: Splitwise allows you to search for existing Splitwise users and add them to your group. Enter the name or email address of the person you want to add and select them from the search results. Repeat this step for each participant you wish to add.
4. Manually enter participant details: If the participants you want to add are not registered Splitwise users, you can manually enter their details. Enter their name, email address, and any other necessary information in the provided fields. You can also specify their role or designation within the group, such as being an admin or a regular member.
5. Save the participant details: After adding all the desired participants, review the entered details and ensure their accuracy. Click on the “Save” or “Add” button to save the participant details and add them to the group.
6. Notification to participants: Once the participants have been added to the group, Splitwise will automatically notify them via email or app notification. This notification will inform them about their inclusion in the group and provide any necessary instructions or details.
7. Repeat for additional participants: If there are more participants you wish to add to the group, simply repeat the process of searching for existing users or manually entering their details until all participants are added.
By adding participants to the group, you ensure that everyone who is involved in the recurring bills is included and has access to the shared expenses and relevant updates. With the group set up and participants added, it’s time to move on to the next step: adding the recurring bill itself.
Step 3: Add the recurring bill
Now that you have created a group and added participants to it, it’s time to add the recurring bill to Splitwise. Adding the recurring bill allows you to specify the details of the bill and begin tracking it within the group. Follow these steps to add the recurring bill:
1. Access the group: Log in to your Splitwise account and navigate to the group where you want to add the recurring bill. This is the group you created for managing your shared expenses.
2. Go to “Expenses”: Once you’re on the group page, locate the “Expenses” tab or option. Click on it to access the section where you can add and manage expenses within the group.
3. Add a new expense: On the Expenses page, look for the option to add a new expense. This is usually represented by a button labeled “Add Expense” or a plus (+) sign.
4. Specify recurring: In the expense creation form, you will have the option to specify that the expense is recurring. Look for the recurring option and make sure to select it. This indicates that the expense is a recurring bill that will be tracked automatically.
5. Enter bill details: Fill in the necessary details of the recurring bill, such as the bill name, the total amount of the bill, and any additional information or notes. This allows you to provide context and details about the bill to the participants in the group.
6. Split the bill: Splitwise enables you to divide the bill among the participants based on specific split methods. Select the appropriate split method, whether it’s an equal split, a percentage split, or custom ratios. This determines how the bill amount will be divided among the participants.
7. Attach receipts (if necessary): You can attach digital receipts or supporting documents to the recurring bill to provide additional documentation or proof of payment. This is especially useful for bills that require proof of payment or for record-keeping purposes.
8. Save the recurring bill: Once you have entered all the necessary information and reviewed the details, click on the “Save” or “Add” button to save the recurring bill in Splitwise.
By following these steps, you can easily add the recurring bill to Splitwise, specifying the details and ensuring that it is tracked within the group. Now that the recurring bill is added, it’s time to move on to the next step: specifying the frequency and start date for the bill.
Step 4: Specify the frequency and start date
After adding the recurring bill in Splitwise, the next step is to specify the frequency at which the bill recurs and set a start date. This allows Splitwise to automate the generation of bill entries based on the specified frequency. Follow these steps to specify the frequency and start date:
1. Access the recurring bill: Log in to your Splitwise account and navigate to the group where the recurring bill is added. Locate the recurring bill within the group’s Expenses section and click on it to access the bill details.
2. Edit the recurring bill: Once you’re on the recurring bill page, look for the option to edit or modify the bill details. This is usually represented by an “Edit” button or an icon that resembles a pencil.
3. Specify the frequency: In the edit form, you will find the option to specify the frequency at which the bill recurs. Choose the appropriate frequency, such as monthly, weekly, or a specific day of the month. This determines how often the bill entries will be generated by Splitwise.
4. Set the start date: Select the start date from which the bill cycle begins. This is the date on which the first bill entry will be generated. Make sure to choose a start date that aligns with when the bill is due or when the payment cycle begins.
5. Review and save: Review the changes you made to the recurring bill, including the frequency and start date. Verify that the details are correct, and if everything looks good, click on the “Save” or “Update” button to save the changes.
By specifying the frequency and start date, you ensure that Splitwise generates bill entries at the appropriate intervals and keeps track of the recurring bill in the group. Once you have defined the frequency and start date, it’s time to move on to the next step: entering the bill details.
Step 5: Enter the bill details
After specifying the frequency and start date of the recurring bill in Splitwise, it’s time to enter the specific details of the bill. This step allows you to provide comprehensive information about the bill, including the name, amount, and any additional notes. Follow these steps to enter the bill details:
1. Access the recurring bill: Log in to your Splitwise account and navigate to the group where the recurring bill is added. Find the recurring bill within the Expenses section of the group and click on it to access the bill details.
2. Edit the recurring bill: Once you’re on the recurring bill page, look for the option to edit or modify the bill details. This is typically represented by an “Edit” button or an icon resembling a pencil.
3. Enter the bill name: In the bill details form, enter a descriptive and recognizable name for the bill. This will help all participants in the group easily identify and refer to the bill.
4. Specify the bill amount: Enter the total amount of the bill in the provided field. Make sure to enter the correct amount to ensure accurate calculations and distributions among the participants.
5. Choose the split method: Splitwise offers different split methods, such as equal split, percentage split, or custom ratios. Select the appropriate split method for dividing the bill amount among the participants. This determines how the amount will be allocated among the group members.
6. Add any additional notes: If there are any specific instructions, due dates, or additional notes related to the bill, include them in the notes section. This provides clarity and ensures that everyone in the group is aware of important details regarding the bill.
7. Attach receipts or supporting documents (if necessary): If you have any digital receipts or supporting documents related to the bill, upload them as attachments. This helps keep track of important documentation and provides proof of payment or expenses.
8. Review and save: Before saving the bill details, carefully review the entered information to ensure accuracy. Double-check the bill name, amount, split method, and any additional notes or attachments. Once you’re satisfied, click on the “Save” or “Update” button to save the bill details.
By entering the specific details of the bill, you provide clarity and transparency to all participants in the group. They can easily understand the bill and actively contribute to the shared expenses. Now that you have entered the bill details, let’s move on to the next step: confirming and saving the recurring bill.
Step 6: Confirm and save the recurring bill
After entering the bill details in Splitwise, the next step is to confirm and save the recurring bill. This ensures that all the information is accurate and ready to be tracked within the group. Follow these steps to complete the process:
1. Review the recurring bill: Carefully review all the details you have entered for the recurring bill. Double-check the bill name, amount, split method, start date, and any additional notes or attachments. Verify that everything is correct and reflects the bill accurately.
2. Make any necessary adjustments: If you notice any errors or want to make changes to the bill details, edit the relevant fields accordingly. This allows you to correct any mistakes or update the information based on the latest updates regarding the bill.
3. Check the frequency and start date: Ensure that the specified frequency and start date align with the bill’s recurring nature and the bill cycle’s actual timeframe. If needed, make any adjustments to the frequency or start date to accurately reflect the billing cycle.
4. Verify the split method: Confirm that the chosen split method accurately splits the bill amount among the participants based on your preferences. Ensure that the split method reflects the agreed-upon arrangement among the group members.
5. Save the recurring bill: Once you have reviewed and adjusted the details, click on the “Save” or “Update” button to save the recurring bill in Splitwise. This action finalizes the creation of the recurring bill and adds it to the group’s expenses.
6. Notify the participants: After saving the recurring bill, Splitwise will automatically notify all the participants in the group regarding the bill’s addition and the details associated with it. This notification ensures that everyone is aware of the new recurring bill and can actively participate in managing the shared expenses.
7. Track the recurring bill: With the recurring bill saved, Splitwise will generate bill entries based on the specified frequency and start date. You can now track the bill within the group, view payment statuses, and easily calculate the amounts owed by each participant.
By confirming and saving the recurring bill, you establish the foundation for seamless management and tracking of the shared expenses. With the recurring bill now in place, you can move forward with managing and maintaining it, as well as making any necessary adjustments or updates as needed.
Managing recurring bills in Splitwise
Once you have set up recurring bills in Splitwise, it’s important to understand how to manage and maintain them effectively. Splitwise provides various features and options to help you stay organized and keep track of your shared expenses. Here’s how you can manage recurring bills in Splitwise:
Editing a recurring bill: If there are any changes to the recurring bill, such as an adjustment in the amount, split method, or bill frequency, you can easily edit the bill details in Splitwise. Access the recurring bill in the group’s Expenses section, select the edit option, make the necessary modifications, and save the updated details. Splitwise will then apply the changes to the future bill entries.
Deleting a recurring bill: If you no longer need to track a recurring bill or if the bill is no longer relevant, you can delete it from Splitwise. Locate the recurring bill in the Expenses section, select the delete option, and confirm the deletion. Deleting a recurring bill will remove all future bill entries associated with it, so ensure you no longer require the bill history.
Tracking payments for recurring bills: Splitwise simplifies tracking payments for recurring bills by providing real-time updates on payment statuses. Participants can mark their payments as “Paid” within Splitwise, indicating their contribution towards the bill. Splitwise automatically calculates each participant’s balance based on the amount they owe or are owed. This transparency in payment tracking eliminates confusion and ensures that everyone is up to date with their financial responsibilities.
Communication within the group: Splitwise includes a built-in chat feature that allows group members to communicate and discuss bill-related matters. This feature enables seamless communication within the app, eliminating the need for separate messaging platforms. Participants can use the chat feature to clarify any questions, discuss bill details, or coordinate payments, promoting effective collaboration and resolving any issues that may arise.
Payment reminders: Splitwise sends payment reminders to participants with outstanding balances. These reminders serve as prompts to settle up and ensure that the shared expenses are promptly addressed. The reminders can be customized to suit your preferences and can be sent via email or app notifications, helping participants stay on top of their payment obligations.
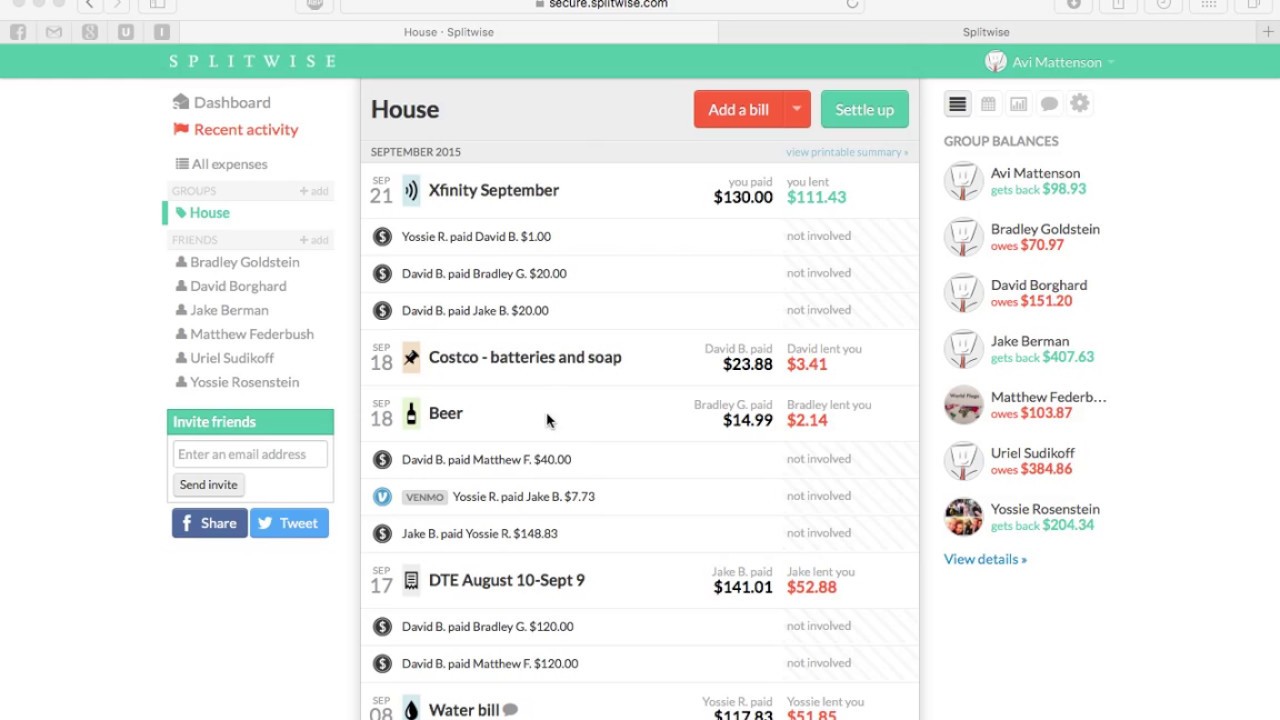
Expense summaries and reports: Splitwise provides comprehensive expense summaries and reports for each participant in the group. These summaries detail the total amount owed, the total amount owed to them, and a breakdown of individual expenses. Participants can easily access these summaries to track their financial commitments, simplify expense settlements, and maintain a clear overview of their shared expenses.
By effectively managing and maintaining your recurring bills in Splitwise, you can streamline your shared expenses and ensure a smooth process for all participants. Take advantage of the editing and deleting options, track payments, utilize the communication features, and leverage the expense summaries to stay organized and on top of your recurring bills.
Editing a recurring bill
Splitwise provides the flexibility to edit recurring bills, allowing you to make adjustments when needed. Whether you need to update the amount, change the split method, or modify the bill frequency, editing a recurring bill is a simple process. Here’s how you can edit a recurring bill in Splitwise:
1. Access the recurring bill: Log in to your Splitwise account and navigate to the group where the recurring bill is located. Find the recurring bill within the Expenses section and click on it to open the bill details.
2. Select the edit option: Once you’re on the recurring bill page, look for the edit option. This can usually be found as an “Edit” button or an icon resembling a pencil. Click on it to enter the edit mode for the recurring bill.
3. Make the necessary changes: Within the edit mode, you can modify various aspects of the recurring bill. Update the bill name, amount, split method, or any other details that require modification. You can also alter the bill frequency, if necessary, by adjusting the specified intervals.
4. Review the changes: Before saving the edits, carefully review all the modifications you’ve made. Double-check the bill details to ensure accuracy and that the updates reflect the changes you want to implement.
5. Save the changes: Once you’re satisfied with the edits, click on the “Save” or “Update” button to save the changes to the recurring bill. Splitwise will then apply the updates to the future bill entries based on the modified details.
6. Communicate the changes (if necessary): After editing the recurring bill, it can be beneficial to communicate the changes to the participants involved. Utilize Splitwise’s built-in chat feature or any other chosen means of communication to inform the group members about the modified bill details and ensure everyone is aware of the updates.
By being able to edit recurring bills in Splitwise, you have the flexibility to adjust them as needed. This feature allows you to keep your shared expenses up to date, reflecting any changes in the bill amount, split method, frequency, or other relevant details. Regularly reviewing and updating recurring bills helps to maintain accurate record-keeping and ensures that all participants are informed of any modifications made to the bill.
Deleting a recurring bill
In certain situations, you may need to delete a recurring bill in Splitwise. Whether the bill is no longer relevant or you need to stop tracking it, deleting a recurring bill is a straightforward process. Here’s how you can delete a recurring bill in Splitwise:
1. Access the recurring bill: Log in to your Splitwise account and navigate to the group that contains the recurring bill. Locate the recurring bill within the Expenses section and click on it to access the bill details.
2. Look for the delete option: Once you’re on the recurring bill page, search for the delete option. This is typically represented by a delete button or an icon resembling a trash bin. Click on it to initiate the deletion process.
3. Confirm the deletion: Upon selecting the delete option, Splitwise will prompt you to confirm the deletion. Read the confirmation message carefully to make sure you are deleting the correct recurring bill.
4. Verify the deletion: After confirming the deletion, Splitwise will permanently remove the recurring bill and all future bill entries associated with it. Ensure that you no longer require access to the bill history or any related information before proceeding.
5. Communicate the deletion (if necessary): If the participants in the group need to be informed about the deletion, you can use Splitwise’s chat feature or any other means of communication to communicate the removal of the recurring bill. This ensures that everyone is aware of the decision to delete the bill.
It’s important to note that deleting a recurring bill removes all future instances of the bill and cannot be undone. If you have any doubts or concerns about deleting a recurring bill, it’s recommended to first discuss it with the group members or consider whether pausing or editing the bill is a more suitable option.
By being able to delete a recurring bill in Splitwise, you have the flexibility to manage and maintain your shared expenses more effectively. Deleting a recurring bill removes it from your records, allowing you to keep your expense list organized and up to date.
Tracking payments for recurring bills
Tracking payments for recurring bills in Splitwise is a key aspect of effectively managing shared expenses within a group. Splitwise provides a seamless way to monitor and record payments, ensuring transparency and accuracy among participants. Here’s how you can track payments for recurring bills in Splitwise:
1. Access the recurring bill: Log in to your Splitwise account and navigate to the group containing the recurring bill. Locate the recurring bill within the Expenses section and click on it to access the bill details.
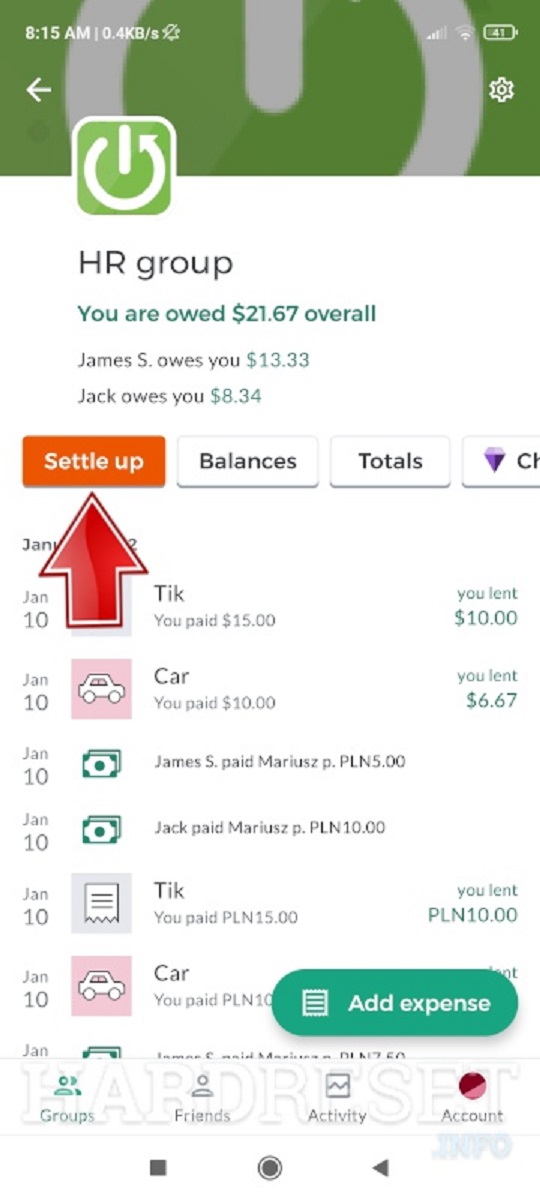
2. View payment statuses: Within the recurring bill’s details, you will see a list of participants and their respective payment statuses. Splitwise provides real-time updates on who has paid and who still needs to contribute to the bill.
3. Mark payments as “Paid”: Participants can mark their payments as “Paid” within Splitwise. When a participant makes a payment towards the recurring bill, they can select the “Mark as Paid” option next to their name in the payment status list. This action indicates that they have fulfilled their financial obligation.
4. Automatic balance calculations: By marking payments as “Paid,” Splitwise automatically calculates the updated balances for each participant within the group. It considers the bill amount, split method, and previous payments to determine the current amount owed by or owed to each participant.
5. Balance adjustments and payments: Participants can settle outstanding balances by making payments to others directly outside of Splitwise. They can use a variety of payment methods, including cash, bank transfers, or online payment platforms, to make the payment and settle up their remaining balance.
6. Payment reminders: Splitwise sends out payment reminders to individuals who have outstanding balances. These reminders serve as gentle prompts to settle up and ensure that all participants are aware of their payment obligations.
7. Communication within the group: Splitwise features a built-in chat function that allows group members to communicate and discuss payment-related matters. This feature can be used to clarify any questions, coordinate payment details, or address any issues that arise during the payment process.
By effectively tracking payments for recurring bills in Splitwise, you promote transparency and accountability within the group. Participants can easily monitor their payment statuses, settle outstanding balances, and maintain a clear overview of their financial commitments. Splitwise’s automated balance calculations and payment reminders help streamline the payment process and ensure smooth expense management for all involved.
Conclusion
Splitwise’s recurring bill feature offers a convenient and efficient solution for managing shared expenses within a group. By following the steps outlined in this guide, you can easily set up, edit, and track recurring bills in Splitwise.
With Splitwise, you can create a group and add participants, ensuring everyone is involved in the shared expenses. Specifying the frequency and start date allows Splitwise to generate bill entries automatically, saving you time and effort. By entering the bill details accurately, you provide clarity and transparency to all participants.
Editing a recurring bill and deleting it when necessary ensures that your shared expenses align with the current situation. Tracking payments within Splitwise allows participants to mark their payments as “Paid,” promoting accountability and eliminating confusion. The built-in chat feature encourages seamless communication within the group, facilitating discussions and resolving any bill-related matters.
Splitwise provides comprehensive expense summaries and reports, enabling participants to easily track their financial commitments and settle up. The platform’s convenience, accuracy, transparency, flexibility, and communication features make it an excellent tool for managing recurring bills.
So, if you’re looking for a hassle-free way to handle recurring bills and simplify the process of splitting expenses, give Splitwise a try. With its user-friendly interface and robust features, you can effortlessly manage your shared expenses within groups, ensuring financial transparency and promoting a harmonious financial dynamic among all participants.