Introduction
Welcome to the world of Near Field Communication (NFC), a fascinating technology that has revolutionized the way we interact with our smartphones and other devices. With NFC, you can transfer data with just a simple tap, making tasks such as making payments, sharing files, and exchanging information effortless and convenient.
NFC enables seamless communication between devices in close proximity, allowing you to perform a wide range of tasks quickly and effortlessly. This technology has gained immense popularity and is now integrated into various devices, including smartphones, tablets, and even wearable gadgets.
In this article, we will dive into the world of NFC tags and explore how you can program them to unleash their full potential. NFC tags are small, unpowered devices that can store and transmit information wirelessly. By programming these tags, you can assign them different functions and automate various tasks.
Whether you are a tech enthusiast looking to explore the endless possibilities of NFC or a developer seeking to integrate NFC functionality into your application, this article will guide you through the process of programming NFC tags effectively.
From choosing the right app to erasing or formatting the tag, we will walk you through the steps required to program an NFC tag successfully. Along the way, we will also discuss the different types of NFC tags available and provide troubleshooting tips for common issues you may encounter.
So, if you are ready to embark on this exciting NFC journey, let’s get started and unlock the potential of these powerful little tags!
What is NFC?
Near Field Communication (NFC) is a short-range wireless communication technology that allows devices to exchange information when they are brought within close proximity (usually a few centimeters). NFC has become increasingly prevalent in recent years due to its versatility and convenience.
NFC operates on the principles of contactless communication and electromagnetic induction. It requires two primary components: an NFC-enabled device (such as a smartphone or tablet) and an NFC tag or another compatible NFC device.
NFC offers three distinct modes of operation:
1. Peer-to-Peer Mode: In this mode, two NFC-enabled devices can communicate directly with each other, allowing quick data transfer, such as sharing files, contacts, or even initiating Bluetooth connections.
2. Read/Write Mode: NFC-enabled devices can read information from and write data onto NFC tags or other compatible devices. This mode is particularly useful for tasks like contactless payments, access control, or retrieving information from smart posters.
3. Card Emulation Mode: In this mode, an NFC-enabled device can emulate an NFC card or tag, allowing it to be used for purposes such as mobile payments or transportation ticketing.
NFC operates at a frequency of 13.56 MHz and supports communication speeds of up to 424 kbps. It is designed for short-range communication, typically up to a maximum distance of 4 centimeters. This short range makes NFC more secure and less susceptible to data breaches compared to other wireless technologies like Bluetooth or Wi-Fi.
Since NFC is a widely adopted technology, it is supported by a myriad of devices and platforms, including Android, iOS, and Windows. Many modern smartphones come equipped with NFC functionality, enabling users to take advantage of the various applications and services that utilize this technology.
Overall, NFC has transformed the way we interact with our devices, unlocking a world of possibilities for contactless communication. Its ease of use, security, and versatility make it invaluable in a wide range of industries, including healthcare, retail, transportation, and more.
Now that we understand the fundamentals of NFC, let’s delve into the intriguing world of NFC tags and discover how we can harness their potential by programming them to perform various tasks.
How Do NFC Tags Work?
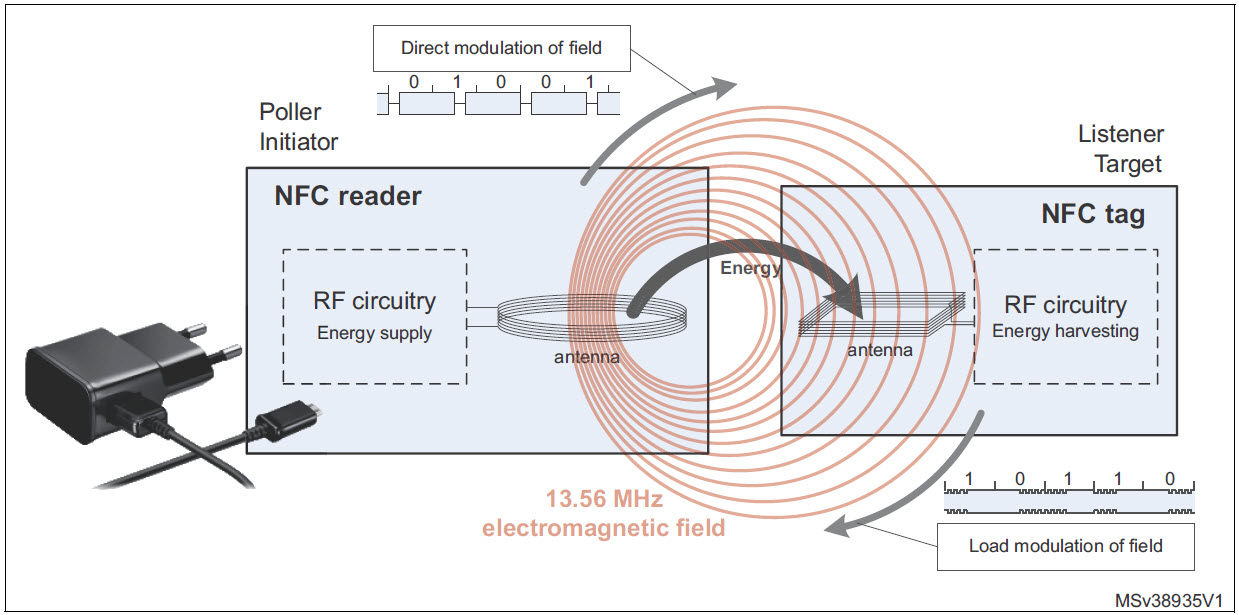
NFC tags are small, unpowered devices that contain an antenna and a tiny microchip. These tags rely on the principle of electromagnetic induction to communicate with NFC-enabled devices. When an NFC-enabled device, such as a smartphone, is brought into close proximity to an NFC tag, the two devices establish a connection and exchange information.
The NFC tag consists of several components that work together to facilitate communication:
1. Antenna: The antenna in the NFC tag is responsible for transmitting and receiving electromagnetic waves. When an NFC-enabled device gets close, it generates an RF (radio frequency) field that powers the tag and allows communication to take place.
2. Microchip: The microchip in the NFC tag stores data and contains the necessary circuitry to process and communicate with the NFC-enabled device. The microchip may have different storage capacities and capabilities, depending on the type of NFC tag.
3. Data Encoding: NFC tags can store various types of data, including text, URLs, contact information, or even executable commands. The data is usually encoded in a specific format, such as NDEF (NFC Data Exchange Format), which ensures compatibility across different NFC-enabled devices.
When an NFC-enabled device comes in close proximity to an NFC tag, the devices’ antennas interact and create an electromagnetic field. This field induces a small electrical current in the tag’s antenna, powering the microchip. The microchip then modulates the current in the antenna to transmit data back to the NFC-enabled device.
NFC tags can be read-only, meaning their contents are fixed and cannot be modified, or they can be read-write, allowing data to be written and rewritten multiple times. This flexibility makes NFC tags incredibly versatile, as they can be programmed to perform various actions when tapped by an NFC-enabled device.
It is important to note that NFC tags cannot actively initiate communication; they rely on an NFC-enabled device to initiate the transaction. Once activated by an NFC-enabled device, the NFC tag responds and shares its stored data or executes specific commands.
Now that we have a basic understanding of how NFC tags work, let’s explore the different types of NFC tags that are available and the considerations for selecting the right one for your needs.
Types of NFC Tags
When it comes to NFC tags, there are several different types available, each with its own unique characteristics and capabilities. It’s essential to understand these variations to ensure you choose the right NFC tag for your specific requirements. Let’s explore some of the common types of NFC tags:
1. NFC Forum Type 1: These tags have a storage capacity of up to 48 bytes and are often used for simple tasks like storing URLs or small amounts of text. They are compatible with all NFC-enabled devices.
2. NFC Forum Type 2: Type 2 tags have a storage capacity ranging from 48 bytes to 2 kilobytes. They are widely used in applications like NFC-enabled smart posters, business cards, and retail product labels. Type 2 tags are compatible with most NFC devices.
3. NFC Forum Type 3: Designed for more complex applications, Type 3 tags have a higher storage capacity, typically ranging from 128 kilobytes to 2 megabytes. They are commonly used in contactless payment systems, public transportation cards, and other applications requiring larger data storage.
4. NFC Forum Type 4: Type 4 tags offer the largest storage capacity, ranging from 32 kilobytes to several megabytes. They are highly secure and commonly utilized in applications like access control cards, e-passports, and authentication systems.
5. Writable vs. Read-Only: NFC tags can be either writable or read-only. Writable tags allow you to write and rewrite data multiple times, making them versatile for dynamic applications. On the other hand, read-only tags come with pre-programmed data that cannot be modified.
6. Form Factors: NFC tags come in various physical forms, including stickers, keychains, wristbands, cards, and more. The choice of form factor depends on the intended application and user preference.
In addition to these standard NFC tags, there are also specialized tags such as anti-metal NFC tags (designed for use on metal surfaces), NFC-enabled microSD cards, and NFC-enabled SIM cards, each with their own unique features and use cases.
When selecting an NFC tag, consider factors such as the required storage capacity, compatibility with your NFC-enabled devices, the desired level of security, and any additional features or form factors that may be essential for your application.
Now that we have explored the different types of NFC tags available, it’s time to delve into the process of programming these tags to unleash their full potential.
Programming an NFC Tag
Programming an NFC tag involves writing data onto the tag, assigning specific functions, and configuring it to perform desired actions when tapped by an NFC-enabled device. The process typically involves the following steps:
Step 1: Choosing the Right App: To program an NFC tag, you’ll need a compatible app on your NFC-enabled device. There are various apps available for both Android and iOS platforms that provide the necessary tools and features to program NFC tags. Popular apps include NFC Tools, Trigger, and NFC TagWriter.
Step 2: Erase or Format the NFC Tag (if necessary): If the NFC tag has previously programmed data, you may need to erase or format it before writing new data. This step ensures a clean slate for your programming.
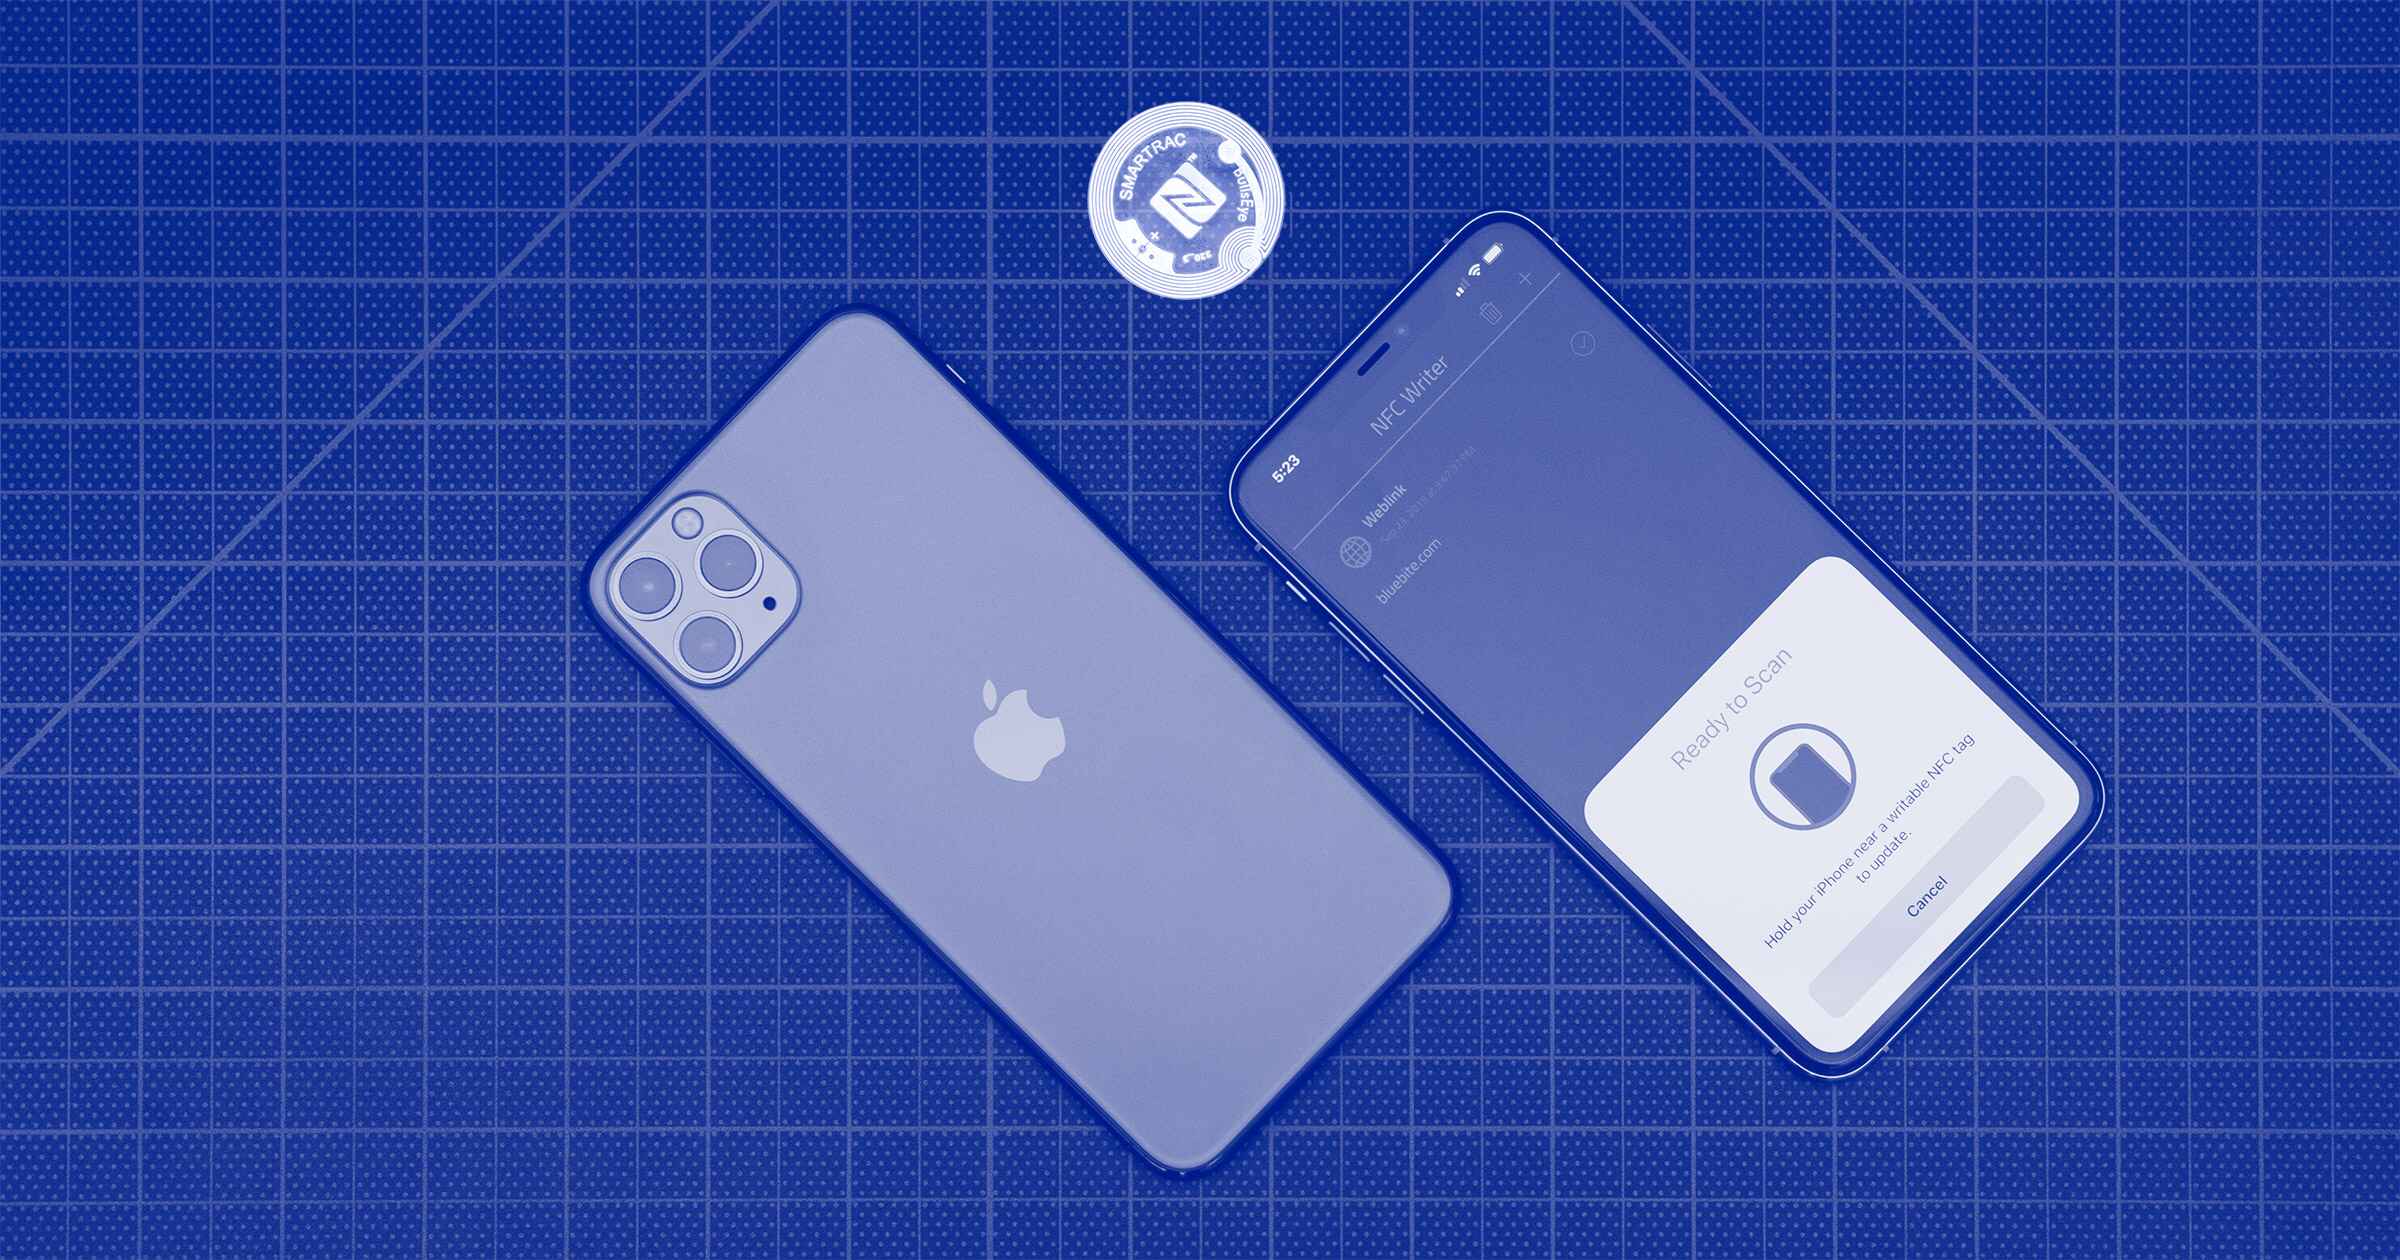
Step 3: Writing Data to the NFC Tag: Use the NFC programming app to write data onto the NFC tag. This can include information such as URLs, contact details, or custom commands. The app will guide you through the process, allowing you to select the type of data and configure its behavior.
Step 4: Testing the NFC Tag: Once the data is written onto the NFC tag, it’s crucial to test its functionality. Simply tap your NFC-enabled device against the programmed tag and observe the expected action. For example, if you have programmed a URL, the device’s browser should open and load the corresponding webpage.
During the programming process, you may encounter certain challenges or issues. Let’s discuss some common troubleshooting tips to help you overcome potential obstacles.
Troubleshooting Common Issues:
1. Tag Compatibility: Ensure that the NFC tag you are using is compatible with your NFC-enabled device. Some tags may not work with certain devices due to technology or compatibility limitations.
2. Distance and Alignment: Make sure you tap your device against the NFC tag with proper alignment and at a close enough distance. NFC requires close proximity for communication to occur effectively.
3. Data Encoding: Ensure that the data you are writing onto the NFC tag is encoded correctly. Incorrect encoding may cause compatibility issues or lead to unexpected behavior.
4. App Permissions: Check that the NFC programming app has the necessary permissions to access NFC functionality on your device. Without proper permissions, the app may not be able to write data onto the NFC tag.
By following these steps and troubleshooting tips, you can successfully program an NFC tag and customize its functionality based on your specific needs. Programming NFC tags opens up a world of possibilities, allowing you to automate tasks and streamline interactions with your NFC-enabled devices.
Now that you have learned how to program NFC tags, let’s wrap up our journey by highlighting the key aspects covered in this article.
Step 1: Choosing the Right App
When it comes to programming NFC tags, selecting the right app is crucial. The app you choose will provide the necessary tools and features to program and customize the behavior of your NFC tags. Here are some key considerations to keep in mind when choosing an app:
Compatibility: Ensure that the app is compatible with your specific NFC-enabled device. Check the app’s compatibility requirements and verify that it works seamlessly with your smartphone or tablet’s operating system.
User-Friendly Interface: Look for an app with a user-friendly interface that is easy to navigate and understand. The app should provide clear instructions and intuitive controls to make the programming process smooth and hassle-free.
Feature Set: Consider the features and functionalities offered by the app. Look for options that align with your specific programming needs. For example, if you want to program complex tasks or write custom commands, ensure that the app supports such capabilities.
Read and Write Capabilities: Verify that the app allows both reading and writing to NFC tags. This is crucial for programming and customizing the behavior of the tags effectively. The app should provide options to write different types of data onto the tags, such as URLs, text, or commands, depending on your requirements.
Advanced Options: If you have more advanced programming needs, look for an app that provides additional options such as task automation, conditional programming, or integration with other apps or services. These features can enhance the functionality and versatility of your programmed NFC tags.
User Reviews and Ratings: Read user reviews and ratings of the app before making a decision. This will give you insights into the overall user experience, stability, and reliability of the app. Look for apps with positive reviews and high ratings to ensure a seamless programming experience.
Popular NFC programming apps for Android include NFC Tools, Trigger, and NFC TagWriter. For iOS devices, apps like NFC for iPhone and NFC TagWriter by NXP are widely used and highly rated. Take the time to explore these apps and find the one that best suits your needs and preferences.
Choosing the right app is the first step toward successfully programming your NFC tags. Once you have made your selection, you can proceed to the next steps of erasing or formatting the tag (if necessary), writing data onto the tag, and testing its functionality.
Now that we have covered the importance of selecting the right app, let’s move on to discussing the next step involved in programming NFC tags.
Step 2: Erase or Format the NFC Tag (if necessary)
Before you can start programming a new set of data onto an NFC tag, it’s essential to ensure that the tag is in a clean state. If the NFC tag has previously programmed data, you may need to erase or format it to make way for the new data. Follow these steps to erase or format an NFC tag:
Check Tag Compatibility: Confirm that the NFC tag you are using is compatible with the erasing or formatting process. Different tag types and models may have specific requirements or limitations, so it’s crucial to consult the device manufacturer’s guidelines or the app’s instructions.
Select the Appropriate Option: Open your chosen NFC programming app and navigate to the option that allows you to erase or format NFC tags. The specific location of this option may vary depending on the app, but it is typically found in the settings or advanced options menu.
Erase or Format the NFC Tag: Once you have accessed the erase or format option, follow the on-screen instructions to initiate the process. The app will send the appropriate signals to clear the existing data on the NFC tag, returning it to a blank state.
Confirm Erasure or Formatting: After completing the erasing or formatting process, the app should provide a confirmation message indicating the successful completion of the task. Be sure to verify that the tag is now blank before proceeding to write new data onto it.
It’s important to note that some NFC tags may not support erasing or formatting. In such cases, you may need to use a new, unprogrammed NFC tag to ensure a clean slate for your programming needs. Always refer to the tag’s specifications or consult the app’s guidelines for compatibility and limitations.
Erasing or formatting an NFC tag is a crucial step to ensure that the programmed data is accurate and doesn’t conflict with any previously stored information. By starting with a clean NFC tag, you can minimize the chances of errors or unexpected behavior when writing new data onto it.
Now that the NFC tag is cleared and ready for programming, we can move on to the next step: writing data onto the NFC tag.
Step 3: Writing Data to the NFC Tag
Now that you have a clean NFC tag, you can proceed with the exciting step of writing data onto it. By configuring the tag with the specific information and actions you desire, you can unleash its full potential. Follow these steps to write data onto an NFC tag:
Open the NFC Programming App: Launch your chosen NFC programming app on your NFC-enabled device. Ensure that the app supports writing data to NFC tags and that it is compatible with your device.
Choose the Data Type: Select the type of data you want to write onto the NFC tag. Common options include URLs, text, contact information, Wi-Fi settings, or custom commands. The app should provide a variety of data options to choose from.
Enter or Select the Data: Based on the selected data type, you will need to input or select the appropriate information. For example, if you are programming a URL, enter the webpage address. If you are adding contact information, enter the name, phone number, and email address.
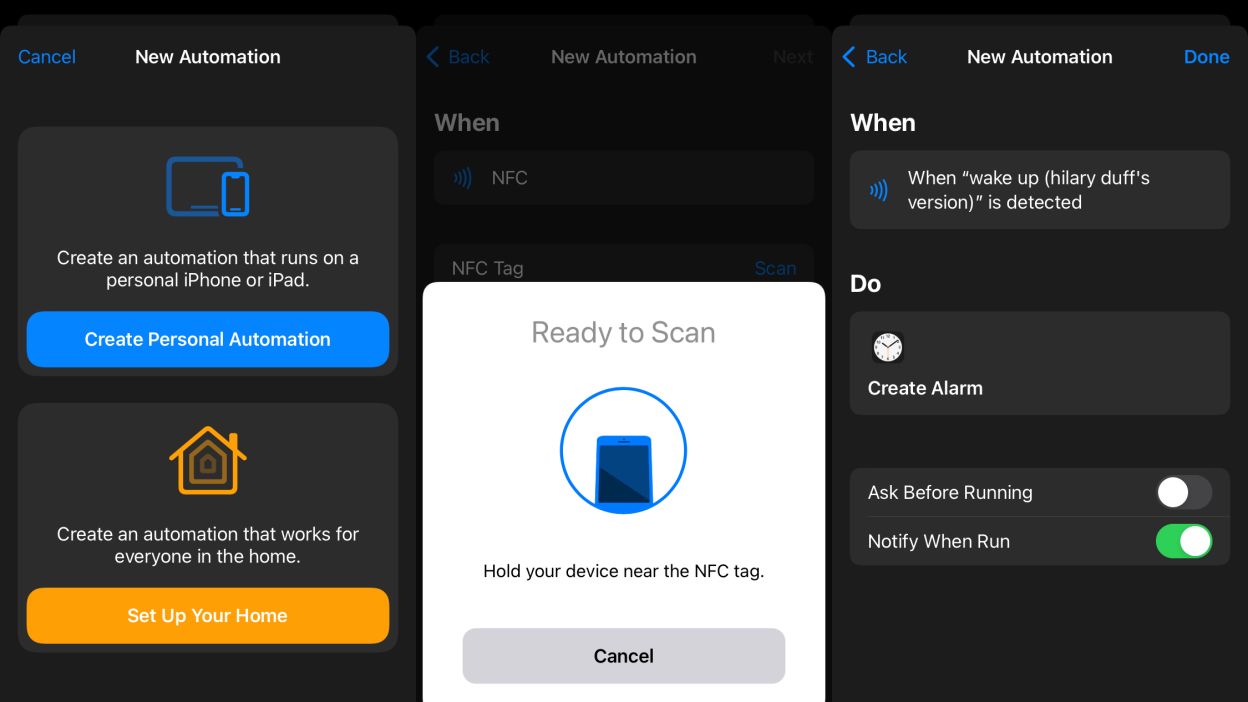
Configure the Behavior: Customize the behavior of the NFC tag based on your preferences. Some apps allow you to specify actions triggered by tapping the tag, such as opening a specific app, launching a website, or initiating a phone call. Use the app’s interface to configure the desired behavior.
Write the Data to the NFC Tag: Once you have entered the necessary information and configured the behavior, follow the app’s instructions to write the data onto the NFC tag. Bring your NFC-enabled device in close proximity to the tag, and the app will initiate the data transfer process.
Verify the Writing Process: Upon successful completion, the app should confirm that the data has been written to the NFC tag. Take a moment to verify that the desired data is stored on the tag and that any assigned actions or behaviors are correctly set.
Remember to ensure that your NFC-enabled device is properly aligned with the NFC tag during the writing process. Keep the two devices in close proximity to establish a stable connection for data transfer.
By following these steps, you can successfully write data onto an NFC tag and customize its behavior to meet your specific needs. Take advantage of the versatility of NFC tags to automate tasks, share information, or trigger specific actions with a simple tap.
Now that the data is written onto the NFC tag, we can move on to the final step of testing its functionality.
Step 4: Testing the NFC Tag
After successfully writing data onto an NFC tag, it’s crucial to test its functionality to ensure that the programmed actions and behaviors are working as intended. Testing the NFC tag will help you confirm that the information is properly stored and that the tag is triggering the desired actions when tapped by an NFC-enabled device. Follow these steps to test an NFC tag:
Prepare an NFC-Enabled Device: Take an NFC-enabled device, such as a smartphone or tablet, that is compatible with the NFC tag you programmed. Ensure that NFC functionality is enabled in the device’s settings.
Tap the NFC Tag: Bring the NFC-enabled device in close proximity to the programmed NFC tag. Gently tap the tag with the device, ensuring proper alignment and contact between the two. The NFC tag should trigger the programmed action upon contact.
Observe the Result: After tapping the NFC tag, observe the result on the NFC-enabled device. Depending on the programming, the device may open a specific website, display contact information, launch an app, or perform any other action you programmed.
Check for Accuracy: Verify that the displayed information or executed action matches what you programmed onto the NFC tag. Ensure that any URLs, text, or contact information is accurate and displayed correctly.
Repeat the Test: Perform multiple tests with different NFC-enabled devices, if available, to ensure consistent and reliable functionality across various devices and operating systems.
Testing the NFC tag is an essential step to confirm that everything is functioning as expected. If the tag does not trigger the desired action or if there are any inaccuracies, revisit the programming steps and verify that the data was correctly entered or configured.
By thoroughly testing the NFC tag, you can ensure that it is ready for use in real-world scenarios, whether it’s for contactless payments, accessing information, or automating tasks with a simple tap.
With the tag successfully tested and verified, you are now ready to enjoy the convenience and efficiency of your programmable NFC tag. Should you encounter any issues or inconsistencies, refer to the troubleshooting tips provided earlier to address common problems.
Now that you have completed the testing phase, let’s summarize the key aspects covered in this article before we wrap up our journey through the world of programming NFC tags.
Troubleshooting Common Issues
While programming NFC tags can be a straightforward process, there are instances when you may encounter issues or face challenges. Fortunately, many common issues have simple solutions that can get your NFC tags up and running smoothly. Here are some troubleshooting tips to help you navigate through common problems:
Tag Compatibility: Ensure that the NFC tag you are using is compatible with your NFC-enabled device. Some tags may have specific requirements or limitations, so verify compatibility before starting the programming process.
Distance and Alignment: Make sure you tap your NFC-enabled device against the NFC tag with proper alignment and at a close enough distance. NFC operates within a short range, so maintaining proximity and alignment is crucial for successful communication.
Data Encoding: Double-check that the data you are writing onto the NFC tag is encoded correctly. Incorrect encoding can cause compatibility issues or lead to unexpected behavior. Verify that the data format matches the requirements of the intended action or application.
App Permissions: Check that the NFC programming app has the necessary permissions to access NFC functionality on your device. Without proper permissions, the app may not be able to write data onto the NFC tag or communicate with the device effectively.
Interference: Ensure that there are no interfering objects or electromagnetic sources (e.g., metal objects or other NFC devices) in close proximity to the NFC tag and your NFC-enabled device. Such interference can disrupt communication between the devices.
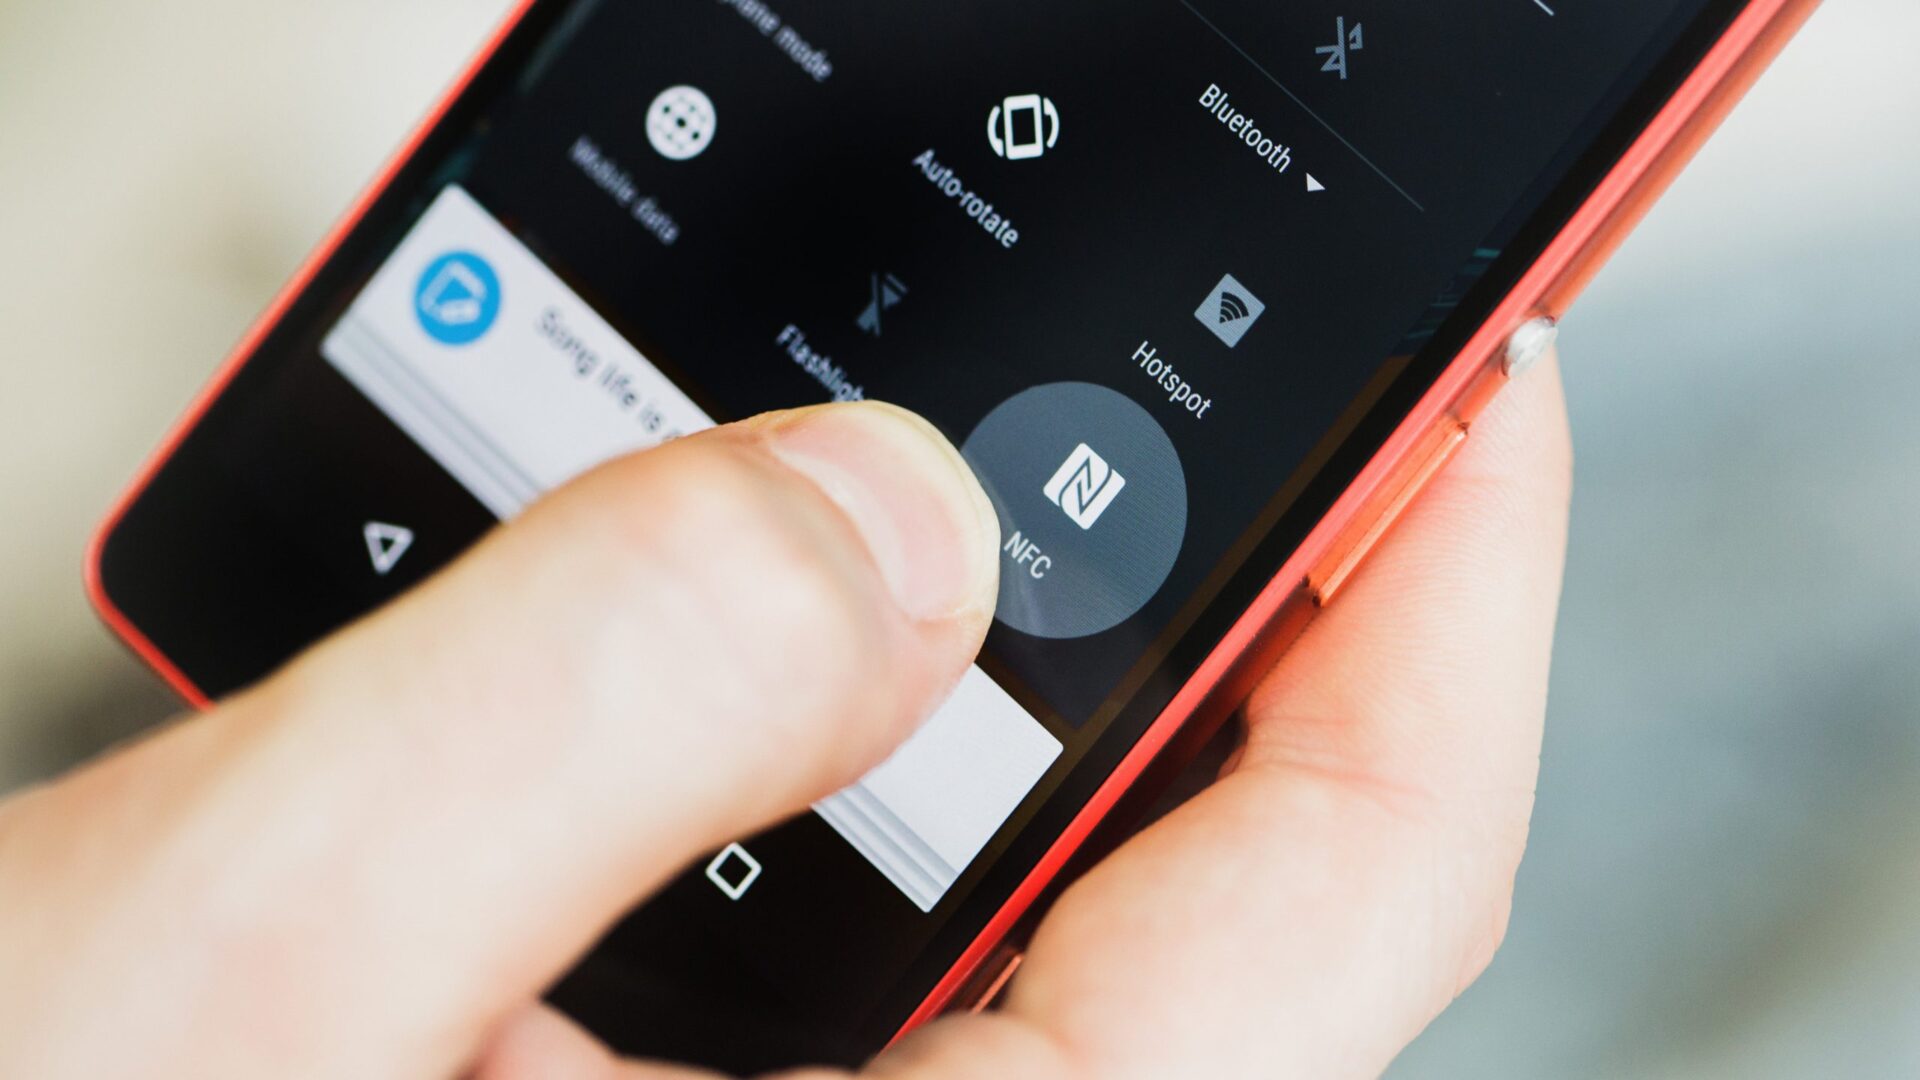
NFC Feature Enabled: Confirm that the NFC feature is enabled on your device. In some cases, it may be accidentally disabled or turned off, preventing the device from recognizing the NFC tag.
Restart Device: If you are experiencing persistent issues, try restarting your NFC-enabled device. This can help reset any temporary glitches or conflicts that might be affecting the NFC functionality.
Update Firmware and Apps: Ensure that both your NFC-enabled device’s firmware and the NFC programming app are up to date. Keeping your device and apps updated can resolve compatibility issues and provide enhanced functionality.
If you are still facing issues after attempting these troubleshooting steps, consult the app’s user guide or reach out to the app’s support team for further assistance. They can provide specific guidance based on the app you are using and help resolve any persistent problems.
By addressing common issues through troubleshooting, you can overcome obstacles and enjoy the full potential of your programmed NFC tags.
Now that we’ve covered troubleshooting, let’s wrap up our exploration of programming NFC tags by summarizing the key points covered in this article.
Conclusion
Near Field Communication (NFC) technology has revolutionized the way we interact with our devices, enabling convenient and seamless communication through a simple tap. Programming NFC tags allows us to unlock the full potential of these tiny devices, automating tasks, sharing information, and bringing a new level of convenience to our daily lives.
In this article, we explored the basics of NFC, understanding how NFC tags work and the different types available. We then delved into the step-by-step process of programming an NFC tag, from choosing the right app to erasing or formatting the tag, writing data, and finally, testing its functionality. By following these steps, you can customize the behavior of NFC tags to suit your specific needs.
We also discussed common troubleshooting tips to address any issues that may arise during the programming or testing process. From tag compatibility and alignment to data encoding and app permissions, these troubleshooting tips can help you overcome common obstacles and ensure successful programming of NFC tags.
Whether you are using NFC tags for contactless payments, sharing business information, automating tasks through NFC-enabled smart devices, or exploring innovative applications, the possibilities are endless. NFC tags offer convenience, versatility, and security in an ever-connected world.
Remember to choose the right app, follow the programming steps carefully, and test your NFC tags to ensure accurate functionality. With practice and experimentation, you will unlock the full potential of NFC technology and discover creative ways to leverage its capabilities.
Now that you are equipped with the knowledge of NFC tag programming, it’s time to unleash your creativity and explore the vast possibilities that NFC technology offers. Embrace this exciting technology and start transforming the way you interact with your devices and the world around you.