Introduction
Are you looking to receive Ethereum on Coinbase? Coinbase is one of the most popular cryptocurrency exchange platforms, offering a user-friendly interface and a secure platform for buying, selling, and storing various cryptocurrencies. If you are new to the world of cryptocurrencies and want to receive Ethereum, this article is here to guide you through the process on Coinbase.
As a digital currency, Ethereum operates on a decentralized network, allowing seamless peer-to-peer transactions without the need for intermediaries like banks. Coinbase not only provides a user-friendly interface for trading Ethereum but also allows users to store and receive Ethereum in their own digital wallets.
To get started, you’ll need to create an account on Coinbase, set up a wallet, and generate a receive address. By following these simple steps, you’ll be able to receive Ethereum from anyone in no time.
Receiving Ethereum on Coinbase opens up opportunities for various transactions, including receiving payments, participating in ICOs (Initial Coin Offerings), and more. Whether you’re a cryptocurrency trader, developer, or freelancer looking to receive Ethereum as payment, Coinbase provides a convenient and trusted platform to do so.
In this article, we’ll walk you through the process of creating a Coinbase account, setting up a wallet, generating a receive address, and verifying the transactions. We’ll also cover how to check your received Ethereum balance on Coinbase.
So, let’s dive into the details and start on the path to receiving Ethereum on Coinbase!
Creating a Coinbase Account
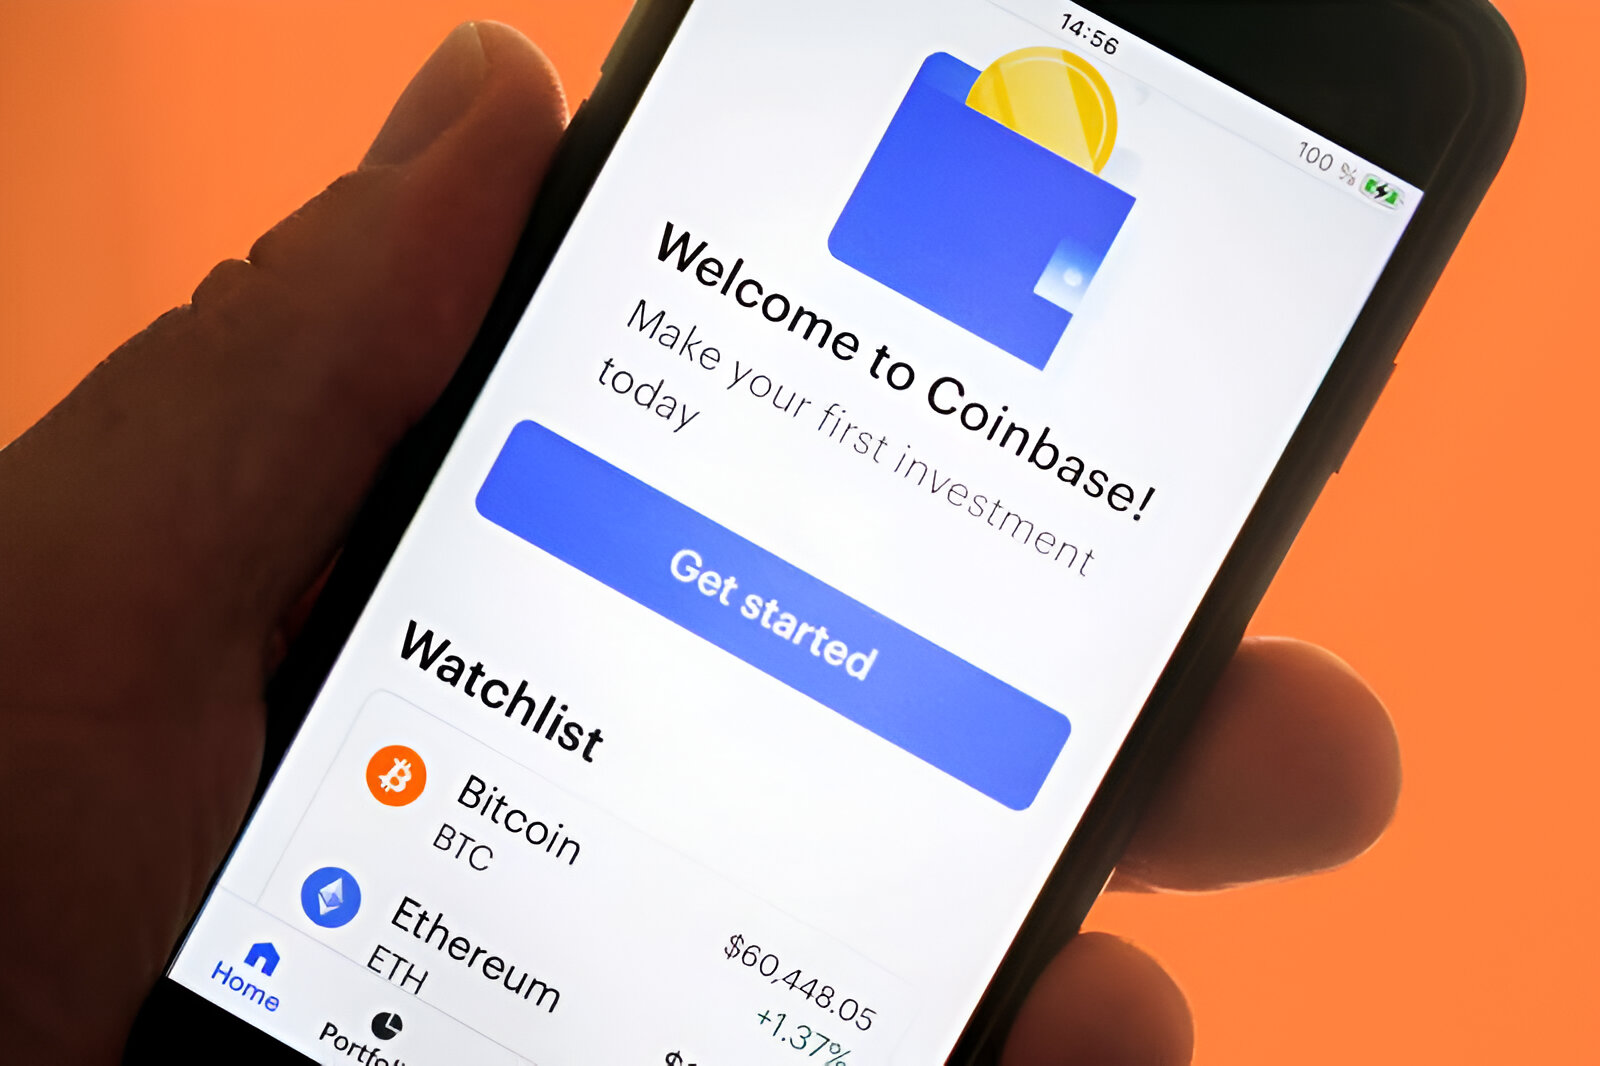
To receive Ethereum on Coinbase, the first step is to create an account on the platform. Follow these simple steps to get started:
1. Visit the Coinbase website: Go to the Coinbase website and click on the “Sign Up” button.
2. Provide your information: Fill in the required information, including your name, email address, and password. It’s important to choose a strong password to ensure the security of your account.
3. Verify your email address: After signing up, Coinbase will send a verification link to the email address you provided. Click on the link to verify your email and activate your Coinbase account.
4. Set up two-factor authentication (2FA): Coinbase strongly recommends enabling two-factor authentication for an added layer of security. You can choose to receive 2FA codes via SMS or use an authentication app like Google Authenticator.
5. Complete identity verification: To comply with regulatory requirements, Coinbase may require you to complete an identity verification process. This typically involves providing a photo ID and verifying your identity.
6. Link a payment method: To be able to receive Ethereum, you’ll need to link a payment method to your Coinbase account. This can be a bank account, debit card, or credit card. Coinbase takes the necessary steps to verify your payment method for security purposes.
Once you’ve completed these steps, your Coinbase account will be ready to use. Remember to keep your login credentials secure and never share them with anyone.
Creating a Coinbase account opens up a world of possibilities in the world of cryptocurrencies. Not only can you receive Ethereum, but you can also buy, sell, and trade various cryptocurrencies with ease. Now that you have your Coinbase account set up, let’s move on to the next step – setting up a wallet on Coinbase.
Setting Up a Wallet on Coinbase
Once you have created your Coinbase account, the next step is to set up a wallet to store and manage your Ethereum. Follow these steps to set up your wallet on Coinbase:
1. Access your Coinbase account: Log in to your Coinbase account using your email and password.
2. Navigate to the wallet section: On the Coinbase dashboard, find and click on the “Wallets” option.
3. Choose Ethereum: In the list of available cryptocurrencies, locate Ethereum and click on the “Receive” button.
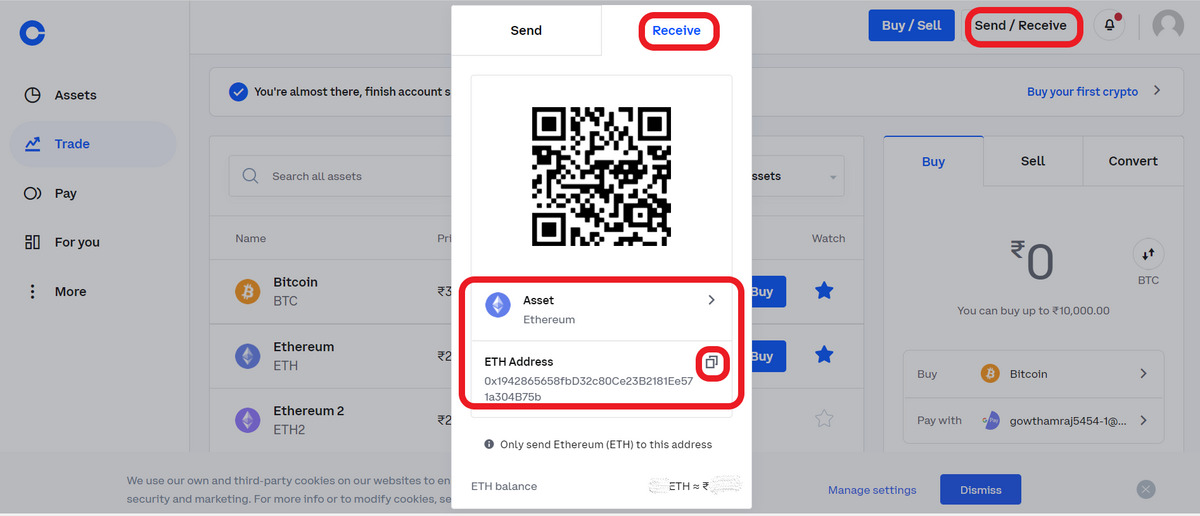
4. Review the wallet details: Coinbase will display the details of your Ethereum wallet, including the wallet address and a QR code. Take a moment to review this information.
At this point, you have successfully set up a wallet for Ethereum on Coinbase. The wallet allows you to securely store and receive Ethereum, as well as track your transactions in real-time.
Generating a Receive Address
To receive Ethereum, you’ll need to generate a unique receive address. Follow these steps to generate an address on Coinbase:
1. Click on the “Receive” button: Within your Ethereum wallet, click on the “Receive” button.
2. Generate a new address: Coinbase will provide the option to generate a new address. Click on the “Generate Address” button.
Once you have generated a receive address, you’re ready to start receiving Ethereum on Coinbase.
Sharing Your Receive Address
To receive Ethereum from others, you need to share your receive address. It’s a unique identifier that allows others to send Ethereum to your wallet. Here’s how you can share your receive address:
1. Copy the receive address: Coinbase will display your receive address on the screen. Click on the “Copy Address” button to copy it to your clipboard.
2. Share the address: You can share your receive address via email, messaging platforms, or by providing it directly to the sender.
By sharing your receive address, you enable others to send Ethereum to your Coinbase wallet effortlessly.
Receiving Ethereum on Coinbase
Now that you have a wallet set up and a receive address, it’s time to receive Ethereum on Coinbase. Follow these steps:
1. Ask the sender for your Ethereum transaction: Provide your receive address to the person sending you Ethereum and request the transaction.
2. Confirm the transaction: Once the sender initiates the transaction, Coinbase will automatically check the blockchain network for incoming Ethereum transactions.
It’s important to note that the time taken for the transaction to be confirmed and appear in your Coinbase account may vary depending on network congestion. In most cases, however, you should receive the Ethereum within a few minutes.
In the next section, we’ll cover how to verify the transaction and check your received Ethereum balance on Coinbase.
Generating a Receive Address
To receive Ethereum on Coinbase, you need to generate a unique receive address. This address serves as a destination for others to send Ethereum to your Coinbase wallet. Follow these steps to generate a receive address:
1. Access your Ethereum wallet: Log in to your Coinbase account and navigate to your Ethereum wallet.
2. Click on the “Receive” button: Within your Ethereum wallet, locate and click on the “Receive” button. This will open the receive address generation screen.
3. Generate a new address: On the receive address generation screen, you will have the option to generate a new address. Click on the “Generate Address” button.
4. Copy the receive address: Coinbase will generate a unique receive address for you. It will be a long string of characters, usually starting with “0x”. To ensure accuracy and avoid errors, click on the “Copy Address” button to copy the address to your clipboard.
Generating a receive address on Coinbase is a straightforward process, and you can generate as many addresses as you need. It’s important to note that each generated address is unique and tied to your Coinbase account.
Once you have generated a receive address, you can start sharing it with others to receive Ethereum transactions. By providing your receive address to senders, they can initiate transactions to your Coinbase wallet easily.
Remember that each generated receive address on Coinbase is specific to Ethereum. If you are using other cryptocurrencies on Coinbase, such as Bitcoin or Litecoin, you will need to generate separate receive addresses for each cryptocurrency.
In the next section, we will discuss how you can share your receive address with others and start receiving Ethereum on Coinbase.
Sharing Your Receive Address
To receive Ethereum on Coinbase, you need to share your receive address with the sender. Your receive address is a unique identifier that allows others to send Ethereum to your Coinbase wallet. Here’s how you can share your receive address:
1. Copy the receive address: After generating a receive address on Coinbase, the platform will display it on the screen. To copy the address, click on the “Copy Address” button. This will save the address to your clipboard.
2. Share the address: There are several ways you can share your receive address with the sender. You can send it via email, messaging platforms, or simply provide it directly to the sender.
– Email: If you are communicating with the sender via email, you can paste the receive address into the email and send it directly to them.
– Messaging platforms: If you are using messaging platforms like WhatsApp or Telegram, you can paste the receive address into the chat and send it to the sender. Alternatively, you can use the platform’s file-sharing feature to send a text file or image with the receive address.
– Direct sharing: If you are in direct communication with the sender, such as during a face-to-face transaction, you can verbally provide them with the receive address or show them a written copy.
When sharing your receive address, it is essential to double-check that you have copied it correctly. Ethereum transactions are irreversible, so any mistake in the address can result in the funds being sent to the wrong recipient.
Additionally, it is recommended to only share your receive address with trusted individuals or reputable organizations. Cryptocurrency transactions are pseudonymous, which means that anyone who possesses your address can see all incoming and outgoing transactions associated with it.
By sharing your receive address, you enable others to initiate Ethereum transactions to your Coinbase wallet. This allows you to receive payments, participate in Initial Coin Offerings (ICOs), or receive Ethereum for any other purpose.
In the next section, we will discuss how to receive Ethereum on Coinbase and verify the transaction.
Receiving Ethereum on Coinbase
Once you have shared your receive address with the sender, you can start receiving Ethereum on Coinbase. Follow these steps to receive Ethereum:
1. Provide the address to the sender: Share your receive address with the sender through the method discussed earlier, whether it’s via email, messaging platforms, or direct communication.
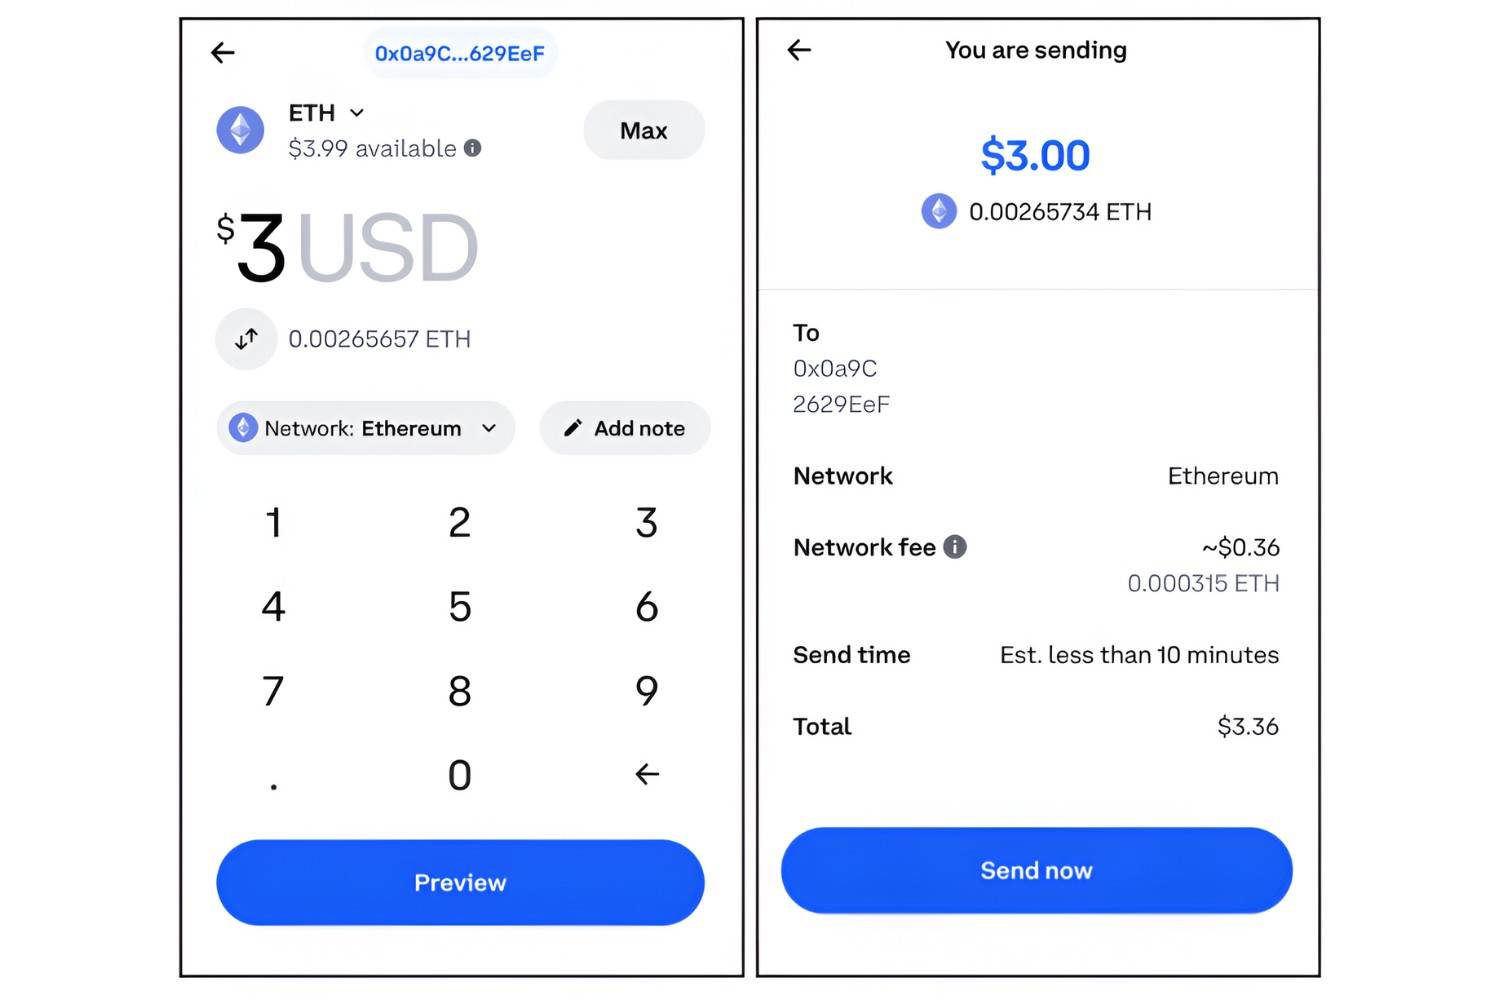
2. Request the Ethereum transaction: Inform the sender to initiate the Ethereum transaction to your receive address. Provide them with any additional information they may need, such as the specific amount or any transaction notes.
3. Confirm the transaction: Once the sender has initiated the Ethereum transaction to your receive address, Coinbase will automatically check the blockchain network for incoming transactions. This process may take some time, depending on network congestion and the verification process.
4. Monitor the transaction status: You can monitor the status of the transaction on Coinbase. The platform will provide updates on the transaction’s progress, including confirmations and the estimated time for completion.
It’s important to note that the time taken for the transaction to be confirmed and appear in your Coinbase account may vary. Ethereum transactions typically require multiple confirmations on the blockchain network before they are considered final.
Once the Ethereum transaction is confirmed and appears in your Coinbase account, you have successfully received Ethereum. The received Ethereum will be reflected in your Ethereum wallet balance on Coinbase.
To ensure the accuracy and security of your transactions, it is recommended to verify the transaction details, including the sender’s address and the transaction amount, before considering the transaction as complete.
In the next section, we’ll cover how you can verify the transaction and check your received Ethereum balance on Coinbase.
Verifying the Transaction
Once you have received Ethereum on Coinbase, it is important to verify the transaction to ensure its accuracy and security. Follow these steps to verify the transaction:
1. Access your Coinbase account: Log in to your Coinbase account using your email and password.
2. Navigate to your Ethereum wallet: On the Coinbase dashboard, find and click on the “Wallets” option. Locate and select your Ethereum wallet.
3. Review the transaction history: Within your Ethereum wallet, you will find a list of your recent transactions. Look for the transaction that corresponds to the Ethereum you have received. Click on the transaction to view its details.
4. Verify the sender’s address: In the transaction details, you will find the Ethereum sender’s address. Make sure it matches the address provided by the sender. This is an essential step to ensure that the Ethereum was sent by the intended sender.
5. Check the transaction amount: Verify that the transaction amount matches the amount you were expecting to receive. This allows you to confirm the accuracy of the transaction.
6. Confirm the transaction status: Coinbase provides information about the transaction’s status, including the number of confirmations. Confirmations indicate how many times the transaction has been validated by the Ethereum network. The more confirmations, the more secure the transaction becomes.
By verifying the transaction details, you can ensure that the Ethereum you have received is from the intended sender and that the transaction amount is correct. If you notice any discrepancies or unusual activities, it is recommended to contact Coinbase support for assistance.
Verifying transactions is an essential practice to protect your funds and maintain the integrity of your Ethereum transactions.
In the next section, we’ll discuss how you can check your received Ethereum balance on Coinbase to keep track of your holdings and monitor your account’s activity.
Checking the Received Ethereum Balance
After receiving Ethereum on Coinbase, it’s important to stay on top of your account balance and monitor your received Ethereum. Checking your balance allows you to keep track of your holdings and ensure the accuracy of your transactions. Here’s how you can check your received Ethereum balance on Coinbase:
1. Access your Coinbase account: Log in to your Coinbase account using your email and password.
2. Navigate to your Ethereum wallet: On the Coinbase dashboard, click on the “Wallets” option. Locate and select your Ethereum wallet.
3. View your Ethereum balance: Once you are in your Ethereum wallet, you will see your Ethereum balance displayed prominently. This balance represents the total amount of Ethereum you currently hold in your Coinbase account.
4. Review transaction history: To see the details of the transactions that contributed to your Ethereum balance, you can review the transaction history within your Ethereum wallet. This allows you to track the individual deposits and withdrawals that have occurred.
5. Monitor account activity: Regularly monitor your Ethereum wallet to keep track of any incoming or outgoing transactions. This helps you stay informed about the activity in your account and ensures the security of your funds.
It’s important to note that your Ethereum balance on Coinbase may fluctuate due to various factors, such as market volatility, transfers to and from other wallets, and trading activities. By regularly checking your balance, you can stay informed about any changes and take appropriate actions if necessary.
Coinbase also provides additional features and tools to track your Ethereum balance, such as transaction history filters, export options for record-keeping, and real-time portfolio value calculation.
In summary, checking your received Ethereum balance on Coinbase is crucial for managing your holdings and monitoring your account activity. By regularly reviewing your balance and transaction history, you can ensure the accuracy of your received Ethereum and maintain control of your cryptocurrency investments.
In the next section, we will conclude this article with a brief recap of the key steps discussed and the overall importance of receiving Ethereum on Coinbase.
Conclusion
Receiving Ethereum on Coinbase opens up a world of opportunities in the world of cryptocurrencies. By following the steps outlined in this article, you can create a Coinbase account, set up a wallet, generate a receive address, and start receiving Ethereum seamlessly.
Creating a Coinbase account is the first step towards receiving Ethereum. By providing the required information, verifying your email address, and setting up two-factor authentication, you can ensure the security of your account.
Setting up a wallet on Coinbase allows you to store and manage your Ethereum securely. Generating a receive address enables others to send Ethereum to your wallet, and sharing this address can be done through various communication channels.
Once you have shared your receive address, you can start receiving Ethereum on Coinbase. By confirming the transactions and verifying the details, you can ensure the accuracy and security of the incoming Ethereum.
To stay informed about your received Ethereum, it is essential to check your account balance regularly. Monitoring your balance, reviewing transaction history, and staying aware of account activity contribute to better control and management of your cryptocurrency holdings.
Receiving Ethereum on Coinbase opens up opportunities for various transactions, including receiving payments, participating in ICOs, or simply holding Ethereum as an investment. Coinbase provides a user-friendly interface, robust security measures, and a reliable platform for all your Ethereum-related activities.
As you engage in the world of cryptocurrencies, always remember to exercise caution and follow best practices for security. Keep your login credentials secure, double-check addresses before transactions, and only share your receive address with trusted individuals or organizations.
Receiving Ethereum on Coinbase is just the beginning of your crypto journey. Explore the various features and services offered by Coinbase, such as buying, selling, and trading cryptocurrencies, to make the most of your digital assets.
So, if you’re ready to receive Ethereum, follow the steps outlined in this article, and start harnessing the benefits of the decentralized world of cryptocurrencies on Coinbase.
Happy receiving and happy trading!