Introduction
Welcome to our guide on how to install the Insignia NS-PAUM50 USB microphone! Whether you’re a content creator, podcaster, or simply someone who wants to improve their audio quality during video calls and recordings, this microphone is a fantastic choice. In this article, we’ll walk you through the step-by-step process of unboxing, connecting, and setting up the Insignia NS-PAUM50 USB microphone on your computer.
The Insignia NS-PAUM50 USB microphone is a versatile and reliable microphone that offers high-quality audio recording and playback. With its plug-and-play functionality, it eliminates the need for complex setups or additional audio interfaces. This microphone is compatible with both Windows and Mac operating systems, making it accessible to a wide range of users.
Whether you’re a beginner or an experienced user, this guide will provide you with all the necessary information to get started with your Insignia NS-PAUM50 USB microphone. We’ll cover everything from unboxing the microphone to installing the required drivers and adjusting the settings.
By following the steps outlined in this guide, you’ll be able to unleash the full potential of your microphone and achieve professional-quality sound for your recordings or online communication. So, let’s dive in and get started with the unboxing process!
What is the Insignia NS-PAUM50 USB Microphone?
The Insignia NS-PAUM50 USB microphone is a high-quality microphone designed for capturing professional-grade audio. It is a versatile and affordable option that is suitable for a variety of applications, including podcasting, voiceovers, music recording, and online conferencing.
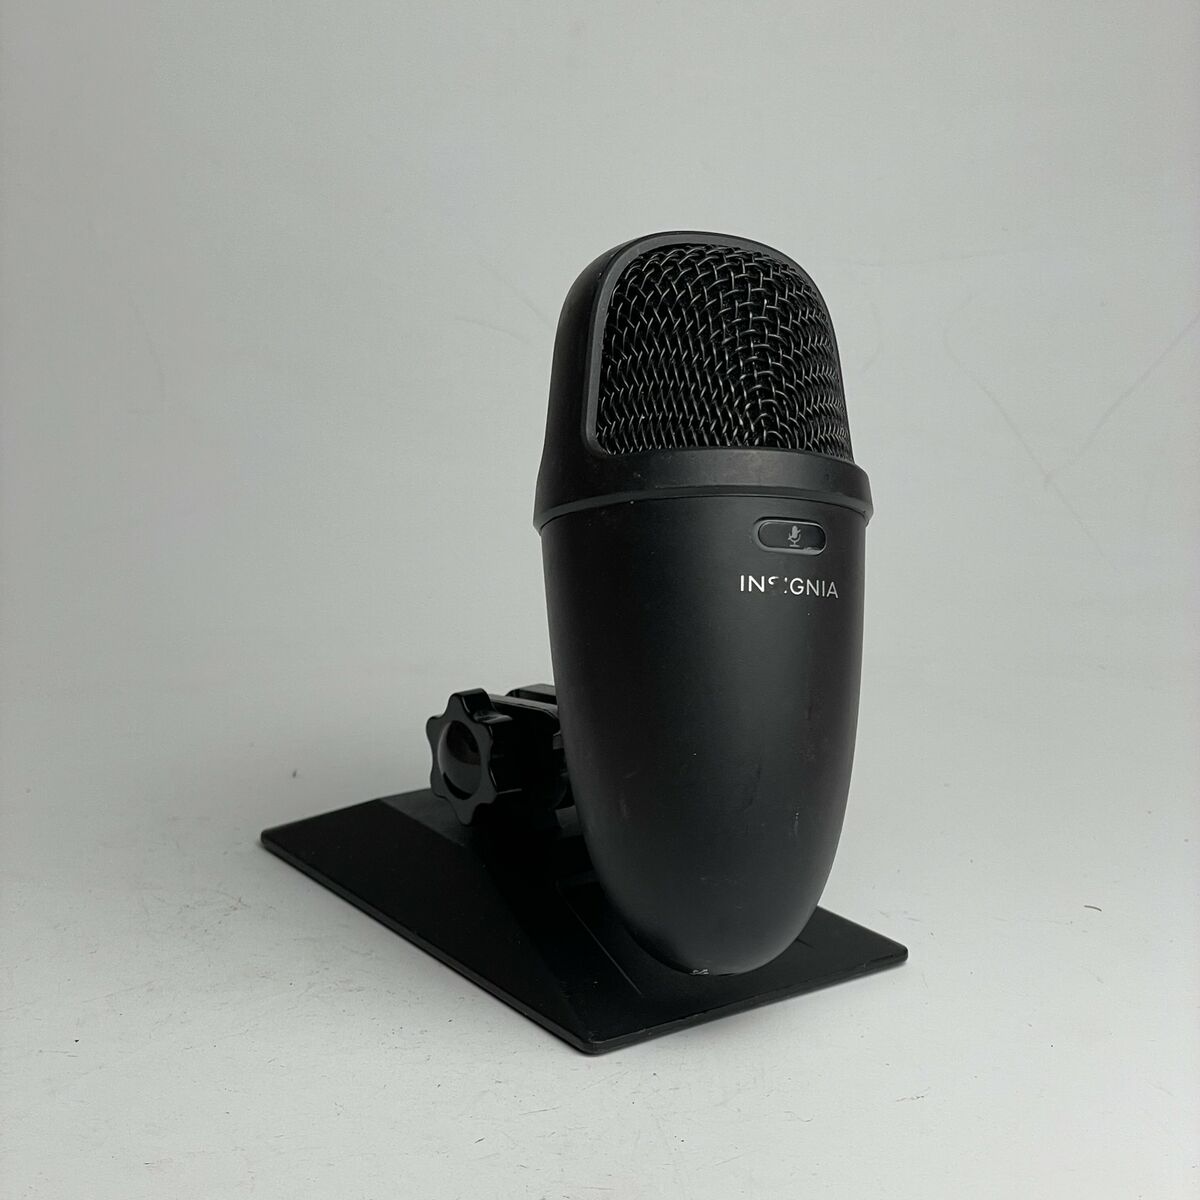
This microphone features a compact and sleek design, with a sturdy metal construction that ensures durability and longevity. It comes with a built-in tripod stand that provides stability during recordings, and its adjustable microphone head allows for precise positioning to capture the best sound quality.
The Insignia NS-PAUM50 USB microphone utilizes a plug-and-play functionality, which means it can be easily connected to your computer or laptop without the need for any additional drivers or software. It is compatible with both Windows and Mac operating systems, making it accessible to a wide range of users.
One of the standout features of this microphone is its excellent audio recording capability. It utilizes a cardioid pickup pattern, which means it focuses on capturing sound from the front while effectively reducing background noise and unwanted sound from the sides and rear.
With a frequency response range of 50Hz to 16kHz, the Insignia NS-PAUM50 USB microphone delivers clear and accurate sound reproduction. Whether you’re recording vocals, instruments, or conducting online meetings, this microphone ensures that your audio comes through with exceptional clarity.
In addition to its exceptional performance, the Insignia NS-PAUM50 USB microphone also offers convenience and versatility. It features a headphone jack that allows for real-time monitoring, enabling you to listen to your recordings as you make them. The mic mute button on the front of the microphone provides easy control over audio input.
Overall, the Insignia NS-PAUM50 USB microphone is a reliable and user-friendly option for anyone looking to improve their audio quality. With its high-quality construction, plug-and-play functionality, and excellent sound reproduction, it is a valuable tool for content creators, musicians, and professionals alike.
Step 1: Unboxing the Insignia NS-PAUM50 USB Microphone
Before we start setting up the Insignia NS-PAUM50 USB microphone, the first step is to unbox the package and familiarize yourself with its contents. Follow these steps to unbox your microphone:
- Locate the box containing the Insignia NS-PAUM50 USB microphone.
- Carefully remove the microphone from the box.
- Inspect the packaging materials to ensure that everything is intact.
- Take out the included tripod stand, USB cable, and any other accessories that may be included (such as a windscreen).
- Place the tripod stand on a flat and stable surface. This will serve as the base for your microphone.
- Ensure that all the components are in good condition and free from any damage.
Once you have successfully unboxed the Insignia NS-PAUM50 USB microphone and verified that all the components are present and undamaged, you are ready to move on to the next step of the setup process.
It’s important to keep the packaging materials and original box in a safe place, as you may need them for future storage or transportation of the microphone. Now that you have completed the unboxing process, we can proceed to the next step of connecting the microphone to your computer.
Step 2: Connecting the Insignia NS-PAUM50 USB Microphone to Your Computer
Now that you have unboxed the Insignia NS-PAUM50 USB microphone, it’s time to connect it to your computer. Follow these simple steps to establish the connection:
- Locate an available USB port on your computer. This is where you will connect the Insignia NS-PAUM50 USB microphone.
- Take the USB cable that came with the microphone and connect one end to the USB port on your computer.
- Connect the other end of the USB cable to the USB port located at the bottom of the microphone. Make sure it is securely plugged in.
- Once the microphone is connected to your computer, it should be recognized automatically. Your operating system will begin installing the necessary drivers.
- Wait for the driver installation process to complete. This may take a few moments.
- Once the installation is complete, your computer should recognize the Insignia NS-PAUM50 USB microphone as an available audio input device.
Now that you have successfully connected the Insignia NS-PAUM50 USB microphone to your computer, you are ready to move on to the next step of installing the required drivers.
It’s worth noting that if you are using a newer operating system, such as Windows 10 or Mac OS X, the driver installation process may be automatic, and you may not need to perform any additional steps. However, if your operating system does not automatically install the drivers, we will cover the manual driver installation process in the next step.
Step 3: Installing the Required Drivers for the Insignia NS-PAUM50 USB Microphone
After connecting the Insignia NS-PAUM50 USB microphone to your computer, it’s time to ensure that the required drivers are installed. Although the microphone is designed to be plug-and-play, certain operating systems may require you to manually install the drivers. Follow these steps to install the required drivers:
- Check the manufacturer’s website or the documentation that came with the microphone to see if any specific drivers are recommended for your operating system.
- If specific drivers are recommended, download them from the manufacturer’s website and save them to a location on your computer.
- Locate the downloaded driver file and double-click on it to start the installation process.
- Follow the on-screen instructions provided by the driver installer. This may involve agreeing to the terms and conditions, selecting a destination folder, or choosing any additional settings.
- Once the driver installation is complete, restart your computer to ensure that the changes take effect.
If there are no specific drivers recommended for your operating system, you can proceed without installing additional drivers. In most cases, newer operating systems will automatically detect and install the necessary drivers for the Insignia NS-PAUM50 USB microphone.
After restarting your computer, the Insignia NS-PAUM50 USB microphone should be fully recognized and ready to use. You can proceed to the next step to adjust the settings for optimal performance.
Keep in mind that driver installation may vary depending on your specific operating system. Be sure to consult the manufacturer’s documentation or support resources for any additional guidance specific to your situation.
Step 4: Adjusting the Settings for the Insignia NS-PAUM50 USB Microphone
Now that you have successfully installed the drivers for the Insignia NS-PAUM50 USB microphone, it’s time to adjust the settings to ensure optimal performance. Follow these steps to configure the microphone settings:
- Locate the sound settings on your computer. This can usually be found in the Control Panel (Windows) or System Preferences (Mac).
- Within the sound settings, navigate to the input or recording tab.
- Locate the Insignia NS-PAUM50 USB microphone in the list of available audio input devices.
- Select the microphone and click on “Properties” or “Configure”. This will allow you to access more advanced settings.
- Adjust the microphone volume or gain settings as needed. You can increase or decrease the input level based on your preferences or the specific recording environment.
- Experiment with the microphone placement and distance to find the optimal position for capturing your desired audio quality.
- Take note of any other available settings, such as equalization or noise cancellation, and adjust them as necessary.
- Monitor the audio levels by speaking into the microphone and observing the level meters. Make sure that the input signals are not exceeding the recommended maximum levels or causing distortion.
It’s important to note that the exact steps for adjusting the microphone settings may vary depending on your specific operating system and software. Be sure to consult your operating system’s documentation or support resources for more specific instructions if needed.
By taking the time to adjust the microphone settings, you can optimize the audio quality and achieve the desired sound for your recordings, podcasts, or online communication.
Once you have adjusted the settings to your satisfaction, you are now ready to move on to the final step of testing the Insignia NS-PAUM50 USB microphone.
Step 5: Testing the Insignia NS-PAUM50 USB Microphone
After following the previous steps to unbox, connect, install the drivers, and adjust the settings for the Insignia NS-PAUM50 USB microphone, it’s important to conduct a test to ensure that it is functioning properly. Follow these steps to test your microphone:
- Open an application or software that allows for audio recording or communication, such as an audio recording program, voice chat application, or video conferencing platform.
- Select the Insignia NS-PAUM50 USB microphone as the audio input device within the settings or preferences of the application.
- Start a test recording or initiate a call or video chat with a friend or colleague.
- Speak or make sounds into the microphone and monitor the audio levels or feedback from your recording or conversation.
- Listen to the playback or ask the person on the other end of the call for feedback on the audio quality, clarity, and volume.
- Make any necessary adjustments to the microphone settings or placement based on the test results. This may include fine-tuning the volume, repositioning the microphone, or experimenting with different recording environments.
- Repeat the test recording or communication process to ensure consistent and satisfactory performance.
By conducting a thorough test of the Insignia NS-PAUM50 USB microphone, you can verify that it is capturing sound accurately and achieving the desired audio quality for your specific use case.
If any issues or concerns arise during the test, refer back to the previous steps to troubleshoot and make any necessary adjustments. Additionally, consult the manufacturer’s documentation or support resources for further guidance.
Once you are satisfied with the performance of the Insignia NS-PAUM50 USB microphone and confident in its audio quality, you are ready to begin using it for your recordings, podcasts, voiceovers, or online communication.
Conclusion
Congratulations! You have successfully completed the installation and setup process for the Insignia NS-PAUM50 USB microphone. By following the steps outlined in this guide, you have unboxed the microphone, connected it to your computer, installed the required drivers (if necessary), adjusted the settings, and performed a thorough test to ensure optimal performance.
The Insignia NS-PAUM50 USB microphone is a versatile and reliable tool that can greatly enhance your audio recording and communication experiences. With its plug-and-play functionality, high-quality construction, and excellent sound reproduction, this microphone is suitable for content creators, podcasters, musicians, and professionals alike.
As you continue to use your Insignia NS-PAUM50 USB microphone, don’t hesitate to explore and experiment with different settings and techniques to further optimize your audio quality. You may find that adjusting the volume, positioning the microphone differently, or exploring software enhancements can help you achieve even better results.
Remember, proper maintenance and care of your microphone can also contribute to its longevity and performance. Keep it clean, store it in a safe place when not in use, and handle it with care to ensure years of reliable use.
We hope that this guide has provided you with the knowledge and confidence to fully utilize the capabilities of the Insignia NS-PAUM50 USB microphone. Whether you’re creating content, hosting virtual meetings, or simply enjoying high-quality audio, this microphone is sure to elevate your audio experience.
Thank you for choosing the Insignia NS-PAUM50 USB microphone. We wish you the best in all of your future audio endeavors!