Introduction
Inserting a SIM card into your Sony Xperia D6503 is a fundamental step in setting up your device for communication and connectivity. Whether you're a tech enthusiast or a novice user, understanding the process of inserting a SIM card can ensure a seamless experience with your mobile device. This article will guide you through the simple and straightforward steps to insert a SIM card into your Sony Xperia D6503, allowing you to harness the full potential of your smartphone.
The Sony Xperia D6503, known for its sleek design and advanced features, relies on a SIM card to enable cellular communication and access to mobile networks. By following the steps outlined in this guide, you'll be able to effortlessly insert a SIM card into your device, paving the way for uninterrupted calls, text messages, and data usage.
Whether you're setting up your Sony Xperia D6503 for the first time or replacing an existing SIM card, understanding the process of inserting a SIM card is essential for maximizing the functionality of your device. With the right guidance, you can confidently navigate this process and enjoy the full range of features and services offered by your Sony Xperia D6503.
Now, let's delve into the step-by-step instructions for inserting a SIM card into your Sony Xperia D6503, ensuring that you can seamlessly integrate your device into your daily life and stay connected with the world around you.
Step 1: Locate the SIM card slot
Locating the SIM card slot on your Sony Xperia D6503 is the first crucial step in the process of inserting a SIM card. The SIM card slot is designed to securely house your SIM card, enabling your device to establish a connection with your mobile network provider. To begin, you'll need to identify the precise location of the SIM card slot on your Sony Xperia D6503.
-
Turn Off Your Device: Before locating the SIM card slot, ensure that your Sony Xperia D6503 is powered off. This precautionary step is essential to prevent any potential damage to the device or the SIM card during the insertion process.
-
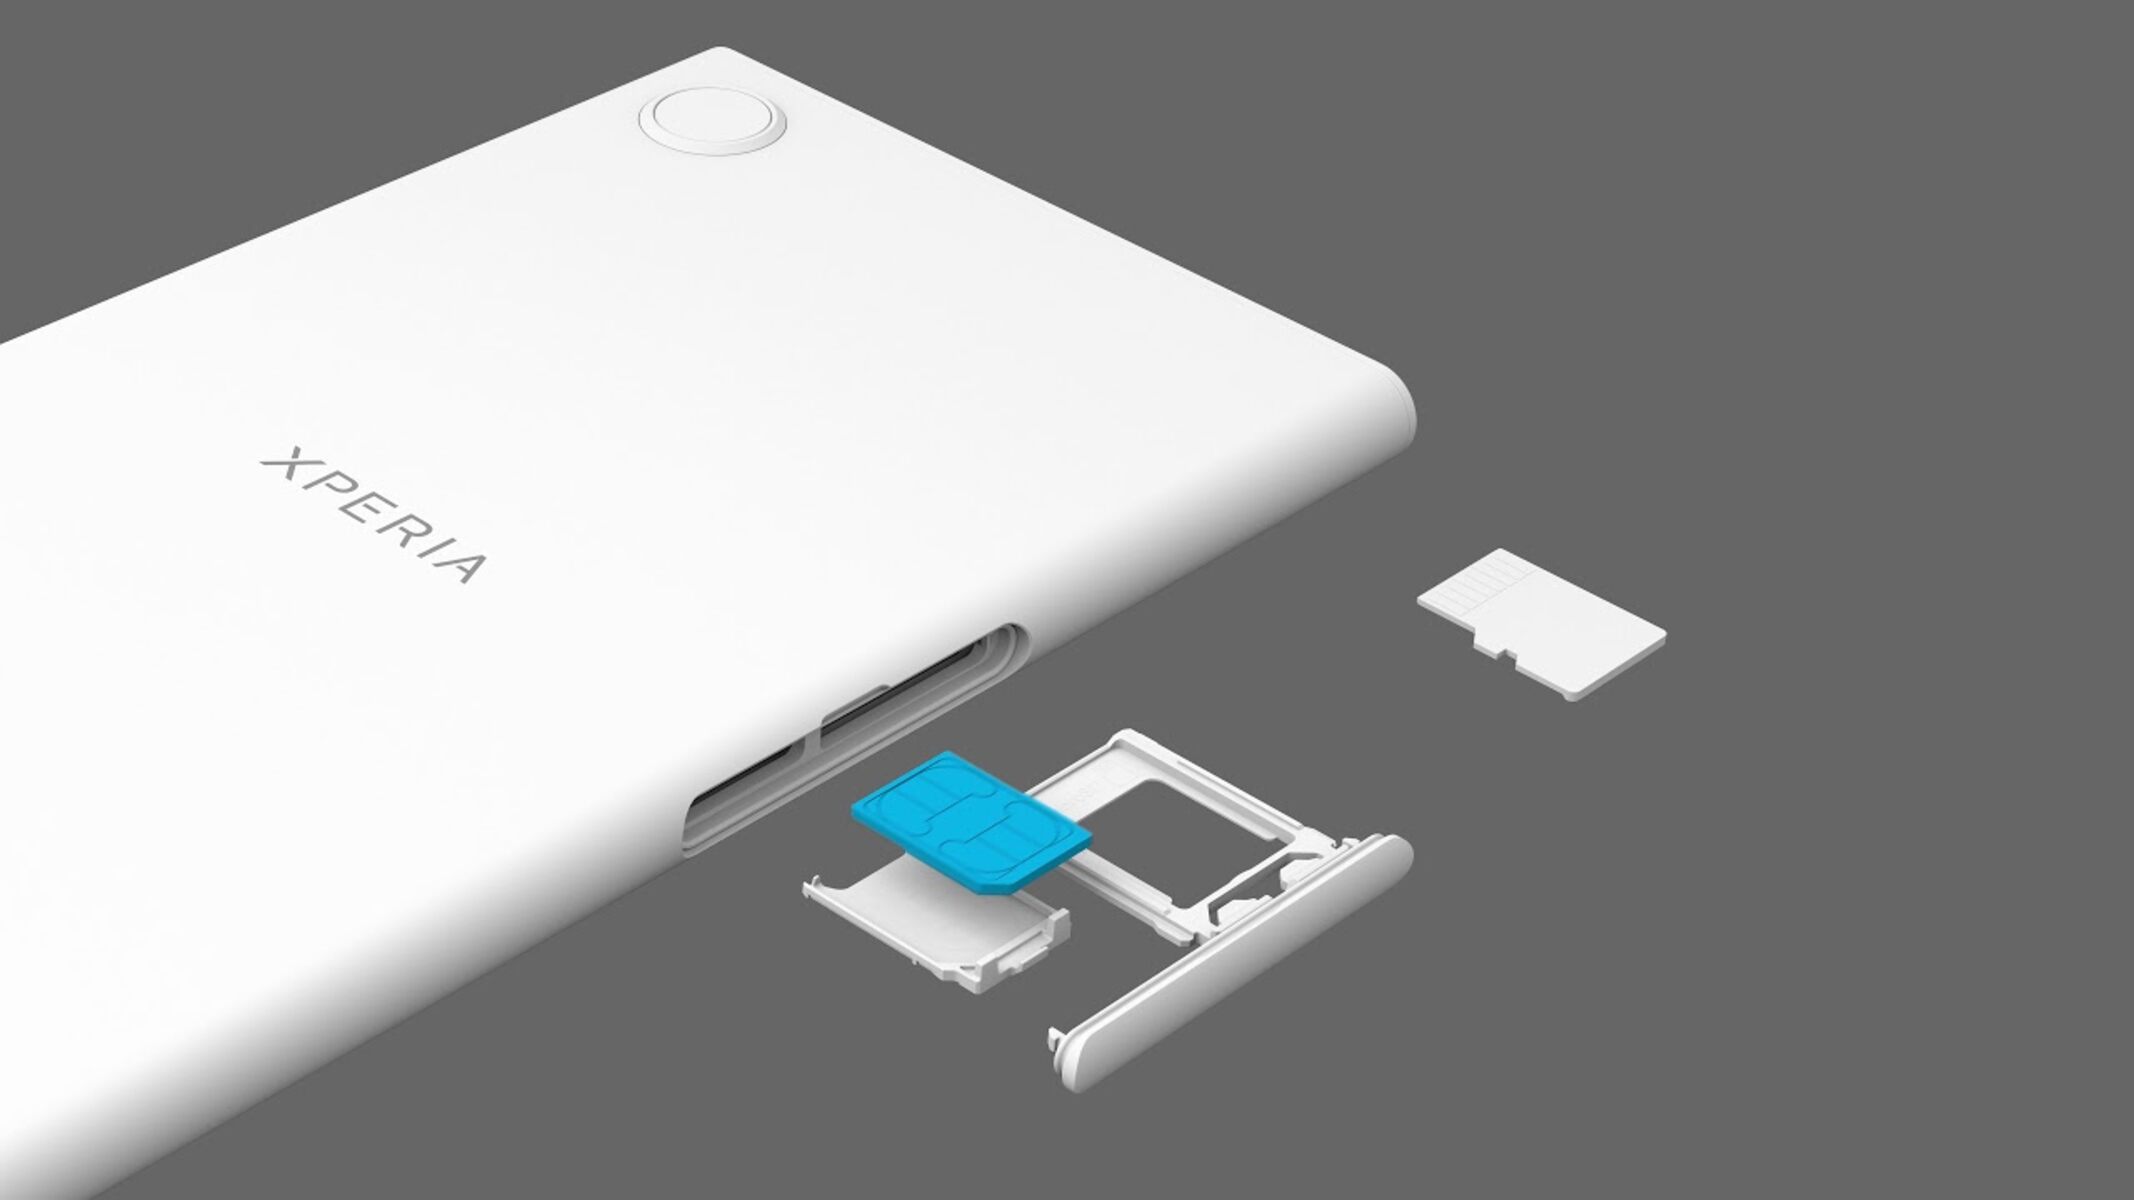
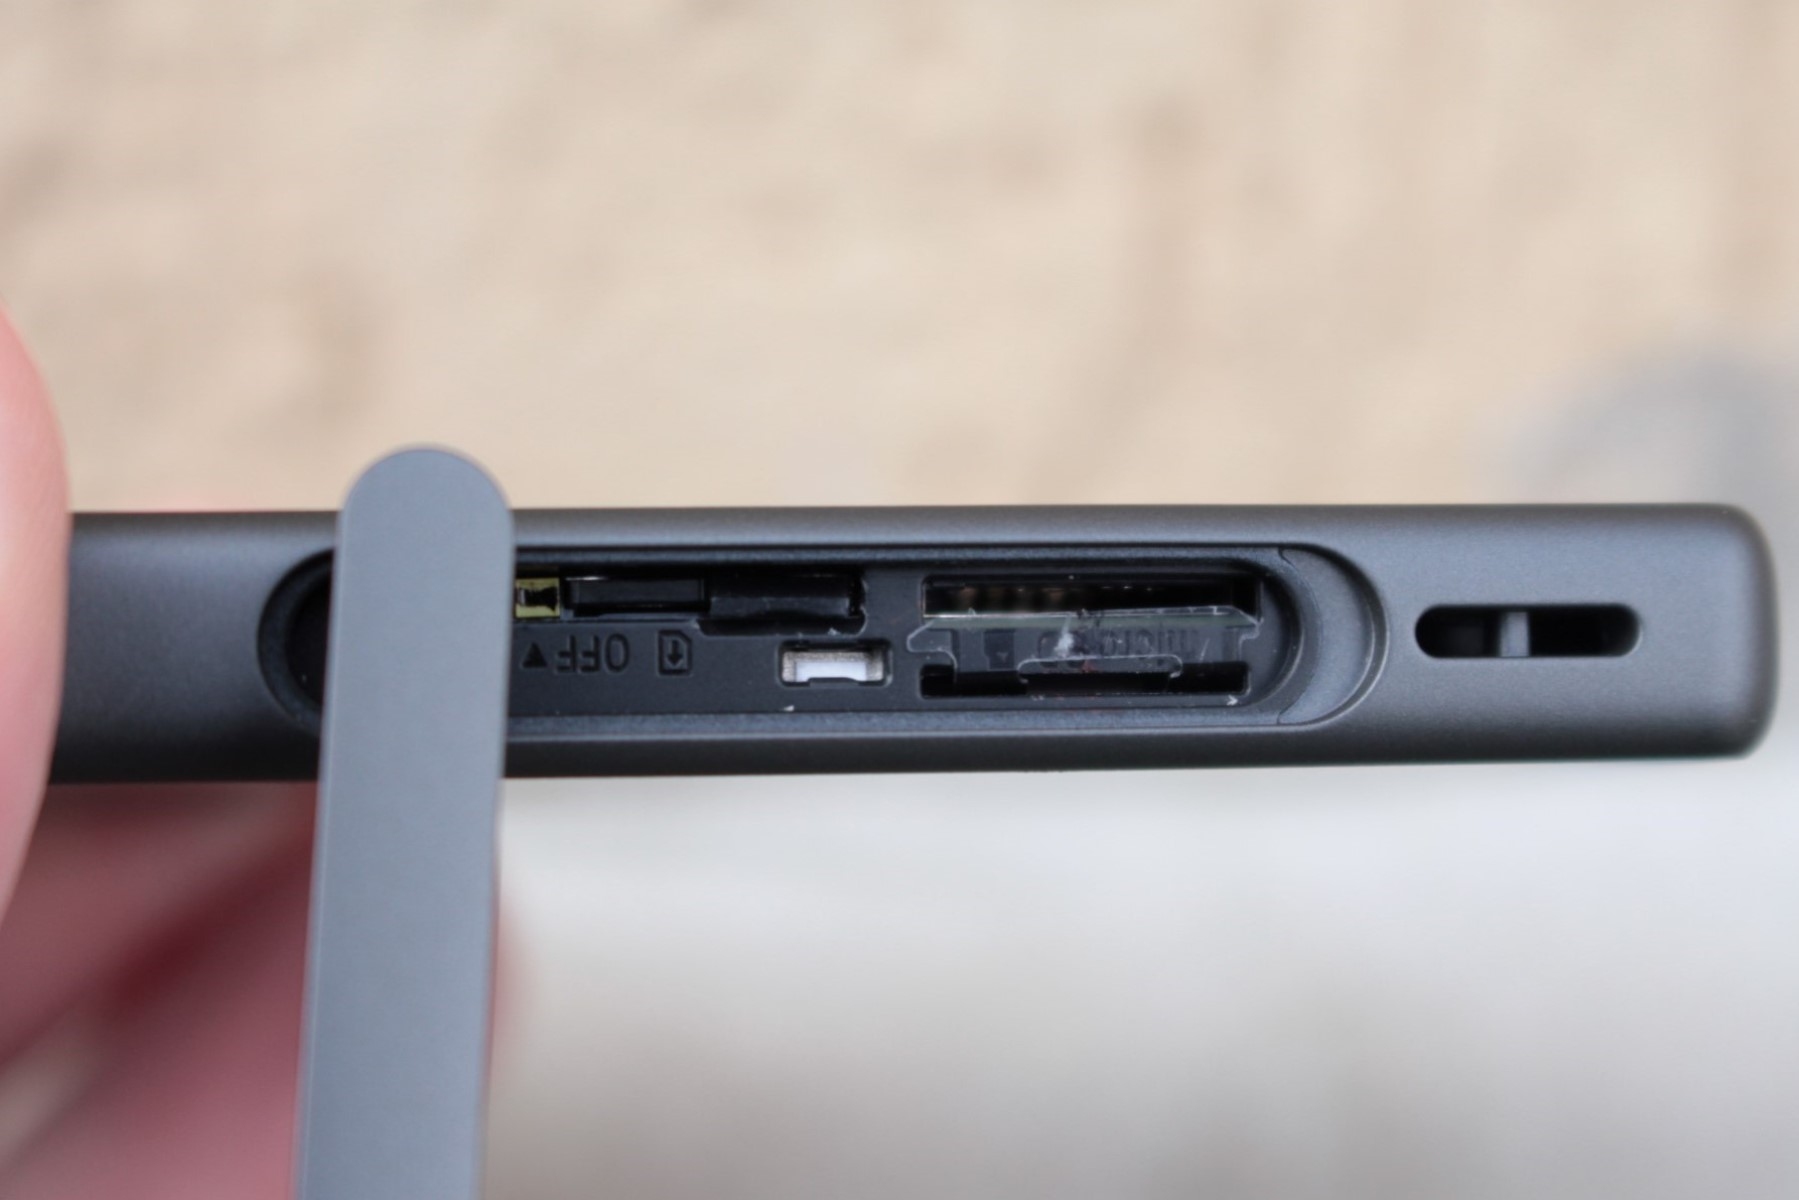
Identify the Slot: Once your device is powered off, examine the exterior of your Sony Xperia D6503 to locate the SIM card slot. Typically, the SIM card slot is situated on the side of the device. Look for a small, discreet compartment with a tiny pinhole or a removable cover. This compartment is designed to house the SIM card and facilitate its seamless integration with your device.
-
Use the User Manual: If you encounter any difficulty in identifying the SIM card slot, refer to the user manual provided with your Sony Xperia D6503. The user manual contains detailed illustrations and instructions that can assist you in pinpointing the exact location of the SIM card slot on your device.
-
Handle with Care: As you locate the SIM card slot, handle your device with care to avoid any accidental damage. The SIM card slot is a delicate component of your Sony Xperia D6503, and exercising caution during this step can help maintain the integrity of the slot and ensure a smooth insertion process.
By successfully locating the SIM card slot on your Sony Xperia D6503, you've completed the initial phase of the SIM card insertion process. With this essential step accomplished, you're now ready to proceed to the next phase: inserting the SIM card into the designated slot on your device. This pivotal step will enable you to establish a seamless connection with your mobile network provider, unlocking the full potential of your Sony Xperia D6503 and empowering you to stay connected with the world around you.
Step 2: Insert the SIM card
After successfully locating the SIM card slot on your Sony Xperia D6503, the next crucial step is to insert the SIM card into the designated slot. This process is essential for establishing a seamless connection with your mobile network provider and enabling your device to access cellular services and data connectivity. Follow the step-by-step instructions below to effortlessly insert the SIM card into your Sony Xperia D6503:
-
Prepare the SIM Card: Before inserting the SIM card, ensure that it is compatible with your Sony Xperia D6503. The SIM card should correspond to the specific size and type supported by your device. If you're using a new SIM card, carefully remove it from the packaging, handling it by the edges to avoid any damage to the chip or contacts.
-
Align the SIM Card: Hold the SIM card with the chip facing downwards and the notched corner oriented as per the guidelines provided. Align the SIM card with the corresponding shape and size of the SIM card slot on your Sony Xperia D6503. It's essential to position the SIM card correctly to facilitate a secure and stable connection within the slot.
-
Insert the SIM Card: Gently slide the SIM card into the designated slot, ensuring a smooth and precise insertion. Apply gentle pressure to secure the SIM card within the slot, taking care not to force it or cause any damage to the device or the SIM card itself. Once inserted, the SIM card should fit snugly within the slot, ready to enable cellular communication and data connectivity.
-
Secure the Slot: After inserting the SIM card, ensure that the slot cover or tray is securely closed to protect the SIM card and maintain the integrity of the slot. This step is crucial for safeguarding the SIM card against accidental removal or damage, ensuring a reliable and uninterrupted connection with your mobile network provider.
By following these simple yet essential steps, you've successfully inserted the SIM card into your Sony Xperia D6503, setting the stage for seamless communication and connectivity. With the SIM card securely integrated into your device, you're now poised to power on your Sony Xperia D6503 and embark on a journey of uninterrupted calls, text messages, and data usage. This pivotal step unlocks the full potential of your device, empowering you to stay connected with the world around you and harness the advanced features offered by the Sony Xperia D6503.
Step 3: Power on the device
Powering on your Sony Xperia D6503 after inserting the SIM card is the final step in the process of integrating the card with your device. This crucial step initiates the activation of the SIM card, allowing your Sony Xperia D6503 to establish a connection with your mobile network provider and access a wide array of communication and data services. Follow the detailed instructions below to seamlessly power on your device and embark on a journey of uninterrupted connectivity and mobile functionality.
-
Press and Hold the Power Button: Located on the side or top of your Sony Xperia D6503, the power button is designed to initiate the device's startup process. Press and hold the power button for a few seconds until you see the device's screen illuminate, indicating that it is powering on.
-
Wait for the Startup Sequence: Upon pressing the power button, your Sony Xperia D6503 will commence its startup sequence, displaying the manufacturer's logo and initializing the device's operating system. Allow the device a few moments to complete this process, ensuring that the SIM card is recognized and activated within the device.
-
Enter PIN (if required): If your SIM card is protected by a PIN (Personal Identification Number), the device will prompt you to enter the PIN to unlock the SIM card and establish a secure connection with your mobile network provider. Carefully enter the PIN using the on-screen keypad, ensuring accuracy to successfully unlock the SIM card.
-
Establish Network Connection: As your Sony Xperia D6503 powers on, it will automatically attempt to establish a network connection using the inserted SIM card. The device will search for available mobile networks and connect to the one associated with your SIM card, enabling you to make calls, send text messages, and access mobile data services.
-
Confirmation of Connectivity: Once the startup sequence is complete, your Sony Xperia D6503 will display indicators confirming the successful connection to the mobile network. These indicators may include signal strength bars, network provider name, and data connectivity icons, signifying that your device is ready for seamless communication and data usage.
By following these detailed steps to power on your Sony Xperia D6503 after inserting the SIM card, you've successfully completed the essential process of integrating the SIM card with your device. With your Sony Xperia D6503 powered on and the SIM card activated, you're now poised to enjoy uninterrupted communication, seamless connectivity, and access to a wide range of mobile services. This pivotal step marks the culmination of the SIM card insertion process, empowering you to harness the full potential of your Sony Xperia D6503 and stay connected with the world around you.
Conclusion
Congratulations! By following the simple yet essential steps outlined in this guide, you have successfully inserted a SIM card into your Sony Xperia D6503, setting the stage for seamless communication and connectivity. The process of locating the SIM card slot, aligning and inserting the SIM card, and powering on your device has enabled you to integrate the SIM card with your Sony Xperia D6503, unlocking its full potential and empowering you to stay connected with the world around you.
With the SIM card securely integrated into your device, you now have the ability to make and receive calls, send text messages, and access mobile data services, all essential components of modern-day communication. The seamless activation of the SIM card within your Sony Xperia D6503 ensures that you can harness the advanced features and capabilities of your device, enabling you to stay connected with friends, family, and colleagues while on the go.
Furthermore, the successful insertion of the SIM card paves the way for a wide array of mobile services, including internet browsing, social media engagement, and access to a diverse range of mobile applications. Whether you're using your Sony Xperia D6503 for personal or professional purposes, the integrated SIM card ensures that you can leverage the full spectrum of mobile connectivity and functionality offered by your device.
As you embark on your journey with your Sony Xperia D6503, remember that the seamless integration of the SIM card is a foundational step in maximizing the potential of your device. By following the step-by-step instructions provided in this guide, you have not only completed the process of inserting a SIM card but also gained valuable insight into the essential components of your device's functionality.
In conclusion, the successful insertion of a SIM card into your Sony Xperia D6503 signifies the beginning of a seamless and uninterrupted mobile experience. With the SIM card securely in place, your device is now primed to keep you connected, informed, and engaged, allowing you to navigate the digital landscape with confidence and convenience. Embrace the connectivity and communication capabilities of your Sony Xperia D6503, knowing that the simple act of inserting a SIM card has unlocked a world of possibilities at your fingertips.