Setting Up Facebook Pay
Facebook Pay is a convenient and secure way to send and receive money through the Facebook platform. Before you can start withdrawing money, you’ll need to set up Facebook Pay. This process is quick and easy, and here’s how you can do it:
First, log in to your Facebook account and navigate to the settings menu. On the left-hand side of the screen, you’ll find the “Facebook Pay” option. Click on it to get started.
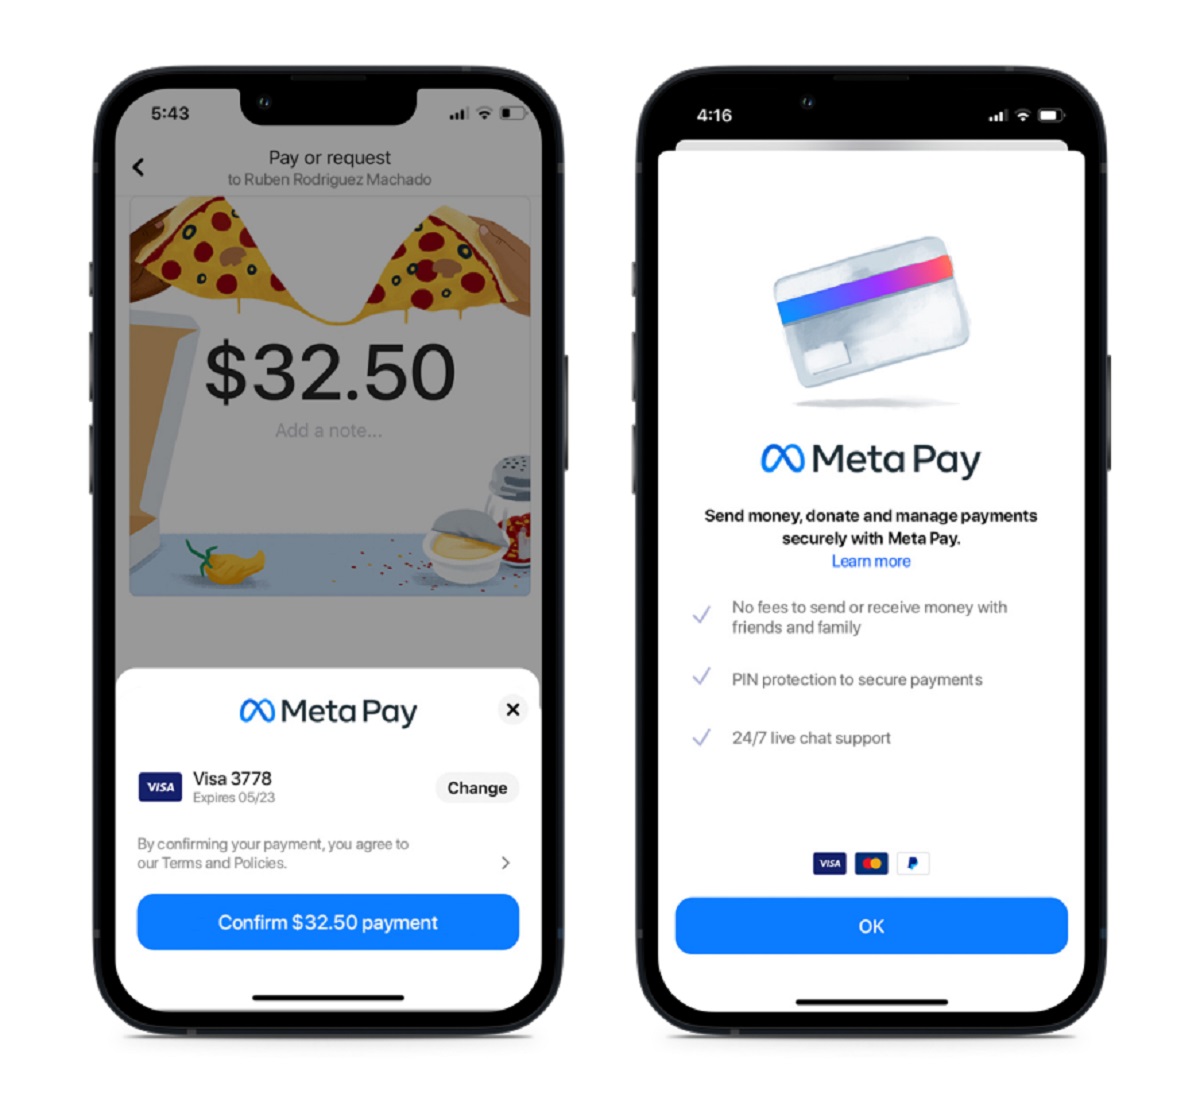
Next, you’ll need to add a payment method. Facebook Pay supports various payment options, including credit and debit cards, as well as PayPal. Choose the option that suits you best and follow the prompts to link your preferred payment method to your Facebook account.
Once your payment method is connected, you’ll have the option to set a preferred currency for your transactions. This will ensure that your withdrawals will be processed in your desired currency.
Additionally, you can choose whether to enable Facebook Pay for making purchases on Facebook and other partner platforms. By doing so, you can enjoy a seamless shopping experience and easily manage your payments within the Facebook ecosystem.
Lastly, you’ll need to review and confirm your settings. Make sure to double-check the accuracy of your linked payment method and currency preference. Once everything looks good, click on the “Confirm” button, and you’re all set up with Facebook Pay!
Setting up Facebook Pay only takes a few minutes, and it opens up a world of convenient money transactions within the Facebook platform. Whether you want to send money to friends, make purchases, or receive payments, Facebook Pay provides a simple and secure solution.
Linking a Bank Account or Card
In order to withdraw funds from Facebook Pay, you’ll need to link a bank account or card to your Facebook account. This allows Facebook Pay to securely transfer money to your preferred financial institution. Here’s how you can link a bank account or card:
Start by accessing the Facebook Pay settings, which can be found in the settings menu on your Facebook account. Once there, select the “Payment Methods” option.
Here, you’ll have the option to link a bank account or card. Choose the option that suits you and follow the on-screen instructions to provide the necessary details.
If you choose to link a bank account, you’ll need to provide your account number, bank name, and other required information. Facebook Pay will then verify the account details to ensure a secure connection.
If you decide to link a card instead, provide the card number, expiration date, and any additional information requested. Facebook Pay will also validate the card details to ensure a smooth transaction process.
Keep in mind that the availability of linking options may vary depending on your location and the financial institutions supported by Facebook Pay.
Once you’ve entered the necessary information, review the details carefully to avoid any mistakes. Click on the “Add” button to save your bank account or card information to your Facebook Pay settings.
Remember, Facebook Pay prioritizes security and takes measures to protect your personal and financial information. However, it’s always a good practice to regularly monitor your transaction history and account activity for any unauthorized charges.
By linking a bank account or card to your Facebook account, you can conveniently withdraw funds from Facebook Pay and have them transferred to your chosen financial institution. It’s a seamless process that ensures your money is securely and efficiently managed.
Withdrawing Funds from Facebook Pay
Once you’ve set up Facebook Pay and linked a bank account or card, you’re ready to start withdrawing funds. Facebook Pay offers various withdrawal methods to accommodate different preferences and needs. Here’s how you can withdraw funds from Facebook Pay:
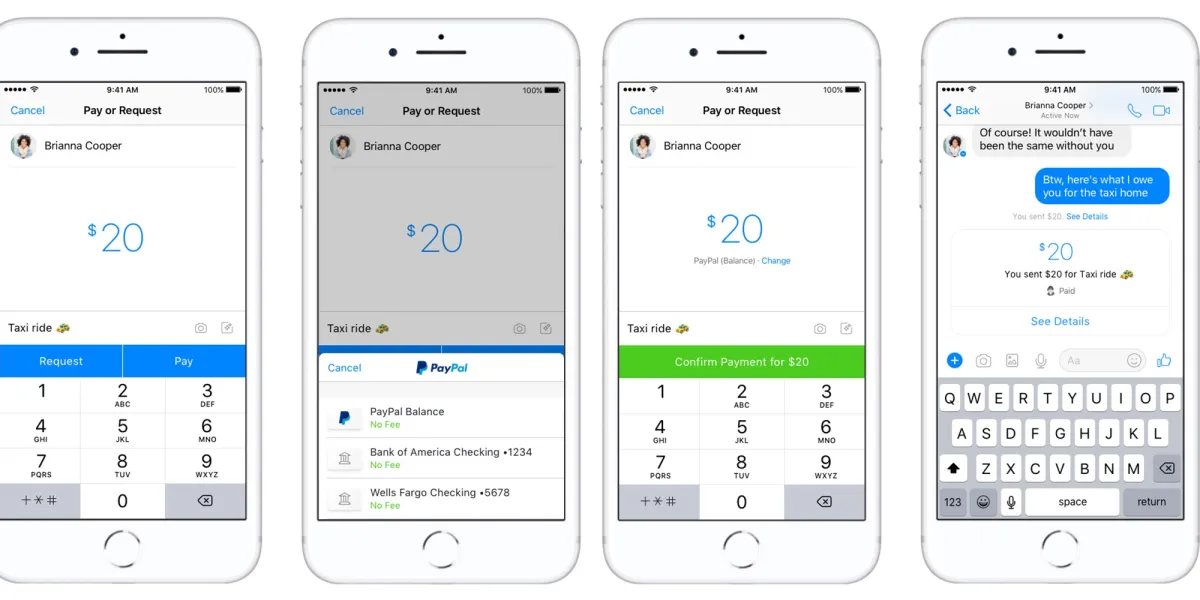
To access the Facebook Pay settings, begin by logging in to your Facebook account. Navigate to the settings menu and select the “Facebook Pay” option on the left-hand side of the screen.
Within the Facebook Pay settings, you’ll find the “Withdraw” option. Click on it to proceed with the withdrawal process.
Facebook Pay provides different withdrawal methods, including bank transfers and PayPal. Choose the method that suits you best and follow the prompts to continue.
If you opt for a bank transfer, you’ll need to select the linked bank account you wish to withdraw funds to. Facebook Pay will securely process the transfer, and the funds should be reflected in your bank account within a few business days.
Alternatively, if you choose PayPal as your withdrawal method, you’ll be redirected to the PayPal website to log in to your account. Follow the necessary steps within PayPal to complete the withdrawal process.
It’s important to note that there may be minimum withdrawal amounts and applicable fees depending on the withdrawal method and your location.
Once you’ve chosen your withdrawal method and provided the required information, review the details carefully. Click on the “Confirm” or “Withdraw” button to initiate the withdrawal.
Facebook Pay will prompt you with a confirmation message to ensure that you want to proceed with the withdrawal. Double-check that all the information is correct and confirm your decision.
After confirming the withdrawal, you may receive a confirmation email or notification to confirm the successful initiation of the transfer.
Depending on the withdrawal method and other factors such as location and current banking processes, the processing time for the withdrawal may vary. It’s essential to be patient and allow sufficient time for the funds to be transferred to your chosen account.
Withdrawing funds from Facebook Pay is a straightforward process, providing you with the flexibility to manage your money according to your preferences and financial needs.
Accessing the Facebook Pay Settings
Accessing the Facebook Pay settings allows you to manage your payment methods, review transaction history, and make changes to your preferences. Here’s how you can access the Facebook Pay settings:
To begin, log in to your Facebook account and navigate to the settings menu. On the left-hand side of the screen, you’ll find the “Facebook Pay” option. Click on it to access the Facebook Pay settings.
Within the Facebook Pay settings, you’ll see various options and features that you can manage. These include payment methods, transaction history, privacy settings, and more.
If you need to add or remove a payment method, choose the “Payment Methods” option. This will allow you to link or unlink a bank account, credit card, or PayPal account.
To review your transaction history and track your past withdrawals, select the “Transactions” or “History” option, depending on the terminology used in your Facebook Pay settings.
Within the transaction history section, you’ll be able to see a list of all your past transactions, including withdrawals, payments, and any other activities related to Facebook Pay. You can filter the transactions by date, transaction type, or other relevant criteria.
Furthermore, if you wish to update your preferences or change your privacy settings related to Facebook Pay, look for the corresponding options within the settings menu.
It’s important to regularly review your Facebook Pay settings to ensure that the payment methods linked to your account are up to date and accurate.
By accessing the Facebook Pay settings, you have full control over managing your payment methods, tracking your transactions, and making any necessary adjustments based on your preferences and needs.
Choosing a Withdrawal Method
When it comes to withdrawing funds from Facebook Pay, you have options to choose from depending on your preferences and needs. Here are the different withdrawal methods offered by Facebook Pay:
1. Bank Transfer: This is the most common and widely-used method for withdrawing funds. With a bank transfer, you can have your funds directly deposited into your linked bank account. This method is convenient and secure, and the funds typically reflect in your account within a few business days.
2. PayPal: If you prefer using PayPal as your primary financial service, you can choose this withdrawal method. When you select PayPal, you’ll be redirected to the PayPal website to log in to your account and complete the withdrawal process. This option allows for quick and seamless transfers if you already have a PayPal account set up.
3. Other Payment Providers: Depending on your location, Facebook Pay may offer additional payment providers for withdrawing funds. These providers can vary and may include local or regional payment services. If available, selecting this option allows you to withdraw funds to your preferred payment provider.
When choosing a withdrawal method, consider factors such as processing time and any associated fees. Bank transfers are typically the most straightforward and widely accepted method, but PayPal or other payment providers may be better suited for users who prefer using those services.
Additionally, consider the accessibility and compatibility of the withdrawal method. Ensure that the bank account, PayPal account, or payment provider you choose is available in your region and supports transactions with Facebook Pay.
It’s essential to carefully evaluate and select the withdrawal method that aligns with your financial preferences and requirements. Facebook Pay aims to provide a range of options to ensure a seamless and efficient withdrawal process for users around the world.
Initiating a Withdrawal
Once you’ve chosen your preferred withdrawal method for your Facebook Pay funds, it’s time to initiate the withdrawal. Here’s how you can start the withdrawal process:
First, log in to your Facebook account and access the Facebook Pay settings. Navigate to the section that specifically deals with withdrawals or transferring funds.
Within the withdrawal section, you’ll find options related to the different withdrawal methods available to you, such as bank transfers, PayPal, or other payment providers.
Select the withdrawal method that you have chosen and proceed by following the prompts or clicking on the designated option.
Depending on the withdrawal method, you may be required to provide additional information or confirm certain details, such as the amount you wish to withdraw or the account where you want the funds to be transferred.
Ensure that you have reviewed the information and entered the correct details before confirming the withdrawal. This step is crucial to avoid any errors or delays in the transfer process.
Once you are satisfied with the details, click on the “Confirm” or “Withdraw” button to initiate the withdrawal process.
Facebook Pay will then process your withdrawal request and provide you with a confirmation message or email to acknowledge that the withdrawal has been initiated.
During this phase, it’s important to remain patient and allow sufficient time for the withdrawal to be processed. Depending on the withdrawal method and other factors, such as location and banking processes, it may take a few business days for the funds to reflect in your chosen account.
While the withdrawal is being processed, it’s advisable to regularly check your email or Facebook notifications for any status updates or additional requests for verification.
Initiating a withdrawal from Facebook Pay is a straightforward process that can be completed in just a few steps. By following the instructions provided and staying attentive to the details, you can successfully initiate a withdrawal and transfer your funds securely and efficiently.
Confirming the Withdrawal
After initiating a withdrawal from Facebook Pay, it is important to confirm the transaction to ensure the funds are transferred accurately and securely. Here’s how you can confirm the withdrawal:
Once you have initiated the withdrawal process by selecting your preferred withdrawal method and providing the necessary details, Facebook Pay will prompt you with a confirmation message.
Review the withdrawal details carefully to ensure that all the information is correct. This includes verifying the withdrawal amount, destination account, and any associated fees.
If everything looks accurate, proceed to confirm the withdrawal by clicking on the “Confirm” or “Withdraw” button provided.
Facebook Pay may ask for an additional layer of verification for security purposes, such as entering a unique code sent to your registered email or phone number. Follow the instructions and provide the requested verification code, if applicable.
Once the withdrawal is confirmed, Facebook Pay will process the transaction and initiate the transfer of funds to your designated account or payment provider.
During this confirmation stage, be sure to maintain a safe and secure online environment. Ensure that you are accessing your Facebook account and confirming the withdrawal from a trusted device and network.
It is also important to note that fees may be associated with the withdrawal, depending on the withdrawal method and your location. Review the terms and conditions of the withdrawal method to understand any applicable fees.
After confirming the withdrawal, you can expect to receive a confirmation email or notification from Facebook Pay, acknowledging that the withdrawal has been successfully confirmed and initiated.
Remember that processing times for withdrawals may vary depending on factors such as the withdrawal method, location, and banking processes. It is essential to be patient and allow sufficient time for the funds to be transferred to your designated account.
By carefully confirming the withdrawal from Facebook Pay, you can ensure the accuracy and security of the transfer, providing you with peace of mind throughout the process.
Processing Time and Fees
When withdrawing funds from Facebook Pay, it is important to consider the processing time and any applicable fees associated with the withdrawal. Here’s what you need to know:
Processing Time: The processing time for withdrawals from Facebook Pay may vary depending on factors such as the withdrawal method, location, and banking processes. Bank transfers usually take a few business days to reflect in your account, while PayPal or other payment providers may offer quicker processing times. It is important to be patient and allow sufficient time for the funds to be transferred.
Fees: Fees may be associated with withdrawals from Facebook Pay, depending on the withdrawal method and your location. It is essential to review the terms and conditions of the withdrawal method to understand any applicable fees. Common fees may include transaction fees, currency conversion fees, or fees imposed by the payment provider or financial institution involved in the withdrawal process.
Keep in mind that the availability of withdrawal methods and associated fees may vary depending on your location and the specific financial institutions supported by Facebook Pay in your region.
Before confirming a withdrawal, carefully review the transaction details to understand any incurred fees and the total amount that will be transferred to your designated account or payment provider. This will help you make an informed decision and no surprises.
It is also important to note that additional fees or charges may be imposed by your bank or payment provider upon receiving the funds. It is advisable to contact your financial institution or payment provider directly for more information about any potential receiving fees.
Understanding the processing time and fees associated with withdrawing funds from Facebook Pay is crucial for managing your finances effectively. By being aware of these factors, you can plan your withdrawals accordingly and make informed decisions regarding your financial transactions.
Tracking Withdrawal History
Tracking your withdrawal history is an important aspect of managing your finances with Facebook Pay. It allows you to keep a record of your past withdrawals and helps you monitor your financial transactions. Here’s how you can track your withdrawal history:
To access your withdrawal history, log in to your Facebook account and navigate to the Facebook Pay settings. Look for the section that specifically deals with transaction history or past withdrawals.
Once you’re in the transaction history section, you’ll see a list of your past withdrawals. The information provided may include the date and time of the withdrawal, the withdrawal amount, the destination account or payment provider, and any associated fees.
You can customize the display of your withdrawal history by applying filters such as date ranges, withdrawal methods, or transaction types. This allows you to narrow down the results and access the specific information you’re looking for.
In addition to viewing the transaction details, you may have the option to download or export your withdrawal history for record-keeping purposes. This can be particularly useful for financial tracking and reconciliation.
If you notice any discrepancies or issues with your withdrawal history, it is recommended to contact Facebook Pay support or your financial institution to resolve the matter. They will be able to assist you in investigating and resolving any concerns regarding your withdrawal transactions.
Regularly reviewing your withdrawal history can provide you with insights into your financial activity and help you stay organized. It allows you to reconcile your transactions, keep track of your funds, and identify any irregularities or unauthorized withdrawals.
By taking advantage of the tracking capabilities provided by Facebook Pay, you can have a clear overview of your past withdrawals and ensure the accuracy and transparency of your financial transactions.
Troubleshooting Withdrawal Issues
While using Facebook Pay for withdrawals is generally smooth and hassle-free, there may be instances where you encounter issues. If you’re facing any problems with your withdrawals, here are some troubleshooting steps you can take:
1. Verify Your Account Details: Double-check that the withdrawal information, such as the destination account or payment provider details, is accurate. Ensure that you’ve entered the correct information and that your account is in good standing.
2. Contact Customer Support: If you’re experiencing any issues with your withdrawals, reach out to Facebook Pay customer support for assistance. They can provide guidance, troubleshoot the issue, and address any concerns or questions you may have.
3. Check for Maintenance or Downtime: Sometimes, Facebook Pay or the associated payment providers may undergo maintenance or experience downtime. Check the Facebook support page or the official website of your payment provider for any notifications regarding maintenance or known issues.
4. Review Transaction History: Take a look at your transaction history within the Facebook Pay settings to verify if the withdrawal has been processed. If it appears as pending or unsuccessful, wait for a reasonable amount of time to allow for processing before raising a concern.
5. Ensure Sufficient Funds: Check that you have adequate funds available in your Facebook Pay account or the linked bank account or payment provider. Insufficient funds may result in failed withdrawals.
6. Verify Withdrawal Limits: Some withdrawal methods may have specific limits imposed. Ensure that you’re within the allowed withdrawal limits for your chosen method. If necessary, consider splitting the withdrawal into multiple transactions that fall within the specified limits.
7. Clear Cache and Cookies: Clearing the cache and cookies on your internet browser can help resolve any technical glitches that may be interfering with the withdrawal process. Close and reopen your browser before attempting the withdrawal again.
8. Update Your App: If you’re using the Facebook app, make sure it’s updated to the latest version. Outdated app versions may contain bugs or compatibility issues that could impact your withdrawal experience.
9. Try a Different Device or Browser: If you’re experiencing issues on a specific device or browser, try switching to a different device or browser. This helps rule out any device-related or browser-specific issues that may be affecting the withdrawal process.
If you’ve exhausted these troubleshooting steps and are still unable to resolve the withdrawal issue, it’s recommended to reach out to Facebook Pay customer support or contact your financial institution for further assistance.
Remember to provide as much detail as possible when seeking support, including the date and time of the withdrawal, the withdrawal amount, and any error messages or notifications you may have encountered. This information will help in the troubleshooting process and expedite the resolution of your issue.
By following these troubleshooting steps, you can overcome common withdrawal issues and have a smoother experience with Facebook Pay.