Introduction
Welcome to the digital era, where online payments have become an integral part of our daily lives. Gone are the days of carrying physical wallets filled with cash and multiple credit cards. With the advent of technology, digital payment methods have made transactions quick, convenient, and hassle-free. One such popular platform for digital payments is Facebook Pay, introduced by Facebook to streamline financial transactions within its ecosystem.
Facebook Pay enables users to send and receive money securely through the Facebook app. Whether you want to split a bill with friends, make a purchase from a Facebook Marketplace seller, or donate to a charity, Facebook Pay provides a simple and efficient way to handle your transactions. To start using this feature, you need to link your bank account to Facebook Pay. This ensures that you have a reliable source of funds for all your financial activities on the platform.
In this article, we will guide you through the steps to link your bank account to Facebook Pay. Rest assured, the process is straightforward and can be completed within a few minutes. So, without further ado, let’s get started on setting up your bank account with Facebook Pay!
Steps to Link Your Bank Account to Facebook Pay
Linking your bank account to Facebook Pay is a simple process that can be done directly through the Facebook app. Follow the steps below to get started:
- Open the Facebook App: Launch the Facebook app on your mobile device. Make sure you are logged in to your account.
- Go to Settings: Once you’re in the app, locate the menu button. On most devices, it appears as three horizontal lines in the top-right corner of the screen. Tap on it to access the menu.
- Select “Facebook Pay”: Scroll down through the menu options until you find “Settings & Privacy.” Tap on it, and then select “Facebook Pay” from the available options.
- Add A Payment Method: In the Facebook Pay settings, you will see an option to “Add a payment method.” Tap on it to proceed.
- Choose Your Bank: You will now be presented with a list of available payment options. Select “Bank” to link your bank account.
- Enter Your Bank Account Details: On the next screen, you will need to provide your bank account details. This includes your account number, routing number, and any other required information. Ensure that you enter the information accurately.
- Verify Your Bank Account: After entering your bank account details, Facebook will verify the information to ensure it is correct. This may involve a small deposit or withdrawal to confirm that your account is valid.
- Start Using Facebook Pay: Once your bank account is successfully linked and verified, you can start using Facebook Pay for various transactions within the platform.
Congratulations! You have successfully linked your bank account to Facebook Pay. Now you can enjoy the convenience of making secure transactions and sending money to friends and family directly from the app.
Step 1: Open the Facebook App
To begin linking your bank account to Facebook Pay, you first need to open the Facebook app on your mobile device.
Ensure that the app is installed and up to date on your device. If you haven’t installed it yet, head to your device’s app store and search for “Facebook.” Tap on the “Install” or “Update” button to proceed with the download or update.
Once the app is installed or updated, locate the Facebook icon on your device’s home screen or app drawer. Tap on the icon to launch the app.
If you are not already logged in, enter your Facebook account credentials, including your email address or phone number and password. Tap on the “Log In” button to access your Facebook account.
Once you are logged in, you will be directed to your Facebook news feed, where you can see updates from your friends and pages you follow. Now you are ready to move on to the next step of linking your bank account to Facebook Pay.
It’s worth mentioning that you can also access Facebook through a web browser on your computer if you prefer. Simply open your preferred web browser and type in “www.facebook.com.” Enter your login credentials to access your account.
Now that you have successfully opened the Facebook app and logged in, let’s move on to step 2, where we will guide you through accessing the settings necessary for linking your bank account.
Step 2: Go to Settings
After opening the Facebook app and logging in to your account, the next step in linking your bank account to Facebook Pay is to navigate to the settings menu.
To access the settings, locate the menu button in the app. On most devices, this appears as three horizontal lines in the top-right corner of the screen. Tap on the menu button to open the dropdown menu.
Scroll down through the menu options until you find “Settings & Privacy.” Tap on it to expand the settings submenu. Within this submenu, you will find various options related to customizing your Facebook experience.
Among these options, you will see “Settings.” Tap on this option to access your Facebook account settings. By tapping on “Settings,” you will be directed to a new screen that includes a wide range of account customization options and preferences.
On this screen, you will find different settings categories, such as Account, Privacy, Security, and Payments & Wallets. To proceed with linking your bank account, tap on the “Payments & Wallets” option. This will take you to a section specifically dedicated to managing your payments and financial settings within the Facebook app.
Now that you have successfully navigated to the settings menu, specifically the “Payments & Wallets” section, you are ready to proceed to the next step, where we will guide you through selecting “Facebook Pay” as your preferred payment option.
Step 3: Select “Facebook Pay”
Once you have accessed the “Payments & Wallets” section in the Facebook app settings, the next step in linking your bank account is to select “Facebook Pay” as your preferred payment option.
In the “Payments & Wallets” section, you will find a list of available payment methods and options. Look for the option labeled “Facebook Pay” and tap on it to proceed with the setup process.
By selecting “Facebook Pay,” you are indicating your intention to link a bank account to this feature and utilize it for your financial transactions within the Facebook app.
When you tap on “Facebook Pay,” a new screen will open, presenting you with additional settings and customization options related to this payment method. Here, you can enable features like One-Time Password (OTP) authentication, add a PIN for extra security, and customize your payment settings according to your preference.
Take a moment to review these settings and adjust them according to your needs. Ensure that you understand the implications of each setting before enabling or disabling them.
Once you have reviewed and adjusted the Facebook Pay settings to your liking, you are ready to proceed to the next step, where we will guide you through adding a payment method and specifically linking your bank account.
Step 4: Add A Payment Method
After selecting “Facebook Pay” in the Facebook app settings, the next step in linking your bank account is to add a payment method. This will allow you to link your bank account and access it for financial transactions within the app.
In the “Facebook Pay” settings screen, you will find an option titled “Add a payment method.” Tap on this option to proceed with adding your bank account as a payment method.
When you tap on “Add a payment method,” a list of available payment options will appear. Select the option labeled “Bank” to indicate that you want to link your bank account.
By choosing “Bank,” you are specifying that you want to use your bank account as the primary source of funds for any transactions you make through Facebook Pay.
Once you have selected “Bank,” a new screen will open, prompting you to enter your bank account details. This includes information such as your account number, routing number, and any other required details.
It’s important to ensure that you enter the correct and accurate information regarding your bank account. Double-check the account number and routing number to avoid any errors that may hinder the successful linking of your bank account.
Take your time to fill out the required fields with the necessary information. If you’re unsure about any specific details, you may need to refer to your bank statement or contact your bank for assistance.
After entering your bank account details, proceed to the next step, where we will cover how to verify your bank account to complete the linking process successfully.
Step 5: Choose Your Bank
Once you have entered your bank account details in the previous step, the next step in linking your bank account to Facebook Pay is to choose your bank from the available options.
After filling out the necessary information, you will be presented with a list of banks to choose from. This list includes popular banks and financial institutions that are compatible with Facebook Pay.
Scroll through the list, and when you find your bank, tap on it to select it as your financial institution. If you cannot find your bank on the list, you can try searching for it using the search bar provided.
Choosing your bank accurately is essential to ensure the seamless integration of your bank account with Facebook Pay. It enables smoother transactions and reflects the correct banking information associated with your account.
If you are unsure about which bank to choose or encounter any difficulties finding your bank on the list, you can reach out to Facebook support for further assistance. They can help you identify the appropriate selection or guide you through any troubleshooting steps required.
Once you have selected your bank, you can move on to the next step, in which we will guide you through entering your bank account details for verification and security purposes.
Step 6: Enter Your Bank Account Details
With your bank selected in the previous step, the next step in linking your bank account to Facebook Pay is to enter your bank account details for verification and security purposes.
On the screen following the bank selection, you will be prompted to enter your bank account details. These details typically include your account number, routing number, and sometimes additional information such as the account type (e.g., checking or savings).
Ensure that you carefully enter each detail accurately and double-check for any mistakes or typos. Incorrectly entered information can cause delays in the verification process or even result in a failed bank account linking.
To find your account number and routing number, refer to your checks or contact your bank for assistance. These numbers are unique to your bank account and are essential for proper identification and validation.
As you enter your bank account details, you may notice that the Facebook app automatically detects and formats certain information based on the bank you selected. However, it is still crucial to verify that the information provided by the app matches your actual bank account details.
Take your time to carefully fill in the required fields with the correct information. Any errors or discrepancies could lead to issues in the linking process or cause problems with future transactions.
Once you have entered your bank account details, move on to the next step, where we will guide you through the verification process to ensure the successful linking of your bank account to Facebook Pay.
Step 7: Verify Your Bank Account
After entering your bank account details in the previous step, the next critical step in linking your bank account to Facebook Pay is the verification process. Verification is essential to ensure the security and accuracy of the information provided.
To verify your bank account, Facebook Pay employs various methods, one of which may involve a small deposit or withdrawal from your bank account. This process confirms that the account is valid and belongs to you.
During the verification process, keep an eye on your bank account transactions. You may notice a small deposit made by Facebook Pay into your account, usually ranging from a few cents to a couple of dollars. Alternatively, you may see a small withdrawal made by Facebook Pay, which will be reimbursed shortly. These transactions typically include a unique verification code in their description or statement.
Once you detect the deposit or withdrawal in your bank account, access the Facebook Pay settings in the app and navigate to the verification section. Enter the specific verification code provided by the transaction in the designated field.
It’s essential to note that the verification process may vary depending on your region and the policies implemented by your bank. Facebook Pay may offer alternative verification methods, such as providing additional personal information, linking a debit card, or utilizing a unique code sent via SMS to your registered mobile number.
Ensure that you follow the instructions provided by Facebook Pay accurately to complete the verification process successfully. Failing to verify your bank account may result in limitations or restrictions on your use of Facebook Pay.
Once your bank account is successfully verified, you have completed the crucial step of linking your bank account to Facebook Pay. You can now enjoy the ease and convenience of making secure transactions directly within the Facebook app.
Step 8: Start Using Facebook Pay
Congratulations! You have successfully linked your bank account to Facebook Pay. Now, you can start utilizing this convenient payment feature for various transactions within the Facebook app.
With Facebook Pay, you can effortlessly send money to friends and family, make purchases on Facebook Marketplace, donate to charitable causes, and even pay for in-app purchases on select games and applications.
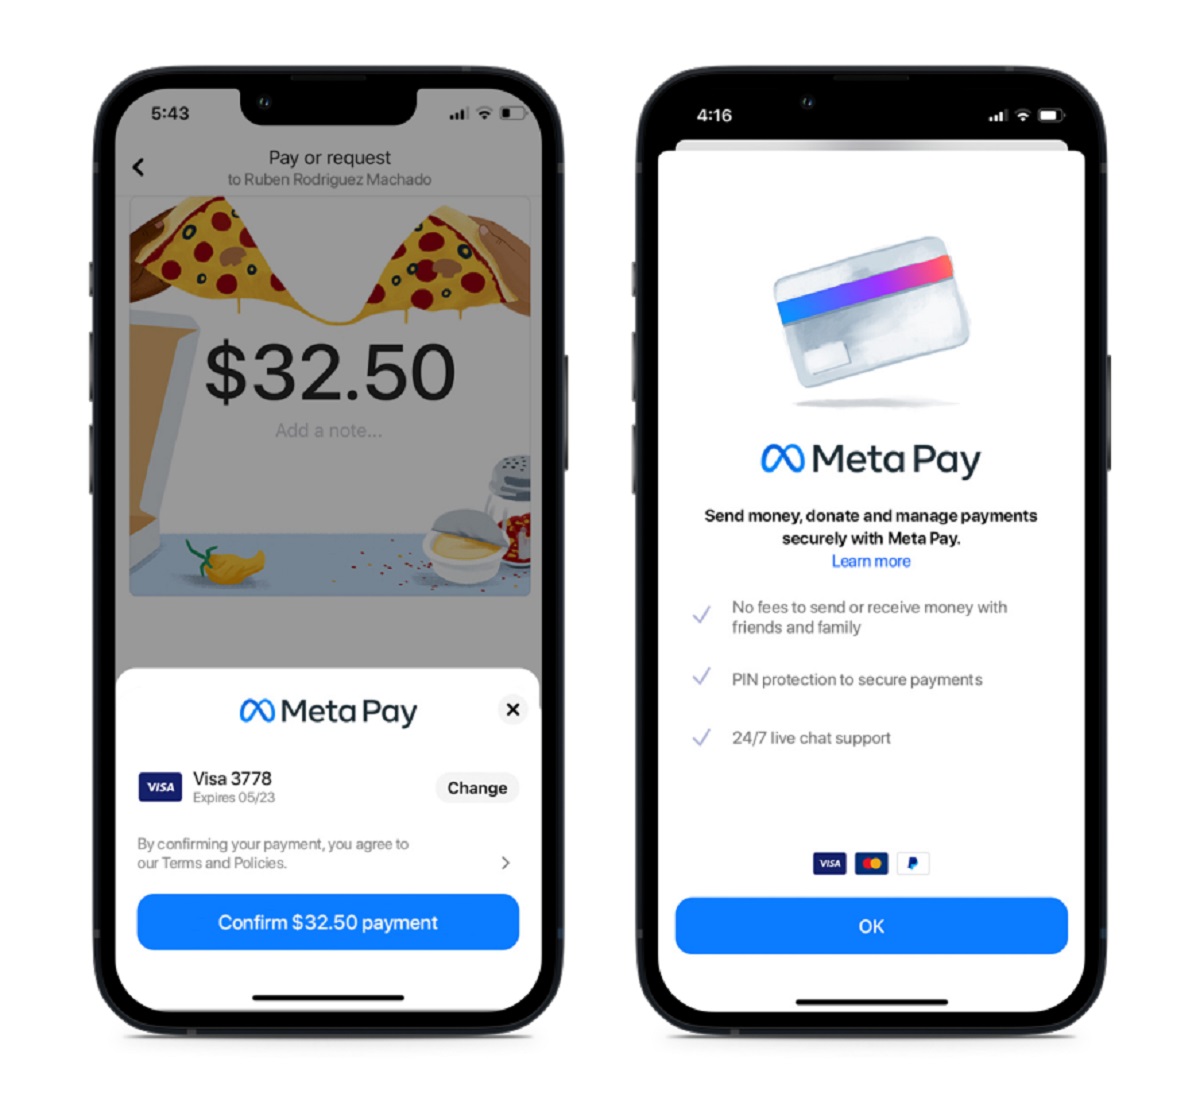
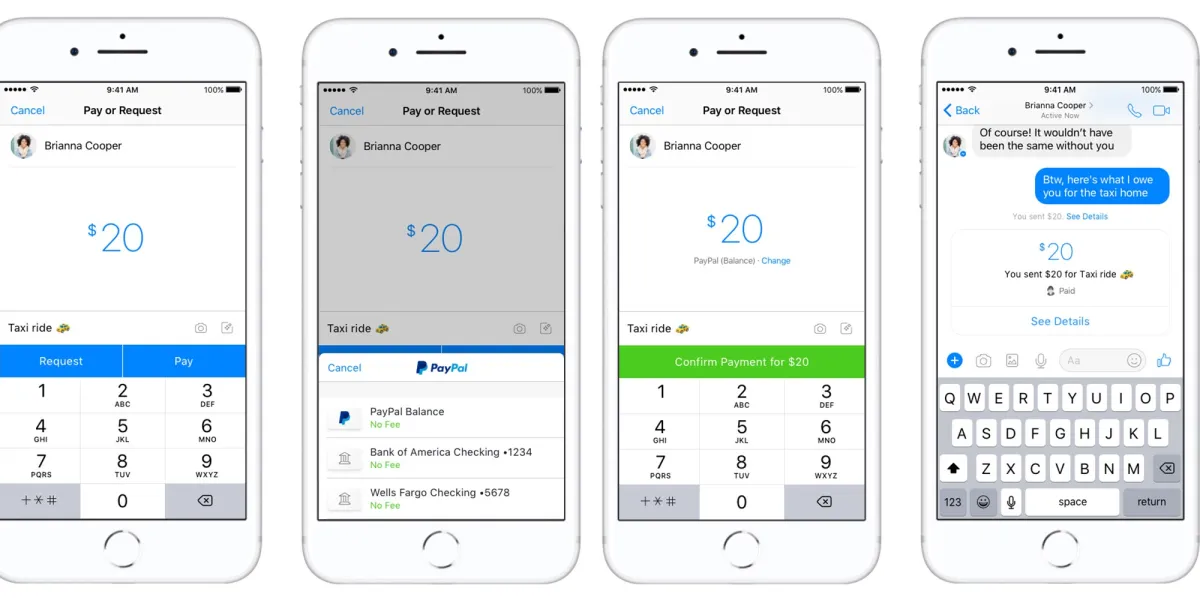
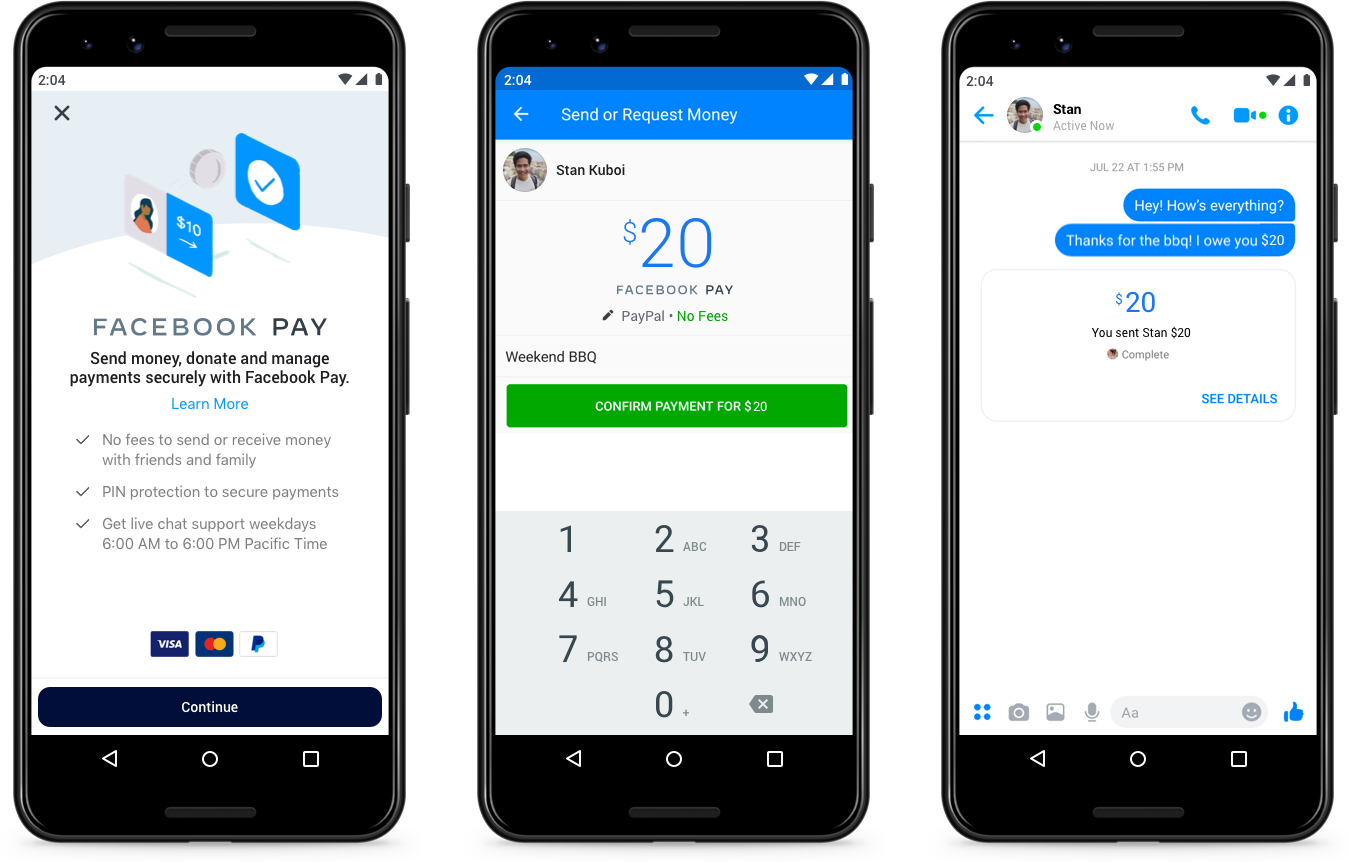
To use Facebook Pay, simply navigate to the desired transaction within the app. For example, if you want to send money to a friend, open a conversation with that person and tap on the dollar sign icon, which represents payments. Enter the amount you wish to send, add a message if desired, and confirm the transaction.
If you want to make a purchase on Facebook Marketplace, select the item you wish to buy and go through the usual checkout process. Facebook Pay will be automatically selected as the payment option, making the transaction seamless and secure.
It’s important to note that Facebook Pay provides additional security measures to protect your financial information. Transactions are encrypted and monitored for any suspicious activity, and you can also enable extra security features such as two-factor authentication or setting a PIN code.
Furthermore, you can access your transaction history and manage your payment methods from the Facebook Pay settings, ensuring full control and transparency over your financial activities.
Enjoy the convenience and peace of mind that comes with using Facebook Pay within the app. As you explore the various features and functionalities it offers, you will realize how it simplifies your financial interactions and enhances your overall Facebook experience.
Remember to keep your bank account and personal information secure at all times. Avoid sharing sensitive details with unauthorized individuals or entities, and regularly monitor your transactions for any discrepancies.
Now that you’ve completed all the steps to link your bank account to Facebook Pay, you are ready to embrace the advantages of this seamless and efficient payment option. Begin enjoying the convenience and ease of financial transactions within the Facebook app, all while keeping your personal information safe and secure.
Conclusion
In this article, we have walked you through the step-by-step process of linking your bank account to Facebook Pay. By following these simple instructions, you can conveniently and securely handle financial transactions within the Facebook app.
Facebook Pay enables you to send money to friends, make purchases on Facebook Marketplace, donate to charitable causes, and more. It eliminates the need for additional payment apps or services, streamlining your online transactions all in one place.
Remember to take your time when entering your bank account details and ensure their accuracy. Mistakes or typos may disrupt the linking process or result in failed transactions. Stay vigilant during the verification process, making sure to complete the necessary steps to confirm your bank account successfully.
Once your bank account is linked and verified, you can enjoy using Facebook Pay with confidence. Take advantage of the added security features, such as two-factor authentication and PIN codes, to protect your financial information.
Keep in mind that Facebook Pay’s availability may vary by region, so ensure that your country supports this feature. Additionally, be aware of any transaction fees or limitations that may apply to certain transactions or regions.
As technology continues to evolve, digital payment methods like Facebook Pay play an increasingly significant role in our daily lives. They offer convenience, security, and efficiency, transforming the way we handle financial transactions.
So, what are you waiting for? Start linking your bank account to Facebook Pay today and experience the convenience and ease it brings to your financial interactions within the Facebook app.
Embrace the digital revolution and enjoy seamless, hassle-free transactions with Facebook Pay. Say goodbye to physical wallets and complicated payment procedures, and say hello to the future of convenient banking within your favorite social media platform.