What is Zelle?
Zelle is a popular digital payment service that allows you to send and receive money quickly and securely. It provides a convenient way to send money to family, friends, or businesses directly from your bank account using just a recipient’s email address or mobile phone number. With Zelle, you can easily split expenses with friends, reimburse someone for a shared meal, or pay your landlord without the hassle of cash or checks.
Unlike other payment platforms, Zelle operates directly between banks, which means there’s no need to create a separate account or link to a third-party service. As long as your bank is partnered with Zelle, you can seamlessly integrate it into your existing online or mobile banking app.
Zelle offers real-time transfers, allowing you to send and receive money within minutes. This makes it convenient for urgent transfers or when you need to quickly settle a debt or expense. Whether you’re paying rent, chipping in for a gift, or splitting a restaurant bill, Zelle simplifies the process and eliminates the need for cash or physical checks.
One of the key advantages of Zelle is that it’s widely supported by major banks and credit unions across the United States. This means that even if your recipient doesn’t have a Zelle account, they can still receive money through Zelle by simply following the instructions provided in the payment notification.
In addition, Zelle also emphasizes security. All transactions made through the platform are protected by strong encryption and fraud prevention measures, giving you peace of mind when transferring money. Plus, since Zelle operates within your existing banking app, you can rely on your bank’s robust security measures to keep your account safe.
Ultimately, Zelle offers a fast, convenient, and secure way to send and receive money digitally. Whether you need to split expenses or quickly pay someone, Zelle provides an easy-to-use solution directly through your banking app. With the wide adoption and security measures in place, Zelle has become a popular choice for individuals looking for a hassle-free payment service.
How to Sign Up for Zelle
Signing up for Zelle is a simple and straightforward process that can be done through your bank or credit union’s mobile app or online banking platform. Follow the step-by-step guide below to create your Zelle account and start sending money:
- Check if your bank supports Zelle: Before getting started, ensure that your bank or credit union is partnered with Zelle. Most major financial institutions in the United States offer Zelle, but it’s always a good idea to confirm this with your bank to avoid any confusion.
- Download and open your bank’s mobile app: If your bank supports Zelle, download their mobile app from your device’s app store and open it. Alternatively, you can also access Zelle through your bank’s online banking website from your computer.
- Find the Zelle option: Once you’ve opened the app or website, navigate to the section that deals with money transfers or payments. Look for the option that mentions Zelle or person-to-person payments.
- Enter your personal information: To sign up for Zelle, you’ll need to provide some personal information, including your name, email address, and mobile phone number. Make sure to enter accurate details to ensure a seamless registration process.
- Agree to terms and conditions: Before proceeding, you’ll likely be presented with Zelle’s terms and conditions. Take the time to review these and ensure you understand them. Once you’re comfortable, check the box indicating your agreement and proceed.
- Create a Zelle profile: As part of the sign-up process, you may need to create a Zelle profile. This usually involves choosing a username and password that you’ll use to access your Zelle account in the future.
- Link your bank account: After creating your profile, you’ll need to link your bank account to Zelle. This is typically done by providing your bank account number and other required information. Rest assured that Zelle employs advanced security measures to protect your banking information.
- Verify your phone number or email address: To ensure the security of your Zelle account, you’ll likely be asked to verify your phone number or email address. This can be done by following the instructions provided by Zelle, such as entering a verification code sent via text message or email.
- Customize your account settings: Once you’ve completed the registration process, you can explore the account settings to personalize your Zelle experience. This may include adding a profile picture or adjusting notification preferences.
- Start sending and receiving money: With your Zelle account set up, you’re now ready to start sending and receiving money. Simply select the contact you want to send money to, enter the amount, and confirm the transaction. The funds will be securely transferred to the recipient’s bank account in minutes.
Remember, the specific steps and options may vary depending on your bank or credit union’s mobile app or online banking platform. If you encounter any difficulties during the sign-up process, reach out to your bank’s customer support for assistance.
Step-by-Step Guide for Creating a Zelle Account
If you’re new to Zelle and want to create an account to start sending and receiving money, follow the step-by-step guide below:
- Check if your bank supports Zelle: Before getting started, confirm whether your bank or credit union is partnered with Zelle. Most major financial institutions in the United States offer Zelle, but it’s always a good idea to double-check to avoid any confusion.
- Access Zelle through your banking app or website: Once you’ve confirmed that Zelle is supported by your bank, log in to your mobile banking app or online banking platform using your username and password.
- Locate the Zelle option: After logging in, navigate to the section that is dedicated to money transfers or payments. Look for the option that specifically mentions Zelle or peer-to-peer payments.
- Provide your personal information: To create a Zelle account, you’ll need to provide some basic personal information. This typically includes your name, email address, and mobile phone number. Ensure that you enter accurate details to ensure a smooth registration process.
- Agree to the terms and conditions: Before proceeding, take the time to carefully read through Zelle’s terms and conditions. Once you’ve reviewed and understood them, check the box indicating your agreement to proceed with creating your account.
- Create a Zelle profile: As part of the sign-up process, you may be prompted to create a Zelle profile. This may involve choosing a username and password that you’ll use to access your Zelle account in the future. It’s important to select a strong password for added security.
- Link your bank account: After creating your Zelle profile, you’ll need to link your bank account to the app. Follow the instructions provided, such as entering your bank account number, routing number, and other required information. Rest assured that Zelle employs advanced security measures to protect your banking information.
- Verify your phone number or email address: To ensure the security of your Zelle account, you may be required to verify your phone number or email address. This can typically be done by entering a verification code sent to your mobile phone number or email address.
- Personalize your Zelle account: Once your account is set up, you can customize your Zelle experience by personalizing your account settings. This may include adding a profile picture, adjusting notification preferences, or setting up additional security features like biometric authentication.
- Start using Zelle: With your Zelle account created and linked to your bank account, you’re now ready to start sending and receiving money. Simply select the contact you want to send money to, enter the amount, and confirm the transaction. The recipient will be notified and the funds will be securely transferred to their bank account in minutes.
Keep in mind that the exact steps and options may vary depending on your bank or credit union’s mobile app or online banking platform. If you encounter any difficulties or have questions during the account creation process, don’t hesitate to reach out to your bank’s customer support for assistance.
How to Link Your Bank Account to Zelle
Linking your bank account to Zelle is a crucial step that enables you to seamlessly send and receive money through the platform. Follow the step-by-step guide below to link your bank account to Zelle:
- Open your bank’s mobile app or website: Launch the mobile app provided by your bank or access their online banking platform through a web browser on your computer.
- Log in to your bank account: Enter your username and password to log in to your bank account. If you haven’t set up online banking, you may need to enroll first before proceeding.
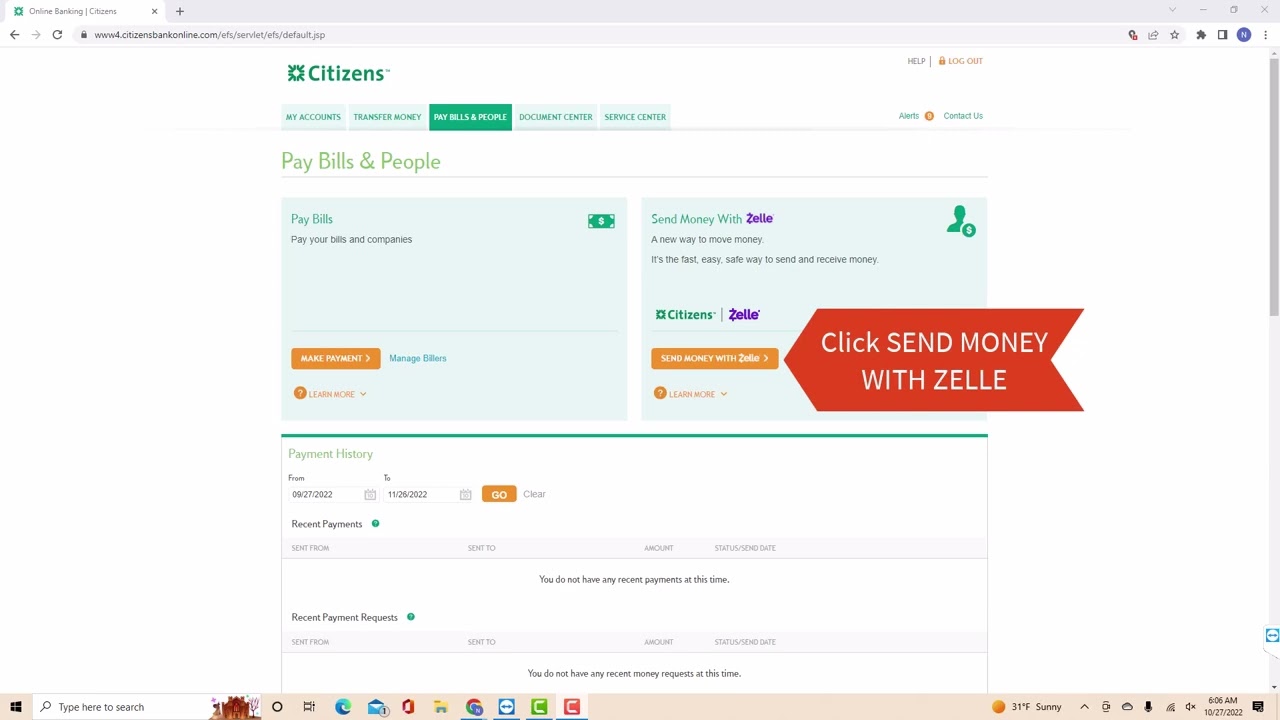
- Navigate to the Zelle section: Once you have logged in to your bank account, locate the section that relates to Zelle or person-to-person payments. The location and labeling of this section may vary depending on your bank’s interface.
- Choose to link your bank account: Within the Zelle section, you should see an option to link your bank account. Click or tap on this option to get started.
- Enter your bank account details: Follow the prompts provided by your bank to enter the required information for linking your bank account. This typically includes your bank account number, routing number, and other relevant details. Double-check the information you provide to ensure accuracy.
- Confirm your bank account: Once you’ve entered the necessary details, your bank may require you to confirm your bank account before linking it to Zelle. This is usually done by verifying a small deposit or withdrawal made to your bank account. Note that this step may take a couple of days depending on your bank’s processing time.
- Linking complete: After you have successfully confirmed your bank account, your account will be linked to Zelle. You can now use the service to send and receive money directly from your bank account.
It’s important to follow all the instructions provided by your bank during the linking process to ensure a successful and secure linkage. If you encounter any issues or have questions along the way, don’t hesitate to contact your bank’s customer support for assistance.
Additionally, remember that bank account linking is a one-time process, and you do not need to repeat it each time you use Zelle. Once your bank account is linked, you can continue to access and use Zelle through your bank’s mobile app or online banking platform.
Adding and Verifying Your Phone Number or Email Address
When using Zelle, it’s essential to add and verify your phone number or email address to ensure the security and accuracy of your account. Follow the steps below to add and verify your contact information:
- Open the Zelle app or access Zelle through your bank’s mobile app or online banking platform.
- Navigate to your account settings or profile section. This is usually found in the menu or settings tab.
- Select the option to add a phone number or email address. Choose the preferred method for contact.
- Enter your phone number or email address accurately. Double-check for any typos or errors.
- Verify your phone number or email address. Depending on the method chosen, you will receive a verification code via text message or email.
- Enter the verification code in the app or website where prompted. Make sure to enter it correctly to successfully validate your contact information.
- Once the verification code is accepted, your phone number or email address will be linked to your Zelle account.
- Repeat the process if you want to add and verify both your phone number and email address.
It is crucial to ensure the accuracy of your contact information, as this will be used for transaction notifications and communication with other Zelle users. By verifying your phone number or email address, you can be confident that you will receive important updates and notifications regarding your Zelle account activity.
Keep in mind that in some cases, your bank may have already linked your phone number or email address to your Zelle account during the initial setup process. If this is the case, you may not need to add and verify your contact information separately.
If you encounter any difficulties during the process or do not receive the verification code, double-check your contact information and ensure that the correct phone number or email address is linked to your Zelle account. If problems persist, reach out to your bank’s customer support or Zelle’s customer service for assistance.
Setting Up a Zelle Profile and Personalizing Your Account
Once you have created a Zelle account and linked your bank account, you can personalize your profile and customize your Zelle account settings. Follow the steps below to set up your Zelle profile and make your account your own:
- Open the Zelle app or access Zelle through your bank’s mobile app or online banking platform.
- Navigate to your account settings or profile section. Look for the option that allows you to edit or manage your Zelle profile.
- Choose a profile picture. You can upload a photo from your device or select one from the provided options.
- Enter additional details, such as your full name or a display name. This will help others recognize and identify you on Zelle.
- Review and customize your notification preferences. Decide how and when you want to receive alerts and notifications about your Zelle account activity.
- Explore and adjust your account security settings. Depending on the platform, you might be able to enable features like biometric authentication for added account protection.
- Set up additional email addresses or phone numbers for notifications. This can be helpful if you prefer to receive Zelle updates on multiple devices.
- Review and accept any updated terms and conditions or privacy policies, if prompted.
- Save your changes to update your Zelle profile and account settings.
Setting up a Zelle profile allows you to personalize your account, making it more recognizable and customizable to your preferences. By adding a profile picture and ensuring that your name is accurate, you can create a more personal and identifiable presence on the platform.
By customizing your notification preferences, you can choose how and when you receive alerts about Zelle transactions or account updates. This allows you to stay on top of your Zelle activity without being overwhelmed by constant notifications.
Furthermore, taking the time to review and adjust your account security settings helps safeguard your Zelle account and ensure the privacy of your personal information. Enabling additional security features adds an extra layer of protection, reducing the risk of unauthorized access.
Remember to periodically review and update your Zelle profile and account settings to reflect any changes in your personal preferences or contact information.
If you need assistance or have any questions regarding setting up your Zelle profile or customizing your account, don’t hesitate to reach out to your bank’s customer support or consult the Zelle FAQs and support resources.
How to Send Money Using Zelle
Sending money using Zelle is a straightforward process that allows you to transfer funds quickly and securely to friends, family, or businesses. Follow the steps below to send money through Zelle:
- Open the Zelle app or access Zelle through your bank’s mobile app or online banking platform.
- Ensure that you are logged in to your Zelle account and have linked your bank account.
- Choose the option to send money. This is typically located on the home screen or in the main menu.
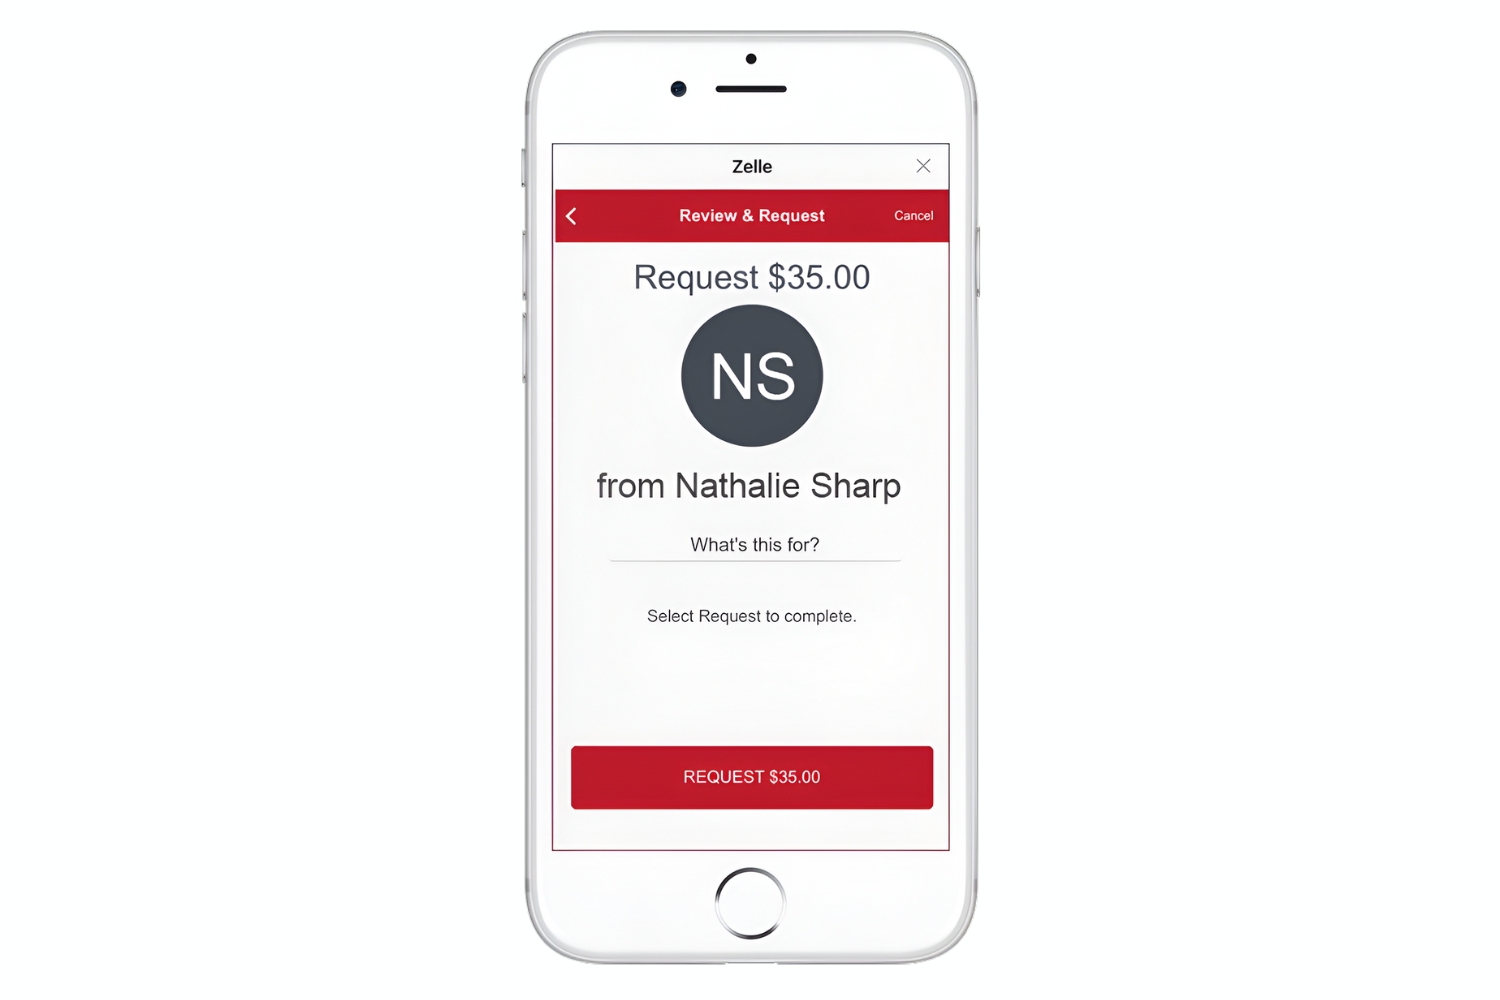
- Select the recipient. You can enter their email address or mobile phone number, or choose from your list of previous recipients.
- Enter the amount you want to send. Double-check the amount to ensure accuracy.
- Review the transaction details. Confirm that the recipient’s information and the amount are correct.
- Add an optional note or memo for the recipient. This can help clarify the purpose of the transaction.
- Choose the payment method. Select the bank account linked to your Zelle account that you want to use for the transaction.
- Review and confirm the transaction. Take a moment to review all the details before proceeding.
- Submit the payment. Once you’ve reviewed and confirmed the transaction, submit the payment to initiate the transfer.
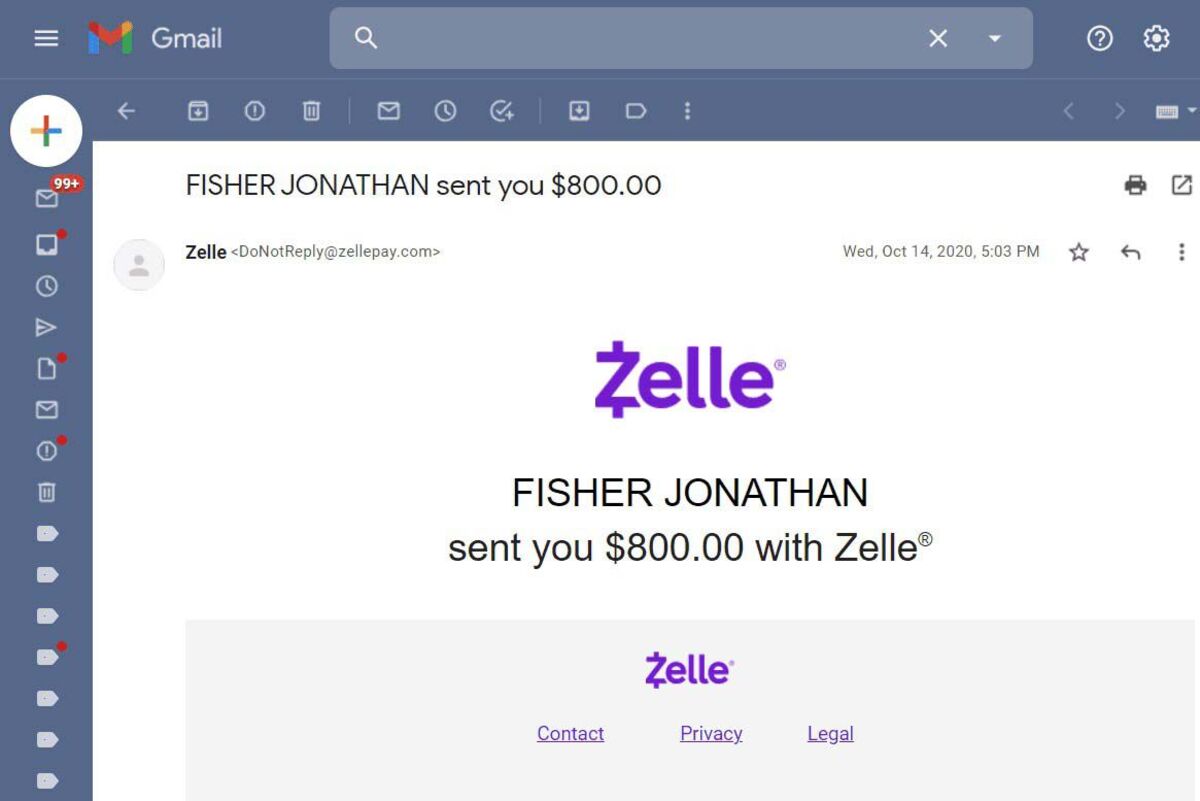
- Wait for the confirmation. Zelle will provide a confirmation message once the transaction has been successfully sent.
It’s important to note that the speed of the transaction may vary depending on the recipient’s bank and their Zelle enrollment status. In most cases, funds sent through Zelle are available to the recipient within minutes.
Zelle is designed for sending money to individuals you trust. While Zelle provides some security measures, it’s essential to ensure that you are sending money to the correct recipient. Always double-check the contact information before completing the transaction to avoid any errors or unintended transfers.
Additionally, be mindful of any transaction fees or limits that may apply when using Zelle. Review your bank’s terms and conditions or contact their customer support for clarification if needed.
By following these simple steps, you can send money conveniently and securely using Zelle, simplifying the process of transferring funds to individuals or businesses within minutes.
Understanding Zelle Transaction Limits and Fees
When using Zelle, it’s important to be aware of the transaction limits and potential fees associated with the service. Here’s a rundown of what you need to know:
Transaction Limits:
Zelle sets transaction limits to ensure the security of your funds. The specific limits may vary depending on the policies of your bank or credit union, so it’s best to consult your financial institution for the most accurate information. Generally, Zelle transaction limits include:
- Daily Limits: Typically, there is a maximum daily limit on the amount you can send through Zelle. This limit is in place to prevent any unauthorized or fraudulent activity.
- Weekly or Monthly Limits: Some banks may impose additional limits on a weekly or monthly basis, in addition to the daily limit. These limits may vary depending on your bank’s policies and your account status.
While Zelle allows you to send money quickly and conveniently, it’s essential to note that these transaction limits are in place to ensure the safety of your funds and prevent potential misuse.
Transaction Fees:
Zelle generally does not charge fees for sending or receiving money through the platform. However, your bank or credit union may have their own fee structure for certain types of transactions or account types. It’s crucial to review your bank’s fee schedule or contact their customer support to understand if any fees apply when using Zelle.
It’s worth noting that if you send money to a recipient who is not enrolled with Zelle, they may be subject to fees imposed by their bank or credit union when receiving the funds. It’s advisable to inform the recipient beforehand to avoid any surprises.
Understanding the transaction limits and potential fees associated with Zelle ensures that you can make informed decisions when sending or receiving money. Remember to check with your bank for specific details regarding the limits and fees that apply to your Zelle transactions.
By staying informed about these limits and fees, you can make the most of your Zelle experience while keeping your financial transactions secure and cost-effective.
Zelle Security Measures and Protecting Your Account
When using Zelle to send and receive money, it’s crucial to understand the security measures in place to protect your account and ensure the safe transfer of funds. Here are some key security features and best practices to keep in mind:
Encryption:
Zelle employs advanced encryption technology to safeguard your personal information and transaction data. This encryption helps protect your account details from unauthorized access, ensuring that your financial information remains secure during the payment process.
Authentication:
Zelle integrates with your banking app or online banking platform, leveraging the security protocols established by your financial institution. This includes authentication methods such as username and password requirements, as well as additional security measures like biometric authentication (fingerprint or facial recognition) or two-factor authentication (2FA) for an extra layer of protection.
Fraud Prevention:
Zelle has implemented various fraud prevention measures to mitigate the risk of fraudulent activities. These measures include real-time transaction monitoring, anomaly detection systems, and stringent identity verification protocols. In addition, Zelle works closely with banks and credit unions to promptly identify and address any potential security issues.
Account Safety Tips:
To further protect your Zelle account, it’s important to follow best practices:
- Keep your login credentials secure and confidential. Avoid sharing your username and password with anyone.
- Enable any additional security features offered by your bank or Zelle, such as biometric authentication or two-factor authentication, if available.
- Regularly review your account activity and transactions to ensure they are accurate and authorized.
- Beware of phishing attempts and fraudulent messages. Zelle will never ask for your personal or account information via email, phone, or text message.
- Only send money to individuals or businesses you trust and know personally. Double-check the recipient’s information before completing a transaction.
- If you suspect any suspicious activity or unauthorized access to your account, report it immediately to your bank’s customer support or Zelle’s customer service.
By following these security measures and best practices, you can enhance the protection of your Zelle account and reduce the risk of unauthorized activity or fraud.
It’s important to note that while Zelle implements robust security measures, it’s always advisable to use caution and practice good online security habits. Stay vigilant, keep your device and banking app updated, and educate yourself about current security threats.
If you have any concerns or questions about the security of your Zelle account, reach out to your bank’s customer support or consult Zelle’s documentation and support resources for further assistance.
Troubleshooting Common Issues with Zelle
While Zelle is a convenient and reliable platform, like any technology, it’s possible to encounter occasional challenges or issues. Here are some common problems that users may face when using Zelle, along with troubleshooting steps to help resolve them:
1. Payment Declined:
If your payment is declined, it could be due to insufficient funds in your bank account, reaching your transaction limit, or issues with the recipient’s account. Check your available balance and ensure that the recipient’s contact information is correct. If the problem persists, contact your bank’s customer support for assistance.
2. Delayed Transactions:
In some cases, Zelle transactions may experience delays. This can be due to various factors, including network connectivity issues, high transaction volumes, or verification processes. If your transaction is delayed, wait for a reasonable amount of time and check your transaction history. If the delay persists or you suspect an error, contact Zelle’s customer support or your bank for further investigation.
3. Unable to Register:
If you are unable to register for Zelle, ensure that your bank or credit union supports the service. Confirm that you are eligible for Zelle enrollment by meeting any necessary requirements. If you still experience difficulties, reach out to your bank’s customer support for assistance with the registration process.
4. Forgotten Username or Password:
If you forget your Zelle username or password, use the “Forgot Username” or “Forgot Password” option on the login page. Follow the instructions provided to reset your login credentials. If you continue to have difficulty accessing your account, contact your bank’s customer support for further assistance.
5. Disputed Transactions:
In the event of a disputed or unauthorized transaction, contact your bank’s customer support promptly. They will guide you through the process of filing a dispute and help investigate the situation to ensure a resolution.
6. Unsupported Banks:
If your bank does not support Zelle, you will not be able to use the service through your bank’s app or online banking platform. In such cases, consider alternative electronic payment methods or explore other options provided by your bank for money transfers.
7. Unexpected Error Messages:
If you encounter unexpected error messages while using Zelle, try closing and reopening the app or clearing the cache and temporary files on your device. If the problem persists, check for any available app updates or contact Zelle’s customer support for assistance.
It’s important to remember that troubleshooting steps may vary depending on your bank or specific circumstances. In case of any issues or concerns, don’t hesitate to reach out to your bank’s customer support or consult Zelle’s FAQs and support resources for further guidance.
By staying informed and proactive, you can overcome common issues with Zelle and enjoy a seamless and hassle-free experience with the platform.
Frequently Asked Questions about Zelle
Here are answers to some commonly asked questions about Zelle:
1. Is it free to use Zelle?
Zelle itself does not charge any fees to send or receive money. However, your bank or credit union may have their own fee structure for certain transactions or account types. It’s advisable to review your bank’s fee schedule or contact their customer support to understand if any fees apply when using Zelle.
2. How long does it take to send money with Zelle?
In most cases, money sent through Zelle is usually available to the recipient within minutes. However, there may be occasional delays due to factors such as network connectivity issues or the recipient’s bank processing time.
3. Can I use Zelle internationally?
Zelle is currently available for use within the United States only. You can only send and receive money with individuals or businesses located in the U.S. Additionally, both the sender and recipient must have U.S. bank accounts to utilize Zelle.
4. Can I cancel a payment made through Zelle?
Once you have sent a payment using Zelle, it cannot be canceled. It is essential to double-check all details, including the recipient’s contact information and the transaction amount, before confirming the payment.
5. What if the person I want to send money to does not have Zelle?
If the recipient is not enrolled with Zelle, they will receive a notification with instructions on how to enroll and claim the payment. Most major banks in the United States offer Zelle, so there is a high chance that they can join and receive the funds.
6. Is Zelle secure?
Zelle takes security seriously. The platform utilizes encryption technology, authentication methods, and fraud prevention measures to ensure the safety of your personal information and transactions. However, it’s important to practice good online security habits, such as keeping your login credentials secure and being cautious of phishing attempts.
7. Can I use Zelle with multiple bank accounts?
Yes, you can link multiple bank accounts to your Zelle profile. However, the availability of this feature may vary depending on your bank or credit union’s policies. Check with your bank or consult Zelle’s support resources for specific instructions on linking multiple accounts.
8. What should I do if I have issues with Zelle?
If you encounter any issues or have questions about using Zelle, start by contacting your bank’s customer support. They can provide guidance specific to your account and help resolve any problems. You can also visit the Zelle website or consult their FAQs for additional support and resources.
Remember that these FAQs provide general information, and it’s always recommended to consult your bank or credit union for the most accurate and up-to-date guidance on using Zelle.
Conclusion
Zelle offers a convenient and secure way to send and receive money directly from your bank account. Whether you need to split expenses with friends, pay your bills, or send money to loved ones, Zelle provides a user-friendly platform that simplifies the process.
In this guide, we covered the essential steps for getting started with Zelle, from signing up and linking your bank account to sending money and troubleshooting common issues. By following these steps and understanding the features of Zelle, you can make the most of this digital payment service.
Throughout the process, prioritize the security of your Zelle account. Take advantage of the encryption, authentication methods, and fraud prevention measures that Zelle has in place. Additionally, follow best practices such as safeguarding your login credentials, being cautious of phishing attempts, and regularly reviewing your account activity.
Remember to be familiar with any transaction limits and potential fees associated with using Zelle. While Zelle itself does not charge fees for transactions, your bank or credit union may have their own fee structure for certain transactions or account types. Stay informed by reviewing your bank’s fee schedule or reaching out to their customer support for clarification.
If you encounter any difficulties during the Zelle registration or usage process, don’t hesitate to contact your bank’s customer support or consult Zelle’s support resources. They are equipped to provide the necessary assistance and guidance to resolve any issues or answer any questions you may have.
By utilizing Zelle’s convenient features, following security measures, and staying informed, you can enjoy a seamless and efficient experience in sending and receiving money digitally. Zelle’s integration with your existing bank account makes it a convenient choice for a variety of personal and small-business transactions.
Make payments with ease, split expenses effortlessly, and embrace the convenience of digital payments with Zelle. Start utilizing this user-friendly platform today and simplify your financial transactions.