Introduction
Welcome to the world of solid-state drives (SSDs), an innovative and rapidly evolving technology that has revolutionized the storage industry. If you’re reading this article, it’s likely that you’ve encountered the frustrating issue of having an unallocated SSD. Don’t worry, you’re not alone.
An SSD, short for solid-state drive, is a data storage device that uses integrated circuit assemblies to store data persistently. Unlike traditional hard disk drives (HDDs), which use spinning disks and mechanical parts, SSDs are built with flash memory chips. This enables them to provide faster access times, improved performance, and greater reliability.
Allocated and unallocated space refers to how the storage on your SSD is divided. Allocated space contains data and partitions that are recognized by your operating system, while unallocated space refers to unused or unassigned areas that your system doesn’t recognize.
There are several reasons why an SSD may become unallocated. Accidental disk management actions, such as deleting a partition or formatting the drive, can lead to this issue. Corrupted disk partition tables, initialization failures, and even loose connections can also contribute to an unallocated SSD.
Fortunately, there are various methods to fix an unallocated SSD. Windows users can make use of the Disk Management tool or third-party partition managers, while macOS users can utilize Disk Utility. It’s crucial to keep in mind that before making any changes to your SSD, it’s essential to back up your data to prevent any potential loss.
In the following sections, we will explore these reasons in more detail and guide you through the process of fixing an unallocated SSD. By the end of this article, you will have the knowledge and tools to reclaim your allocated space and get your SSD up and running smoothly once again.
What is an SSD?
In the world of computer storage, solid-state drives (SSDs) have emerged as a game-changer. An SSD is a type of storage device that uses flash memory to store data persistently, offering significant advantages over traditional hard disk drives (HDDs).
Unlike HDDs, which rely on spinning magnetic disks and mechanical parts to read and write data, SSDs utilize integrated circuit assemblies, known as NAND flash memory chips. This technology allows SSDs to access and transfer data at a much faster rate, resulting in improved performance and responsiveness. Additionally, the absence of moving parts makes SSDs more resistant to damage from physical shock and vibrations.
One of the primary benefits of SSDs is their speed. Since they don’t rely on a spinning disk to locate data, SSDs can access and retrieve information almost instantaneously. This makes them perfect for tasks that require quick access to data, such as booting up your operating system, launching applications, or transferring large files.
Another advantage of SSDs is their reliability. With no moving parts, the risk of mechanical failure is minimal. HDDs, on the other hand, are prone to disk crashes and data loss due to mechanical wear and tear. Additionally, SSDs are less susceptible to data corruption caused by magnetic fields or physical impacts.
In terms of physical design, SSDs come in various form factors to suit different devices. They can be found in the traditional 2.5-inch size, which is compatible with most laptops and desktops, as well as in smaller M.2 form factors that are commonly used in ultrabooks, tablets, and other compact devices.
As SSD technology continues to evolve, the storage capacity of these devices also continues to increase. Today, you can find SSDs with capacities ranging from a few hundred gigabytes to several terabytes. This allows users to store large amounts of data, including operating systems, applications, and multimedia files.
Overall, SSDs have become the preferred choice for many computer users, offering numerous benefits over traditional HDDs. From faster speeds and improved responsiveness to enhanced reliability and durability, SSDs have transformed the storage landscape. Whether you’re a gamer, professional, or casual user, investing in an SSD is a worthwhile upgrade that can significantly enhance your computer’s performance and user experience.
Understanding Allocated and Unallocated Space
When it comes to storage devices, understanding the concepts of allocated and unallocated space is essential. Allocated space refers to the portion of a storage device, such as an SSD, that is assigned to specific partitions or data. In contrast, unallocated space represents the unused or unassigned areas on the drive that are not recognized or utilized by the operating system.
Allocated space is where your data resides. It is divided into partitions, which are logical divisions or sections on the storage device that the operating system recognizes as separate units. These partitions can be formatted with different file systems, such as NTFS, FAT32, or exFAT, to organize and manage data effectively.
Typically, when you set up a new storage device or install an operating system, the setup process creates one or more partitions to allocate space for the necessary system files and data. For example, on a Windows system, you may have a partition for the operating system files and another for your personal data.
Unallocated space, on the other hand, is the portion of the storage device that is not assigned to any partition. It is essentially “free space” that has not been allocated for storing data. This space may result from various scenarios, such as deleting a partition, formatting a partition, or setting up a new drive without allocating all available space.
Unallocated space is not recognized by the operating system, which means it cannot be accessed or used to store files. It appears as raw or unknown space when viewed through disk management tools or file explorers. To utilize this space, you need to allocate it to a partition and format it with a compatible file system.
It’s worth noting that having some unallocated space on your SSD is not necessarily a problem. In fact, it can be useful for future partitioning or for creating additional partitions to store different types of data. However, if large portions of your SSD are unallocated despite not intentionally setting it up that way, it may indicate an issue that needs to be addressed.
Having a clear understanding of allocated and unallocated space is crucial when troubleshooting issues with your SSD or managing your storage efficiently. It allows you to identify and utilize available space effectively, ensuring optimal performance and organization for your data.
Reasons for SSD being Unallocated
Encountering an unallocated SSD can be frustrating, especially if you’re unsure why it happened in the first place. There are several reasons why an SSD may become unallocated, and understanding these reasons can help you troubleshoot and resolve the issue effectively.
Accidental Disk Management Actions: One common reason for an unallocated SSD is accidentally performing disk management actions such as deleting a partition or formatting the drive. These actions can result in the removal of allocated space and render the SSD unallocated.
Corrupted Disk Partition Table: A corrupted partition table can also lead to an unallocated SSD. The partition table is a critical data structure that holds information about the partitions and their locations on the SSD. If this table becomes corrupted due to system errors or malware, the operating system may fail to recognize the partitions, resulting in unallocated space.
SSD Initialization Failure: During the initialization process, an SSD undergoes a series of operations to prepare it for use, including partitioning and formatting. If the initialization process encounters an error or interruption, it can result in an unallocated SSD. This can happen due to power failures, hardware issues, or software conflicts.
Disconnection or Loose Connection of SSD: Sometimes, an unallocated SSD can occur simply because the SSD is not properly connected to the system. Loose connections, faulty cables, or improperly seated SSDs can prevent the system from recognizing the drive and result in unallocated space.
It’s important to note that these are just some of the common reasons for an unallocated SSD. Other factors, such as software conflicts, driver issues, or firmware problems, can also contribute to this issue.
Understanding the reasons behind an unallocated SSD is the first step in resolving the problem. By identifying the cause, you can narrow down the troubleshooting steps and implement the appropriate solutions to regain access to your allocated space and ensure the proper functioning of your SSD.
Accidental Disk Management Actions
Accidentally performing disk management actions is one of the common reasons why an SSD becomes unallocated. Disk management actions involve tasks like deleting a partition, formatting the drive, or resizing partitions. While these actions are typically performed to optimize your storage setup, one wrong click or unintended operation can lead to data loss and an unallocated SSD.
Deleting a Partition: In some cases, you may accidentally delete a partition on your SSD while attempting to manage or reorganize your storage. This can happen if you mistakenly select the wrong partition or misunderstand the consequences of the deletion. Once a partition is deleted, the allocated space from that partition is removed, resulting in unallocated space on the SSD.
Formatting the Drive: Formatting an SSD is a way to prepare it for use or to erase all data on the drive. However, if you accidentally format the wrong SSD or perform a quick format instead of a regular format, you can unintentionally erase all partitions and end up with an unallocated SSD.
Resizing Partitions: Resizing partitions is a common disk management task that allows you to adjust the size of existing partitions on your SSD. However, if you incorrectly resize a partition and extend it beyond the available space or shrink it to the point where data is lost, the SSD can become unallocated as the partitions are modified.
To prevent accidental disk management actions, it’s crucial to exercise caution and double-check your actions before executing them. Make sure you have a clear understanding of the consequences and potential risks involved. Additionally, it’s a good practice to create regular backups of important data to minimize the impact of accidental data loss.
If you find yourself with an unallocated SSD due to accidental disk management actions, there are methods to recover the lost partitions and allocated space. Utilizing data recovery tools or seeking professional assistance can often help restore the deleted or lost partitions, allowing you to regain access to your data.
Remember, prevention is always better than a cure. Take your time, be attentive, and double-check before performing any disk management actions to avoid the hassle and frustration of dealing with an unallocated SSD.
Corrupted Disk Partition Table
A corrupted disk partition table is another common cause of an unallocated SSD. The partition table is a critical data structure that holds information about the partitions and their locations on the SSD. When this table becomes corrupted or damaged, the operating system fails to recognize the partitions, resulting in unallocated space.
There are several factors that can lead to a corrupted partition table:
System Errors: System errors, such as sudden power outages, improper shutdowns, or software conflicts, can cause damage to the partition table. When the system experiences a crash or fails to complete essential disk management operations, the partition table can become corrupted, resulting in an unallocated SSD.
Malware or Virus Attacks: Malware or virus attacks can target important system files, including the partition table. Certain types of malicious software are specifically designed to corrupt disk structures and render the partitions unrecognizable. If your SSD becomes unallocated after encountering a malware or virus attack, it’s essential to address the issue promptly to restore your partitions and prevent further damage.
Hardware Failures: Hardware failures, such as a failing storage controller or a faulty cable, can contribute to a corrupted partition table. Inconsistent power supply or physical damage to the SSD can interrupt data transfer and corrupt the partition structure. It’s crucial to ensure that your hardware components are in good working condition to reduce the risk of encountering a corrupted partition table.
To recover from a corrupted partition table and restore your SSD to its allocated state, you can utilize specialized disk recovery tools. These tools can scan for and repair the corrupted partition table, allowing the operating system to recognize the partitions and restore access to your data.
Prevention is key when it comes to dealing with a corrupted partition table. Regularly backing up your data can minimize the impact of any potential disk failures or corruptions. Implementing robust security measures, such as using anti-malware software and keeping your operating system up to date, can also help protect your SSD from malware attacks that may lead to corrupted partitions.
If you suspect that your SSD has a corrupted partition table, it’s advisable to seek professional assistance or consult online resources for step-by-step instructions on how to recover and repair the partition table. By addressing the issue promptly and accurately, you can restore your SSD to a functioning state and prevent any potential data loss.
SSD Initialization Failure
SSD initialization is the process through which an SSD is prepared for use. It involves partitioning the drive, creating file systems, and formatting the partitions. If the initialization process encounters an error or interruption, it can result in an unallocated SSD.
Several factors can contribute to an SSD initialization failure:
Power Failures: Sudden power outages or fluctuations during the initialization process can lead to incomplete or corrupted initialization. If the power supply is interrupted while the SSD is being initialized, the process might not complete successfully, resulting in an unallocated SSD.
Hardware Issues: Faulty hardware components, such as a failing storage controller or defective cables, can cause an SSD initialization failure. When the SSD is unable to communicate properly with the system, the initialization process may fail, leaving the drive in an unallocated state.
Software Conflicts: Software conflicts, outdated drivers, or incompatible software can interfere with the SSD initialization process. Conflicting software can disrupt the communication between the operating system and the SSD, preventing proper initialization and resulting in unallocated space.
When faced with an SSD initialization failure, there are a few steps that you can take to resolve the issue:
- Check the Connections: Ensure that all connections between the SSD and the system are secure and properly seated. Loose or faulty connections can cause initialization failures.
- Verify Power Supply: Make sure that the SSD is receiving a stable power supply. Plug the SSD into a different power connector or switch out the power cable to rule out any power-related issues.
- Update Firmware and Drivers: Update the firmware of your SSD and ensure that you have the latest drivers installed. Outdated firmware or drivers can lead to compatibility issues that result in initialization failures.
- Utilize Data Recovery Tools: In some cases, data recovery tools specifically designed for SSDs can help recover lost partitions or repair the initialization process. These tools can scan the unallocated space and attempt to restore the proper partition structure.
If the methods mentioned above don’t resolve the issue, it’s recommended to seek professional assistance or consult with the SSD manufacturer’s support for further guidance. They may be able to provide specific troubleshooting steps or offer replacement options if the SSD is found to be defective.
Prevention is always better than cure. Regularly backing up your data and ensuring your hardware and software are up to date can help minimize the risk of an SSD initialization failure. By implementing these practices and taking prompt actions, you can resolve the issue and restore your SSD to a functional state.
Disconnection or Loose Connection of SSD
A common reason for an unallocated SSD is the disconnection or a loose connection of the drive. When the SSD is not properly connected to the system, it may not be recognized, resulting in unallocated space on the drive.
There are a few factors that can lead to the disconnection or loose connection of an SSD:
Loose Cables: Over time, cables connecting the SSD to the motherboard or power supply can become loose due to vibrations or other factors. A loose cable can interrupt the communication between the SSD and the system, causing the drive to be unrecognized and appearing as unallocated space.
Faulty Cables or Connectors: In some cases, the cables or connectors themselves may be faulty, causing intermittent or unstable connections. A faulty cable can result in a disconnection of the SSD, leading to unallocated space on the drive.
Improperly Seated SSD: If the SSD is not properly seated in its slot or connector, it may not make a secure connection, causing the drive to be unrecognized. An improperly seated SSD can result from incorrect installation or physical movement of the drive.
If you suspect that a loose or disconnected SSD is the cause of the unallocated space, there are several steps you can take:
- Check the Connections: Ensure that all cables connecting the SSD to the motherboard and power supply are properly attached and secured. Gently push on the connections to make sure they are snug and securely in place.
- Swap Cables: If possible, try using different cables or connectors to rule out any possible issues with the current ones. Replace the cables with known working ones to see if the SSD is recognized when connected with the new cables.
- Reinsert the SSD: Unplug the SSD from its slot or connector and reinsert it, ensuring that it is correctly seated. Apply gentle pressure to make sure it is securely in place, but avoid using excessive force, as it may cause damage to the SSD or other components.
- Test on a Different System: If the above steps do not resolve the issue, try connecting the SSD to a different system to check if it is recognized. This will help determine if the problem lies with the SSD itself or with the original system’s hardware or configuration.
If none of these steps resolve the issue, it is advisable to seek professional assistance or consult the manufacturer’s support for further guidance. They may be able to provide specific troubleshooting steps or offer a replacement if the SSD is found to be defective.
Regular inspection of the connections and ensuring that the SSD is properly seated can help prevent issues caused by disconnections or loose connections. By taking these precautions and addressing any connection-related issues promptly, you can avoid the hassle of dealing with an unallocated SSD.
How to Fix an Unallocated SSD
Discovering that your SSD is unallocated can be disheartening, but the good news is that there are several methods you can use to fix this issue and restore your allocated space. Let’s explore some of the common solutions below:
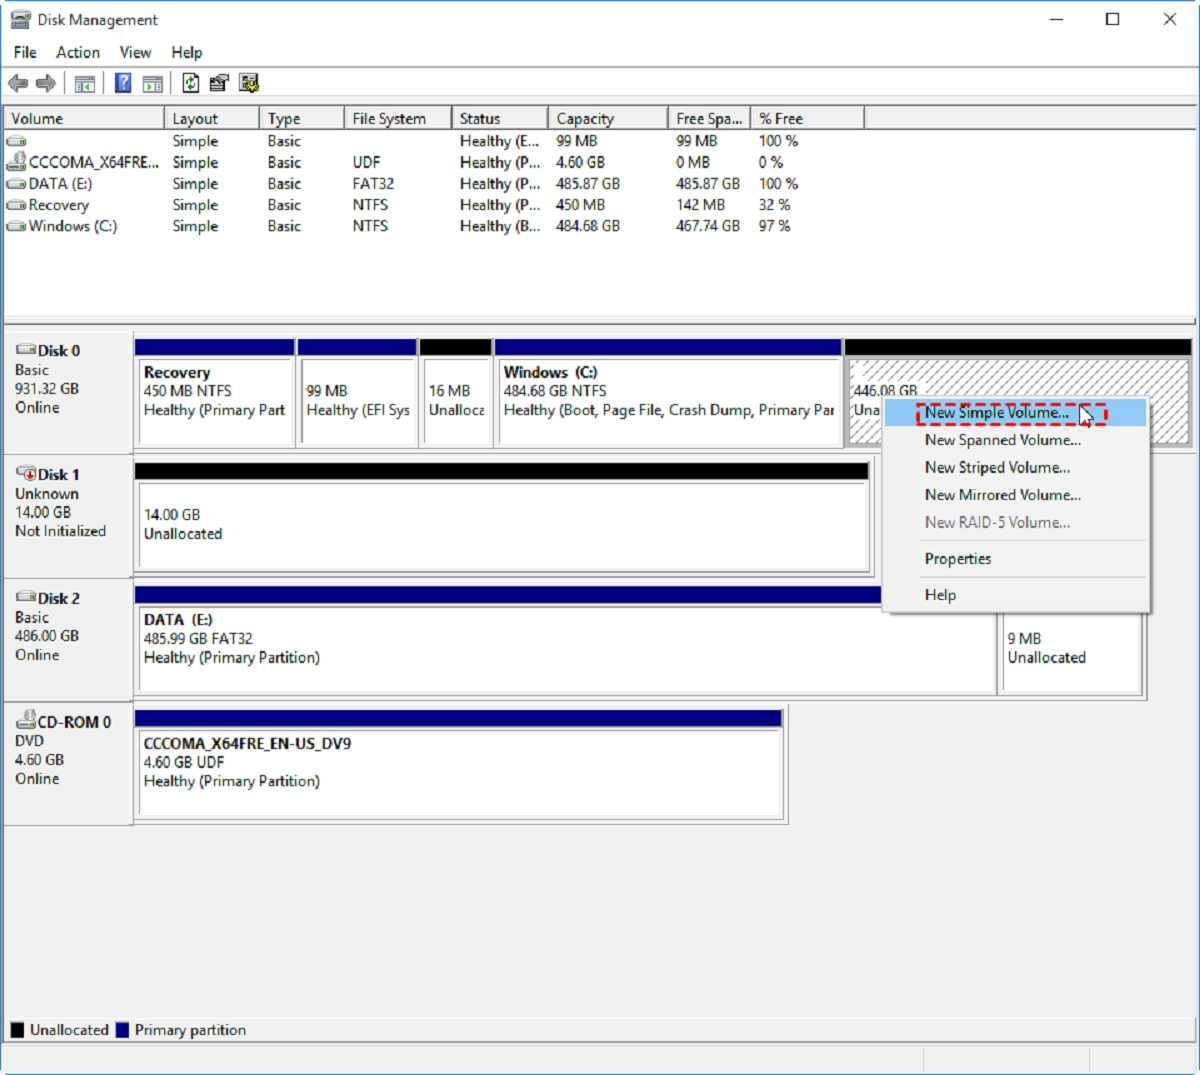
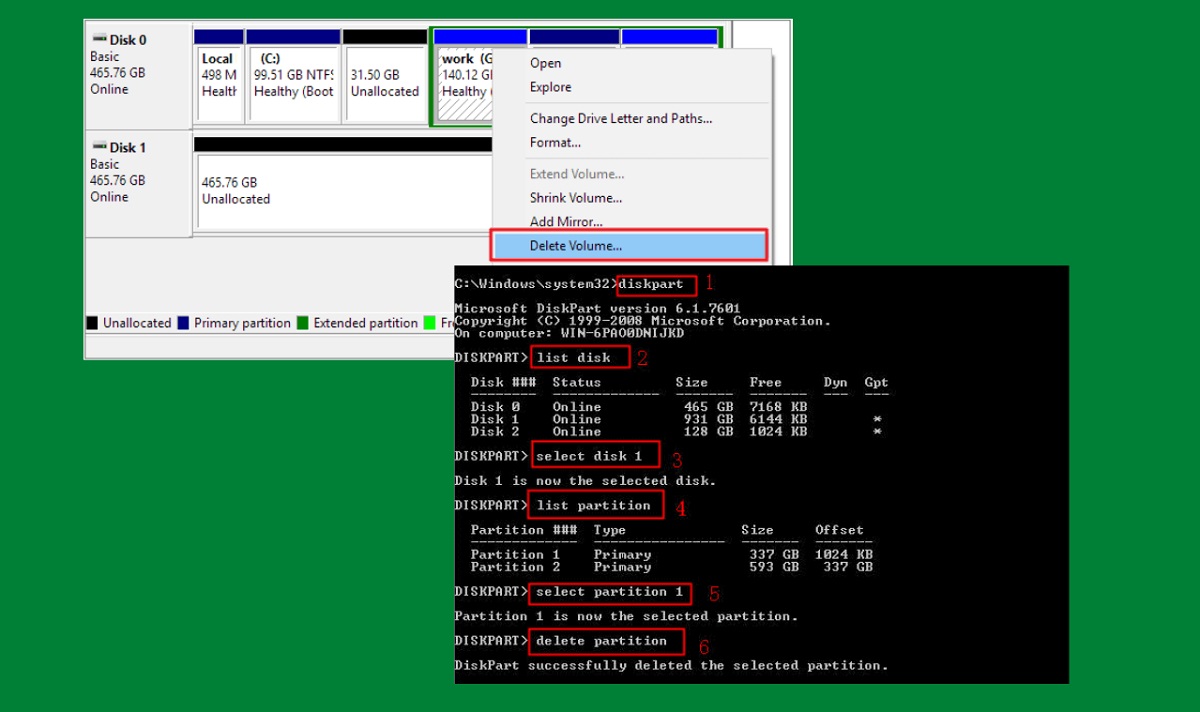
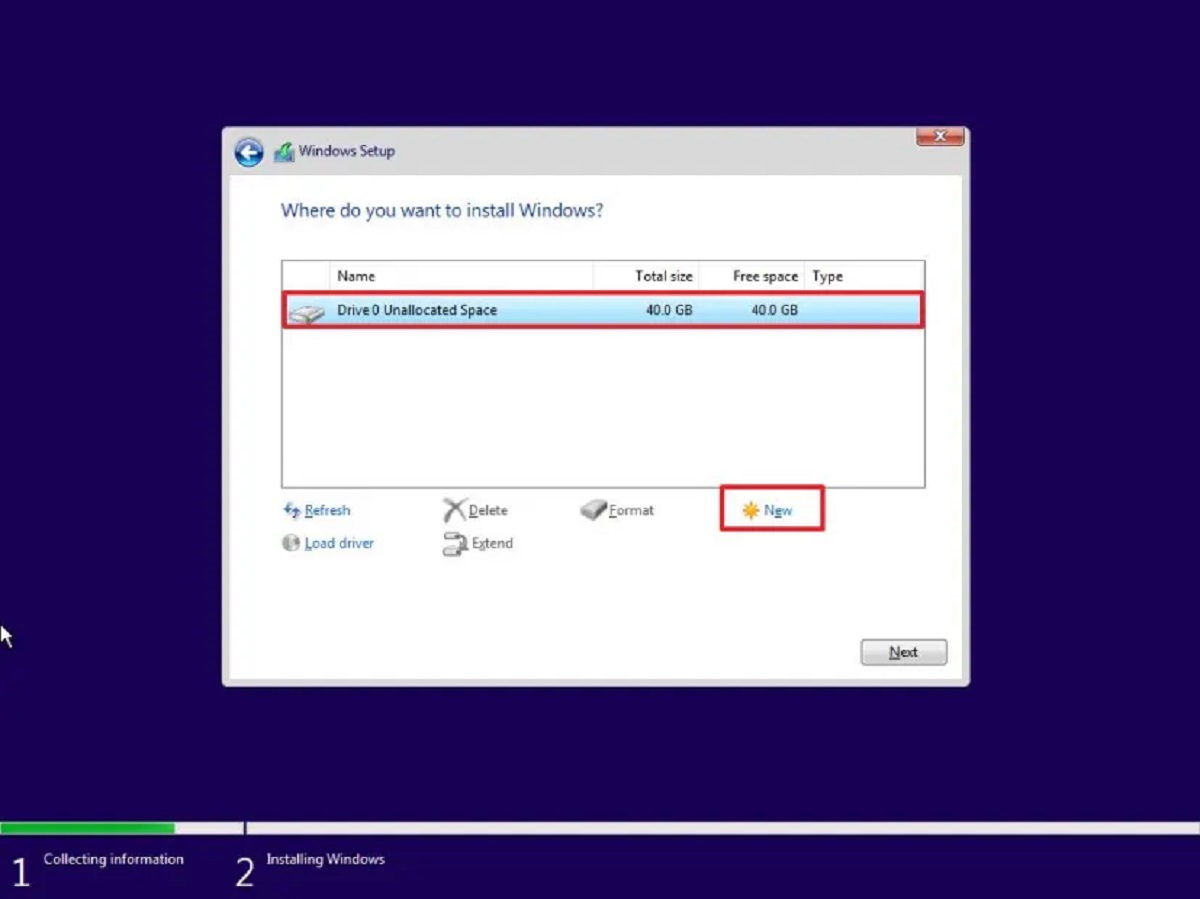
- Using Disk Management in Windows: Windows provides a built-in tool called Disk Management that allows you to manage your storage devices. To fix an unallocated SSD using Disk Management, follow these steps:
- Open Disk Management by right-clicking “This PC/My Computer” and selecting “Manage.” Under the “Storage” section, click on “Disk Management.”
- Locate your unallocated SSD. It should be labeled as “Unallocated.”
- Right-click on the unallocated space and select “New Simple Volume.”
- Follow the on-screen instructions to create a new partition and format it with the desired file system.
- Using Disk Utility in macOS: If you’re using a Mac, you can utilize the Disk Utility tool to fix an unallocated SSD. Here’s how:
- Open Disk Utility by going to “Applications” > “Utilities” > “Disk Utility.”
- Select your unallocated SSD from the list of drives on the left-hand side.
- Click on the “Partition” tab.
- Click on the “+” button to add a new partition.
- Configure the partition settings, such as size and format, and then click “Apply.”
- Using Third-party Partition Managers: There are various third-party partition management tools available that offer more advanced features and flexibility. These tools often provide additional options for fixing unallocated SSDs, such as partition recovery and repair. Some popular third-party partition managers include EaseUS Partition Master, MiniTool Partition Wizard, and AOMEI Partition Assistant.
It’s important to note that when fixing an unallocated SSD, there is a risk of potential data loss. To avoid any accidental data loss, be sure to back up all important files before making any changes to the SSD.
If the above methods do not resolve the issue or if you encounter any difficulties, it is recommended to seek professional assistance or consult with the manufacturer’s support for guidance tailored to your specific situation.
By following these steps and utilizing the appropriate tools, you can effectively fix an unallocated SSD and regain access to your allocated space, allowing you to use your storage device as intended.
Using Disk Management in Windows
Windows provides a built-in tool called Disk Management that allows you to manage your storage devices, including fixing an unallocated SSD. This tool provides a user-friendly interface to create partitions, allocate space, and format drives. Here’s how you can use Disk Management to fix an unallocated SSD:
- Open Disk Management by right-clicking “This PC/My Computer” and selecting “Manage.” Under the “Storage” section, click on “Disk Management.”
- Locate your unallocated SSD. It should be labeled as “Unallocated.”
- Right-click on the unallocated space and select “New Simple Volume.” This will open the New Simple Volume Wizard.
- Click “Next” in the wizard to proceed.
- Specify the volume size for the new partition. If you want to use the entire unallocated space, leave the default value as is. Alternatively, adjust the size if you want to create multiple partitions.
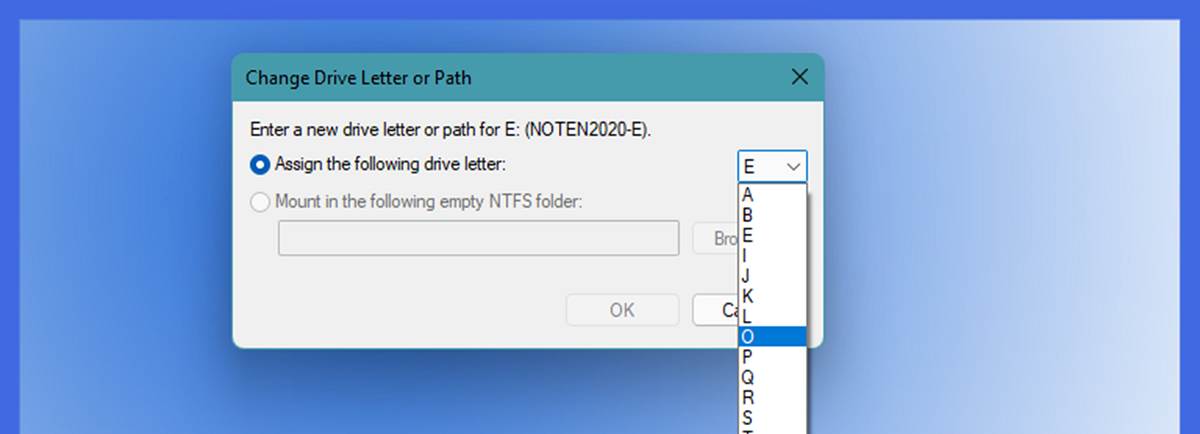
- Select a drive letter or mount path for the new partition. You can choose from the available options or assign a specific letter or path.
- Choose the file system for the partition. The default selection is usually fine, but you can choose a different file system based on your needs.
- Provide a volume label for the partition. This is an optional step, but it can help you easily identify the partition in the future.
- Select the option to “Perform a quick format” (recommended) or choose “Enable file and folder compression” if desired.
- Review the summary of the new partition’s settings, and if everything looks correct, click “Finish” to create the partition.
Once the process is complete, the unallocated space on your SSD will be allocated and formatted, and a new partition will be created. You can now use the partition to store data or install an operating system, depending on your requirements.
It’s important to note that creating a new partition and formatting the SSD may result in data loss if you had any existing data on the drive. Therefore, it is crucial to back up your data before proceeding with Disk Management.
If you encounter any issues or errors during the process, it is recommended to consult online resources, seek professional assistance, or contact Microsoft support for further guidance specific to your situation.
Using Disk Management in Windows provides a simple and straightforward way to fix an unallocated SSD. By following these steps, you can allocate the unallocated space on your SSD and make it usable for storing data or installing an operating system again.
Using Disk Utility in macOS
For macOS users, Disk Utility is the built-in tool that allows you to manage your storage devices, including fixing an unallocated SSD. Disk Utility offers a user-friendly interface to partition, format, and manage your drives. Here’s how you can use Disk Utility to fix an unallocated SSD:
- Open Disk Utility by going to “Applications” > “Utilities” > “Disk Utility.”
- In the left-hand sidebar, you will see a list of drives and volumes. Locate your unallocated SSD and select it.
- Click on the “Partition” tab in the top toolbar.
- Click on the “+” button to add a new partition.
- A new partition will appear in the partition layout. Click on it to customize its settings.
- Choose the size for the new partition by dragging the resize handle or entering the size manually.
- Select a format for the partition. If you plan to use the SSD with macOS exclusively, choose “Mac OS Extended (Journaled)” as the format. If you need compatibility with Windows systems, consider using “ExFAT” as the format.
- Assign a name to the new partition. This name will be displayed for the partition on your system.
- Review the settings and layout of the partitions. Ensure that everything is as desired.
- Click “Apply” to create the partition and initiate the formatting process.
Once the process is complete, the unallocated space on your SSD will be allocated, and a new partition will be created. The partition will be properly formatted and ready for use.
It’s important to note that creating a new partition and formatting the SSD will erase any existing data on the drive. Therefore, it is crucial to back up your data before using Disk Utility to fix the unallocated SSD.
If you encounter any issues or errors during the process, it is recommended to consult online resources, seek professional assistance, or contact Apple support for further guidance specific to your situation.
Using Disk Utility in macOS provides a straightforward method to fix an unallocated SSD. By following these steps, you can allocate the unallocated space on your SSD, create a new partition, and format it according to your requirements.
Using Third-party Partition Managers
In addition to the built-in tools like Disk Management in Windows or Disk Utility in macOS, there are several third-party partition managers available that offer advanced features and greater flexibility when it comes to fixing an unallocated SSD. These tools provide additional options for partition recovery, repair, and management. Here’s how you can use third-party partition managers:
- EaseUS Partition Master: EaseUS Partition Master is a popular and user-friendly partition manager that allows you to resize, move, merge, and recover partitions. To fix an unallocated SSD using EaseUS Partition Master:
- Download and install EaseUS Partition Master from the official website.
- Launch the software and identify your unallocated SSD.
- Choose the unallocated space and click on the “Partition” option.
- Specify the settings for the new partition, such as size, format, and label.
- Review the changes and click “Apply” to start the partition creation and formatting process.
- MiniTool Partition Wizard: MiniTool Partition Wizard is another popular partition manager with a range of partitioning and recovery features. To fix an unallocated SSD with MiniTool Partition Wizard:
- Download and install MiniTool Partition Wizard from the official website.
- Launch the software and select your unallocated SSD from the list of drives.
- Choose the “Create Partition” option and configure the settings for the new partition.
- Specify the size, file system, and label for the partition.
- Preview the changes and click “Apply” to create the partition and format it.
- AOMEI Partition Assistant: AOMEI Partition Assistant is a comprehensive partition management tool that offers various features for managing and fixing unallocated SSDs. To fix an unallocated SSD with AOMEI Partition Assistant:
- Download and install AOMEI Partition Assistant from the official website.
- Launch the software and locate your unallocated SSD in the disk list.
- Select the unallocated space and click on the “Create Partition” option.
- Configure the settings for the new partition, including size, file system, and label.
- Preview the changes and click “Apply” to create the partition and format it.
These third-party partition managers offer intuitive interfaces and step-by-step guides to help you fix an unallocated SSD effortlessly. However, as always, it is important to back up your data before using any partition manager.
If you encounter any difficulties or have questions about using third-party partition managers, it is recommended to consult the documentation provided by the software developer or seek assistance through their support channels.
Using third-party partition managers provides you with additional options and flexibility when it comes to fixing unallocated SSDs. By following the instructions provided by the specific software, you can allocate the unallocated space, create new partitions, and format them according to your needs.
Warning: Backup Your Data before Making Changes
Before attempting to fix an unallocated SSD or making any changes to your storage device, it is vital to emphasize the importance of backing up your data. Making changes to partitions, formatting drives, or utilizing partition management tools can potentially result in data loss or unintended consequences. Therefore, taking the time to back up your data before proceeding is crucial in order to avoid the risk of permanent data loss.
Backing up your data allows you to create a copy of your important files and documents, ensuring that you have a safe and accessible version stored elsewhere. By following these guidelines, you can safeguard your data while performing repairs or modifications on your unallocated SSD:
Identify Critical Data: Determine the files and folders that are vital to you, such as personal documents, photos, videos, or any other irreplaceable data. Make a list of these items to ensure that they are included in your backup.
Choose a Backup Method: Select a backup method that suits your needs, whether it’s an external hard drive, cloud storage, or a dedicated backup software. Consider using multiple backup options to provide redundancy and enhance data protection.
Perform Regular Backups: Establish a routine for regular backups to ensure that your data is always up to date. Set reminders or automate backup processes to make it a seamless and effortless task.
Verify Backup Integrity: Periodically verify the integrity of your backup files. Make sure that the backup process is functioning correctly, and the files can be successfully restored when needed.
Test Data Restoration: It is essential to periodically test the restoration process to ensure that you can successfully recover your data from the backup. This will give you peace of mind and confidence in the reliability of your backup solution.
By following these precautions and regularly backing up your data, you can protect yourself from the potential risks involved in fixing an unallocated SSD. In the event that something goes wrong during the repair process, you can restore your important files from the backup without significant loss or inconvenience.
Remember that prevention is always better than cure when it comes to data loss. Take the time to back up your data and perform regular backups to ensure that your valuable information remains safe and accessible, even in the face of unexpected issues.
Conclusion
Dealing with an unallocated SSD can be a frustrating experience, but with the right knowledge and tools, you can successfully fix this issue and regain access to your allocated space. Understanding the reasons behind an unallocated SSD, such as accidental disk management actions, corrupted disk partition tables, SSD initialization failures, or loose connections, is key to effectively troubleshooting and resolving the problem.
Depending on your operating system, there are different methods to fix an unallocated SSD. Windows users can utilize the Disk Management tool, while macOS users can rely on Disk Utility. Additionally, there are various third-party partition managers available that offer more advanced features and flexibility.
Regardless of the method used, it is crucial to emphasize the importance of backing up your data before making any changes to your SSD. Backing up your data ensures that you have a secure copy of your important files in case of any unintended consequences or data loss during the repair process.
Prevention is key when it comes to avoiding an unallocated SSD. Taking precautions such as double-checking disk management actions, keeping hardware connections secure, and regularly backing up data can help minimize the risk of encountering this issue.
In conclusion, fixating on an unallocated SSD doesn’t have to be a daunting ordeal. By understanding the causes of the problem, utilizing the appropriate tools, and prioritizing data backup, you can successfully resolve the issue and ensure the smooth operation of your SSD. Empowered with this knowledge, you can confidently overcome an unallocated SSD and optimize your storage experience.