Introduction
Welcome to our guide on the placement of stand off screws in PC cases. If you are building your own computer or making upgrades to your existing one, correctly installing stand off screws is crucial for the overall functionality and safety of your system. While it may seem like a minor detail, the placement of these tiny screws can have a significant impact on the performance and longevity of your PC.
Stand off screws are small brass or plastic spacers that elevate the motherboard above the metal surface of the PC case. This separation is necessary to prevent electrical shorts and ensure proper grounding, as well as to provide support and stability to the motherboard. Without stand off screws, the motherboard would directly contact the case, leading to potential damage or malfunction.
Understanding the importance of stand off screws is essential when building or working on a PC. Without them, you risk damaging your components and compromising the overall performance of your system. In the following sections, we will guide you on where to place stand off screws in your PC case, ensuring a secure and reliable setup for your motherboard.
What Are Stand Off Screws?
Stand off screws, also known as motherboard standoffs or spacer screws, are small screws or spacers used to elevate the motherboard above the surface of the PC case. These screws are typically made of brass or plastic and serve a crucial purpose in computer assembly.
The primary function of stand off screws is to prevent the motherboard from coming into direct contact with the metal case, which could result in electrical shorts and potential damage to the components. By creating a gap between the motherboard and the case, stand off screws ensure proper grounding and reduce the risk of static electricity buildup.
In addition to electrical safety, stand off screws also provide support and stability to the motherboard. They help distribute the weight of the components evenly and minimize the risk of bending or warping the circuit board. This is especially important for larger or heavier motherboards that may have multiple expansion cards or intricate cooling setups.
When selecting stand off screws, it’s essential to choose the correct size and type for your specific PC case and motherboard. Most cases and motherboards utilize M3 or 6-32 stand off screws, but it’s always best to consult the manufacturer’s instructions or the case’s user manual for the recommended screw size and threading.
With an understanding of what stand off screws are and their importance, let’s now explore where to place these screws in your PC case to ensure proper installation and optimal performance.
Importance of Stand Off Screws in PC Cases
The importance of stand off screws in PC cases cannot be overstated. These seemingly small and insignificant components play a vital role in ensuring the proper functioning and longevity of your computer system.
First and foremost, stand off screws prevent the motherboard from coming into direct contact with the metal case. This insulation is crucial for preventing electrical shorts that can occur when the bare metal of the case touches the sensitive circuitry of the motherboard. Without stand off screws, the risk of damaged components or system failure due to short circuits greatly increases.
Another key role of stand off screws is to provide proper grounding for the motherboard. By creating a gap between the motherboard and the case, stand off screws help channel any static electricity away from the circuitry and safely dissipate it. This significantly reduces the risk of static discharge damaging the delicate components of the motherboard.
In addition to electrical safety, stand off screws also offer support and stabilization to the motherboard. The screws help evenly distribute the weight of the motherboard and its components, preventing any flexing or warping of the circuit board. This is essential, especially when installing heavier components or using multiple expansion cards, as it ensures the integrity of the connections and prevents potential damage to the motherboard.
Furthermore, by keeping the motherboard raised above the case, stand off screws assist in optimizing airflow within the system. Adequate airflow is crucial for maintaining optimal operating temperatures, particularly for high-performance PCs that generate a significant amount of heat. The spacing provided by the stand off screws allows for unobstructed air circulation around the motherboard, resulting in more efficient cooling and improved overall performance.
By now, you should have a clear understanding of why stand off screws are essential in PC cases. In the next section, we will discuss the specific locations where these screws should be placed to ensure a secure and reliable setup for your motherboard.
Where to Place Stand Off Screws
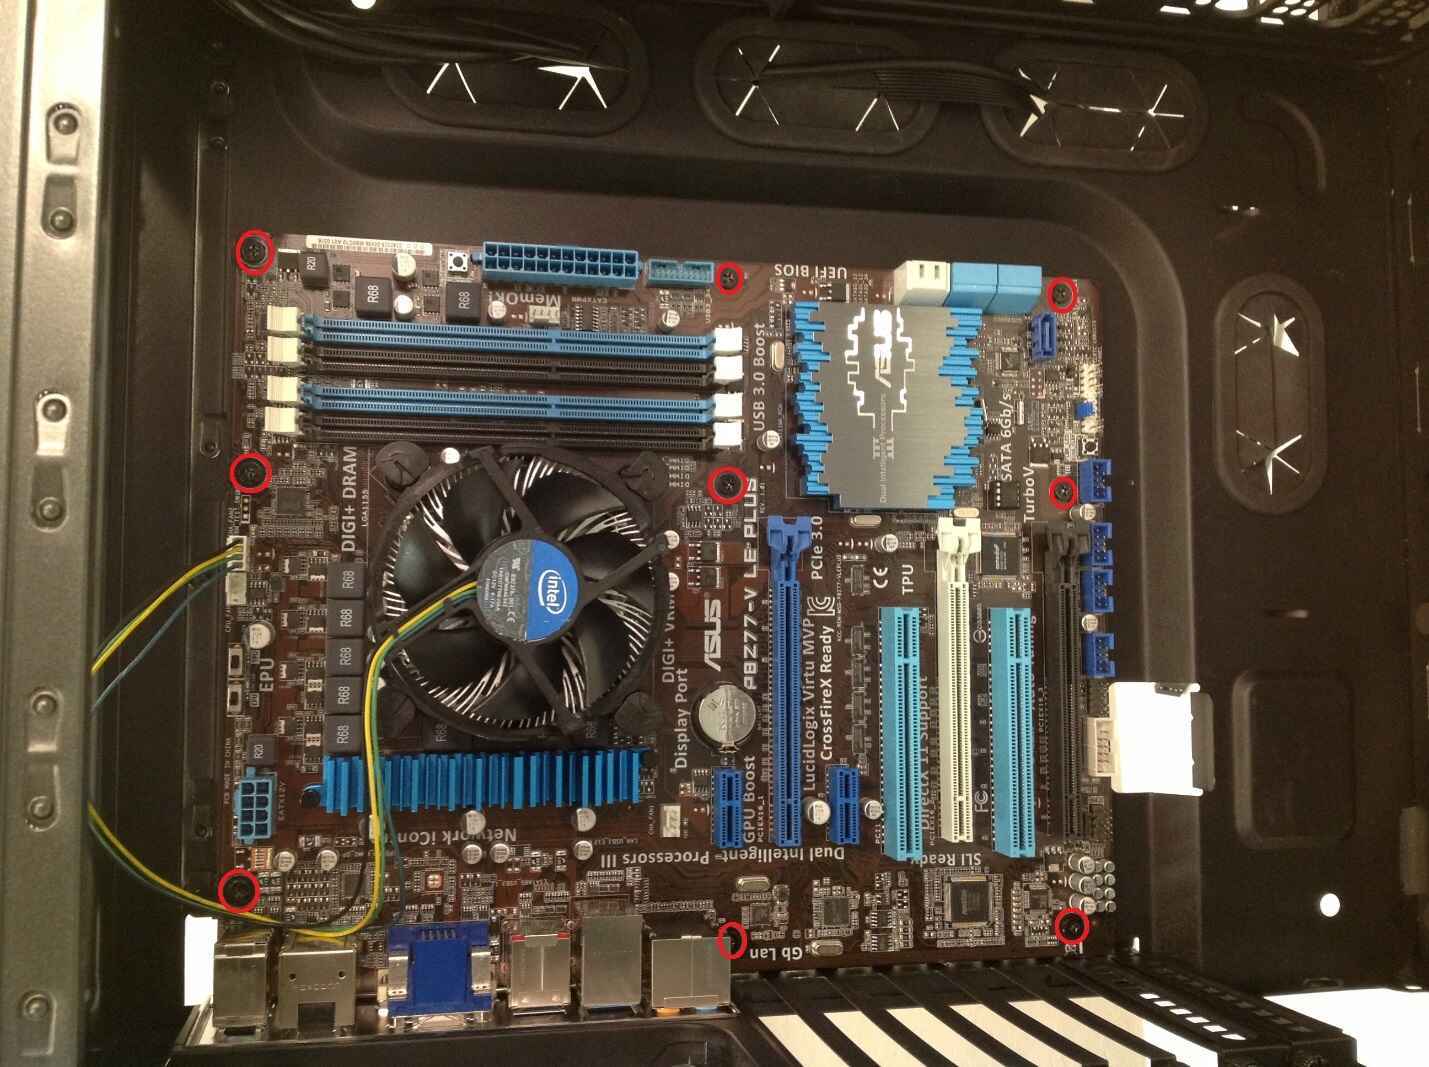
Proper placement of stand off screws is critical for the stability and functionality of your motherboard. Here, we will guide you on the specific locations where you should install these screws in your PC case.
Top Left Corner
Begin by placing a stand off screw in the top left corner of the motherboard. This is typically marked with a mounting hole and is essential for providing stability and support to the upper portion of the motherboard.
Top Right Corner
Next, align the top right corner of the motherboard with another stand off screw. This ensures that the motherboard remains securely fastened and minimizes the risk of any flexing or bending.
Bottom Left Corner
Proceed to install a stand off screw in the bottom left corner of the motherboard. This will contribute to the overall support and stability of the motherboard, especially in the lower section where expansion cards and connectors are usually located.
Bottom Right Corner
Finally, place a stand off screw in the bottom right corner of the motherboard. This completes the installation and provides the necessary support for the remaining portion of the motherboard.
It is important to note that the number of stand off screws required may vary depending on the size of your motherboard and the case. Some motherboards may have additional mounting holes or require extra support in specific areas. Always refer to the motherboard’s manual and the case manufacturer’s instructions for the recommended stand off screw placement for your specific configuration.
One useful tip is to ensure that the stand off screws are tightened securely but not excessively. Over-tightening can potentially damage the motherboard or cause the screws to strip the mounting holes. Find a balance between firm attachment and avoiding excessive force.
By following these guidelines and placing the stand off screws in the correct positions, you can create a stable and secure foundation for your motherboard within the PC case.
Top Left Corner
The top left corner is an important location for the placement of a stand off screw when installing a motherboard in a PC case. This specific position helps provide stability and support to the upper portion of the motherboard.
To install the stand off screw in the top left corner, first identify the corresponding mounting hole on the motherboard. These mounting holes are typically labeled with letters or numbers to indicate their placement.
Once you have identified the correct hole, align it with the corresponding hole on the PC case. Ensure that the hole on the case matches the size and threading of the stand off screw you are using.
Gently place the stand off screw into the hole on the case and begin tightening it. Use a screwdriver or your finger to turn the screw clockwise until it is snugly secured. Be careful not to overtighten, as this can damage the motherboard or strip the mounting hole.
Installing a stand off screw in the top left corner of the motherboard is crucial for providing stability and preventing any excessive flexing or bending. It helps distribute the weight of the motherboard evenly and ensures that the upper portion of the motherboard remains properly supported.
Keep in mind that stand off screw placement can vary depending on the size and manufacturer of your motherboard, as well as the specific layout of your PC case. Always refer to the motherboard’s manual and the case manufacturer’s instructions for the recommended stand off screw positions.
By placing a stand off screw in the top left corner, you are taking an important step towards ensuring the secure installation of your motherboard within the PC case.
Top Right Corner
The top right corner is another crucial location for placing a stand off screw when installing a motherboard in a PC case. This specific position helps provide stability and support to the upper portion of the motherboard, complementing the stand off screw in the top left corner.
To install the stand off screw in the top right corner, locate the corresponding mounting hole on the motherboard. These holes are typically labeled or numbered for easy identification.
Align the hole on the motherboard with the corresponding hole on the PC case. Ensure that the hole on the case matches the size and threading of the stand off screw you are using.
Carefully insert the stand off screw into the hole on the case and begin tightening it. Use a screwdriver or your finger to turn the screw clockwise until it is securely fastened. Avoid overtightening, as this can potentially damage the motherboard or strip the mounting hole.
Installing a stand off screw in the top right corner of the motherboard is vital for maintaining the stability and integrity of the upper section. It helps distribute the weight of the components evenly and ensures that the motherboard remains securely fastened.
Remember that the placement of stand off screws can vary based on the size and manufacturer of your motherboard, as well as the specific layout of your PC case. Always consult the motherboard’s manual and the case manufacturer’s instructions for the recommended stand off screw positions.
By securely installing a stand off screw in the top right corner, you are taking another important step towards creating a stable and reliable platform for your motherboard within the PC case.
Bottom Left Corner
The bottom left corner is a critical location for the placement of a stand off screw when installing a motherboard in a PC case. Installing a stand off screw in this position provides support and stability to the lower section of the motherboard.
To begin, locate the corresponding mounting hole in the bottom left corner of the motherboard. These holes are typically labeled or marked for easy identification.
Align the hole on the motherboard with the corresponding hole on the PC case. Ensure that the hole on the case matches the size and threading of the stand off screw you are using.
Gently insert the stand off screw into the hole on the case and start tightening it. You can use a screwdriver or your finger to turn the screw in a clockwise direction until it is securely fastened. Take care not to overtighten, as this could potentially damage the motherboard or strip the mounting hole.
Installing a stand off screw in the bottom left corner of the motherboard is crucial for providing support and stability to the lower section where expansion cards and connectors are typically located. By doing so, you ensure that the weight of these components is properly distributed, reducing the risk of damage or disconnection.
Remember that the specific placement of stand off screws can vary depending on the size and manufacturer of your motherboard, as well as the layout of your PC case. Always refer to the motherboard’s manual and the case manufacturer’s instructions for the recommended stand off screw positions.
By securely installing a stand off screw in the bottom left corner, you are taking an essential step towards creating a secure and reliable foundation for your motherboard within the PC case.
Bottom Right Corner
The bottom right corner is a crucial location for the placement of a stand off screw when installing a motherboard in a PC case. This specific position provides essential support and stability to the lower section of the motherboard, complementing the stand off screws in the other corners.
To begin, locate the corresponding mounting hole in the bottom right corner of the motherboard. These holes are typically labeled or numbered for easy identification.
Align the hole on the motherboard with the corresponding hole on the PC case. Ensure that the hole on the case matches the size and threading of the stand off screw you are using.
Gently insert the stand off screw into the hole on the case and begin tightening it. Use a screwdriver or your finger to turn the screw in a clockwise direction until it is securely fastened. Avoid overtightening, as this can potentially damage the motherboard or strip the mounting hole.
Installing a stand off screw in the bottom right corner of the motherboard is essential for ensuring the stability and integrity of the lower section. It helps distribute the weight of the components evenly and prevents any flexing or bending of the motherboard.
Remember that the placement of stand off screws can vary based on the size and manufacturer of your motherboard, as well as the specific layout of your PC case. Always consult the motherboard’s manual and the case manufacturer’s instructions for the recommended stand off screw positions.
By securely installing a stand off screw in the bottom right corner, you are completing the installation process and creating a stable and reliable foundation for your motherboard within the PC case.
Additional Stand Off Screw Placement Tips
While the placement of stand off screws in the four corners of the motherboard is crucial, there are a few additional tips to keep in mind to ensure a secure and successful installation.
- Check for Additional Mounting Holes: Some motherboards may have additional mounting holes throughout the PCB. These extra holes provide added support and stability, especially for larger motherboards. Take the time to locate and install stand off screws in these additional holes if your motherboard has them.
- Consider the Shape and Size of the Motherboard: Motherboards come in different sizes and shapes, such as ATX, Micro-ATX, or Mini-ITX. Depending on the size and layout of your motherboard, you may need to install extra stand off screws in specific areas to provide adequate support and prevent any bending or sagging.
- Avoid Mixing Stand Off Screw Types: If your PC case includes both metal and plastic stand off screws, it is best to use the same type throughout the installation process. Mixing different types of stand off screws can result in an uneven fit and potential instability.
- Ensure Proper Screw Tightening: While it’s important to securely tighten the stand off screws, over-tightening can lead to damage. Use only enough force to firmly secure the screws and avoid applying excessive pressure.
- Regularly Check and Re-Adjust Stand Off Screws: Over time, vibrations or movement within the case may slightly loosen the stand off screws. Periodically check and re-adjust the tightness of the screws to maintain a secure connection between the motherboard and the case.
- Consult the Manufacturer’s Documentation: Always refer to the motherboard’s manual and the case manufacturer’s instructions for specific guidelines and recommendations regarding stand off screw placement. These documents will provide detailed instructions and notes applicable to your specific hardware.
By following these additional tips and guidelines, you can ensure a secure and stable installation of your motherboard, maximizing its performance and longevity within the PC case.
Conclusion
Proper placement of stand off screws is essential when installing a motherboard in a PC case. These small components play a crucial role in ensuring the stability, functionality, and safety of your computer system.
By placing stand off screws in the four corners of the motherboard – top left, top right, bottom left, and bottom right – you create a secure and stable foundation for your motherboard within the PC case. This prevents electrical shorts, provides proper grounding, and minimizes the risk of flexing or warping of the motherboard.
Additional tips to consider include checking for extra mounting holes on your motherboard, using the same type of stand off screws throughout the installation process, properly tightening the screws without over-tightening, regularly checking and re-adjusting the screws, and consulting the manufacturer’s documentation for specific guidelines.
Remember, the placement of stand off screws may vary depending on the size and shape of your motherboard and the layout of your PC case. It is important to consult the manuals and instructions provided by the motherboard and case manufacturers to ensure accurate and precise installation.
By following these guidelines and taking care in the placement of stand off screws, you can create a stable and reliable foundation for your motherboard, ensuring optimal performance and longevity for your PC.