What Is the Color Balance on a Digital Camera?
The color balance on a digital camera refers to the adjustment of color tones and hues in an image to ensure accurate and true-to-life colors. It is a crucial aspect of photography as it directly affects the overall look and feel of the images we capture. By understanding color balance and how it works, photographers can produce visually pleasing and balanced photographs.
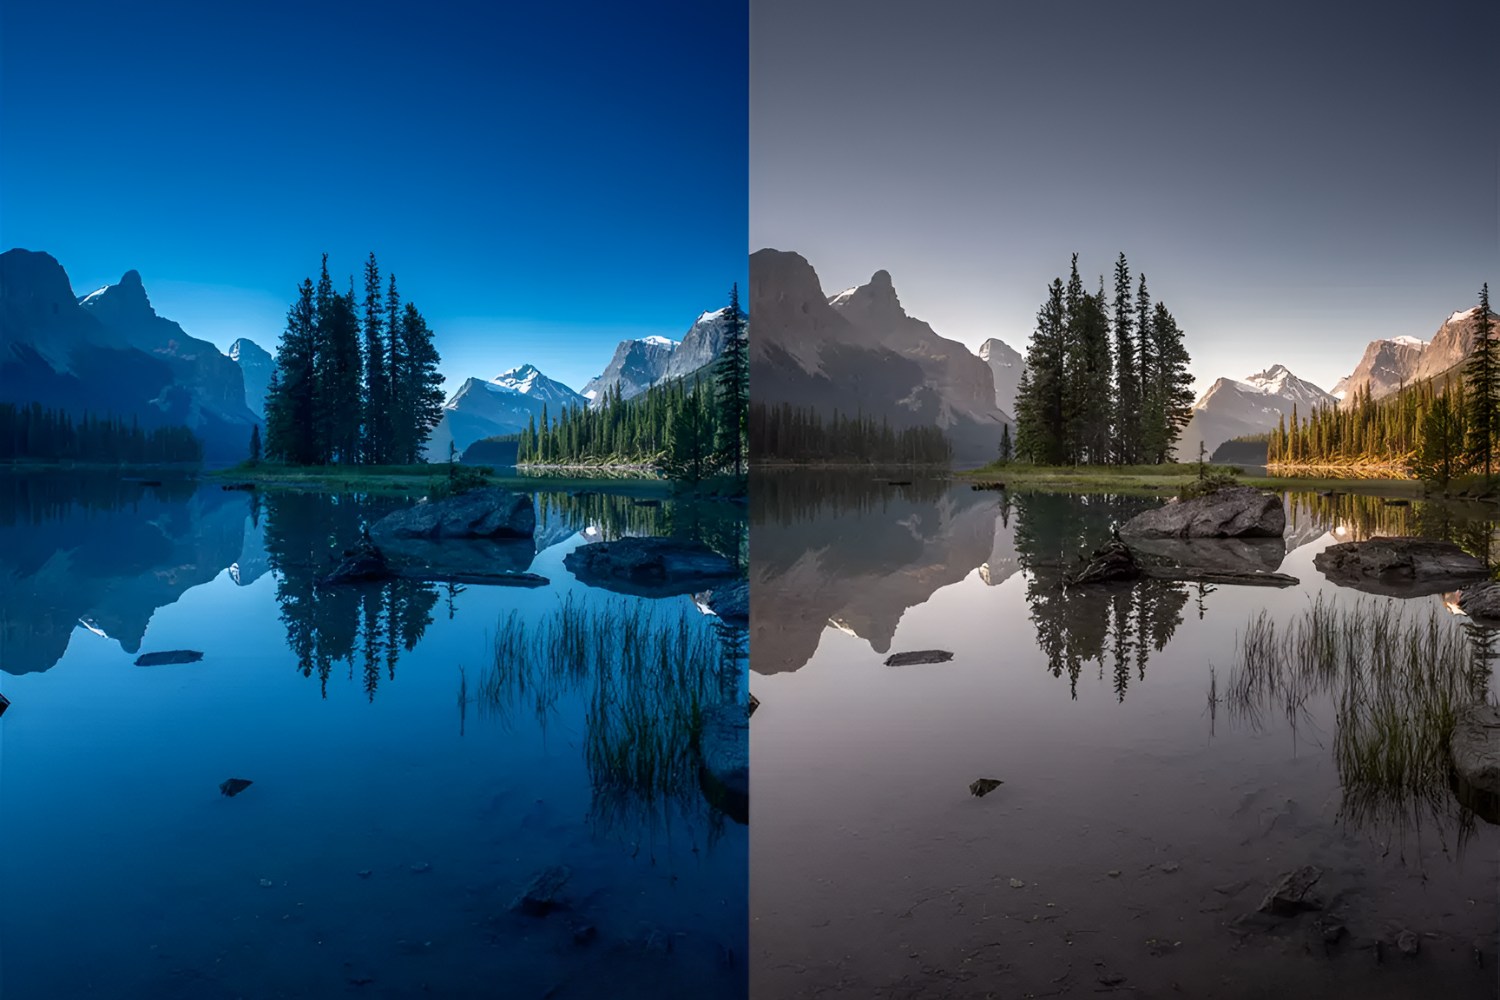
Color balance is essentially the distribution of colors in an image. It involves adjusting the relative intensities of the primary colors – red, green, and blue – to achieve a natural and accurate representation of the scene. Different light sources have varying color temperatures, which can result in images appearing too warm (orange/yellow) or too cool (blue). The goal of color balance is to counteract these color casts and produce a neutral image.
Color balance is particularly important when shooting in different lighting conditions. For example, indoor lighting tends to have a warmer tone, while outdoor lighting can vary depending on the time of day. By adjusting the color balance, photographers can ensure that the colors in their images appear as they would in real life, enhancing the overall quality of the photographs.
Understanding color balance involves recognizing the concept of “white balance.” White balance is the process of neutralizing any color cast present in a scene by adjusting the relative intensities of the primary colors. It ensures that white objects in a photograph appear truly white. When the white balance is properly set, all other colors in the image will also appear accurately.
Digital cameras often provide different white balance presets to help photographers achieve accurate color balance. These presets include settings such as “Auto,” “Daylight,” “Cloudy,” “Tungsten,” “Fluorescent,” and more. Each preset corresponds to a specific color temperature and is designed to compensate for the color cast produced by different lighting conditions.
While the auto white balance mode can be effective in many situations, it may not always produce the desired results. In such cases, photographers can manually adjust the white balance to achieve the desired color balance. This can be done through the camera’s menu settings or by using custom white balance settings.
Adjusting the color balance on a digital camera involves trial and error. Photographers may need to experiment with different settings to achieve the desired results. It is also worth noting that the color balance can be further fine-tuned during post-processing using software like Adobe Photoshop or Lightroom.
By mastering the concept of color balance, photographers can enhance the overall quality of their images. Accurate color reproduction can have a significant impact on how the viewer perceives and connects with a photograph. Therefore, understanding and controlling color balance is a fundamental skill for any photographer.
Introduction
Photography is an art form that allows us to capture the beauty of the world around us. One of the essential elements that contribute to successful photography is color balance. The color balance on a digital camera plays a crucial role in how images appear, as it determines the accuracy and realism of the colors captured. Whether you’re a professional photographer or an amateur enthusiast, understanding color balance is key to producing visually stunning photographs.
The color balance on a digital camera refers to the adjustment of color tones and hues in an image to ensure accurate and true-to-life colors. It involves achieving the right distribution and intensity of primary colors – red, green, and blue – to achieve a natural and balanced result. When the color balance is correctly set, the colors in the image will appear as they do in real life, enhancing the overall quality and impact of the photograph.
Color balance is particularly important because different lighting conditions can have varying color temperatures, creating color casts in photos. For example, indoor lighting tends to have a warmer tone, while outdoor lighting may be cooler or have a blueish cast. The color balance on a digital camera allows photographers to counteract these color casts and produce images that accurately represent the scene.
Understanding color balance involves grasping the concept of “white balance.” White balance is the process of neutralizing any color cast present in a scene by adjusting the relative intensities of the primary colors. It ensures that white objects in a photograph appear truly white, serving as a reference for the accurate representation of other colors. When the white balance is correctly set, all other colors in the image will also appear accurately.
Digital cameras are equipped with various white balance presets that allow photographers to adjust the color balance based on the specific lighting conditions. These presets include settings such as “Auto,” “Daylight,” “Cloudy,” “Tungsten,” and “Fluorescent.” Each preset corresponds to a specific color temperature, compensating for the color cast produced by different lighting sources.
While the default auto white balance mode can be effective in many situations, it may not always produce the desired results. In such cases, photographers can manually adjust the white balance to achieve the desired color balance. This can be done through the camera’s menu settings or by using custom white balance settings.
In this article, we will delve deeper into the concept of color balance, exploring its importance in photography and understanding how to adjust and control it effectively. By mastering the skill of color balance, photographers can truly bring their images to life and create captivating visuals that resonate with their viewers.
What is Color Balance?
Color balance is a fundamental aspect of photography that refers to the adjustment of color tones in an image to achieve accurate and natural-looking colors. It involves the distribution and relative intensities of the primary colors – red, green, and blue – to create a balanced and visually pleasing result.
Every light source emits a different color temperature, which can result in color casts in photographs. For example, indoor lighting tends to have a warmer tone, while outdoor lighting can vary depending on the time of day. These variations in color temperature can impact the colors captured by a camera, often producing images that appear too warm or cool.
The purpose of color balance is to neutralize these color casts and ensure that the colors in the image appear as they would in real life. By adjusting the color balance, photographers can achieve accurate and true-to-life representations of the scenes they capture.
Color balance is particularly important when it comes to photographing subjects that rely heavily on accurate colors, such as landscapes, portraits, and products for commercial purposes. In these cases, achieving proper color balance is essential to convey the intended mood, atmosphere, and visual impact.
An effective way to visualize color balance is through the concept of “white balance”. White balance is the process of neutralizing any color cast present in a scene by adjusting the relative intensities of the primary colors. It ensures that white objects in a photograph appear truly white, acting as a reference for accurately representing other colors in the image.
Modern digital cameras provide various white balance presets to assist photographers in achieving accurate color balance. These presets include settings such as “Auto,” “Daylight,” “Cloudy,” “Tungsten,” and “Fluorescent.” Each preset corresponds to a specific color temperature and is designed to compensate for the color cast produced by different lighting conditions.
While the auto white balance mode can be effective in many situations, it may not always produce the desired results. Factors like tricky lighting conditions or unique artistic preferences may require photographers to manually adjust the white balance to achieve the desired color balance.
By understanding and mastering the concept of color balance, photographers have more control over the final look and feel of their images. It allows them to create visually captivating photographs that accurately represent the colors and atmosphere of the scenes they capture.
Why is Color Balance important in photography?
Color balance plays a vital role in photography as it significantly impacts the overall quality and visual appeal of the images we capture. Achieving accurate color balance is essential for several reasons:
1. Realism and Accuracy: Color balance ensures that the colors in a photograph appear as they would in real life. It creates a sense of authenticity and realism, allowing viewers to connect with the image and perceive it as a faithful representation of the original scene. Whether it’s capturing the vibrant colors of a sunset or the subtle shades of a portrait, accurate color balance enhances the overall impact of the photograph.
2. Mood and Atmosphere: Colors evoke emotions, and color balance is instrumental in conveying the intended mood and atmosphere in a photograph. For example, a warm color balance might be ideal for portraying a cozy and inviting scene, while a cool color balance could enhance the sense of tranquility. By adjusting the color balance, photographers can manipulate the emotional response of the viewer and create a more immersive experience.
3. Consistency and Cohesion: Color balance ensures consistency throughout a series of images. When shooting a project or event, maintaining a consistent color palette helps create a cohesive story and visual flow. Whether it’s a collection of portraits or a set of architectural photographs, accurate color balance ties the images together and enhances the overall cohesiveness of the project.
4. Avoiding Color Casts: Different light sources have varying color temperatures, which can create unwanted color casts in photographs. For instance, incandescent lighting tends to have a warm, yellowish tone, while fluorescent lighting can cast a cool, bluish hue. By adjusting the color balance, photographers can counteract these color casts and ensure that the colors captured accurately represent the subject.
5. Product Representation: From commercial product photography to e-commerce images, color accuracy is crucial for accurately representing the colors of the subject. Whether it’s clothing, food, or electronics, customers rely on accurate color representation to make purchasing decisions. By achieving precise color balance, photographers can provide an accurate and reliable representation of the products they photograph.
6. Post-Processing Control: Proper color balance provides more control during post-processing. When the colors in an image are captured accurately, photographers have a solid foundation for editing and enhancing the photograph further. It allows for more flexibility in adjusting tones, hues, and color grading without compromising the natural look and feel of the image.
Overall, color balance is vital in photography because it allows photographers to create visually appealing, emotionally engaging, and accurate representations of the scenes they capture. By understanding and controlling color balance, photographers can elevate their craft and produce images that resonate with viewers on a deeper level.
Understanding White Balance
White balance is a critical aspect of achieving accurate color balance in photography. It is the process of neutralizing any color cast present in a scene to ensure that white objects appear truly white. Understanding white balance is essential for photographers as it allows them to capture images with natural and realistic colors.
White balance is based on the principle that our eyes perceive objects that we know to be white as truly white, regardless of the lighting conditions. However, different light sources emit different color temperatures, resulting in color casts. For example, indoor lighting tends to have a warmer tone, while outdoor lighting can vary depending on the time of day.
The goal of white balance is to adjust the relative intensities of the primary colors (red, green, and blue) to counteract these color casts and ensure accurate color reproduction. By neutralizing the color cast, the rest of the colors in the image will also appear naturally.
Digital cameras offer white balance presets that correspond to various lighting conditions. These presets include settings such as “Auto,” “Daylight,” “Cloudy,” “Tungsten,” and “Fluorescent.” Each preset is designed to compensate for the color cast produced by different lighting sources, allowing photographers to achieve accurate color balance without manually adjusting the white balance settings.
When shooting in Auto White Balance mode, the camera analyzes the scene and determines the appropriate white balance setting based on the available light. This mode can be effective in many situations, especially when the lighting conditions are consistent throughout the scene.
However, in certain situations, the Auto White Balance mode may not produce desired results. For example, when shooting under mixed lighting conditions or when capturing subjects with specific color tones, manually adjusting the white balance becomes necessary to achieve accurate color balance.
Most digital cameras allow for manual white balance adjustments. By using a neutral reference, such as a white or gray card, photographers can set a custom white balance that best matches the prevailing lighting conditions. This method ensures precise color reproduction and allows for consistent results across a series of images.
Additionally, post-processing software like Adobe Photoshop or Lightroom provides further control over white balance adjustments. These tools offer a range of options to fine-tune and refine the color balance, enabling photographers to achieve their desired look and feel.
Understanding white balance and how it affects the overall color balance of an image is essential for producing visually appealing and accurate photographs. By mastering the concept and techniques of white balance, photographers gain more control over the colors in their images, resulting in images that accurately represent the original scene and create a more engaging visual experience.
How White Balance affects images
White balance is a crucial factor that significantly impacts the overall look and feel of an image. It determines the accuracy and realism of the colors captured, and understanding how white balance affects images is essential for photographers. Here are some key ways in which white balance affects images:
1. Color Temperature: White balance is closely related to the color temperature of light. Different light sources emit light with varying color temperatures, which can result in color casts in images. For example, daylight has a cool color temperature, while indoor lighting tends to be warmer. The white balance setting on a camera compensates for these color temperature differences and ensures that colors appear true to life.
2. Color Shifts: Incorrect white balance can cause color shifts in images, leading to inaccurate color representation. For instance, a photo taken indoors without proper white balance adjustments might appear yellowish or orange due to the influence of warm artificial lighting. On the other hand, outdoor photos shot without adjusting the white balance might exhibit a bluish tint due to the cooler color temperature of natural light.
3. Mood and Atmosphere: White balance has a significant impact on the mood and atmosphere of an image. By adjusting the white balance, photographers can create a specific ambiance and evoke different emotions in the viewer. For example, a warmer white balance might convey a cozy and intimate feeling, while a cooler white balance can evoke a sense of serenity or coldness.
4. Subject Representation: Correct white balance is particularly important when photographing subjects that rely heavily on accurate colors. For example, capturing accurate skin tones in portrait photography is crucial to ensure that the subject’s face looks natural and lifelike. Similarly, accurate white balance is essential when photographing products for commercial purposes to represent their true colors.
5. Consistency: White balance also plays a role in maintaining consistency across a series of images. When shooting a series of photos for a project or event, maintaining a consistent white balance ensures that the colors appear uniform throughout the collection. Consistency in white balance helps create a cohesive visual narrative and enhances the professional look of the final presentation.
6. Artistic Interpretation: In some cases, photographers intentionally adjust the white balance to achieve a creative or artistic effect. For example, intentionally using a cooler white balance for a beach scene can enhance the bluish tones and create a dreamy, ethereal atmosphere. By experimenting with different white balance settings, photographers can explore artistic interpretations and add their unique touch to an image.
Understanding how white balance affects images is crucial for photographers to achieve accurate color reproduction and convey the desired mood and atmosphere in their photographs. By considering color temperature, color shifts, subject representation, and the overall artistic vision, photographers can use white balance as a powerful tool to enhance the visual impact of their images.
The different White Balance presets
Digital cameras offer a range of white balance presets that photographers can utilize to adjust the color balance of their images based on specific lighting conditions. Each preset corresponds to a specific color temperature and is designed to compensate for the color cast produced by different light sources. Understanding the different white balance presets allows photographers to achieve accurate color reproduction effortlessly. Here are some common white balance presets found in digital cameras:
1. Auto: The Auto white balance mode allows the camera to analyze the scene and automatically adjust the white balance settings based on the available light. This preset is suitable for most situations as it can accurately determine the appropriate white balance setting. However, it may not always produce the desired results, especially under challenging lighting conditions or for specific creative intents.
2. Daylight/Sunny: This preset is designed to compensate for the color cast produced by natural daylight. It is suitable for outdoor photography under clear, sunny conditions. The Daylight preset renders colors that are typically accurate and vibrant, as it balances the red, green, and blue channels to achieve a neutral or slightly cool look.
3. Cloudy: The Cloudy preset is specifically designed to counteract the cooler color temperature caused by overcast or cloudy weather. It adds warmth to the image, enhancing the yellows and oranges, and helps compensate for the bluish cast that can occur under cloudy skies. This preset is ideal for capturing landscape, portraits, or other subjects in diffused light conditions.
4. Shade: When photographing in shade, where lighting conditions can be slightly cooler and bluish, the Shade preset compensates to bring back warmth and correct the color balance. It reduces the bluish cast and adds warmth to the overall image, ensuring accurate and pleasing colors.
5. Tungsten/Incandescent: The Tungsten, also known as the Incandescent preset, is designed to counteract the strong yellow/orange color cast produced by tungsten or incandescent light bulbs. It adjusts the color balance to reduce the warmth and produce more natural-looking colors when shooting indoors or under artificial lighting.
6. Fluorescent/Artificial: The Fluorescent or Artificial preset helps neutralize the greenish cast often produced by fluorescent lights. By adjusting the color balance to counteract the green hue, this preset produces more accurate and balanced colors when shooting in indoor environments lit by fluorescent lights.
7. Flash: The Flash preset compensates for the typically cooler light emitted by the camera’s built-in flash or external flashes. It balances the color temperature to ensure that the flash lighting integrates seamlessly with the ambient light, resulting in natural-looking images.
These are just a few examples of the white balance presets commonly found in digital cameras. Some cameras may offer additional presets or allow for custom white balance settings. By understanding and utilizing the appropriate white balance preset for a given lighting situation, photographers can ensure accurate color reproduction and capture visually pleasing images.
Auto White Balance vs Manual White Balance
White balance settings are an essential aspect of achieving accurate color balance in photography. Digital cameras provide two main options for adjusting white balance: Auto White Balance (AWB) and Manual White Balance. Understanding the differences between these two options is crucial for photographers seeking precise control over the color balance of their images.
Auto White Balance (AWB): AWB is the default setting on most cameras, allowing the camera to analyze the scene and automatically adjust the white balance based on the lighting conditions. This mode is convenient in situations where lighting conditions change frequently or when photographers want to rely on the camera’s judgment. AWB can accurately set the white balance in many situations, producing natural-looking colors without requiring manual adjustment.
However, AWB may not always produce the desired results. In certain lighting conditions, such as mixed lighting or unique creative settings, the automated system might misunderstand the scene and result in inaccurate color balance. For example, shooting under strong tungsten lighting may lead to an overall blue cast instead of neutral colors. In such cases, manually adjusting the white balance is necessary to achieve accurate color reproduction.
Manual White Balance: Manual White Balance allows photographers to take full control over the white balance settings. It involves manually adjusting the color temperature to achieve accurate color reproduction in a specific lighting situation. Photographers can set a custom white balance by using a neutral reference, such as a white or gray card, which provides a known neutral color.
Setting the white balance manually ensures that the colors in the image appear as they should, regardless of the lighting conditions. It is particularly useful in situations where accurate color reproduction is critical, such as product photography, studio shoots, or challenging lighting environments. By manually adjusting the white balance, photographers can achieve consistent and precise color balance throughout their images.
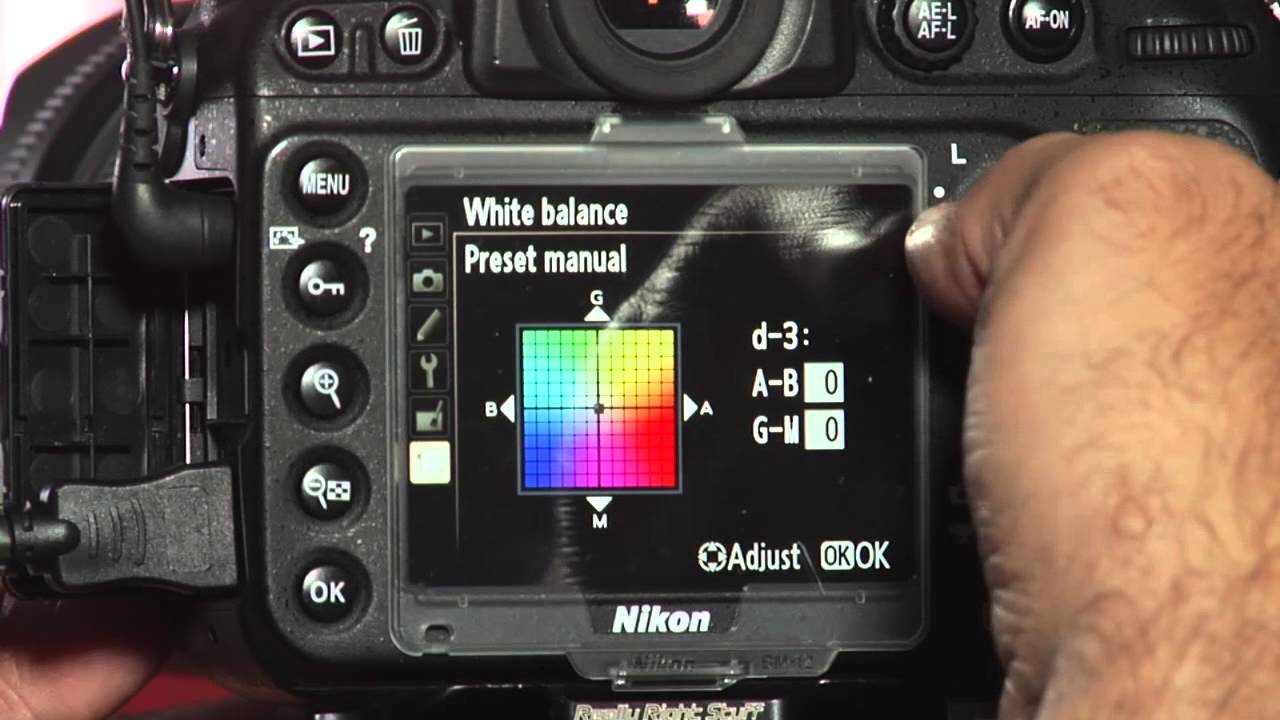
Manual white balance can be adjusted using the features and controls in the camera’s menu settings. Some cameras also allow for fine-tuning the white balance further by adjusting the color temperature and tint, giving photographers even more control over the color balance.
It’s important to note that post-processing software, such as Adobe Photoshop or Lightroom, also provides options to adjust and refine the white balance of the images during editing. However, achieving an accurate white balance at the time of capture reduces the amount of post-processing needed and can yield more authentic and natural results.
Choosing between AWB and Manual White Balance depends on the photographer’s preference and the shooting conditions. While AWB is convenient in many situations, manual white balance offers precise control over color reproduction, ensuring consistent and accurate results. Photographers should experiment with both options and understand their camera’s capabilities to make informed decisions based on the specific shooting circumstances and desired creative outcome.
How to adjust the Color Balance on your camera
Adjusting the color balance on your camera is crucial for achieving accurate and pleasing colors in your photographs. Most digital cameras provide various options to adjust the color balance, allowing you to customize the white balance settings based on the specific lighting conditions. Here are the steps to adjust the color balance on your camera:
1. Understand your camera: Familiarize yourself with the various white balance options and functionality of your camera. Read the camera manual to learn how to access and adjust the white balance settings specific to your model.
2. Use the White Balance presets: Start by utilizing the White Balance presets available on your camera. These presets, such as “Auto,” “Daylight,” “Cloudy,” “Tungsten,” and “Fluorescent,” are designed to compensate for the color cast produced by different lighting conditions. Choose the preset that best matches the prevailing lighting situation.
3. Manually adjust the White Balance: If the White Balance presets do not produce the desired results, you can manually adjust the white balance. Access the manual white balance settings on your camera, usually found in the menu. Some cameras allow you to adjust the white balance by selecting a color temperature, while others allow for custom adjustments using a neutral reference, like a white or gray card.
4. Set a Custom White Balance: To set a custom white balance, place a white or gray card in the scene under the current lighting conditions. Ensure that the card fills the frame and is evenly illuminated by the light source. Access the custom white balance settings on your camera and follow the instructions to set the white balance based on the card’s reference color.
5. Fine-tune the color balance: Some cameras provide additional options to fine-tune the color balance further. These options often include adjusting the color temperature and tint. Experiment with these settings to achieve the desired color balance for your specific shooting conditions and creative vision.
6. Check the results: After adjusting the color balance, review the images on your camera’s LCD screen to ensure that the colors appear accurate and pleasing. Pay attention to any color casts or shifts and make further adjustments if necessary.
7. Post-processing adjustments: Keep in mind that post-processing software, such as Adobe Photoshop or Lightroom, also offers options to adjust the color balance during editing. If needed, further refine the color balance during the post-processing stage to achieve your desired look and feel.
Remember to experiment and practice adjusting the color balance on your camera in various lighting conditions. By mastering the art of color balance, you can ensure that the colors in your photographs accurately represent the scene and create visually stunning images.
Using Custom White Balance Settings
Custom white balance settings allow photographers to achieve precise color balance by using a neutral reference in a specific lighting condition. This method provides the opportunity to fine-tune the white balance settings to accurately represent the colors in a scene. Here’s how to utilize custom white balance settings on your camera:
1. Find a neutral reference: Select a neutral reference object, such as a white or gray card, that reflects an equal amount of red, green, and blue light. This reference should reflect the light in the scene without introducing any color casts or biases.
2. Set up the lighting: Place the neutral reference in the same lighting conditions as your subject. Ensure that the reference object is well-illuminated by the light source you want to capture accurately.
3. Access the custom white balance setting: On your camera’s menu or settings, locate the custom white balance option. This may vary depending on the camera model, so refer to your camera’s manual for specific instructions.
4. Capture a reference image: Frame the neutral reference object so that it fills the majority of the frame. Take a photograph of the reference object under the current lighting conditions.
5. Select the custom white balance option: Once you have captured the reference image, navigate to the custom white balance setting on your camera. Choose the option that allows you to select or set a custom white balance value.
6. Set the custom white balance: Use the reference image you captured as a basis for setting the custom white balance. Follow the camera’s instructions to select the reference image and set it as the custom white balance value.
7. Review and test: After setting the custom white balance, review the resulting images on your camera’s LCD screen to ensure that the colors appear accurate and balanced. Take test shots in different lighting conditions to verify the effectiveness of the custom white balance setting.
Custom white balance settings provide photographers with more control over the resulting color balance. This method allows for accurate color representation, especially in challenging lighting situations or when precise color matching is crucial. Custom white balance can be particularly useful for product photography, studio shoots, or situations with mixed lighting sources.
Keep in mind that custom white balance settings are specific to the lighting conditions at the time of capture. If the lighting changes, you may need to recalibrate the custom white balance or switch to another white balance preset or manual adjustment.
By mastering the use of custom white balance settings, photographers can achieve superior color accuracy and maintain consistent color reproduction, resulting in more professional-looking and visually appealing photographs.
Tips for achieving accurate Color Balance
Accurate color balance is essential in photography as it ensures that the colors in your images appear natural and true to life. Here are some tips to help you achieve accurate color balance in your photographs:
1. Understand the lighting: Different lighting conditions have varying color temperatures, which can result in color casts in your images. Take the time to observe and understand the lighting situation before you start shooting. Recognize whether the lighting is natural daylight, incandescent, fluorescent, or any other type, and adjust your camera’s white balance accordingly.
2. Use a gray card or white balance target: Utilize a gray card or a white balance target as a reference to achieve accurate color balance. These tools provide a neutral and consistent color for setting the white balance correctly. When shooting in challenging lighting conditions, take a test shot with the gray card or white balance target in the scene and use it as a reference for setting the custom white balance or adjusting in post-processing.
3. Shoot in RAW format: If your camera supports it, shoot in RAW format rather than JPEG. RAW files capture more data and allow for extensive white balance adjustments during post-processing without losing image quality. This gives you greater flexibility in fine-tuning the color balance and correcting any color shifts or casts.
4. Take test shots: Before capturing critical images, take test shots to evaluate the color balance and make any necessary adjustments. Review the test shots on your camera’s LCD screen to check for any color casts or shifts. This allows you to make real-time adjustments to the white balance settings to achieve the desired color accuracy.
5. Consider the intended mood: Think about the mood and atmosphere you want to convey in your photographs. Adjusting the white balance intentionally can enhance the emotional impact of an image. For example, warming up the colors by adjusting the white balance settings can create a cozy and inviting atmosphere, while cooling down the colors can evoke a sense of tranquility or a colder environment.
6. Post-process if necessary: If you can’t achieve the desired color balance in-camera, consider post-processing techniques to correct any color issues. Software such as Adobe Photoshop or Lightroom provides powerful tools for fine-tuning the white balance and overall color adjustments. However, it’s best to get the color balance as accurate as possible during the shooting stage to minimize the need for extensive post-processing.
7. Practice and experiment: Color balance can be subjective and depend on artistic vision. Practice adjusting the white balance settings in different lighting conditions and experiment with using different presets or custom white balance settings. With practice, you’ll develop an eye for color balance and become more adept at achieving accurate and pleasing colors in your photographs.
By following these tips, you can improve your ability to achieve accurate color balance in your images. Paying attention to the lighting, using reference tools, taking test shots, and considering the intended mood will help you create visually appealing and true-to-life photographs.
Conclusion
Color balance is a fundamental aspect of photography that directly impacts the overall look and feel of the images we capture. Achieving accurate color balance is essential for producing visually appealing and realistic photographs.
Understanding the concept of color balance and its relationship to white balance is key to achieving accurate color reproduction. White balance allows photographers to neutralize any color casts present in a scene, ensuring that colors appear as they would in real life. By using white balance presets or manually adjusting the settings, photographers can control the color temperature and achieve accurate color balance.
Utilizing the different white balance presets on a camera, such as Auto, Daylight, Cloudy, Tungsten, and Fluorescent, provides convenience and accuracy in varying lighting conditions. However, knowing when to use manual white balance adjustments, such as using a gray card or setting a custom white balance, allows for precise control over color balance in challenging lighting situations or when seeking specific creative effects.
To achieve accurate color balance, it is important to understand the lighting conditions, consider the desired mood and atmosphere, and utilize tools like gray cards or white balance targets. Test shots can help evaluate the color balance and make necessary adjustments before capturing critical images. Shooting in RAW format provides flexibility in post-processing to fine-tune the color balance further.
By practicing and gaining experience in adjusting the color balance, photographers can develop a keen eye for accurately representing colors and enhancing the visual impact of their photographs.
Ultimately, mastering color balance is a continuous learning process that requires experimentation and understanding of the specific camera’s capabilities. With attention to detail and an artistic approach, photographers can create captivating images with accurate color reproduction, evoking emotions and conveying their intended messages to viewers.