Introduction
Welcome to this guide on how to zoom in In Photoshop! As an essential tool in any designer or photographer’s toolkit, Photoshop offers a variety of methods for zooming in to get a closer look at your images or designs. Whether you need to focus on intricate details or make precise edits, mastering the art of zooming in will enhance your workflow and help you achieve the desired results.
When working in Photoshop, zooming in allows you to examine your work more closely, ensuring accuracy and attention to detail. It enables you to view finer nuances, refine specific elements, or zoom out to see the overall picture. By zooming in, you gain the ability to work more precisely and make precise adjustments to your designs. Whether you need to edit a photo, create complex digital artwork, or design web graphics, the ability to zoom in effectively is a crucial skill.
In this guide, we will explore different methods to zoom in in Photoshop and provide you with tips for maximizing your zooming experience. So, whether you are a beginner learning the basics of the software or an experienced user looking for more efficient zooming techniques, this guide will provide you with the knowledge and tools you need to zoom in like a pro.
Now, let’s dive into the various methods you can use to zoom in in Photoshop, from the zoom tool and keyboard shortcuts to the navigator panel and zoom percentage box. By familiarizing yourself with these techniques, you will be able to navigate through your images effortlessly and have complete control over your zooming preferences. So, let’s get started!
What is Zooming in Photoshop
Zooming in Photoshop refers to the action of increasing the magnification level of your image or design to view it more closely. It allows you to explore the details of your work and make precise edits or adjustments with precision. Whether you’re working on a small element within a larger composition or analyzing the finer details of a photograph, zooming in offers a closer look at your work.
Photoshop provides various methods for zooming in so that you can choose the one that suits your workflow and preferences. By zooming in, you can focus on specific areas, fine-tune intricate details, or simply get a better understanding of the overall composition. This tool is especially beneficial for tasks such as retouching imperfections, adjusting colors, or working with small graphical elements.
With zooming, you can achieve a level of precision that is crucial in professional design and photo editing. It allows you to accurately assess the quality of your work and make necessary adjustments. Whether you are working on high-resolution images or pixel-perfect digital designs, the ability to zoom in ensures that you maintain quality and achieve the desired results.
Photoshop offers several zooming options to accommodate different user preferences. From using the zoom tool to navigating through the navigator panel or adjusting the zoom percentage, each method provides a unique approach to zooming in and out of your artwork. By understanding and utilizing these zooming techniques, you can optimize your workflow and streamline the editing process.
Now that you have an understanding of what zooming in Photoshop entails and its significance, let’s explore the different methods you can employ to zoom in effectively. Whether you’re a beginner or an experienced user, mastering these techniques will enable you to work with precision and elevate the quality of your designs. Keep reading to learn more!
Method 1: Using the Zoom Tool
One of the most straightforward ways to zoom in Photoshop is by using the Zoom Tool. This tool allows you to zoom in on specific areas of your image with precision. To access the Zoom Tool, press the “Z” key on your keyboard or select it from the toolbar.
Once you have selected the Zoom Tool, you can click and drag over the area you want to zoom in on. Dragging to the right will zoom in, while dragging to the left will zoom out. Alternatively, you can use the Zoom Tool options bar at the top of the screen to set a specific zoom percentage.
Another way to use the Zoom Tool is by clicking on the canvas. Each click will zoom in by a predetermined increment, centered on the location of your click. This allows you to quickly zoom in on different areas of your image without continuously adjusting the zoom level manually.
If you need to quickly zoom in or out to fit your image on the screen, double-clicking the Zoom Tool icon will set the zoom level to “Fit Screen.” This automatically adjusts the zoom to fit your entire image within the workspace.
Using the Zoom Tool gives you precise control over the level of zoom you want to apply. It allows you to focus on specific areas of your work and make accurate adjustments. Whether you’re retouching imperfections, refining details, or working on intricate artwork, the Zoom Tool ensures you have a clear view of your work.
Remember that you can also use keyboard shortcuts to control the Zoom Tool more efficiently. For example, pressing “Ctrl” + “+” zooms in, while “Ctrl” + “-” zooms out. Additionally, pressing “Ctrl” + “0” sets the zoom level to “Fit Screen.”
Now that you know how to use the Zoom Tool in Photoshop, you can experiment with zooming in on different parts of your images or designs. This method provides a simple and effective way to get a closer look at your work and enhance your editing capabilities. Let’s explore more zooming methods in the next section!
Method 2: Using Keyboard Shortcuts
Another efficient way to zoom in Photoshop is by utilizing keyboard shortcuts. These shortcuts allow you to quickly adjust the zoom level without the need to navigate through menus or toolbars. Here are some essential keyboard shortcuts for zooming:
- Zoom In: Press “Ctrl” + “+” (Windows) or “Command” + “+” (Mac) to zoom in. Each press will increase the zoom level incrementally.
- Zoom Out: Press “Ctrl” + “-” (Windows) or “Command” + “-” (Mac) to zoom out. Each press will decrease the zoom level incrementally.
- Fit Screen: Press “Ctrl” + “0” (Windows) or “Command” + “0” (Mac) to fit the entire image within the workspace, adjusting the zoom level accordingly.
- Scroll Wheel: If you have a mouse with a scroll wheel, you can hold down the “Ctrl” key (Windows) or the “Option” key (Mac) and scroll up or down to zoom in or out, respectively.
Using keyboard shortcuts for zooming provides a convenient and efficient way to adjust the zoom level while working on your projects. It allows for quick and precise zooming without interrupting your workflow. By memorizing these shortcuts, you’ll be able to rapidly toggle between different zoom levels and focus on specific areas of your image or design.
Additionally, you can combine keyboard shortcuts with other tools and features in Photoshop to enhance your zooming experience. For example, pressing “Ctrl” (Windows) or “Command” (Mac) with the Zoom Tool selected will temporarily activate the Zoom Out mode. Similarly, holding down the “Ctrl” (Windows) or “Command” (Mac) key while using the Hand Tool allows you to temporarily access the Zoom In mode.
Mastering keyboard shortcuts for zooming is a valuable skill that can significantly improve your efficiency and productivity in Photoshop. By having these shortcuts at your fingertips, you can navigate through your images and designs seamlessly, zooming in and out to work with precision.
Now that you are familiar with the keyboard shortcuts for zooming in Photoshop, let’s move on to exploring another method—using the Navigator Panel. This method provides an alternative way to zoom in and navigate through your images. Keep reading to find out more!
Method 3: Using the Navigator Panel
The Navigator Panel in Photoshop is a powerful tool that allows you to navigate through your images and adjust the zoom level effortlessly. It provides a visual representation of your entire image and offers a convenient way to zoom in and out by simply dragging a slider.
To access the Navigator Panel, go to the Window menu in the top navigation bar and select Navigator. If it’s already checked, it means the panel is already visible on your screen.
Once the Navigator Panel is open, you will see a thumbnail of your image and a red rectangle called the Navigator View Box. The Navigator View Box represents the currently visible area of your image within the Photoshop workspace.
To zoom in using the Navigator Panel, you can either drag the slider upwards or click on the area above the red box. This action will increase the zoom level, focusing on the selected area. Conversely, to zoom out, drag the slider downwards or click on the area below the red box.
One of the advantages of using the Navigator Panel is that it allows you to see a real-time preview of the zoom level and easily switch between different areas of your image. By clicking and dragging the red Navigator View Box within the thumbnail, you can pan around your image and explore different regions without losing the zoom level.
Furthermore, you can also double-click on the Navigator Panel’s thumbnail to instantly set the zoom level to “Fit Screen.” This rescales your image to fit within the confines of the Photoshop workspace.
The Navigator Panel is particularly useful when working on projects with large files or complex compositions. It gives you a bird’s eye view of your image and helps you navigate through it with ease. By leveraging this panel, you can maintain a sense of context while zooming in and out, which is especially valuable when working on detailed edits or intricate artwork.
Now that you’re familiar with using the Navigator Panel to zoom in Photoshop, let’s explore another method—the Zoom Percentage box. This method provides a precise way to set specific zoom levels for your images. Keep reading to learn more!
Method 4: Using the Zoom Percentage box
The Zoom Percentage box in Photoshop is a precise and straightforward way to set a specific zoom level for your images. It allows you to quickly enter a specific percentage and instantly adjust the zoom level to your desired magnification.
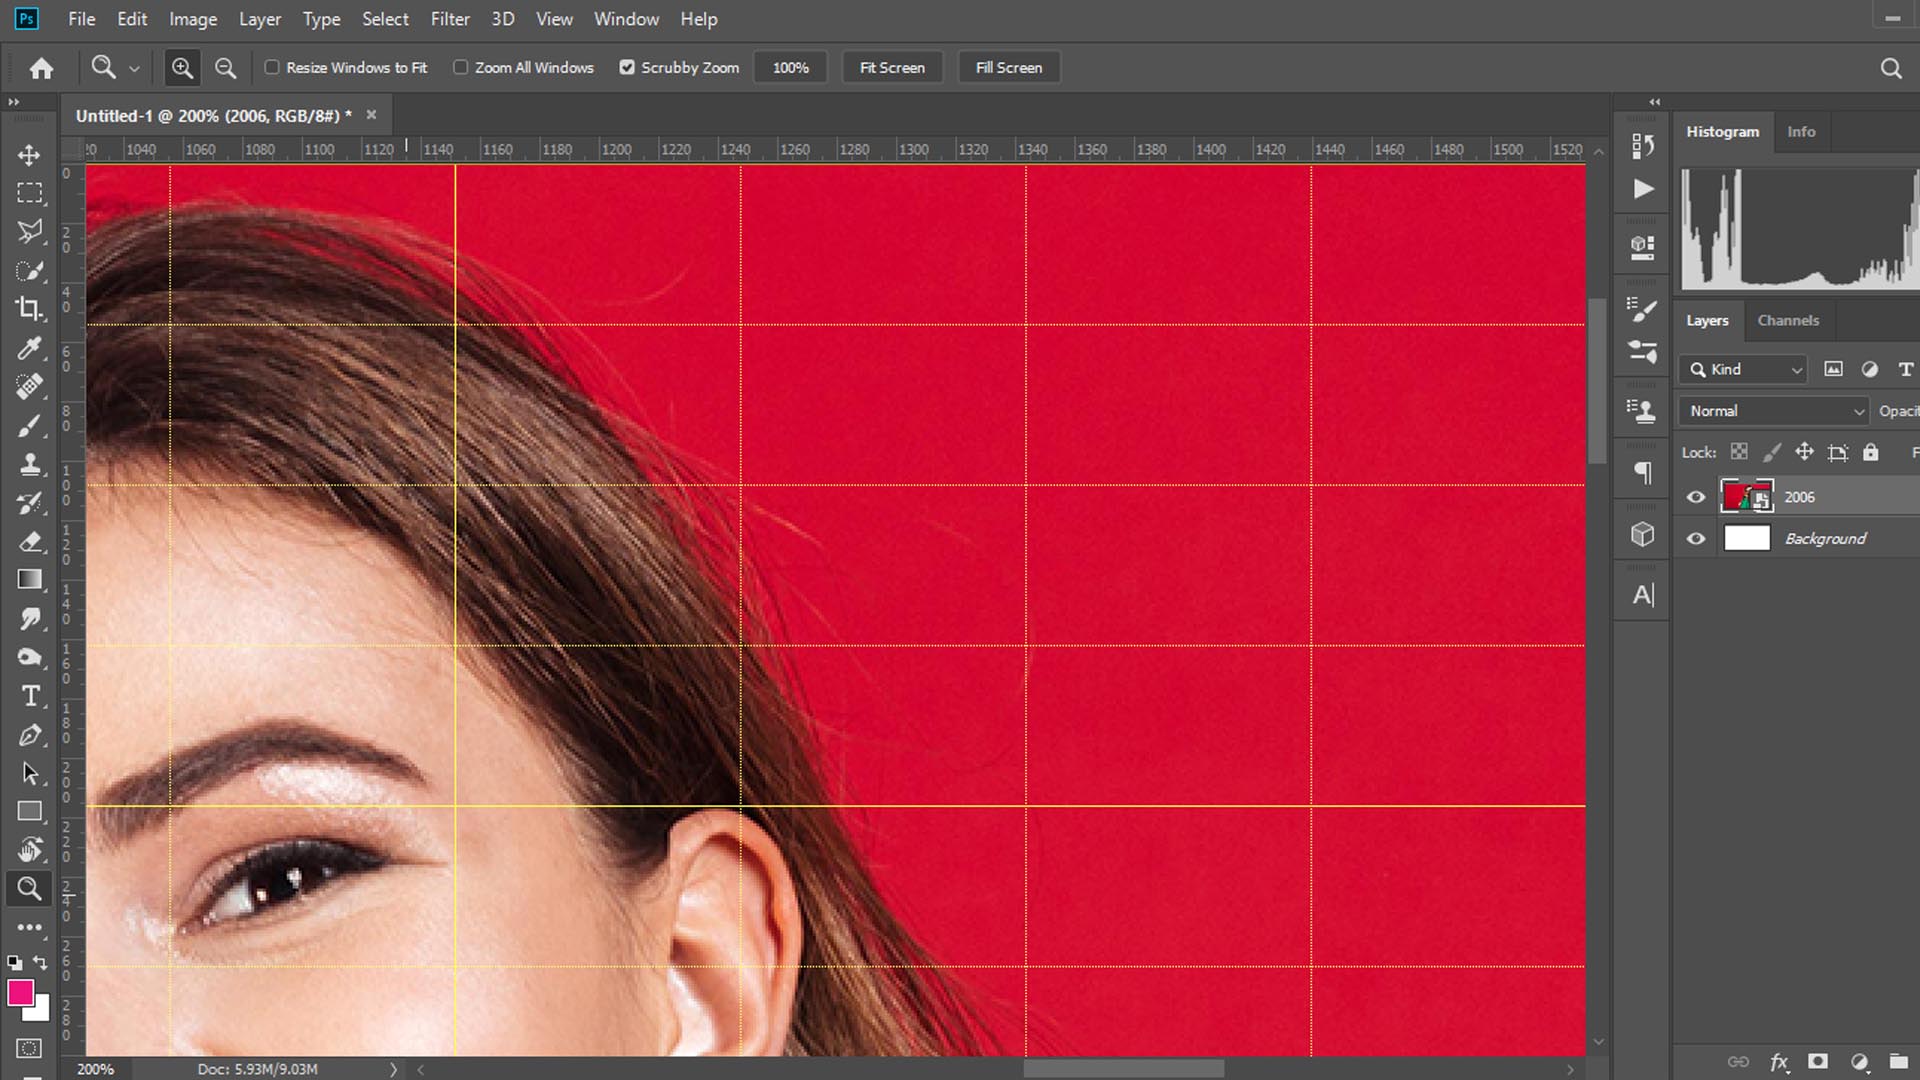
To access the Zoom Percentage box, you can find it in the bottom-left corner of the Photoshop interface, next to the zoom tool icons. It displays the current zoom level in percentage, such as 100% for actual size, 200% for double the size, and so on.
To change the zoom level using the Zoom Percentage box, simply click on the box, and a cursor will appear. You can then type your desired zoom percentage and press Enter or Return on your keyboard. For example, entering “50” will zoom out to 50% of the original size, while entering “200” will zoom in to 200%.
Additionally, you can use some keyboard shortcuts to modify the zoom level through the Zoom Percentage box:
- Zoom In: Press “Ctrl” + “K” (Windows) or “Command” + “K” (Mac) to open the Preferences dialog. Then, under the General tab, adjust the Zoom Percentage to a higher value and click OK to apply the change.
- Zoom Out: Press “Ctrl” + “K” (Windows) or “Command” + “K” (Mac) to open the Preferences dialog. Then, under the General tab, adjust the Zoom Percentage to a lower value and click OK to apply the change.
The Zoom Percentage box provides a precise method for setting specific zoom levels in Photoshop. It allows you to have fine control over the magnification of your images and designs, ensuring accurate editing and adjustments.
Using this method, you can easily switch between different zoom levels, whether you need a close-up view for detailed work or a broader perspective to assess the overall composition of your image.
Now that you’re familiar with using the Zoom Percentage box for zooming in Photoshop, let’s move on to some tips for zooming in effectively. These tips will help you optimize your workflow and make the most out of the zooming techniques we’ve covered so far. Keep reading to learn more!
Tips for Zooming In Effectively
Now that you have learned different methods to zoom in Photoshop, let’s explore some tips to optimize your zooming experience and make the most out of this powerful feature.
- Use Keyboard Shortcuts: Memorize the keyboard shortcuts for zooming in and out. This will save you time and allow for quick adjustments without interrupting your workflow.
- Combine Zoom Methods: Experiment with using different zoom methods in conjunction with one another. For example, you can start with the Zoom Tool to focus on a specific area and then use the Navigator Panel to pan around your image.
- Zoom In on a Separate Layer: If you are making specific edits or adjustments, consider creating a duplicate layer and zooming in on that layer instead. This allows you to work more precisely without affecting the original image.
- Check for Pixelation: As you zoom in, pay attention to any pixelation or loss in image quality. This can help indicate if your image is in a suitable resolution for the desired level of detail.
- Use Guides and Rulers: To assist with precise adjustments, utilize guides and rulers when zooming in. These visual aids will help you align elements accurately and maintain consistency.
- Balance Zoom Levels: Find a balance between zooming in for detailed work and zooming out to view the overall composition. Switching between different zoom levels helps you maintain perspective and context in your design process.
- Take Breaks: When working on detailed edits, remember to take regular breaks and zoom out to view your work from a distance. This can provide a fresh perspective and help you spot any potential issues or areas for improvement.
By following these tips, you can enhance your zooming efficiency and achieve better results in Photoshop. Remember that zooming in is not just about getting closer to your work; it’s about maintaining precision, attention to detail, and overall composition.
Now that you are equipped with various methods and tips for effective zooming in Photoshop, you can elevate your editing skills and create stunning designs with confidence. Practice and experimentation will further refine your zooming techniques and allow you to achieve your desired artistic vision.
Experiment with different methods, keyboard shortcuts, and combinations to discover your preferred approach. Over time, you will develop a zooming workflow that suits your needs and helps you work more efficiently and effectively.
So, go ahead and start exploring the power of zooming in Photoshop. Zoom in, discover the intricate details, and bring your designs to life!
Conclusion
Mastering the art of zooming in Photoshop is a crucial skill for any designer or photographer. With the ability to zoom in, you can delve into the minute details of your images and designs, ensuring precision and accuracy in your editing process.
In this guide, we explored various methods for zooming in Photoshop, including using the Zoom Tool, utilizing keyboard shortcuts, accessing the Navigator Panel, and adjusting the Zoom Percentage box. Each method offers its own advantages and allows you to customize your zooming experience according to your preferences and workflow.
By combining these zooming techniques and incorporating tips for effective zooming, such as using keyboard shortcuts, balancing zoom levels, and leveraging visual aids like guides and rulers, you can optimize your workflow and achieve remarkable results.
Remember, zooming in Photoshop is not just about getting a closer look at your work; it’s about enhancing your ability to make precise edits, refine details, and maintain perspective on your overall composition.
So, dive into Photoshop, experiment with different zooming methods, and discover the power of zooming in to elevate your designs and photographs. Zoom in, focus on the details, and let your creativity flourish!