Connecting Your Laptop to Your Smart TV
Are you tired of squinting at a small laptop screen when you want to watch your favorite movies or videos? Well, you’re in luck! With a few simple steps, you can easily connect your laptop to your smart TV and enjoy a bigger and better viewing experience. Let’s explore some popular methods to accomplish this.
Option 1: Using an HDMI Cable
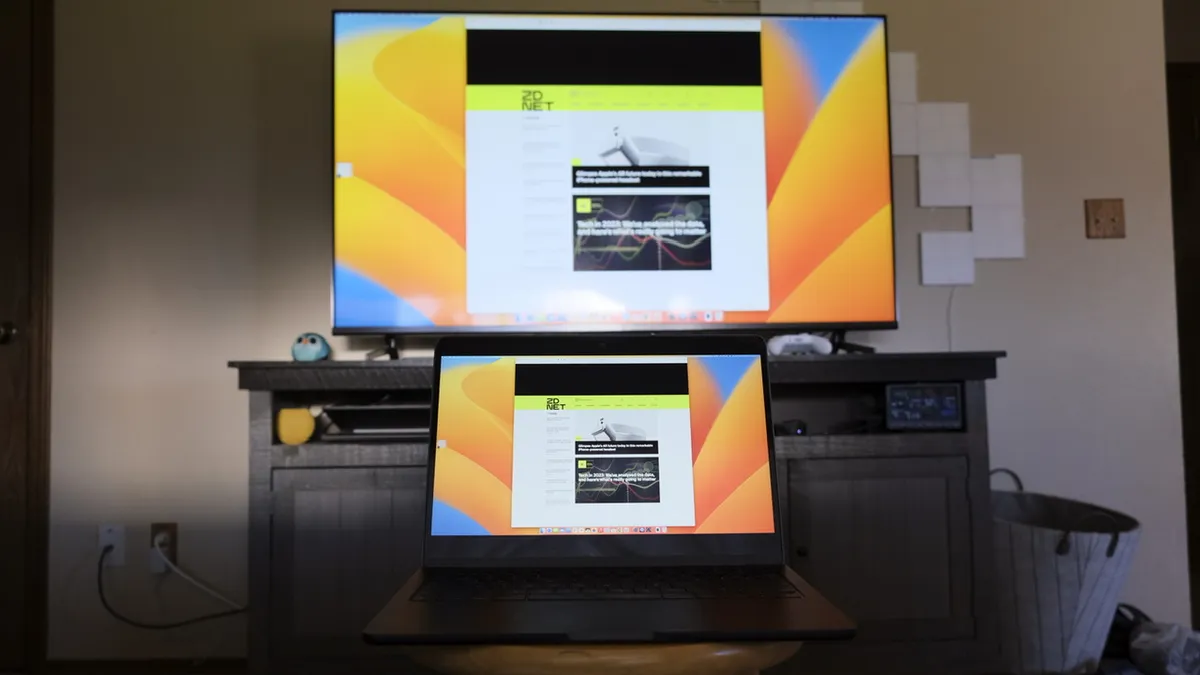
If you’re looking for a reliable and straightforward method, using an HDMI cable is your best bet. All you need is an HDMI cable that is compatible with both your laptop and your smart TV. Simply connect one end of the HDMI cable to your laptop’s HDMI port and the other end to your smart TV’s HDMI port. Once connected, select the appropriate HDMI input on your TV, and voila! Your laptop screen will now be mirrored on your smart TV, allowing you to enjoy your content on a larger screen.
Option 2: Using a Wireless Connection
For those who prefer a cable-free setup, you can connect your laptop to your smart TV using a wireless connection. The first step is to ensure that both devices are connected to the same Wi-Fi network. Next, enable screen mirroring on your smart TV. The exact steps may vary depending on the brand of your television, so consult the user manual for guidance. Once screen mirroring is enabled, head to your laptop’s settings and enable screen mirroring as well. Now, you can wirelessly connect your laptop to your smart TV and enjoy your favorite content on the big screen.
Option 3: Using a Media Streaming Device
If you want to take your streaming experience to the next level, consider using a media streaming device such as a Chromecast, Apple TV, or Roku. These devices allow you to stream content from your laptop to your smart TV seamlessly. Start by setting up your media streaming device according to the manufacturer’s instructions. Once set up, connect your laptop to the same Wi-Fi network as the streaming device. Finally, use the streaming device’s dedicated app or software to stream your laptop’s display on your smart TV. Now, sit back, relax, and enjoy your laptop’s content on the big screen.
These methods offer convenient ways to connect your laptop to your smart TV and elevate your entertainment experience. Whether you prefer a wired or wireless connection, there is a solution for every need. So, gather your cables or explore a wireless setup, and get ready to enjoy your favorite movies, videos, and even presentations on the big screen of your smart TV.
Option 1: Using an HDMI Cable
If you’re looking for a reliable and straightforward method to connect your laptop to your smart TV, using an HDMI cable is the way to go. This option ensures high-quality audio and video transmission without any lag or buffering issues. Here’s how you can set it up:
1. Check the compatibility: Before getting an HDMI cable, ensure that both your laptop and smart TV have HDMI ports. Most modern laptops and smart TVs come equipped with HDMI ports, but it’s always good to double-check.
2. Get the right cable: There are different categories of HDMI cables, such as standard HDMI, high-speed HDMI, and premium high-speed HDMI. For most home entertainment setups, a high-speed HDMI cable will suffice. Choose a cable length that suits your needs and budget.
3. Connect the cable: Once you have the HDMI cable, connect one end of it to your laptop’s HDMI port and the other end to your smart TV’s HDMI port. Make sure the cable is securely plugged in on both ends.
4. Select the input source: On your smart TV, use the remote control to navigate to the input source menu. Choose the HDMI input that corresponds to the HDMI port you connected the cable to. Your TV may have multiple HDMI inputs, so select the one that matches the cable connection.
5. Adjust laptop display settings: On your laptop, go to the display settings menu. Depending on your operating system, you can usually access it by right-clicking on the desktop and selecting “Display settings” or a similar option. Look for the option to extend or duplicate your display, and select the appropriate setting based on your preference.
6. Enjoy the big screen experience: Your laptop’s screen will now be mirrored on your smart TV. You can watch movies, view photos, play games, or even give presentations on the larger screen. Adjust the volume and other settings as needed using the TV remote control.
Using an HDMI cable is a simple and effective way to connect your laptop to your smart TV. It provides a seamless connection that ensures high-quality audio and video playback. So, grab an HDMI cable, follow the steps outlined above, and get ready to enjoy all your favorite content on the big screen!
Option 2: Using a Wireless Connection
If you prefer a cable-free setup or your laptop doesn’t have an HDMI port, you can connect your laptop to your smart TV using a wireless connection. This method allows for flexibility and convenience, as you can easily stream your laptop’s display to your TV. Here’s how you can accomplish this:
1. Ensure both devices are on the same network: To establish a wireless connection, make sure that both your laptop and smart TV are connected to the same Wi-Fi network. This is crucial for them to communicate with each other.
2. Enable screen mirroring on your smart TV: The next step is to enable screen mirroring on your smart TV. The exact process may vary depending on the brand and model of your TV. Refer to the user manual or search online for specific instructions related to your TV.
3. Enable screen mirroring on your laptop: Once screen mirroring is enabled on your TV, it’s time to enable it on your laptop. The process will depend on your laptop’s operating system. For Windows laptops, you can typically find the screen mirroring option in the “Display settings” or “Project” menu. On Mac laptops, look for the AirPlay icon in the menu bar or go to System Preferences > Displays and choose the appropriate option.
4. Connect your laptop to your smart TV wirelessly: After enabling screen mirroring on both devices, your laptop should detect your smart TV as an available display. Select your smart TV from the list of available devices on your laptop. Once connected, your laptop’s display will be mirrored on your TV, allowing you to enjoy your content on a larger screen.
Wireless connections offer convenience and flexibility, allowing you to easily stream your laptop’s display to your smart TV. Whether you’re watching movies, browsing the internet, or giving a presentation, the wireless connection provides a seamless and enjoyable experience.
Keep in mind that different laptops and smart TVs may have slight variations in the steps involved. It’s always a good idea to consult the user manuals or online support resources specific to your devices if you encounter any difficulties during the setup process.
Now, sit back, relax, and enjoy your laptop’s content on the big screen of your smart TV, all without the hassle of cables.
Step 1: Ensure Both Devices are on the Same Network
To establish a wireless connection between your laptop and smart TV, it is essential to ensure that both devices are connected to the same Wi-Fi network. By being on the same network, they can communicate and share information seamlessly. Here’s how you can ensure both devices are on the same network:
1. Check Wi-Fi connectivity: On your laptop, make sure that Wi-Fi is turned on and that it is connected to the desired Wi-Fi network. Look for the Wi-Fi icon in the taskbar or system tray of your laptop’s operating system. If it is not connected or you need to switch to a different network, click on the icon and select the appropriate Wi-Fi network from the available options.
2. Connect the smart TV to Wi-Fi: On your smart TV, access the settings menu. The steps may vary depending on the brand and model of your TV, but you typically need to go to the “Settings” or “Network” section. Locate the option to connect to a Wi-Fi network and select the desired network from the list of available networks. Enter the Wi-Fi password if prompted.
3. Confirm network connectivity: Once both devices are connected to the same Wi-Fi network, it’s crucial to confirm that they are indeed on the same network. On your laptop, open a web browser and visit a website. On your smart TV, open a streaming app or try accessing online content. If both devices are successfully connected to the same network, you should be able to browse the web and stream content on your smart TV.
It’s worth mentioning that different smart TVs may have different user interfaces and settings menus. However, the basic principle of connecting to a Wi-Fi network remains the same. If you encounter any difficulties during the process, refer to the user manual or support resources specific to your smart TV model.
By ensuring that both your laptop and smart TV are on the same network, you lay the foundation for a successful wireless connection. This step is a crucial prerequisite for establishing a smooth and seamless connection between the devices.
Now that you have confirmed network connectivity, you can move on to the next steps of enabling screen mirroring on both your laptop and smart TV, allowing you to wirelessly connect your laptop’s display to your TV and enjoy a larger and more immersive viewing experience.
Step 2: Enable Screen Mirroring on Your Smart TV
In order to wirelessly connect your laptop’s display to your smart TV, you need to enable screen mirroring on your smart TV. Enabling this feature allows your TV to receive and display the content being displayed on your laptop. Here’s how you can enable screen mirroring on your smart TV:
1. Turn on your smart TV: Ensure your smart TV is powered on and ready to be used. Use the remote control or the power button located on the TV itself to turn it on.
2. Navigate to the settings: On your smart TV, access the settings menu. The exact steps may vary depending on the brand and model of your TV. Usually, there is a dedicated button on the remote control for accessing the settings menu. Alternatively, you can use the on-screen menu to navigate to the settings.
3. Find the screen mirroring option: Within the settings menu, look for the “Screen Mirroring,” “Miracast,” or “Cast Screen” option. The wording may differ depending on the TV brand and model. Once located, select this option to proceed.
4. Enable screen mirroring: After selecting the screen mirroring option, you may be prompted to choose whether you want to enable screen mirroring. Select “On” or “Enable” to activate the feature on your smart TV.
5. Wait for pairing: Once screen mirroring is enabled on your smart TV, it will start searching for available devices to pair with. Keep in mind that the pairing process may take a few seconds or minutes. Your TV screen may display a list of available devices during this time.
6. Confirm connection: On your laptop, check for a list of available devices for screen mirroring or casting. The location of this option may vary depending on your laptop’s operating system. Look for the wireless display settings or screen casting settings. Select your smart TV from the list of available devices.
7. Establish the connection: After selecting your smart TV on your laptop, the devices will attempt to establish a connection. This process may require you to confirm the connection on both your laptop and smart TV. Once the connection is established, your laptop’s display will be mirrored on your TV.
By enabling screen mirroring on your smart TV, you open up the possibilities for wirelessly connecting your laptop’s display. Now that screen mirroring is enabled, you are ready to move on to the next step of enabling screen mirroring on your laptop, allowing you to complete the wireless connection and enjoy your laptop’s content on the big screen of your smart TV.
Step 3: Enable Screen Mirroring on Your Laptop
In order to establish a wireless connection between your laptop and smart TV, you need to enable screen mirroring on your laptop. By enabling this feature, you allow your laptop’s display to be wirelessly transmitted and mirrored on your smart TV. Follow these steps to enable screen mirroring on your laptop:
1. Open the settings menu: On your laptop, access the settings menu. The process may vary depending on your laptop’s operating system. For Windows laptops, you can usually find the settings by right-clicking on the desktop and selecting “Display settings” or a similar option. On Mac laptops, go to System Preferences and select “Displays.”
2. Find the screen mirroring option: Once in the settings menu, look for the screen mirroring, display mirroring, or projection settings. Again, the exact wording may differ depending on your laptop’s operating system.
3. Enable screen mirroring: Once you have found the screen mirroring option, select it to enable the feature on your laptop. In some cases, you may need to choose the mode in which you want to mirror your screen, such as extending the display or duplicating it on both devices.
4. Select the smart TV: After enabling screen mirroring on your laptop, it will start searching for available devices to connect to. Your smart TV, which is enabled for screen mirroring, should appear in the list of available devices. Select your smart TV to establish the connection.
5. Allow access: Depending on your laptop’s operating system, you may be prompted to allow access or confirm the connection on both your laptop and smart TV. Follow the on-screen prompts to complete the process.
6. Confirm the connection: Once the connection between your laptop and smart TV is established, you should see your laptop’s display mirrored on the TV screen. The experience may vary depending on your laptop’s performance and the capabilities of your smart TV.
Enabling screen mirroring on your laptop is an important step in establishing a wireless connection with your smart TV. With this feature enabled, you can stream videos, browse the internet, or give presentations on a larger screen, providing a more immersive and enjoyable viewing experience.
Remember to check your laptop’s user manual or online support resources if you encounter any difficulties enabling screen mirroring, as the steps may vary depending on your specific laptop model and operating system.
Now that screen mirroring is enabled on both your laptop and smart TV, you can move on to the final step of wirelessly connecting your laptop’s display to your smart TV and enjoy your favorite content on the big screen.
Step 4: Connect Your Laptop to Your Smart TV Wirelessly
Now that you have enabled screen mirroring on both your laptop and smart TV, it’s time to establish the wireless connection between the two devices. Follow these steps to connect your laptop to your smart TV wirelessly:
1. Make sure both devices are turned on: Ensure that both your laptop and smart TV are powered on and ready to be used. If they were already on during the previous steps, they should still be on.
2. Navigate to the wireless display settings on your laptop: On your laptop, locate the wireless display settings or screen mirroring settings. The location may vary depending on your laptop’s operating system. On Windows laptops, you can usually find this setting by clicking on the “Connect” button in the action center or notification shade. On Mac laptops, look for the AirPlay icon in the menu bar or go to System Preferences > Displays.
3. Scan for available devices: In the wireless display settings on your laptop, click on the “Scan” or “Search” button to search for available devices to connect to. Your smart TV, which is ready for screen mirroring, should appear in the list of available devices.
4. Select your smart TV: From the list of available devices, select your smart TV to establish the wireless connection. Your laptop may display a connection prompt or ask for confirmation before connecting to the TV.
5. Confirm the connection on your smart TV: Once your laptop connects to the smart TV, your TV screen may display a prompt asking for confirmation. Use your TV remote to confirm the connection and allow your laptop’s display to be mirrored on the TV.
6. Begin screen mirroring: After the wireless connection is established and confirmed, your laptop’s display will start mirroring on your smart TV. You should see the same content displayed on both screens.
Now that your laptop is connected to your smart TV wirelessly, you can enjoy multimedia content, such as videos, photos, and presentations, on the big screen. Whether you’re streaming movies, sharing vacation photos with family and friends, or delivering a business presentation, the wireless connection provides flexibility and convenience.
If you encounter any issues during the wireless connection process, make sure that both your laptop and smart TV are properly connected to the same Wi-Fi network and that screen mirroring is enabled on both devices. Refer to the user manuals or online support resources specific to your laptop and smart TV models for troubleshooting steps.
With a successful wireless connection established, you can now sit back, relax, and enjoy your laptop’s content on the larger screen of your smart TV.
Option 3: Using a Media Streaming Device
If you want to take your streaming experience to the next level, using a media streaming device is a great option. These devices, such as Chromecast, Apple TV, or Roku, allow you to easily stream content from your laptop to your smart TV. Here’s how you can set up and utilize a media streaming device:
1. Set up your media streaming device: Start by setting up your chosen media streaming device according to the manufacturer’s instructions. This typically involves connecting the device to your smart TV via an HDMI port and connecting to your Wi-Fi network. Follow the on-screen prompts or refer to the user manual for detailed setup instructions specific to your device.
2. Connect your laptop to your media streaming device: Once your media streaming device is set up, connect your laptop to it. Depending on the device, you may connect wirelessly or with a physical cable. For wireless connections, ensure that your laptop and media streaming device are connected to the same Wi-Fi network. Refer to the device’s instructions for detailed information on how to establish the connection.
3. Stream your laptop display on your smart TV: After connecting your laptop to the media streaming device, you can start streaming the content from your laptop to your smart TV. Most media streaming devices have dedicated apps or software that facilitate screen mirroring or content casting. Access the appropriate app on your laptop and follow the instructions to initiate the streaming process. Your laptop’s display will be mirrored on your smart TV, allowing you to enjoy your content on the big screen.
Using a media streaming device offers convenience and versatility. These devices provide a seamless method for wirelessly connecting your laptop to your smart TV without the need for complex setup or cables. Additionally, media streaming devices often come with various streaming services and apps built-in, allowing you to enjoy a wide range of content directly on your smart TV.
It’s worth noting that different media streaming devices may have slightly different setup processes and supported features. Familiarize yourself with the capabilities and instructions specific to your chosen device by referring to the user manual or online resources provided by the manufacturer.
Once everything is set up and connected, sit back, relax, and enjoy the convenience and breadth of streaming options that a media streaming device brings to your entertainment setup.
Step 1: Set Up Your Media Streaming Device
To enjoy the benefits of using a media streaming device to connect your laptop to your smart TV, you first need to set up the device. Setting up a media streaming device is a relatively simple process that involves a few steps to get you up and running. Here’s how you can set up your media streaming device:
1. Gather the necessary equipment: Start by ensuring that you have all the necessary equipment. This usually includes the media streaming device itself, an HDMI cable, and a power adapter. Check the packaging or the manufacturer’s website to make sure you have everything you need.
2. Choose the appropriate HDMI port: Locate an available HDMI port on your smart TV. Most modern smart TVs have multiple HDMI ports, typically located on the back or side of the TV. Choose one and remember which port you selected, as you will need to connect the media streaming device to this port.
3. Connect the media streaming device: Take one end of the HDMI cable and plug it into the HDMI port on your media streaming device. Then, take the other end of the HDMI cable and connect it to the chosen HDMI port on your smart TV. Ensure that the connection is secure.
4. Power up the media streaming device: Connect the power adapter to the media streaming device and plug it into a power outlet. Follow any additional instructions provided by the manufacturer to power up the device.
5. Select the HDMI input on your TV: Use your smart TV’s remote control to navigate to the appropriate HDMI input. This step may vary depending on your TV model, but it usually involves pressing the “Input” or “Source” button and selecting the HDMI port that you connected the media streaming device to.
6. Follow setup prompts: Once your TV recognizes the media streaming device, a setup process will likely begin. Follow the on-screen prompts and instructions to complete the setup process. This may involve connecting the media streaming device to your Wi-Fi network, creating an account, or agreeing to terms and conditions.
7. Update the device firmware (if necessary): After completing the initial setup, it is a good idea to check for any available firmware updates for your media streaming device. Firmware updates can provide bug fixes, performance improvements, and new features. Refer to the device’s instructions or the manufacturer’s website for information on how to update the firmware.
By following these steps, you can successfully set up your media streaming device and prepare it for connecting your laptop to your smart TV. Each device may have some slight variations in the setup process, so make sure to consult the user manual or online resources specific to your device if you encounter any difficulties.
Now that your media streaming device is set up, you can move on to the next step of connecting your laptop to the device, allowing you to stream content from your laptop directly to your smart TV.
Step 2: Connect Your Laptop to Your Media Streaming Device
After setting up your media streaming device, the next step is to connect your laptop to the device. This connection allows you to stream content from your laptop directly to your smart TV. Follow these steps to successfully connect your laptop to your media streaming device:
1. Ensure both devices are on the same Wi-Fi network: Before connecting your laptop to the media streaming device, verify that both your laptop and the device are connected to the same Wi-Fi network. This is crucial for establishing a seamless and stable connection.
2. Launch the media streaming app or software on your laptop: Depending on the media streaming device you’re using, you may need to download and install the corresponding app or software on your laptop. This app or software is provided by the device manufacturer and allows your laptop to communicate with the media streaming device.
3. Open the app or software on your laptop and sign in, if necessary: Once the app or software is installed, open it on your laptop. If prompted, sign in to your account associated with the media streaming device. This step may require creating a new account or using an existing one.
4. Locate the option to connect or pair your laptop to the media streaming device: Within the app or software, look for the option to connect or pair your laptop to the media streaming device. This option is usually located in the settings or device management section. Click on it to initiate the connection process.
5. Follow the on-screen instructions to establish the connection: The app or software will guide you through the connection process. This may involve selecting your media streaming device from a list of available devices, entering a pairing code, or confirming the connection on both your laptop and the media streaming device.
6. Wait for the connection to be established: Once you have followed the on-screen instructions, your laptop will attempt to establish a connection with the media streaming device. This process may take a few seconds or minutes, so be patient and wait for the connection to complete.
7. Confirm the connection and settings on both devices: After the connection is established, confirm the connection on both your laptop and the media streaming device. Double-check that the correct media streaming device is selected and ensure that the settings, such as audio output and video resolution, are configured to your preference.
By connecting your laptop to the media streaming device, you have established a direct link between the two devices, allowing for seamless content streaming. Now, you’re ready to stream your laptop’s display and enjoy your favorite movies, videos, and more on your smart TV.
If you encounter any difficulties during the connection process, consult the user manual or online support resources specific to your media streaming device and laptop. Troubleshooting steps may vary depending on the device model and software used.
With the successful connection between your laptop and the media streaming device, you’re all set to stream your laptop’s content on your smart TV and enhance your viewing experience.
Step 3: Stream Your Laptop Display on Your Smart TV
With your laptop successfully connected to your media streaming device, you’re now ready to stream your laptop’s display on your smart TV. Streaming your laptop display allows you to enjoy a larger screen and share your content with others. Here’s how you can stream your laptop display on your smart TV:
1. Ensure both devices are powered on and connected: Make sure that your laptop and smart TV are powered on and that they remain connected to the same Wi-Fi network. This ensures a stable connection during the streaming process.
2. Launch the media streaming app or software on your laptop: Open the media streaming app or software that you installed on your laptop from the previous step. This is the interface that allows you to control and manage the streaming process.
3. Select your media streaming device: Within the app or software on your laptop, locate the option to select the media streaming device connected to your smart TV. This option may be labeled “Cast,” “Stream,” or something similar. Click on it to display a list of available devices.
4. Choose your smart TV from the list: In the list of available devices, select your smart TV to establish the streaming connection. Once selected, your laptop’s display will be transmitted to your smart TV, and you’ll see your laptop screen mirrored on the TV screen.
5. Adjust display settings, if necessary: Depending on the media streaming app or software you’re using, you may have the option to adjust display settings such as resolution, aspect ratio, or screen orientation. Explore the settings within the app or software to configure the display to your preference.
6. Start streaming: Once you’ve selected your smart TV and adjusted the display settings, you’re ready to start streaming. Any content that is displayed on your laptop’s screen will now be mirrored and shown on your smart TV. Whether it’s watching movies, browsing the internet, or giving a presentation, you can now enjoy it on a larger screen.
7. Control playback from your laptop or smart TV remote: During the streaming process, you can control playback from either your laptop or your smart TV remote. Use your laptop to navigate through content, adjust volume, or pause and play videos. Alternatively, use your smart TV remote to control these functions directly on the TV screen.
By following these steps, you can easily stream your laptop’s display on your smart TV using a media streaming device. Streaming your laptop’s content to the big screen enhances your viewing experience and allows for easy sharing of multimedia content with friends and family.
Remember to keep your laptop and media streaming app or software up to date to take advantage of any new features or improvements. Check for updates regularly through the app or software’s settings or by visiting the manufacturer’s website.
Now that you have successfully streamed your laptop display on your smart TV, sit back, relax, and enjoy the larger and more immersive viewing experience.
Troubleshooting Tips
Despite following the steps mentioned above, you may encounter some issues when connecting your laptop to your smart TV. Don’t worry – we’ve got you covered with these troubleshooting tips to help you resolve common problems:
1. Ensure that both your laptop and smart TV are connected to the same Wi-Fi network. Without being on the same network, they will not be able to communicate with each other.
2. Double-check that both your laptop and smart TV have screen mirroring capabilities. Not all devices support screen mirroring, so consult the manuals or the manufacturer’s website to verify compatibility.
3. Restart both your laptop and smart TV. Sometimes, a simple restart can resolve connectivity issues and reset any temporary glitches.
4. Update your laptop’s operating system, media streaming app or software, and smart TV firmware. Outdated software can cause compatibility issues, so ensuring that everything is up to date can help resolve connectivity problems.
5. Check for any conflicting applications or settings on your laptop that may interfere with the screen mirroring process. Close unnecessary apps running in the background and disable any VPNs or firewall settings that might block the connection.
6. Verify that your HDMI cable is functioning properly. Try using a different HDMI cable to rule out any potential cable-related issues.
7. If using a wireless connection, ensure that there are no physical obstructions or interference between your laptop and smart TV. Thick walls, Wi-Fi signal interferences, or distance can weaken the connection. Moving closer to the Wi-Fi router or minimizing any obstructions can help improve the signal strength.
8. Restart your Wi-Fi router. Sometimes, router issues can affect the stability of the wireless connection. Power cycling your router by unplugging it for a few seconds and then plugging it back in can help resolve router-related issues.
9. Consult the user manuals or online support resources specific to your laptop and smart TV models. Manufacturers often provide troubleshooting guides and FAQs that may address specific issues you encounter.
10. Consider using an alternate method of connecting your laptop to your smart TV if the initial method doesn’t work. For example, if you encounter difficulties with wireless connections, try using an HDMI cable instead.
Remember, troubleshooting steps may vary depending on your specific devices and the issues you encounter. If you are unsure or unable to resolve the problem, don’t hesitate to reach out to customer support for assistance.
By following these troubleshooting tips, you can overcome common issues and ensure a smooth and successful connection between your laptop and smart TV.
Conclusion
Connecting your laptop to your smart TV opens up a world of possibilities for enjoying your favorite content on a larger screen. Whether you choose to use an HDMI cable, a wireless connection, or a media streaming device, the process is relatively simple and can greatly enhance your entertainment experience.
Using an HDMI cable provides a reliable and straightforward connection, ensuring high-quality audio and video transmission. Wireless connections offer flexibility and convenience, allowing you to wirelessly connect your laptop to your smart TV and enjoy a cable-free setup. Media streaming devices take your streaming experience to the next level by providing a dedicated platform to stream and control content easily.
By following the step-by-step instructions provided in this guide, you can establish a seamless connection between your laptop and smart TV, providing you with a larger screen and more immersive viewing experience. Remember to consult the user manuals and online resources specific to your laptop and smart TV models for any additional instructions or troubleshooting tips.
Now that you have the knowledge you need to connect your laptop to your smart TV, it’s time to sit back, relax, and enjoy your favorite movies, videos, or presentations on the big screen. Whether you’re binge-watching a TV series, sharing memories with friends and family, or showcasing your work, the possibilities are endless when you can watch your laptop content on your smart TV.


