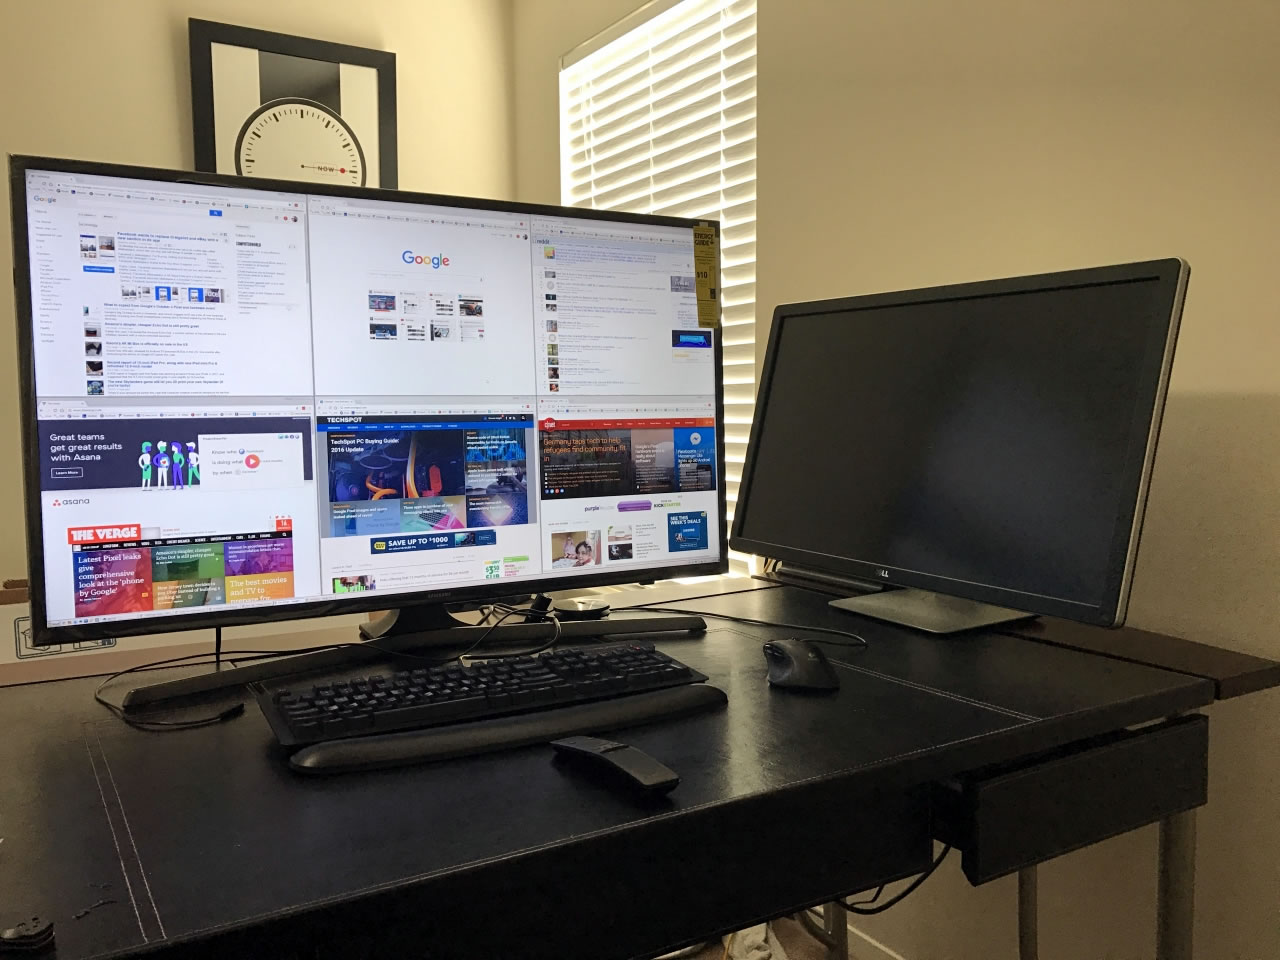
Connecting Your Smart TV to Your Computer
With the increasing popularity of smart TVs, they are not just limited to watching cable TV or streaming content from various apps. One of the many advantages of a smart TV is the ability to use it as a monitor for your computer. This opens up a whole new world of possibilities, whether you want a larger screen for work or want to enjoy your favorite movies and games on a bigger display.
Connecting your smart TV to your computer is a straightforward process that requires just a few simple steps. Here’s a step-by-step guide to help you get started:
- Check the available ports: First, identify the available ports on both your smart TV and computer. Common port options include HDMI, VGA, DVI, and DisplayPort. It’s important to ensure that both devices support the same type of port for a successful connection.
- Select the appropriate cable: Once you’ve determined the compatible ports, choose the appropriate cable to connect your smart TV and computer. For most modern setups, HDMI cables are the preferred choice due to their ability to transmit high-quality audio and video signals.
- Connect the cable: Plug one end of the cable into the corresponding port on your smart TV and the other end into your computer. Make sure the connections are secure.
- Switch input source: On your smart TV, navigate to the input settings and select the appropriate input source corresponding to the port you connected the cable to. This step may vary depending on the TV model, so refer to your TV’s user manual for specific instructions.
- Adjust display settings: On your computer, go to the display settings and ensure that the resolution and refresh rate are compatible with your smart TV. You may need to make adjustments to achieve the optimal display quality.
Once you’ve completed these steps, your smart TV should be successfully connected to your computer. You can now enjoy the benefits of having a larger screen, whether you’re working on projects, watching movies, or playing games.
It’s important to note that not all smart TVs support the use of a computer as a monitor. Before attempting to connect your computer, check your TV’s user manual or manufacturer’s website to verify if this feature is supported.
Furthermore, while using your smart TV as a monitor, it’s essential to consider the distance between you and the screen to prevent eye strain. Adjust the viewing distance and angle to ensure a comfortable experience.
Adjusting the Screen Resolution
After connecting your smart TV to your computer, you may need to adjust the screen resolution to ensure the best display quality. The screen resolution determines the number of pixels on the screen, affecting the clarity and sharpness of the visuals. Here’s how you can adjust the screen resolution:
- Right-click on the desktop: Start by right-clicking on your computer’s desktop and selecting “Display settings” from the context menu. This will open the display settings window.
- Navigate to the resolution settings: In the display settings window, look for the “Resolution” dropdown menu. Click on it to view the available resolution options.
- Select the desired resolution: Choose the resolution that matches your smart TV’s native resolution or the recommended resolution for optimal clarity. The available options will depend on your computer’s graphics card and the capabilities of your smart TV.
- Apply the changes: After selecting the desired resolution, click on the “Apply” button to apply the changes. Your smart TV will briefly display a test pattern to confirm the new settings.
- Confirm the changes: If the test pattern appears correctly and the display quality meets your expectations, click on the “Keep changes” button to permanently apply the new resolution. Otherwise, click on the “Revert” or “Cancel” button to return to the previous settings.
It’s important to choose a resolution that is compatible with both your computer and smart TV to avoid compatibility issues or stretched/distorted visuals. If you encounter any issues or are unsure about the optimal resolution, refer to the user manual or support documentation of your smart TV or contact the manufacturer’s support team for assistance.
Keep in mind that adjusting the screen resolution may also affect the size and positioning of windows, icons, and text on your desktop. If necessary, you can further fine-tune these settings in the display settings window or through your computer’s graphics card control panel.
By adjusting the screen resolution to match your smart TV’s capabilities, you can ensure a visually pleasing and immersive experience while using your smart TV as a monitor.
Setting Up Multiple Monitors
If you have multiple smart TVs or monitors and want to extend your display across them, you can set up multiple monitors on your computer. This feature allows you to have a larger workspace, making it easier to multitask and increase productivity. Here’s a step-by-step guide to help you set up multiple monitors:
- Check your computer’s graphics card: Before setting up multiple monitors, ensure that your computer’s graphics card supports this feature. Most modern graphics cards have multiple video outputs, such as HDMI, DisplayPort, or DVI, which allow you to connect multiple monitors simultaneously.
- Connect the additional monitors: Depending on the available video outputs on your graphics card, connect the additional smart TVs or monitors using the appropriate cables. Ensure that the connections are secure.
- Access display settings: Right-click on your desktop and select “Display settings” from the context menu. This will open the display settings window.
- Arrange the displays: In the display settings window, you will see a visual representation of your connected monitors. Click and drag the displays to arrange them according to your desired configuration. You can adjust the position, orientation, and resolution of each display.
- Set the primary display: If you want one monitor to be the main display (the primary screen), click on the desired monitor and check the box that says “Make this my main display”. This will be the default screen where your desktop icons and taskbar will appear.
- Adjust additional settings: Depending on your computer’s operating system, you may have additional settings to customize the display behavior of multiple monitors. Explore options such as screen duplication, extending the display, or adjusting individual monitor settings.
- Apply the changes: After arranging and configuring the multiple displays, click on the “Apply” button to apply the changes. The displays may briefly flicker as the settings are applied.
With multiple monitors set up, you can now enjoy an extended workspace, spread your windows across different screens, and efficiently manage your tasks. This setup is particularly beneficial for professionals who require multiple applications, such as designers, content creators, and traders.
If you encounter any issues during the setup process or need further assistance, refer to your computer’s user manual or contact the manufacturer’s support team for guidance. They can provide specific instructions based on your computer’s hardware and operating system.
Setting up multiple monitors on your computer opens up a world of possibilities, allowing you to work, play, or stream content across larger screens for a more immersive experience.
Configuring Audio Output
When using your smart TV as a monitor for your computer, it’s essential to configure the audio output to ensure that sound is played through the desired speakers. By default, your computer may output audio through its built-in speakers or headphones. Here’s how you can configure the audio output when using your smart TV as a monitor:
- Access the sound settings: To configure the audio output, right-click on the speaker icon in the system tray of your computer and select “Sounds” from the context menu. This will open the sound settings window.
- Select the playback device: In the sound settings window, navigate to the “Playback” tab. Here, you will see a list of available audio playback devices. Look for the device name corresponding to your smart TV or the audio output connected to your smart TV.
- Set the smart TV as the default playback device: Once you’ve identified the correct audio output device, right-click on it and select “Set as Default Device” from the context menu. This will configure your smart TV as the default playback device for audio.
- Adjust the volume: To adjust the volume, use the volume controls on your smart TV or the remote control. Alternatively, you can also use the volume controls on your computer to adjust the audio output level.
- Test the audio output: To ensure that the audio is playing through the correct speakers, play a sound or video file on your computer. Verify that the audio is being outputted through your smart TV’s speakers.
Keep in mind that the process of configuring audio output may vary slightly depending on your computer’s operating system. If you encounter any difficulties or need further assistance, refer to your computer’s user manual or contact the manufacturer’s support team for specific instructions.
Additionally, if you want to use external speakers or a soundbar with your smart TV, you can connect them using the available audio output options (such as HDMI ARC or optical audio) and configure the audio settings accordingly.
By correctly configuring the audio output, you can ensure that the sound produced by your computer is played through the speakers connected to your smart TV, enhancing your multimedia experience and providing a more immersive audiovisual setup.
Using Your Smart TV as an Extended Display
Using your smart TV as an extended display can greatly enhance your productivity and multitasking capabilities. With an extended display setup, you can spread out your applications, documents, and windows across two screens, providing a larger workspace. Here’s how you can use your smart TV as an extended display:
- Access display settings: Right-click on your desktop and select “Display settings” from the context menu. This will open the display settings window.
- Enable extended display: In the display settings window, under the “Multiple displays” section, choose the “Extend these displays” option. This will enable the extended display mode.
- Arranging the extended display: Drag and arrange the monitors in the display settings window to match the physical setup of your displays. You can position the monitors side by side or even place one above the other, depending on your preference.
- Adjust display size and resolution: On the display settings window, you can also adjust the size and resolution of each screen independently. This ensures that the content on both displays appears crisp and proportionate.
- Moving windows between displays: To move windows or applications between the primary monitor and the extended display, simply drag them from one screen to the other. This allows you to utilize the extended workspace efficiently and organize your tasks.
- Customize display settings: Depending on your operating system, you can customize various display settings for the extended display. This includes options like screen orientation, screen duplication, and screen scaling.
- Enjoy the extended workspace: With your smart TV acting as an extended display, you can now enjoy the benefits of a larger workspace. Spread out your applications, view multiple documents side by side, or use one screen for work and the other for leisure activities like streaming or gaming.
By using your smart TV as an extended display, you can increase your workflow efficiency and improve your overall computing experience. It’s like having two screens seamlessly connected, providing you with a more expansive canvas to work with.
Keep in mind that the performance and compatibility of the extended display setup may depend on your computer’s graphics card and the capabilities of your smart TV. If you encounter any issues or need assistance, refer to your computer’s user manual or contact the manufacturer’s support team for further guidance.
Take full advantage of your smart TV’s capabilities by utilizing it as an extended display, and unlock a whole new level of productivity and convenience.
Mirroring Your Screen
Another useful feature of using your smart TV as a monitor is the ability to mirror your computer screen. Screen mirroring allows you to replicate your computer’s display onto the larger screen of your smart TV, making it ideal for presentations, sharing content with others, or simply enjoying your favorite media on a bigger display. Here’s how you can mirror your screen:
- Access display settings: Navigate to the display settings on your computer. The method for accessing these settings may vary based on your operating system.
- Enable screen mirroring: Look for the screen mirroring or casting option in the display settings. Click on it to enable screen mirroring.
- Choose your smart TV: Your computer will search for available devices to mirror to. Select your smart TV from the list of available devices.
- Confirm the connection: After selecting your smart TV, your computer will establish a connection. You may be prompted to confirm the connection on both your computer and your smart TV.
- Start screen mirroring: Once the connection is established, your computer’s screen will be mirrored on your smart TV. You can now navigate and use your computer as usual, with everything being displayed on the larger screen.
- Adjust display settings (optional): Depending on your preferences, you can adjust the display settings on your computer to optimize the mirrored screen. This includes screen resolution, aspect ratio, and other visual settings.
During screen mirroring, any actions performed on your computer will be mirrored in real time on your smart TV. This allows you to showcase presentations, collaborate on projects, or enjoy content together with others in a more immersive way.
It’s worth noting that certain smart TVs may offer native screen mirroring features specific to their brand. Check your smart TV’s user manual or manufacturer’s website to see if there are any additional instructions for screen mirroring.
If you experience any difficulties or encounter any issues during the screen mirroring process, refer to your computer’s user manual or contact the manufacturer’s support team for further assistance.
Screen mirroring enables you to extend your computer’s display to a larger screen, allowing for a more engaging and inclusive viewing experience. Whether for work or entertainment, take advantage of this feature to enjoy a seamless mirroring experience.
Streaming Content to Your Smart TV
One of the main benefits of using a smart TV as a monitor is its ability to stream content directly from your computer. Whether you want to watch movies, TV shows, or online videos, streaming content to your smart TV provides a more immersive and enjoyable viewing experience. Here’s how you can stream content to your smart TV:
- Ensure your computer and smart TV are connected: Make sure that your computer and smart TV are connected to the same network. This can be achieved either via a wired Ethernet connection or through a shared Wi-Fi network.
- Open the media streaming application: Depending on your preferences and the capabilities of your smart TV, you can use various media streaming applications. Examples include Plex, VLC, or even the built-in casting functionality provided by your smart TV.
- Select the content to stream: Choose the specific media file or content you want to stream from your computer to your smart TV. This could be a movie, TV show, or any other compatible media file type.
- Initiate the streaming process: In the media streaming application, look for the option to cast or stream your media. Click on it and select your smart TV from the list of available devices.
- Confirm the connection: Confirm the connection on your smart TV if prompted. This may involve entering a unique code or accepting the connection request.
- Enjoy the streamed content: Once the connection is established, your chosen media will begin streaming on your smart TV. Control playback, volume, and other settings using either your computer or the remote control of your smart TV.
Streaming content to your smart TV allows you to enjoy your favorite movies, TV shows, and online videos on a larger and more immersive screen. It eliminates the need for physical media or additional devices, simplifying the viewing experience.
Keep in mind that the specific steps and available media streaming applications may vary depending on your smart TV’s brand and model. Refer to your smart TV’s user manual or the manufacturer’s website for detailed instructions on streaming content from your computer.
Additionally, ensure that the media files you intend to stream are compatible with your smart TV’s supported formats. Incompatibility may result in playback issues or the inability to stream certain files.
With the ability to stream content to your smart TV, you can transform your computer into a powerful entertainment hub and enjoy your favorite media on the big screen with ease.
Gaming on Your Smart TV
Gaming on your smart TV can be an exhilarating experience, as it allows you to dive into immersive gameplay on a large display. Whether you’re a casual gamer or a hardcore enthusiast, leveraging your smart TV as a gaming monitor can enhance your gaming sessions. Here’s how you can enjoy gaming on your smart TV:
- Connect your gaming device to your smart TV: Depending on the gaming device you own, such as a gaming console or a gaming PC, connect it to your smart TV using the appropriate cables. HDMI is usually the preferred connection for most gaming devices, as it supports high-definition video and audio signals.
- Select the gaming input: On your smart TV, switch to the input source corresponding to the port you connected your gaming device to. This may be labeled as HDMI1, HDMI2, or another relevant designation. Consult your smart TV’s user manual if you’re unsure how to switch inputs.
- Configure display settings: On your gaming device, adjust the display settings to match the resolution and aspect ratio of your smart TV. This will ensure that the game is displayed properly and optimally on the larger screen.
- Optimize gaming mode: Smart TVs often come with a gaming mode or a similar feature that reduces input lag and enhances the gaming experience. Enable this mode to reduce any display delay and improve responsiveness during gameplay.
- Connect gaming peripherals: If desired, connect gaming peripherals like controllers or gaming keyboards to your gaming device. This will allow you to fully immerse yourself in the gaming experience and take advantage of the larger screen.
- Explore gaming features: Smart TVs may offer additional gaming features, such as game streaming services or built-in gaming apps. Explore these features to discover new games, join gaming communities, or enhance your gaming experience.
- Enjoy gaming on your smart TV: With your gaming device connected and all settings configured, you can now enjoy gaming on your smart TV. Immerse yourself in the stunning visuals and captivating gameplay on the larger screen, whether you’re playing action-packed games, immersive RPGs, or competitive multiplayer titles.
Make sure to check your smart TV’s specifications and gaming capabilities to ensure compatibility with your gaming device and desired gaming experience. Some smart TVs offer features like high refresh rates, variable refresh rate (VRR) technology, or compatibility with specific gaming optimizations.
Additionally, consider your smart TV’s audio capabilities for a more immersive gaming experience. You can connect external speakers or a soundbar to enhance the audio quality and fully immerse yourself in the game’s soundscape.
Gaming on your smart TV provides an exciting way to enjoy your favorite games on a larger screen. Explore the vast gaming possibilities and make the most out of your gaming setup.
Troubleshooting Common Issues
While using your smart TV as a monitor for your computer, you may encounter some common issues. Fortunately, most of these issues can be resolved by following a few troubleshooting steps. Here are some common issues and their potential solutions:
- No Display or Signal: If your smart TV is not displaying anything or showing a “No Signal” message, first ensure that the connections between your computer and the smart TV are secure. Check the cables and connection ports on both devices. Try using a different cable or port if necessary. Restart both your computer and smart TV and check if the issue persists.
- Resolution Mismatch: If the resolution on your smart TV looks incorrect or distorted, access the display settings on your computer and ensure that the resolution is set correctly for both your computer’s display and the smart TV. Adjust the resolution if needed and confirm that the aspect ratio is properly set.
- Audio Problems: If you’re experiencing issues with audio output or the sound quality on your smart TV, first check the volume levels on both your computer and the smart TV. Make sure the audio output is correctly set to your smart TV in the sound settings on your computer. Verify that the audio cables are securely connected. If using external speakers or a soundbar, ensure that they are properly connected to the audio output of your smart TV.
- Input Lag: Input lag refers to the delay between pressing a key or moving the mouse and the corresponding action appearing on the screen. If you notice input lag while using your smart TV as a monitor, enable the gaming mode or PC mode on your smart TV if available. This mode reduces input lag and enhances responsiveness during gameplay or other activities.
- Wi-Fi Connectivity Issues: If you’re connecting your smart TV and computer over Wi-Fi, and experiencing connectivity issues or intermittent connection drops, ensure that the signal strength between your smart TV and Wi-Fi router is strong. Move the router closer to your smart TV, or consider using a wired Ethernet connection for a more stable connection.
- Flickering or Screen Freezing: If the display on your smart TV is flickering or freezing, make sure that the firmware on both your smart TV and computer are up to date. Additionally, check for any software updates for your graphics card on your computer. These updates often include bug fixes that can resolve display-related issues.
If the above troubleshooting steps do not resolve your issues, refer to the user manual of your smart TV or contact the manufacturer’s support team for further assistance. They can provide specific guidance based on the brand and model of your smart TV.
It’s also worth noting that some issues may be related to specific applications or compatibility between your computer and smart TV. Check for any known issues or compatibility requirements between the software you’re using and your smart TV.
By following these troubleshooting steps, you can address common issues that may arise when using your smart TV as a monitor and ensure a smooth and hassle-free experience.
Conclusion
Using your smart TV as a monitor for your computer opens up a world of possibilities, allowing you to enjoy a larger display for work, streaming content, gaming, and more. By following the steps outlined in this guide, you can easily connect your smart TV to your computer, adjust the screen resolution, set up multiple monitors, configure audio output, and utilize the extended display feature. Additionally, you can take advantage of screen mirroring to replicate your computer screen on the larger smart TV display, stream content seamlessly, and enjoy an immersive gaming experience.
While using your smart TV as a monitor, it’s important to be mindful of the distance and viewing angle to prevent eye strain. Adjust the display settings and utilize gaming modes or PC modes offered by your smart TV to optimize your experience. Additionally, troubleshooting common issues, such as display or audio problems, input lag, or connectivity issues, can help ensure a smooth and enjoyable experience.
As technology continues to evolve, smart TVs are no longer limited to traditional television functions. They have become versatile devices that can serve as powerful monitors for your computer. With their large screens, high-definition displays, and smart features, smart TVs provide an immersive and convenient computing experience.
Whether you’re a professional seeking a larger workspace, an avid gamer looking for an enhanced gaming experience, or simply someone who wants to enjoy content on the big screen, utilizing your smart TV as a monitor can greatly enhance your daily activities. Embrace the possibilities and make the most out of your smart TV as you unlock a new level of productivity, entertainment, and enjoyment.