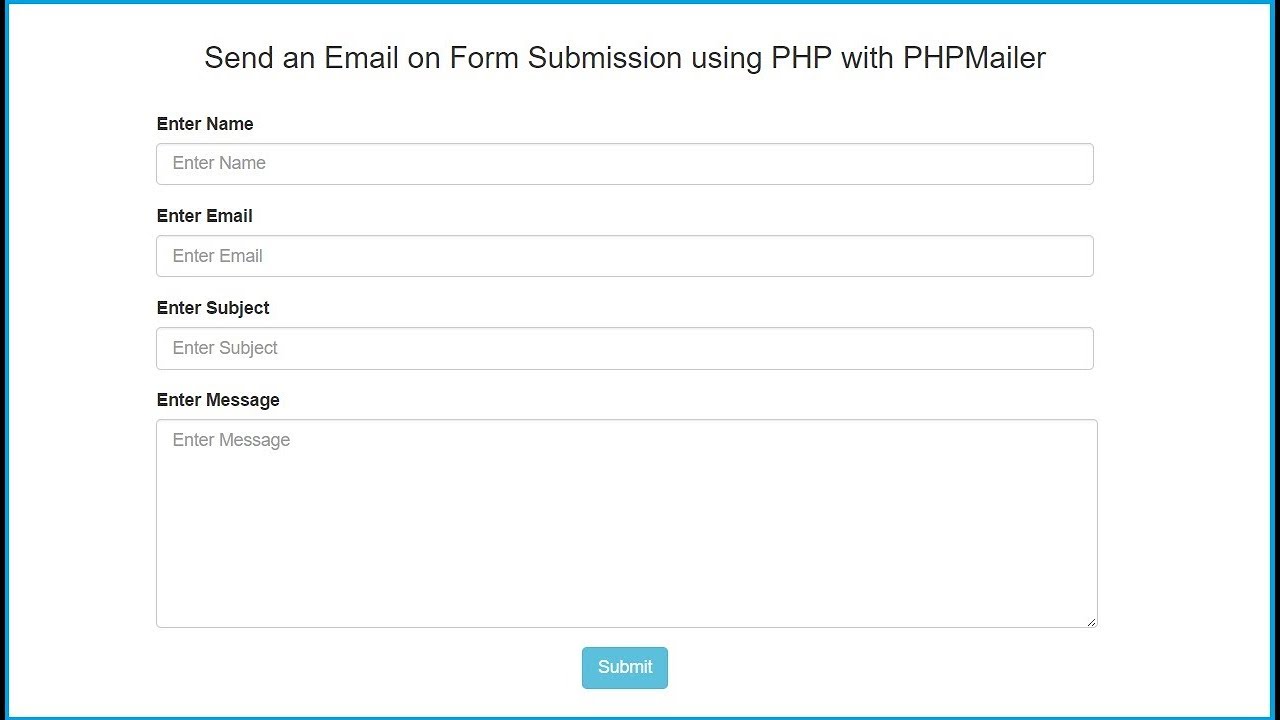
What is PHPmailer?
PHPMailer is a popular open-source PHP library that allows you to send emails easily and efficiently from your PHP application. It provides a simple and flexible solution for sending email messages, including support for attachments, HTML content, SMTP authentication, and more.
Unlike the built-in mail() function in PHP, PHPMailer offers a robust and user-friendly interface, making it easier to handle email tasks within your web application. Whether you need to send transactional emails, newsletters, or notification emails, PHPMailer simplifies the process and provides numerous features to customize your email messages.
One of the key advantages of using PHPMailer is its ability to work with various email sending methods, including the popular Simple Mail Transfer Protocol (SMTP), as well as the capability to integrate with external SMTP servers like Gmail, Yahoo, or Microsoft Exchange. This ensures reliable email delivery and prevents your emails from being marked as spam.
Additionally, PHPMailer supports secure connections using SSL/TLS protocols, allowing you to encrypt your email transmissions for enhanced security.
Another notable feature of PHPMailer is its support for multipart messages. This means you can send both HTML and plain text versions of your email, providing a more versatile and user-friendly email experience for recipients who may have different email clients and preferences.
PHPMailer is widely recognized and actively maintained by a community of developers, ensuring that it remains compatible with the latest PHP versions and security standards. This means you can rely on PHPMailer to continue providing effective email sending capabilities for your PHP applications well into the future.
In the following sections, we will explore how to install and use PHPMailer in your PHP application, covering various functionalities and best practices along the way.
Installing PHPMailer
Installing PHPMailer is a straightforward process that can be done in a few simple steps:
- First, you need to download the PHPMailer library from its official GitHub repository. You can do this by visiting the repository page and clicking on the “Code” button, then selecting “Download ZIP” to download the latest version of PHPMailer.
- Once the ZIP file is downloaded, extract its contents.
- Next, you need to include the PHPMailer Autoload file in your PHP script. You can do this by adding the following line of code at the top of your PHP file:
php
require ‘path/to/PHPMailer/src/PHPMailer.php’;
Note: Replace `path/to` with the actual path to the PHPMailer library on your server.
After including the PHPMailer Autoload file, you are ready to start using PHPMailer in your PHP application.
It’s worth mentioning that PHPMailer requires PHP version 5.5 or later to function properly. Therefore, ensure that your server meets this requirement before proceeding with the installation.
Alternatively, if you are using Composer in your PHP project, you can install PHPMailer by running the following command in your project directory:
bash
composer require phpmailer/phpmailer
This will automatically download and install the latest version of PHPMailer, along with its dependencies.
By following the above steps, you have successfully installed PHPMailer in your PHP application. In the next section, we will explore the basic usage of PHPMailer to send emails.
Basic usage
Using PHPMailer to send emails is simple and requires only a few lines of code. Let’s walk through the basic steps:
- Create a new instance of the PHPMailer class:
php
use PHPMailer\PHPMailer\PHPMailer;
use PHPMailer\PHPMailer\Exception;
$mail = new PHPMailer(true);
The `true` parameter in the constructor enables exceptions, allowing you to catch and handle any errors that occur during the email sending process.
- Set the necessary properties for your email:
php
$mail->setFrom(‘sender@example.com’, ‘Sender Name’);
$mail->addAddress(‘recipient@example.com’, ‘Recipient Name’);
$mail->Subject = ‘Sample Email’;
$mail->Body = ‘This is the content of the email.’;
In the above example, `setFrom()` sets the sender’s email address and name, `addAddress()` sets the recipient’s email address and name, `Subject` sets the subject of the email, and `Body` sets the content of the email.
- Finally, send the email:
php
$mail->send();
That’s it! You have successfully sent an email using PHPMailer.
In case there is an error during the email sending process, you can handle it using a try-catch block:
php
try {
$mail->send();
echo ‘Email sent successfully’;
} catch (Exception $e) {
echo ‘Email could not be sent. Error: ‘ . $mail->ErrorInfo;
}
This ensures that you can gracefully handle any potential failures and display an appropriate error message to the user.
By using the `setFrom()`, `addAddress()`, `Subject`, and `Body` methods, you can customize the email message according to your requirements. It’s also possible to add attachments, send HTML emails, set custom headers, and more, which we will explore in the following sections.
Now that you have an understanding of the basic usage of PHPMailer, let’s move on to setting up SMTP for more reliable email delivery.
Setting up SMTP
Sending emails using SMTP (Simple Mail Transfer Protocol) can greatly enhance the deliverability and reliability of your email messages. By configuring PHPMailer to use an SMTP server, you can ensure that your emails are properly authenticated and avoid the common issue of being marked as spam.
To set up SMTP in PHPMailer, you need the following information:
- SMTP server address
- SMTP port
- SMTP username
- SMTP password
Here’s an example of how to set up PHPMailer to use SMTP:
php
$mail->isSMTP();
$mail->Host = ‘smtp.example.com’;
$mail->SMTPAuth = true;
$mail->Username = ‘your_username’;
$mail->Password = ‘your_password’;
$mail->SMTPSecure = ‘tls’;
$mail->Port = 587;
In the above example, `isSMTP()` enables the use of SMTP for sending emails. `Host` should be set to the address of your SMTP server, which can usually be obtained from your email service provider. `SMTPAuth` should be set to `true` to enable SMTP authentication and prevent unauthorized access. `Username` and `Password` should be set to your SMTP account credentials for authentication.
The `SMTPSecure` property specifies the encryption method for the SMTP connection. Common options include `tls` for Transport Layer Security and `ssl` for Secure Sockets Layer. The appropriate option depends on the configuration of your SMTP server.
The `Port` property specifies the port number to use for the SMTP connection. This port number can vary depending on the email service provider. Port 587 is a commonly used port for SMTP with encryption.
By configuring PHPMailer with the correct SMTP settings, you can ensure that your email messages are sent securely and authenticated through your SMTP server.
Next, we will explore how to send HTML emails using PHPMailer, allowing you to create rich and visually appealing email content.
Sending HTML emails
PHPMailer provides a convenient way to send HTML emails, allowing you to create more visually appealing and dynamic email content.
To send an HTML email using PHPMailer, you can follow these steps:
- Set the `isHTML` property to `true` to indicate that the email content contains HTML:
php
$mail->isHTML(true);
- Compose your email content using HTML markup:
php
$mail->Body = ‘
Welcome to Our Newsletter
Thank you for subscribing to our newsletter. Stay tuned for exciting updates and offers!
‘;
In the above example, we have used HTML tags to format the email content. You can create a visually appealing email by utilizing various HTML elements, such as headings, paragraphs, lists, images, links, and more.
Additionally, you can include CSS inline styles or link external CSS files to customize the appearance of your HTML email. This allows you to control the font styles, colors, layouts, and other visual aspects of your email content.
- Send the email as usual:
php
$mail->send();
With these steps, you can easily send HTML emails using PHPMailer. However, it’s important to note that some email clients may have strict rendering rules or strip out certain CSS styles, so it is recommended to use widely supported HTML and CSS techniques to ensure consistent rendering across different email clients.
In the next section, we will explore how to attach files to your emails using PHPMailer.
Attaching files
PHPMailer allows you to easily attach files to your emails, enabling you to send documents, images, or any other type of file along with your email message.
To attach a file using PHPMailer, you can follow these steps:
- Use the `addAttachment()` method to specify the file you want to attach:
php
$mail->addAttachment(‘/path/to/file.pdf’);
In the above example, replace `/path/to/file.pdf` with the actual path to the file you want to attach. You can attach multiple files by calling `addAttachment()` multiple times.
It’s important to provide the correct file path, including the file extension, to ensure that the file is located and attached successfully.
- You can also specify a custom name for the attachment using the optional second parameter:
php
$mail->addAttachment(‘/path/to/file.pdf’, ‘CustomName.pdf’);
In this example, `CustomName.pdf` will be the name of the attachment displayed to the recipient instead of the actual file name.
It’s worth noting that PHPMailer can handle attachments of any type, including images, PDFs, Word documents, and more. However, keep in mind that some email clients or servers may have restrictions on certain file types or file sizes.
By attaching files to your emails, you can provide additional information or resources to your recipients, making your emails more informative and engaging.
Next, we will explore how to add custom headers to your emails using PHPMailer.
Adding custom headers
PHPMailer allows you to add custom headers to your email messages, giving you more control and flexibility over the email delivery and content.
To add custom headers using PHPMailer, you can follow these steps:
- Use the `addCustomHeader()` method to specify the custom header name and value:
php
$mail->addCustomHeader(‘X-Custom-Header’, ‘Custom Value’);
In the above example, replace `’X-Custom-Header’` with the desired header name and `’Custom Value’` with the value you want to assign to the header.
You can add multiple custom headers by calling `addCustomHeader()` multiple times with different header names and values.
- Send the email as usual:
php
$mail->send();
Custom headers provide a way to add additional information or instructions to your email messages. For example, you can include headers like `X-Priority` to specify the importance of the email, `X-Sender` to identify the sender, or `X-Mailer` to indicate the software used for sending the email.
Custom headers can also be used to add specific instructions to email clients or servers. However, it’s important to note that not all custom headers may be recognized or supported by all email systems.
By leveraging custom headers, you can tailor the behavior and content of your email messages to better suit your requirements.
Next, we will explore how to send emails to multiple recipients using PHPMailer.
Sending emails with multiple recipients
PHPMailer allows you to send emails to multiple recipients, making it convenient to send the same email to a group of people or to include multiple recipients in the same email thread.
To send emails to multiple recipients using PHPMailer, you can follow these steps:
- Use the `addAddress()` method to specify the email addresses of the recipients:
php
$mail->addAddress(‘recipient1@example.com’, ‘Recipient 1’);
$mail->addAddress(‘recipient2@example.com’, ‘Recipient 2’);
In the above example, you can add multiple recipients by calling `addAddress()` multiple times with the email address and an optional recipient name. This allows you to personalize the recipient’s name in the email header.
- Send the email as usual:
php
$mail->send();
By adding multiple recipients to your email, you can streamline your communication and ensure that all relevant parties receive the necessary information.
It’s important to note that when sending emails to multiple recipients, you should be mindful of privacy and ensure that you have proper consent or authorization to include all the recipients in the same email.
In addition to the `addAddress()` method, PHPMailer provides other methods like `addCC()` and `addBCC()` to send carbon copy and blind carbon copy emails, respectively. Carbon copy recipients receive the email along with the primary recipients and are visible to all recipients, while blind carbon copy recipients receive the email without other recipients being aware of their inclusion.
Now that you know how to send emails to multiple recipients, let’s explore how to handle error messages with PHPMailer.
Handling error messages
When using PHPMailer to send emails, it’s important to handle error messages properly to ensure that any issues with the email sending process are dealt with gracefully.
PHPMailer provides an exception-based error handling mechanism that allows you to catch and handle any errors that occur during the email sending process. Here’s an example of how to handle error messages:
php
use PHPMailer\PHPMailer\PHPMailer;
use PHPMailer\PHPMailer\Exception;
$mail = new PHPMailer(true);
try {
// Set up email properties
// …
$mail->send();
echo ‘Email sent successfully’;
} catch (Exception $e) {
echo ‘Email could not be sent. Error: ‘ . $mail->ErrorInfo;
}
In the above example, we use a try-catch block to catch any exceptions that may be thrown during the email sending process. The `send()` method inside the try block attempts to send the email, and if any error occurs, it throws an exception, which is caught in the catch block.
The `ErrorInfo` property of the `$mail` object contains the specific error message or details about the error. This allows you to display a meaningful error message to the user or handle the error in a suitable manner.
Handling error messages is crucial for troubleshooting and fixing any issues related to email sending, such as incorrect SMTP settings, invalid email addresses, or server errors. By properly handling error messages, you can improve the user experience and provide helpful feedback when email sending fails.
Next, we will explore some common troubleshooting tips to help you resolve common issues that you may encounter while using PHPMailer.
Troubleshooting common issues
While using PHPMailer, you may encounter certain common issues that can affect the successful delivery of your email messages. Here are some troubleshooting tips to help you resolve these issues:
- SMTP configuration: Double-check that you have provided the correct SMTP server address, port, username, and password. Ensure that your SMTP server is properly configured and accessible.
- Email authentication: If your email is being marked as spam or not being delivered, it could be due to improper email authentication. Set the appropriate authentication method (e.g., TLS or SSL) and ensure that your SMTP server supports it.
- Firewall or antivirus software: In some cases, firewall or antivirus software can block the SMTP connection. Temporarily disable any such software to see if it resolves the issue. If it does, reconfigure the software to allow the SMTP connection.
- Attachment issues: If you are experiencing problems with attachments, verify that the file paths and names are correct. Additionally, ensure that the files you are attaching are not exceeding any size limits imposed by your email service provider.
- Email validation: Validate the email addresses of your recipients to ensure they are in the correct format. This prevents errors and helps avoid potential delivery issues.
- Error handling: Implement proper error handling to catch and handle any exceptions that occur during the email sending process. This allows you to provide meaningful error messages to the user and troubleshoot issues more effectively.
If you continue to experience difficulties, consult the PHPMailer documentation or seek support from the PHPMailer community. Additionally, check the error logs on your server for any relevant error messages or clues about the issue.
By following these troubleshooting tips and addressing any common issues, you can ensure more successful email delivery and overcome any hurdles that may arise while using PHPMailer.
Now that we have explored troubleshooting tips, let’s summarize what we’ve covered so far in this article.
Conclusion
In this article, we have explored the powerful functionality of PHPMailer, an open-source PHP library that simplifies the process of sending emails from your PHP applications. We discussed various aspects of using PHPMailer, including installation, basic usage, SMTP configuration, sending HTML emails, attaching files, adding custom headers, sending emails to multiple recipients, handling error messages, and troubleshooting common issues.
By leveraging PHPMailer, you can enhance the email sending capabilities of your PHP applications, providing a more reliable and customizable email experience for your users. With features like SMTP support, HTML email composition, file attachment, custom headers, and error handling, PHPMailer offers a robust and flexible solution for your email sending needs.
Remember, when using PHPMailer, it’s important to validate email addresses, handle exceptions, and properly configure your SMTP settings to ensure successful email delivery. Pay attention to potential issues like firewall or antivirus software blocking the SMTP connection, incorrect SMTP configuration, and attachment or authentication problems.
With the knowledge and best practices shared in this article, you can confidently integrate PHPMailer into your PHP applications and streamline your email communication. Whether you are sending transactional emails, newsletters, or notification emails, PHPMailer empowers you with a reliable and efficient solution.
So go ahead and harness the power of PHPMailer to create and send engaging emails from your PHP applications. Happy emailing!