Introduction
Are you an aspiring web developer looking to enhance your skills in PHP programming? Do you want to seamlessly integrate PHP code into your web projects using Dreamweaver CS5? Look no further, as this article will guide you through the process of running PHP in Dreamweaver CS5.
Dreamweaver CS5 is a powerful web development tool that supports multiple server-side scripting languages, including PHP. By incorporating PHP into your Dreamweaver workflow, you can unlock a whole new level of functionality and interactivity for your websites. Whether you’re creating dynamic web pages, processing form data, or fetching data from a database, PHP is a versatile language that will enable you to add dynamic elements to your web projects.
Before we dive into the world of PHP programming in Dreamweaver CS5, it’s important to ensure that PHP is properly installed on your computer. PHP is a server-side scripting language, which means it must be installed on a server to process PHP code. However, for testing and development purposes, you can set up a local testing server directly on your computer.
In this article, we’ll walk you through the process of installing PHP on your computer and setting up a local testing server. We’ll then show you how to configure Dreamweaver CS5 to work seamlessly with PHP. You’ll learn how to create a new PHP file in Dreamweaver, write PHP code within the editor, and even embed PHP code within your HTML pages.
Throughout this tutorial, we’ll provide step-by-step instructions and practical examples to help you grasp the concepts and apply them to your own projects. We’ll also address common issues and provide troubleshooting tips along the way.
By the end of this article, you’ll have a solid foundation for running PHP in Dreamweaver CS5 and be well-equipped to take your web development skills to the next level. So let’s get started and dive into the exciting world of PHP programming in Dreamweaver CS5!
Installing PHP on your computer
Before you can start running PHP in Dreamweaver CS5, you need to ensure that PHP is properly installed on your computer. PHP is a server-side scripting language, so it usually requires a server environment to run. However, for testing and development purposes, you can set up a local testing server on your computer.
The first step is to download the latest version of PHP from the official PHP website (php.net) based on your operating system. Choose the package that matches your system specifications, such as Windows, macOS, or Linux. You can download a ZIP file or an installer depending on your preference.
Once the PHP package is downloaded, you need to extract the files to a designated folder on your computer. You can choose any location, but it’s recommended to select a location that is easily accessible, such as the root directory of your local web server.
Next, you’ll need to configure PHP to work with your web server. The configuration process may vary depending on the server you are using. If you’re using Apache, you can locate the “httpd.conf” file in the “conf” directory of your Apache installation folder. Open the file in a text editor and locate the line that says “LoadModule php_module” or “LoadModule php7_module” (depending on the PHP version). Uncomment this line by removing the “#” symbol at the beginning.
After saving the configuration file, restart your web server to apply the changes. You can do this by stopping and starting the server from the command line or by using a control panel if available.
To verify that PHP is installed correctly, create a new file called “phpinfo.php” in your web server’s root directory. Add the following code to the file:
<?php
phpinfo();
?>
Save the file and access it through your web browser by visiting “http://localhost/phpinfo.php” (assuming your local web server is running). If PHP is installed correctly, you should see a page displaying detailed information about the PHP installation and configuration.
Congratulations! You have successfully installed PHP on your computer. Now you can proceed to the next step of setting up a local testing server with Dreamweaver CS5.
Setting up a local testing server
Before diving into PHP programming in Dreamweaver CS5, you’ll need to set up a local testing server on your computer. A local testing server allows you to run and test your PHP code without the need for an actual live server.
The easiest way to set up a local testing server is by using a software package called XAMPP. XAMPP is a free, open-source solution that provides a complete Apache, MySQL, PHP, and Perl stack for Windows, macOS, and Linux.
To get started, download the appropriate version of XAMPP for your operating system from the Apache Friends website (apachefriends.org). Once downloaded, run the installer and follow the on-screen instructions to complete the installation.
During the installation process, you can choose which components to install. Make sure that the Apache and PHP components are selected, as these are the essential components for running PHP code. You can also choose to install the MySQL database if you plan to use it in your projects.
After the installation is complete, you can start the XAMPP control panel. This control panel allows you to start and stop the Apache web server, MySQL database server, and other related services. Start the Apache server by clicking on the “Start” button next to “Apache”.
Now, open your web browser and enter “http://localhost” or “http://127.0.0.1” in the address bar. If everything is set up correctly, you should see the default XAMPP start page.
To verify that PHP is working properly, click on the “phpMyAdmin” link in the XAMPP start page. This will open phpMyAdmin, a web-based tool for managing MySQL databases. If phpMyAdmin opens without any errors, it means that PHP is configured correctly on your local testing server.
With XAMPP installed and running, you now have a fully functional local testing server for PHP. Dreamweaver CS5 can communicate with this server and execute PHP code in your web projects.
Now that you have a local testing server set up, it’s time to configure Dreamweaver CS5 to work with PHP. This will allow you to seamlessly integrate PHP code into your web projects and take advantage of the dynamic features that PHP offers.
Configuring Dreamweaver to work with PHP
Now that you have installed PHP and set up a local testing server, it’s time to configure Dreamweaver CS5 to work with PHP. This will enable you to write and edit PHP code directly within the Dreamweaver editor and take full advantage of its powerful features.
To start, open Dreamweaver CS5 and go to the “Site” menu. Select “New Site” to create a new site or choose an existing site from the list. The site setup allows Dreamweaver to keep track of your project files and manage server connections.
In the “Site Setup” dialog box, enter a name for your site and specify the local root folder where your project files are stored on your computer. You can choose any location that is convenient for you.
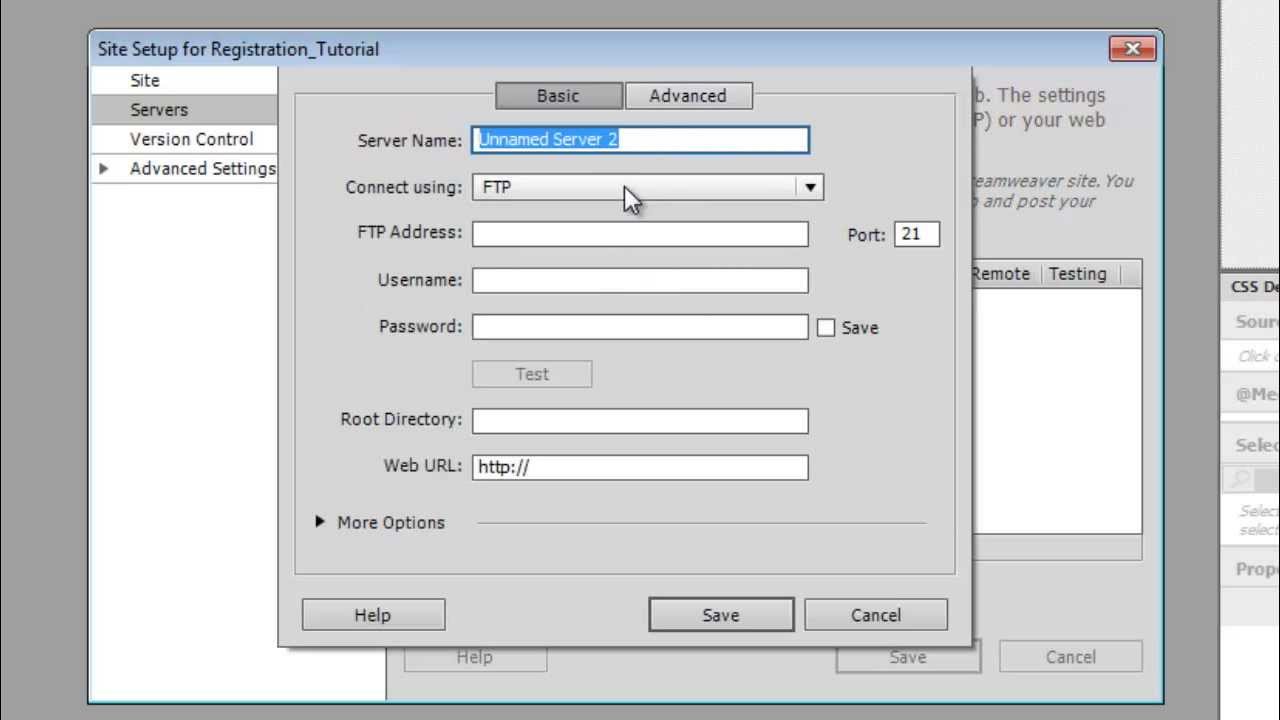
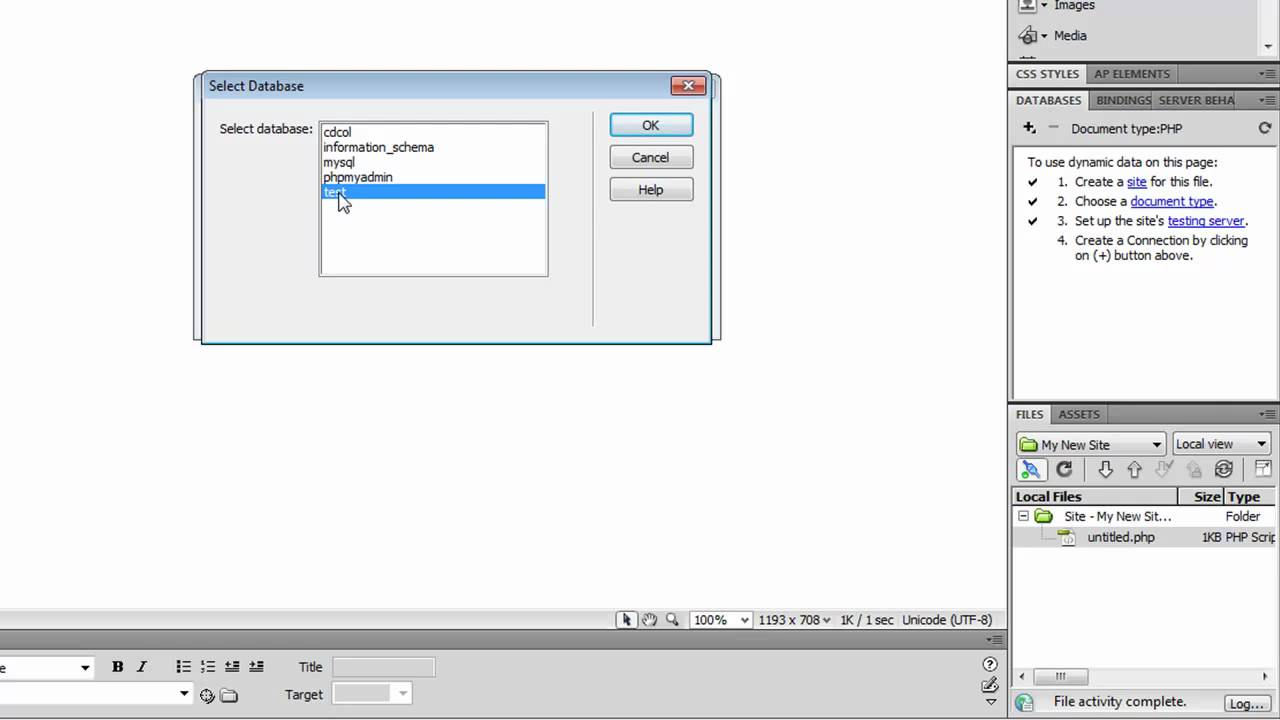
In the “Servers” section, click on the “+” button to add a new server. Fill in the server name, select “PHP MySQL” from the “Server Model” drop-down menu, and enter the server address as “localhost”.
Next, you’ll need to specify the server folder where your PHP files will be stored. This is usually the same as the local root folder you specified earlier. Dreamweaver will use this information to upload your PHP files to the correct location on the server.
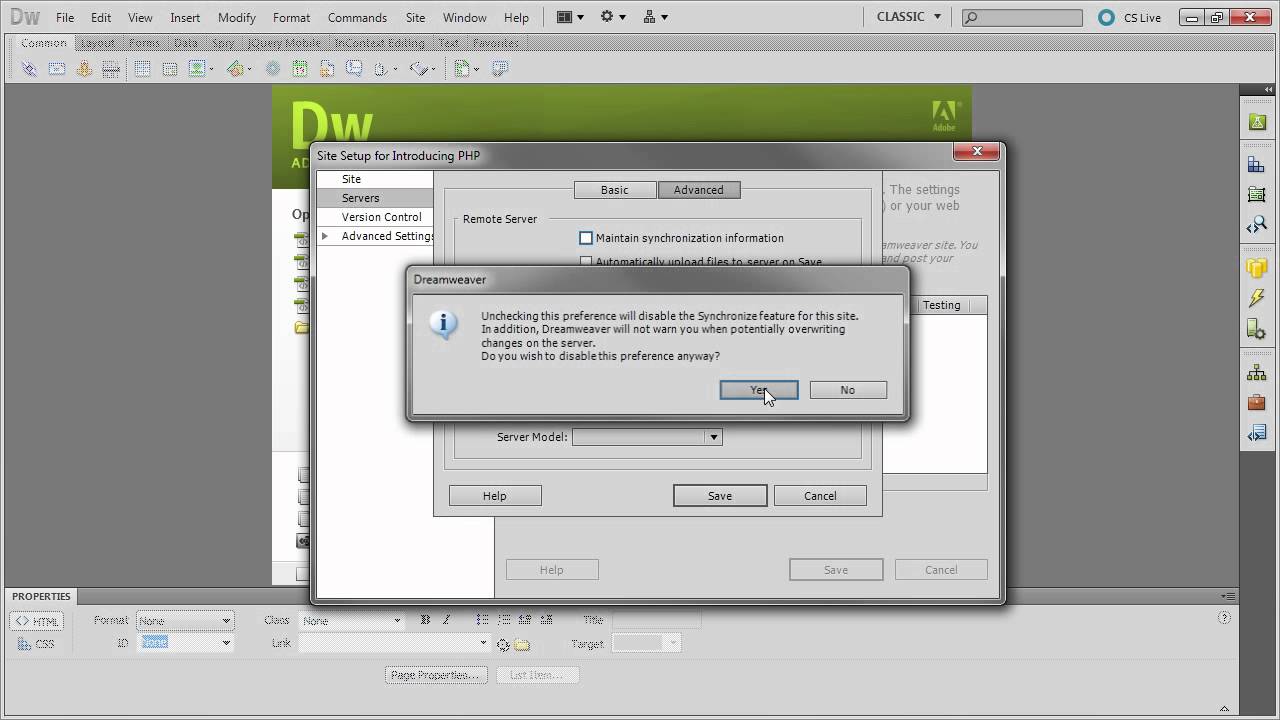
Under the “Advanced” tab, make sure to check the box that says “Testing server requires a URL”. This is important for Dreamweaver to correctly generate links and references to your PHP files.
Once you have configured the server settings, click “Save” to save your site setup. Dreamweaver will now be ready to work with PHP in your project.
In Dreamweaver, you can create a new PHP file by going to the “File” menu and selecting “New”. Choose “PHP” from the list of file types and click “Create”. This will open a blank PHP file in the Dreamweaver editor.
Inside the PHP file, you can start writing your PHP code. Dreamweaver provides syntax highlighting and code suggestions to help you write code more efficiently. It also has built-in error checking to catch any syntax errors or typos.
In addition to writing PHP code, Dreamweaver also allows you to embed PHP code directly into your HTML pages. This is useful when you want to generate dynamic content or execute PHP scripts within your HTML structure.
To embed PHP code into HTML, simply open an HTML file in Dreamweaver and place your PHP code within the appropriate HTML tags. For example, you can use PHP to display the current date or retrieve data from a database and dynamically populate your web page.
With Dreamweaver CS5 configured to work with PHP, you have a powerful development environment at your disposal. You can now write, edit, and test your PHP code directly within Dreamweaver, making it easier and more efficient to develop dynamic websites.
Creating a new PHP file in Dreamweaver
Now that you have configured Dreamweaver to work with PHP, you can start creating new PHP files in your projects. Dreamweaver provides a streamlined process for creating and managing PHP files within your project structure.
To create a new PHP file, first, ensure that you have a site defined in Dreamweaver. Go to the “Site” menu and select “Manage Sites” to access the site setup. Choose an existing site or create a new one by specifying the local root folder.
Once your site is set up, go to the “File” menu and select “New”. In the dialog box that appears, choose “PHP” as the file type. This will create a new blank PHP file in the Dreamweaver editor.
In the new PHP file, you can start writing your PHP code. Dreamweaver’s editor provides features like syntax highlighting, code suggestions, and auto-completion to improve your coding experience. As you type, Dreamweaver will help you with suggestions and display error messages if there are any syntax errors.
When creating a PHP file, it’s important to include the necessary PHP tags. In PHP, code needs to be enclosed within `` tags to indicate where PHP code begins and ends.
For example, let’s say you want to create a simple PHP script that displays a welcome message. You can write the following code in the new PHP file:
<?php
$welcomeMessage = "Welcome to my website!";
echo $welcomeMessage;
?>
In the above code, we’re assigning a welcome message to a variable and then using the `echo` statement to display the message on the web page. Dreamweaver will highlight the code and provide suggestions to help you write it correctly.
Once you have finished writing your PHP code, you can save the file by going to the “File” menu and selecting “Save”. Choose a meaningful name for your file, preferably with the `.php` extension, such as `welcome.php`.
It’s important to note that when viewing a PHP file in a web browser, the PHP code will be processed on the server before the page is displayed. To view your PHP file in the browser, you need to run it on a server environment like the local testing server you set up earlier.
To test your PHP code, ensure that your local testing server is running, and open your web browser. Enter the URL of your PHP file in the browser’s address bar, such as `http://localhost/welcome.php`. The browser will render the PHP code and display the output on the web page.
Creating a new PHP file in Dreamweaver is a straightforward process. By utilizing the powerful features of Dreamweaver’s editor, you can write and manage PHP code efficiently within your projects.
Writing PHP code in Dreamweaver
Once you have created a new PHP file in Dreamweaver, you can start writing PHP code to create dynamic and interactive elements in your web projects. Dreamweaver’s editor provides a range of features that make writing PHP code easier and more efficient.
Dreamweaver’s editor includes syntax highlighting, which helps differentiate between PHP code and HTML markup. PHP code will be colored differently from the HTML code, making it easier to read and understand.
In addition to syntax highlighting, Dreamweaver offers code suggestions and auto-completion for PHP. As you type, Dreamweaver will provide suggestions for functions, variables, and PHP keywords based on the context. This can save you time and reduce the chances of making syntax errors.
When writing PHP code in Dreamweaver, it’s important to follow proper coding conventions and best practices. This includes indentation, commenting, and organizing your code in a readable manner. Properly formatted code will be easier to understand and maintain in the long run.
Let’s take a look at an example to understand how to write PHP code in Dreamweaver. Suppose you want to create a simple website that displays the current date and time. You can achieve this by using PHP’s built-in `date` function.
<?php
$date = date("F j, Y, g:i a");
echo "The current date and time is: " . $date;
?>
In the above code, we first use the `date` function to get the current date and time, formatting it as “Month day, Year, Hour:Minute AM/PM”. We then store this value in the `$date` variable. Finally, we use the `echo` statement to display the date and time on the web page.
By utilizing Dreamweaver’s features, you can easily write and edit PHP code within the editor. As you develop your PHP skills, you can take advantage of more advanced PHP features, such as working with arrays, conditional statements, loops, and functions.
Remember to test your PHP code regularly to ensure it behaves as expected. Dreamweaver allows you to preview your PHP files within the editor, providing a quick way to check the output without opening a web browser.
Writing PHP code in Dreamweaver is a seamless process, thanks to its intuitive editor and helpful features. With practice and experimentation, you’ll be able to create dynamic and interactive web pages using PHP in no time.
Embedding PHP code into HTML in Dreamweaver
One of the powerful features of PHP is its ability to be embedded directly into HTML code. This allows you to dynamically generate content or execute PHP scripts within your HTML structure. With Dreamweaver’s support for PHP, you can easily embed PHP code into your HTML files to create dynamic and interactive web pages.
To embed PHP code into HTML, you can open an HTML file in Dreamweaver and place your PHP code within the appropriate HTML tags. This allows you to mix PHP code and HTML markup seamlessly.
Let’s take a look at an example to understand how to embed PHP code into HTML using Dreamweaver. Suppose you want to display a personalized greeting on your website based on the time of day.
<html>
<head>
   <title>My Website</title>
</head>
<body>
   <h1>Welcome to My Website!</h1>

   <p>
   <?php
      $currentTime = date("H:i");

      if ($currentTime < "12:00") {
         echo "Good morning!";
      } elseif ($currentTime < "18:00") {
         echo "Good afternoon!";
      } else {
         echo "Good evening!";
      }
   ?>
   </p>

   <p>Lorem ipsum dolor sit amet...</p>
</body>
</html>
In the above code, we have an HTML structure with a heading and a couple of paragraphs. Within the second paragraph, we embed PHP code to determine the appropriate greeting based on the current time.
We use the `date` function to get the current time in the "H:i" format, which represents hours and minutes. We then use an if-elseif-else statement to determine whether it is morning, afternoon, or evening, and echo the appropriate greeting message.
When viewing the HTML file in a web browser, the embedded PHP code will be executed on the server side, and the generated greeting will be displayed, providing a personalized experience for the website visitors.
With Dreamweaver's editor, you can easily write and edit PHP code within the HTML structure. The code highlighting and suggestions help ensure that your PHP code is written correctly and error-free. You can also utilize Dreamweaver's Live View feature to preview how the embedded PHP code will be rendered in real-time without having to open a web browser.
By embedding PHP code into HTML, you can create dynamic content, retrieve data from databases, process form submissions, and perform various server-side operations to enhance the functionality of your web pages. Dreamweaver makes it easy to combine PHP and HTML seamlessly, opening up a world of possibilities for creating interactive websites.
Testing your PHP code in Dreamweaver
Testing your PHP code is an important step in the development process to ensure that it functions as expected. Dreamweaver provides several options for testing and previewing your PHP code directly within the editor, allowing you to quickly identify and debug any issues.
One of the simplest ways to test your PHP code in Dreamweaver is to use the Live View feature. Live View allows you to see a real-time preview of your web page, including any dynamic content generated by PHP.
To activate Live View, simply click on the "Live View" button at the top of the Dreamweaver interface, or go to the "View" menu and select "Live View". This will open a new tab in the editor displaying the rendered version of your PHP file.
Using Live View, you can interact with your web page and observe how it responds to different input or conditions. You can also view the dynamic output generated by your PHP code, ensuring that it behaves as expected.
In addition to Live View, Dreamweaver also allows you to check for syntax errors in your PHP code. As you write or edit your PHP code, Dreamweaver's editor will perform real-time error checking, highlighting any syntax errors or typos.
If Dreamweaver detects an error, it will display a red underline or an error icon next to the problematic line. You can hover over the error to view a description of the issue and make the necessary corrections.
While Dreamweaver provides a convenient way to test and preview your PHP code, it is also important to test your code in a live server environment. This is especially crucial if your PHP code interacts with databases or relies on specific server configurations.
To test your PHP code on a live server, you can upload your PHP files to your web hosting server using Dreamweaver's built-in FTP capabilities, or any other FTP client of your choice. Once uploaded, you can access the PHP files through a web browser to see the live results.
When testing your PHP code on a live server, it's important to keep an eye out for any errors or unexpected behavior. Monitor the web server logs for any error messages and use error reporting techniques within your PHP script to identify and address any issues.
By testing your PHP code in Dreamweaver's Live View and on a live server, you can ensure that your code functions correctly and provides the desired output. Regular testing and debugging will help you deliver high-quality web applications that meet your requirements.
Troubleshooting common issues
When working with PHP in Dreamweaver, you may encounter certain issues or errors that can impede your progress. Fortunately, many of these issues have common solutions that can help you troubleshoot and resolve them quickly.
Here are some common issues you may face when working with PHP in Dreamweaver and how to troubleshoot them:
1. Syntax errors: Syntax errors are one of the most common issues in PHP coding. Dreamweaver's editor performs real-time error checking and highlights syntax errors in your code. Carefully review the error messages and the lines where they occur to identify and correct any syntax-related issues.
2. Server configuration issues: Sometimes, PHP code may not execute as expected due to server configuration problems. Ensure that PHP is properly installed and configured on your local or remote server. Check the server settings in Dreamweaver's site setup to confirm the correct server model and folder paths are specified.
3. File permissions: If your PHP code interacts with files or directories, file permissions may need to be configured correctly. Make sure that the permissions are set to allow the necessary operations, such as reading, writing, or executing files, depending on your code's requirements.
4. Database connection problems: If your PHP code connects to a database but encounters connection issues, double-check the database credentials provided in your code. Ensure that the server name, username, password, and database name are correct. Verify that your database server is running and accessible.
5. Variable or function errors: If you encounter undefined variable errors or "function not found" errors, check the spelling and scope of your variables and functions. Ensure that variables are properly declared and initialized, and that function names are correct and accessible within your code.
6. Debugging techniques: When encountering issues, use debugging techniques to identify and resolve the problem. Utilize Dreamweaver's built-in debugging tools, such as setting breakpoints or printing debug messages to the output. Use var_dump or echo statements to inspect variables and their values at different points in your code.
7. Keeping PHP versions in mind: Be aware of the PHP version you are using and the compatibility of certain functions or features. If you encounter deprecated function warnings or compatibility issues, consult the PHP documentation to find alternative solutions or consider updating your PHP version.
Remember, effective troubleshooting involves carefully reviewing error messages, checking server and file configurations, and using debugging techniques to pinpoint and resolve issues. Don't hesitate to consult online resources, forums, or the Dreamweaver community for assistance if needed.
By being proactive in troubleshooting common issues, you can quickly overcome challenges and continue working on your PHP projects with confidence.
Conclusion
In conclusion, running PHP in Dreamweaver CS5 opens up endless possibilities for creating dynamic and interactive web pages. By following the steps outlined in this article, you can easily install PHP on your computer, set up a local testing server, and configure Dreamweaver to work seamlessly with PHP.
We covered the process of creating new PHP files in Dreamweaver, writing PHP code within the editor, and embedding PHP code into HTML to create dynamic content. Dreamweaver's editor features, such as syntax highlighting and code suggestions, make writing and editing PHP code a breeze.
We also discussed the importance of testing your PHP code within Dreamweaver using the Live View feature and on a live server. Regular testing helps identify and resolve any issues or errors, ensuring that your PHP code functions as expected.
Troubleshooting common issues is a crucial part of the development process. By being aware of potential problems, such as syntax errors, server configuration issues, or database connection problems, you can efficiently troubleshoot and resolve them to keep your PHP projects on track.
As you continue your journey of PHP programming in Dreamweaver CS5, remember to stay innovative and explore the vast capabilities that PHP offers. Experiment with different features and techniques to enhance the functionality of your websites and provide dynamic user experiences.
By combining your newfound knowledge of PHP programming with Dreamweaver's powerful features, you can create impressive web applications that impress and engage your audience. So, go ahead and unleash your creativity as you embark on this exciting adventure of running PHP in Dreamweaver CS5!