Introduction
Welcome to our guide on how to use your iPhone as a webcam! In today’s digital world, video conferencing and online meetings have become a vital part of our daily lives, whether for business or personal use. Having a good quality webcam is essential for clear communication, but what if you don’t have a dedicated webcam or you’re not satisfied with the built-in webcam on your computer?
Well, look no further than your trusty iPhone! With its advanced camera capabilities and the abundance of webcam apps available, you can easily turn your iPhone into a high-quality webcam in no time. Using your iPhone as a webcam not only saves you money but also gives you the flexibility to take advantage of the superior camera and features your iPhone offers.
In this guide, we will walk you through the step-by-step process of setting up your iPhone as a webcam and optimizing its performance. Whether you’re using a Windows PC or a Mac, the process is relatively straightforward and can be done with just a few simple steps. By the end of this guide, you’ll be able to seamlessly integrate your iPhone into your video conferences, online meetings, or even live streaming sessions.
But why would you want to use your iPhone as a webcam in the first place? Let’s explore the advantages:
- Superior Image Quality: The iPhone’s camera is known for its exceptional image quality, sharpness, and color accuracy. By using your iPhone as a webcam, you can enjoy a significant improvement in video quality compared to most built-in webcams on computers.
- Versatility: Your iPhone is not just a camera; it’s a versatile device that offers numerous apps, features, and accessories to enhance your webcam experience. You can easily switch between the front and rear cameras, use different camera modes for specific purposes, and even adjust focus and exposure.
- Portability: With your iPhone as a webcam, you no longer have to worry about carrying an additional device when you’re on the go. Whether you’re traveling for work or leisure, your iPhone is always with you, making it a convenient and portable webcam solution.
- Extended Battery Life: iPhones are designed to have efficient battery usage, especially when compared to laptops or computers. By using your iPhone as a webcam, you can take advantage of its extended battery life and have longer video conferencing or streaming sessions.
Ready to unlock the full potential of your iPhone? Let’s dive into the step-by-step setup process to use your iPhone as a webcam.
Why Use iPhone as a Webcam?
Using your iPhone as a webcam offers numerous advantages that can enhance your video conferences, online meetings, or live streaming sessions. Let’s explore some compelling reasons why you should consider using your iPhone as a webcam:
1. Superior Image Quality
One of the main reasons to use your iPhone as a webcam is the exceptional image quality it offers. iPhones are renowned for their advanced camera technology, providing sharpness, clarity, and color accuracy. Compared to most built-in webcams on computers, the iPhone’s camera can deliver significantly better video quality, making your virtual meetings more engaging and professional.
2. Flexibility and Versatility
Your iPhone is more than just a webcam. It is a versatile device that allows you to access a wide range of apps, features, and accessories, making your webcam experience more dynamic. You can effortlessly switch between the front and rear cameras, apply different camera modes for specific purposes, and even adjust focus and exposure to achieve the desired visual effect. This versatility gives you more control over your video conferencing or streaming setup.
3. Portability and Convenience
Carrying an additional webcam can be cumbersome, especially for those on the go. The beauty of using your iPhone as a webcam is that it eliminates the need for a separate device. Whether you are traveling for work or need to set up a temporary video conference area, you can rely on the portability and convenience of your iPhone. It’s always with you, ready to transform into a high-quality webcam wherever and whenever you need it.
4. Extended Battery Life
Compared to laptops or computers, iPhones are designed to have efficient battery usage. This means that by using your iPhone as a webcam, you can take advantage of its extended battery life. You won’t have to worry about draining your laptop’s battery during lengthy video conferences or streaming sessions. Your iPhone’s battery is built to handle longer usage, ensuring uninterrupted and uninterrupted connection.
5. Cost-Effective Solution
If you don’t already have a dedicated webcam or are not satisfied with the quality of your current webcam, using your iPhone as a webcam provides a cost-effective solution. It eliminates the need to invest in additional hardware and allows you to maximize the existing technology you already have. With just a few simple steps, you can transform your iPhone into a powerful webcam without breaking the bank.
Now that we’ve explored the advantages of using your iPhone as a webcam, let’s move on to the step-by-step process of setting it up and configuring the necessary applications. With these instructions, you’ll be ready to take full advantage of your iPhone’s capabilities and elevate your video conferencing experience.
Setting Up Your iPhone as a Webcam
Setting up your iPhone as a webcam is a straightforward process that can be easily accomplished by following a few simple steps. Here’s a step-by-step guide to get you started:
Step 1: Download the App
The first thing you need to do is download a webcam app from the App Store. There are several options available, both free and paid, each with its own set of features and compatibility. Some popular webcam apps include EpocCam, iVCam, and DroidCam. Choose the one that best suits your needs and preferences.
Step 2: Connect Your iPhone to Your Computer
Once you have downloaded the webcam app, connect your iPhone to your computer using a USB cable. Ensure that both your iPhone and computer are on the same Wi-Fi network. If prompted, trust your computer on your iPhone to establish a secure connection between the two devices.
Step 3: Configure the Webcam App
Launch the webcam app on your iPhone and open the corresponding software or client on your computer. The app will typically guide you through the initial setup process, including granting necessary permissions and selecting your iPhone as the video source. Follow the instructions provided by the app to complete the configuration process.
Step 4: Adjust Settings: Video Quality, Resolution, and Frame Rate
Once the webcam app is successfully configured, you can adjust the settings to optimize the video quality according to your preferences. The app should provide options to adjust video quality, resolution, and frame rate. Experiment with these settings to find the balance between video quality and performance that works best for your needs.
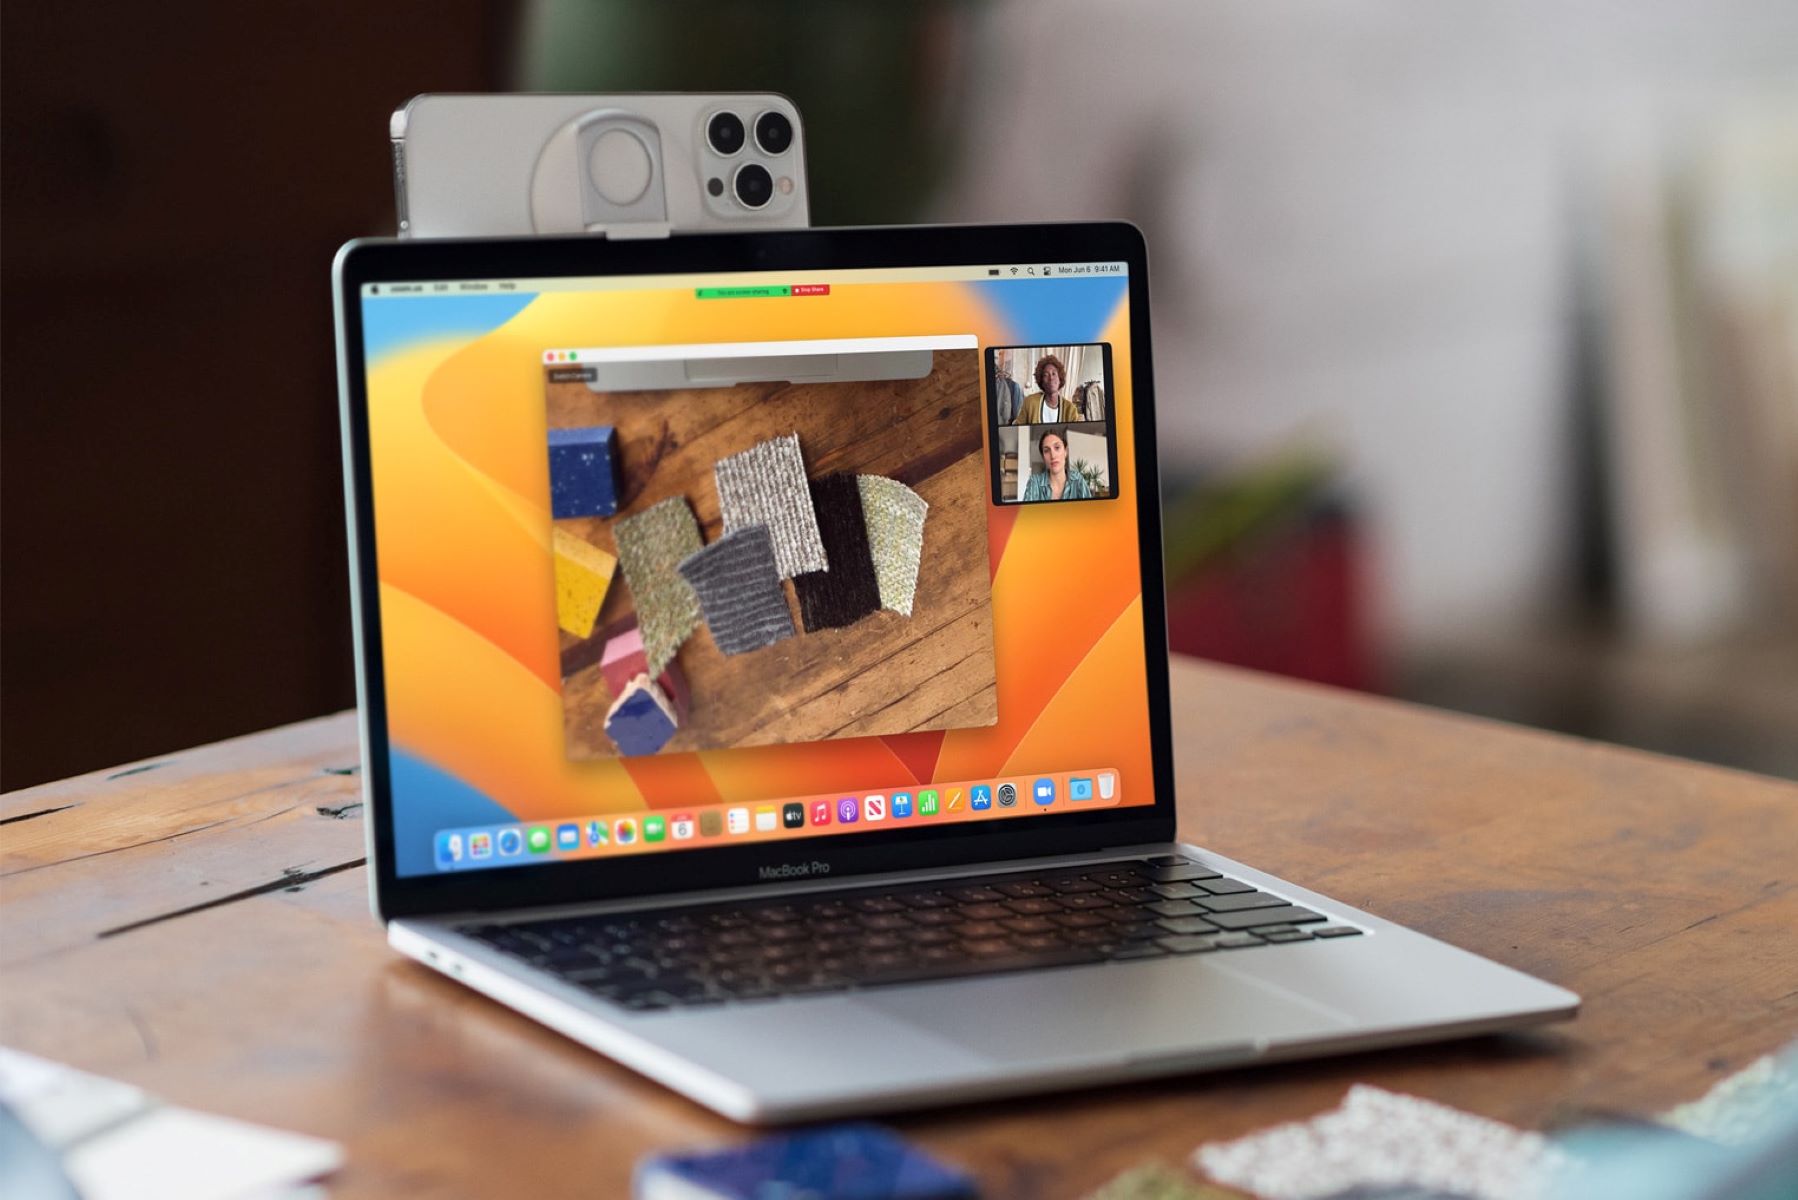
Step 5: Position Your iPhone as a Webcam
Decide on the optimal position for your iPhone as a webcam. Whether you prefer a front-facing or rear-facing camera perspective will depend on your specific use case. Ensure that your iPhone is stable and secured in a position that captures the desired angle and framing. Consider using a tripod or a stand to keep your iPhone steady during virtual meetings.
Step 6: Test Your Webcam Connection
Before using your iPhone as a webcam in a live video conference or streaming session, it’s crucial to test your webcam connection. Open your preferred video conferencing software, such as Zoom or Skype, and access the settings to select your iPhone as the webcam source. Conduct a test call or video preview to verify that your iPhone’s video feed appears correctly and that the audio is synchronized.
And that’s it! You have successfully set up your iPhone as a webcam. Now you can enjoy the enhanced video quality and flexibility that your iPhone offers during your virtual meetings, online classes, or live streaming sessions.
If you encounter any issues during the setup process, consult the app’s documentation or support resources for troubleshooting guidance. Each app may have specific instructions to address common connection or compatibility problems.
Now that your iPhone is acting as a webcam, you can take advantage of its superior image quality, versatility, and convenience to elevate your video conferencing experience.
Step 1: Download the App
The first step in setting up your iPhone as a webcam is to download the necessary app from the App Store. There are several webcam apps available, each offering different features and compatibility options. Here’s how you can download the app:
1. Open the App Store
Navigate to the App Store on your iPhone by tapping on the App Store icon on your home screen. The App Store is represented by a blue icon with a white letter “A” inside a white circle.
2. Search for Webcam Apps
Once you’re in the App Store, use the search bar located at the bottom of the screen to search for webcam apps. Type in keywords like “webcam,” “iPhone webcam,” or the name of a specific webcam app you’re interested in. Hit the Search button to initiate the search.
3. Choose a Webcam App
Review the search results to find a webcam app that suits your needs and requirements. Pay attention to the app’s ratings, reviews, and compatibility information provided. You may also want to consider whether you prefer a free or paid app, as some webcam apps offer additional features with a premium version.
4. Tap on the App
Once you have chosen a webcam app, tap on it to access the app’s details page. Here, you will find more information about the app, including screenshots, a description, and user reviews. Take a few moments to read through this information and ensure that the app meets your expectations.
5. Download the App
If you’re satisfied with your choice, tap on the Get or Download button located next to the app’s name. You may be prompted to enter your Apple ID or use Touch ID/Face ID to authorize the download. Follow the on-screen instructions to complete the app download process. Depending on your internet connection speed, the app should download and install relatively quickly.
6. Open the Webcam App
After the app is successfully downloaded and installed on your iPhone, locate it on your home screen and tap on its icon to open it. The webcam app may require certain permissions, such as access to the camera and microphone, to function properly. Grant the necessary permissions when prompted.
That’s it! You have successfully downloaded the webcam app onto your iPhone. The next step is to connect your iPhone to your computer and configure the webcam app, which we will cover in subsequent steps. By downloading the app, you are one step closer to using your iPhone as a high-quality webcam for your video conferences, online meetings, or live streaming sessions.
Step 2: Connect Your iPhone to Your Computer
To use your iPhone as a webcam, you need to establish a connection between your iPhone and your computer. This connection allows your computer to recognize your iPhone as a webcam device. Here’s how you can connect your iPhone to your computer:
1. Use a USB Cable
Locate the USB cable that came with your iPhone. This cable is typically the one used for charging your iPhone. Connect one end of the USB cable to your iPhone’s charging port.
2. Connect to Your Computer
Take the other end of the USB cable and connect it to an available USB port on your computer. Ensure that the USB port is in good working condition, as a faulty port may prevent your iPhone from establishing a proper connection.
3. Trust Your Computer
If this is the first time you are connecting your iPhone to your computer, you may see a pop-up message on your iPhone asking whether you trust this computer. Tap “Trust” to establish a secure connection between your iPhone and your computer. This step is crucial for your computer to recognize your iPhone as a webcam device.
4. Wait for the Connection
Once your iPhone is connected to your computer, wait for a few moments to allow your computer to recognize the device. In most cases, your computer will automatically detect your iPhone and initiate the necessary drivers and software.
5. Check the Connection
To verify that your iPhone is successfully connected to your computer, you can check the “Devices” section in your computer’s file explorer or equivalent software. Look for your iPhone’s name or model number to confirm the connection. Some computers may display a notification or icon indicating that a new device has been connected.
6. Ensure Wi-Fi Network Compatibility
While your iPhone is physically connected to your computer via USB, it’s important to make sure that both your iPhone and your computer are connected to the same Wi-Fi network. This is necessary for the webcam app to function properly and transmit the video feed from your iPhone to your computer.
That’s it! You have successfully connected your iPhone to your computer. In the following steps, we will configure the webcam app and adjust the necessary settings to optimize your iPhone’s performance as a webcam. By establishing the connection, you are now ready to utilize your iPhone’s advanced camera capabilities for your video conferences, online meetings, or live streaming sessions.
Step 3: Configure the Webcam App
After connecting your iPhone to your computer, the next step in setting up your iPhone as a webcam is to configure the webcam app. Each webcam app may have its own configuration process, but here are the general steps to get you started:
1. Launch the Webcam App
Locate the webcam app on your iPhone’s home screen and tap on its icon to launch the app. The app may take a moment to load, depending on your device’s performance and the complexity of the app.
2. Open the App on Your Computer
On your computer, open the corresponding software or client for the webcam app. This software is typically provided by the app developer and allows your computer to communicate with the webcam app on your iPhone. The app may provide instructions or an automatic connection process to sync with the computer software.
3. Grant Necessary Permissions
The webcam app may require certain permissions to access your iPhone’s camera and microphone. When prompted, grant the necessary permissions to ensure that the app functions properly. Without proper permissions, the webcam app may not be able to transmit the video feed from your iPhone to your computer.
4. Select Your iPhone as the Video Source
Within the webcam app’s interface on your computer, locate the option to select the video source. In most cases, you will see a drop-down menu or a settings panel where you can choose the device you want to use as the webcam. Look for your iPhone’s name or model number and select it as the video source.
5. Adjust Additional Settings
Depending on the webcam app, you may have the option to adjust additional settings to enhance your webcam experience. These settings can include video quality, resolution, focus, exposure, and more. Take some time to explore the app’s settings and experiment with them to find the optimal configuration for your needs.
6. Test the Webcam Connection
To ensure that your iPhone is properly configured as a webcam, conduct a test of the webcam connection. Open a video conferencing software like Zoom, Skype, or Microsoft Teams, and access the settings or preferences. Look for the option to select your webcam source and choose your iPhone from the list of available devices. Start a test call or preview to verify that your iPhone’s video feed appears correctly on your computer.
By completing the configuration process, you have successfully set up your webcam app and established a connection between your iPhone and your computer. In the following steps, we will cover adjusting settings such as video quality, resolution, and frame rate to optimize your webcam experience. With the webcam app properly configured, you are now ready to enjoy the superior image quality and versatility offered by your iPhone as a webcam.
Step 4: Adjust settings: Video Quality, Resolution, and Frame Rate
Once you have configured the webcam app and established a connection between your iPhone and your computer, the next step is to adjust the settings to optimize the video quality, resolution, and frame rate. Here’s how you can fine-tune these settings for an enhanced webcam experience:
1. Video Quality
Most webcam apps offer options to adjust the video quality of your iPhone’s camera feed. Higher video quality settings result in a clearer and more detailed image, but they may require more bandwidth and system resources. Experiment with different video quality settings to find the balance between video clarity and performance that suits your needs.
2. Resolution
The resolution setting determines the size and sharpness of the video image. Higher resolutions, such as 1080p or 720p, offer more detail but may require a stronger internet connection and higher processing power. Lower resolutions, like 480p or 360p, reduce the image detail but allow for smoother playback on slower connections. Choose a resolution that provides a good balance between image clarity and performance.
3. Frame Rate
The frame rate represents the number of frames per second (fps) displayed in the video feed. Higher frame rates create smoother and more fluid motion, particularly during movements or actions. Common frame rate options include 30fps, 60fps, or even higher for some apps. Consider the purpose of your webcam usage and the available resources on your computer when adjusting the frame rate.
4. Focus and Exposure
Some webcam apps allow you to manually adjust the focus and exposure of your iPhone’s camera. This can be particularly useful in situations where the lighting conditions or the distance from the camera to the subject change. Play around with these settings to ensure you get the best possible image quality and visibility during your video conferences or streaming sessions.
5. Test and Fine-Tune
After making adjustments to the video quality, resolution, frame rate, focus, and exposure settings, it’s essential to test the changes in a real-world scenario. Join a video conference or start a test live stream to see how the modifications affect the image quality and overall performance. Fine-tune the settings as needed until you achieve the desired results.
Keep in mind that the optimal settings may vary depending on your specific requirements, the capabilities of your iPhone, and the resources available on your computer. Take some time to experiment and find the configuration that provides the best balance between video quality and performance for your webcam setup.
Now that you’ve adjusted the settings, you are ready to position your iPhone as a webcam. In the next step, we will cover the best practices for positioning your iPhone to capture the desired angle and framing during your video conferences or streaming sessions.
Step 5: Position Your iPhone as a Webcam
Now that you’ve configured the settings for your iPhone as a webcam, it’s time to position it in the ideal location to capture the desired angle and framing. The positioning of your iPhone can greatly impact the overall quality and effectiveness of your video conferences, online meetings, or live streaming sessions. Here are some best practices to consider:
1. Stability is Key
Ensure that your iPhone is placed in a stable position to prevent any unwanted movement or shaking during your webcam sessions. Using a tripod or a stand can help keep your iPhone steady and minimize disruptions in the video feed.
2. Eye-Level Perspective
Position your iPhone at eye level to create a more natural and engaging video conference experience. This perspective allows you to maintain eye contact with the participants, creating a sense of connection. Adjust the height of your iPhone or the position of your tripod accordingly to achieve this optimal perspective.
3. Consider Background and Lighting
Pay attention to the background behind you when positioning your iPhone. Choose a clean and clutter-free background or use a virtual background option if available in your video conferencing software. Additionally, ensure that the lighting in the room is adequate and flattering. Avoid having strong backlighting that can create silhouettes or harsh shadows.
4. Framing and Composition
Take the time to frame your shot properly to ensure that you are in the center of the frame. Use the rule of thirds as a guideline, aligning your face or upper body along the imaginary lines that divide the frame into thirds horizontally and vertically. This composition technique helps create a visually appealing and balanced image.
5. Test Different Angles and Distances
Experiment with different camera angles and distances to find the most flattering and appropriate framing for your webcam sessions. You can try adjusting the tilt or rotation of your iPhone, as well as moving it closer or farther away to find the sweet spot that works best for you.
6. Preview and Adjust
Before your actual video conference or live stream, take some time to preview how you appear on the screen. Check for any distractions or elements that may negatively impact the overall quality. Make any necessary adjustments to framing, position, or lighting to ensure a professional and visually pleasing image.
Remember that each webcam setup will be unique, depending on factors such as the size of the room, the layout, and your personal preferences. Take the time to find the positioning that works best for your specific situation and provides the most comfortable and effective video communication.
Now that your iPhone is positioned as a webcam, the final step is to test your webcam connection and ensure that everything is functioning as intended. In the next step, we will cover how to test your webcam connection to guarantee a smooth video conference or streaming experience.
Step 6: Test Your Webcam Connection
After positioning your iPhone as a webcam, it’s essential to test the webcam connection to ensure that everything is working properly before your video conference, online meeting, or live streaming session. Here’s how you can test your webcam connection:
1. Open Your Video Conferencing Software
Launch the video conferencing software or live streaming platform that you plan to use for your upcoming session. This could be Zoom, Microsoft Teams, Skype, Google Meet, or any other software compatible with your webcam app and computer.
2. Access the Settings
Find the settings or preferences section in your video conferencing software. This is usually represented by a cogwheel icon or a gear symbol. Click on it to access the settings menu.
3. Select Your iPhone as the Webcam Source
In the video settings, look for the option to choose the video source or camera input. Locate your iPhone from the list of available devices and select it as the webcam source. This step ensures that the video feed from your iPhone will be used during your session.
4. Test Your Webcam Connection
Most video conferencing software provides a preview option that allows you to see how you appear on camera before joining a conference or starting a live stream. Click on the preview or test call button to initiate the webcam connection and view your video feed.
5. Verify Video and Audio Quality
During the test call or preview, pay attention to the video and audio quality. Ensure that your camera is capturing the image correctly, and the audio from your iPhone is synchronized properly. Check for any delays, pixelation, or issues with the video or audio feed. Adjust the settings or position of your iPhone if necessary.
6. Conduct a Mock Video Conference or Stream
If possible, schedule a mock video conference or stream with a friend or colleague to further test your webcam connection. This allows you to simulate a real-world scenario and gain feedback on the quality of your video and audio. Use this opportunity to make any final adjustments before your actual session.
By testing your webcam connection, you can ensure that everything is functioning as intended and that you are ready to engage in a smooth and successful video conference, online meeting, or live streaming event. Conducting a thorough test provides peace of mind and reduces the likelihood of technical difficulties during your session.
If you encounter any issues during the test, consult the troubleshooting resources provided by your webcam app, video conferencing software, or computer operating system. Be sure to resolve any problems before your session to ensure a seamless experience for all participants.
Now that you have successfully tested your webcam connection, you are ready to confidently enter your video conferencing or live streaming session using your iPhone as a high-quality webcam. Embrace the flexibility and enhanced video capabilities that your iPhone offers and make the most out of your virtual interactions.
Frequently Asked Questions about Using iPhone as a Webcam
As the use of iPhones as webcams becomes more popular, you may have some questions about this setup. Here are answers to some frequently asked questions about using your iPhone as a webcam:
1. Can I use my iPhone as a webcam on both Windows and Mac?
Yes, you can use your iPhone as a webcam on both Windows and Mac computers. Webcam apps are available for both operating systems, allowing you to integrate your iPhone as a high-quality webcam regardless of the platform you use.
2. What webcam apps are compatible with the iPhone?
There are several webcam apps available for the iPhone, each offering different features and compatibility options. Some popular options include EpocCam, iVCam, and DroidCam. It’s important to check the compatibility of the webcam app with your specific iPhone model and computer operating system.
3. How do I ensure a stable connection between my iPhone and computer?
To ensure a stable connection between your iPhone and computer, use a USB cable to establish a physical connection. Additionally, ensure that both your iPhone and computer are connected to the same Wi-Fi network to enable seamless communication between the webcam app on your iPhone and the software on your computer.
4. Can I use my iPhone’s front and rear cameras as webcams?
Yes, most webcam apps allow you to switch between your iPhone’s front and rear cameras as webcams. This gives you the flexibility to choose the camera that best suits your needs, whether you want to show yourself during a video conference or capture a different perspective during a live stream.
5. Do I need to adjust the settings on my computer to use my iPhone as a webcam?
Yes, after connecting your iPhone to your computer and launching the webcam app, you need to select your iPhone as the webcam source within the video settings of your video conferencing software or live streaming platform. This enables your computer to recognize your iPhone as the video input device.
6. How can I improve the video quality when using my iPhone as a webcam?
To improve the video quality when using your iPhone as a webcam, consider adjusting the video quality, resolution, and frame rate settings within the webcam app. Additionally, make sure you have sufficient lighting and a clutter-free background when positioned for your webcam sessions.
7. Can I use my iPhone as a webcam for multiple applications simultaneously?
Depending on the webcam app you choose, you may be able to use your iPhone as a webcam for multiple applications simultaneously. However, keep in mind that running multiple applications may put a strain on your computer’s resources and could impact the performance of your webcam feed.
These are some of the common questions and answers regarding the use of iPhones as webcams. It’s important to familiarize yourself with the specific features and settings of your chosen webcam app to maximize the benefits of using your iPhone as a high-quality webcam.
Conclusion
Using your iPhone as a webcam is a convenient and cost-effective solution that allows you to leverage the exceptional camera capabilities of your iPhone for video conferences, online meetings, or live streaming sessions. By following the step-by-step instructions in this guide, you can easily set up and configure your iPhone as a webcam, adjust the necessary settings, and position it for optimal performance.
With the use of webcam apps, you can harness your iPhone’s superior image quality, flexibility, and versatility. The ability to switch between front and rear cameras, adjust focus and exposure, and select different camera modes gives you more control over your webcam experience. This allows you to present yourself professionally and efficiently communicate your message in virtual interactions.
Remember to conduct a thorough test of your webcam connection to ensure a smooth and successful video conference, online meeting, or live streaming session. Fine-tune the settings, position your iPhone appropriately, and verify the quality of your video and audio feed. This ensures that you are fully prepared to engage with others confidently and effectively.
As you use your iPhone as a webcam, keep in mind that each webcam setup may require adjustments and fine-tuning based on your specific needs, preferences, and equipment. Take the time to experiment and discover the configuration that works best for you.
Now that you are equipped with the knowledge and steps to use your iPhone as a webcam, embrace the convenience and enhanced capabilities it offers. Utilize the superior image quality, versatility, and portability of your iPhone to elevate your virtual communication experiences and make a lasting impression during your online interactions. Enjoy the benefits of having a high-quality webcam right at your fingertips!