Why Use GPU in Jupyter Notebook
Using a Graphics Processing Unit (GPU) in Jupyter Notebook can significantly accelerate computations for tasks involving complex mathematical calculations and data processing. GPUs are designed to handle large amounts of parallel processing, making them ideal for machine learning, deep learning, and scientific computing applications.
Here are a few key reasons why utilizing a GPU in Jupyter Notebook can be beneficial:
- Speed and Efficiency: GPUs are known for their ability to perform computations at a much faster rate compared to traditional Central Processing Units (CPUs). The parallel structure of GPUs enables them to handle multiple calculations simultaneously, resulting in quicker execution times for complex algorithms.
- Deep Learning and Machine Learning: GPU acceleration is particularly valuable in the field of deep learning and machine learning. These disciplines often involve training and optimizing deep neural networks on large datasets, which can be computationally intensive. By leveraging the power of a GPU, these tasks can be completed much faster and more efficiently.
- Scientific Computing: Many scientific applications, such as simulations, numerical modeling, and data analysis, require extensive computations. GPUs excel in these scenarios, offering a significant performance boost over CPUs. Scientists can benefit from accelerated calculations, enabling them to process more data and explore complex phenomena in a shorter amount of time.
- Data Visualization: GPUs are not only useful for number crunching but also for rendering high-quality graphics. In Jupyter Notebook, you can leverage GPU capabilities to create interactive visualizations, render 3D plots, and handle large datasets, providing more engaging and visually appealing representations of your data.
- Cost-Efficient Solution: GPUs offer a cost-effective solution for increasing computational power. While powerful CPUs can be expensive, GPUs provide a more affordable alternative for boosting performance. Additionally, many cloud service providers offer GPU instances, allowing users to scale their computing resources as needed without incurring the significant costs associated with purchasing and maintaining dedicated hardware.
Overall, leveraging the capabilities of a GPU in Jupyter Notebook can greatly enhance the performance and efficiency of various computational tasks. Whether you are working on machine learning projects, scientific research, or data visualization, utilizing a GPU can help you achieve faster results and unlock the full potential of your computational workflows.
Installing GPU Support for Jupyter Notebook
Before you can start using a GPU in Jupyter Notebook, you need to ensure that your system is properly set up with GPU support. Here are the steps to install GPU support for Jupyter Notebook:
- Install CUDA Toolkit: The CUDA Toolkit is a software development kit provided by NVIDIA that includes libraries, compilers, and tools necessary for GPU programming. Visit the NVIDIA Developer website and download the appropriate version of the CUDA Toolkit for your operating system.
- Verify GPU Compatibility: Make sure that your GPU is compatible with the CUDA Toolkit by checking the list of supported GPUs on the NVIDIA website. If your GPU is not compatible, you may need to consider upgrading or using a different system that supports CUDA.
- Install cuDNN Library: The cuDNN (CUDA Deep Neural Network) library is a GPU-accelerated library that provides highly optimized implementations of deep neural network operations. Download the cuDNN library from the NVIDIA Developer website and follow the installation instructions specific to your operating system.
- Install GPU Enabled TensorFlow: If you are planning to use TensorFlow with GPU support, you need to install the GPU-enabled version of TensorFlow. You can do this by using the pip package manager with the following command:
pip install tensorflow-gpu
This will install TensorFlow along with GPU support on your system. - Install GPU Enabled PyTorch: To use PyTorch with GPU support, you can install the GPU-enabled version of PyTorch using the following command:
pip install torch torchvision
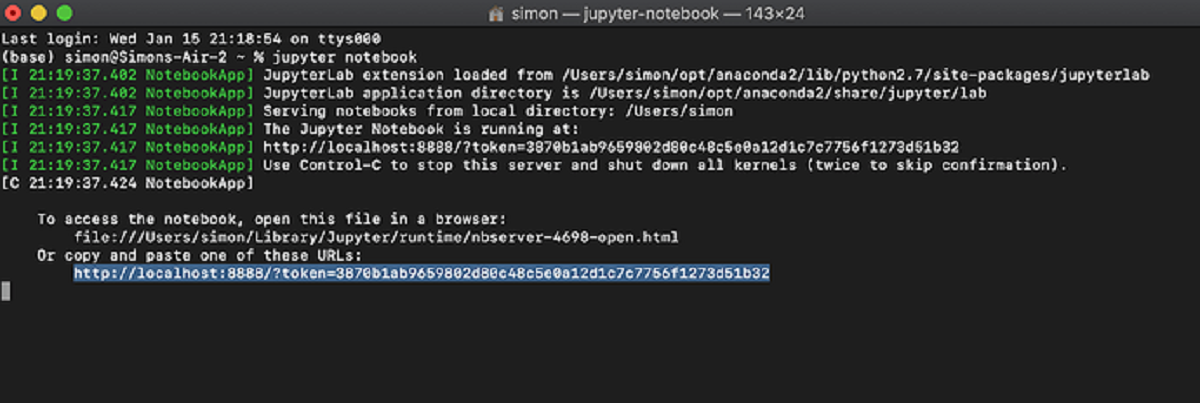
This will install PyTorch and its dependencies with GPU support. - Configure Jupyter Notebook: Once you have installed the necessary GPU libraries and frameworks, you need to configure Jupyter Notebook to use the GPU. Open a terminal or command prompt and run the following command:
jupyter notebook
This will launch Jupyter Notebook in your browser. Create a new notebook or open an existing one, and then select “Kernel” > “Change Kernel” > “Python [conda env:your_environment_name]”. This will ensure that the notebook is using the environment with the GPU-enabled libraries. - Verify GPU Usage: To confirm that your Jupyter Notebook is utilizing the GPU, you can run a sample code snippet that accesses the GPU. For example, in TensorFlow, you can use the following code:
import tensorflow as tf

  tf.test.gpu_device_name()
If the output shows the name of your GPU, it means that TensorFlow is successfully using the GPU for computations.
By following these steps, you will install GPU support for Jupyter Notebook and configure it to leverage the power of your GPU for accelerated computations. This will enable you to take full advantage of the performance benefits offered by GPUs in your Jupyter Notebook workflows.
Importing Libraries for GPU Usage
Once you have installed GPU support for Jupyter Notebook, the next step is to import the necessary libraries that provide GPU functionality for your computational tasks. Depending on the frameworks you are using, such as TensorFlow or PyTorch, you will need to import specific libraries to enable GPU usage. Here’s how to import the relevant libraries:
Using GPU in TensorFlow:
To use GPU support in TensorFlow, you need to import the following libraries:
- tensorflow: This is the main library for using TensorFlow and its functionalities. Import it using the following statement:
import tensorflow as tf - tf.config.experimental: This library provides access to low-level TensorFlow configurations. Use it to enable GPU usage by adding the following line of code before running your TensorFlow code:
tf.config.experimental.set_memory_growth(gpu_device, True)(replace “gpu_device” with the appropriate GPU device name or identifier) - tf.device: This context manager allows you to specify which device (CPU or GPU) TensorFlow should use for computing. Wrap the relevant code or operations in a
tf.device()context manager to execute them on the GPU. For example:with tf.device('/GPU:0'):# your TensorFlow operations here
Using GPU in PyTorch:
To leverage GPU support in PyTorch, you need to import the following libraries:
- torch: This is the primary library for using PyTorch. Import it using the following statement:
import torch - torch.cuda: This module provides access to CUDA functionality in PyTorch. After importing torch, you can import the cuda module using the following code:
import torch.cuda - torch.cuda.is_available: Use this function to check if CUDA is available on your system. You can use it to conditionally execute code based on GPU availability. For example:
if torch.cuda.is_available():# your PyTorch operations here - torch.cuda.device: This context manager allows you to specify which GPU device should be used for computations. By default, PyTorch uses the first available GPU device. Wrap your code or operations in a
torch.cuda.device()context manager to utilize a specific device. For example:with torch.cuda.device(0):# your PyTorch operations here
By importing these libraries in your Jupyter Notebook, you can easily harness the power of your GPU for accelerated computations in both TensorFlow and PyTorch. Refer to the documentation of each library for more details on their functionalities and usage with GPUs.
Checking GPU Availability
Before utilizing the GPU for computations in Jupyter Notebook, it is essential to check whether a GPU is available on your system. Checking GPU availability allows you to handle situations where a GPU may not be accessible or if you need to use alternative approaches for computation. Here are a few methods to check GPU availability:
Using TensorFlow:
In TensorFlow, you can use the tf.config.list_physical_devices() function to retrieve a list of physical devices available, including GPUs. Here’s an example code snippet to check GPU availability:
import tensorflow as tf

gpus = tf.config.list_physical_devices("GPU")

if gpus:
    for gpu in gpus:
        print("GPU:", gpu)
else:
    print("No GPU detected, using CPU for computations.")
If a GPU is available, the output will display information about the available GPU(s). Otherwise, it will indicate that no GPU is detected, and computations will fall back to using the CPU.
Using PyTorch:
In PyTorch, the torch.cuda.is_available() function can be used to check if a GPU is available for computation. Here’s an example code snippet to determine GPU availability:
import torch

if torch.cuda.is_available():
    device = torch.device("cuda")
    print("GPU available, using", torch.cuda.get_device_name(device))
else:
    print("No GPU detected, using CPU for computations.")
If a GPU is available, the code will output the name of the GPU. Otherwise, it will indicate that no GPU is detected, and computations will default to using the CPU.
Manual System Check:
In addition to framework-specific methods, you can also manually check GPU availability by examining your system’s hardware. Open your system’s device manager or GPU management utility to verify if a GPU is listed and properly installed on your system. If you do not see a GPU listed, it likely means that no GPU is available for use.
Checking GPU availability is crucial to ensure that your code gracefully handles different hardware configurations. By verifying GPU accessibility, you can dynamically adjust your code to utilize GPUs when available, providing optimal performance for GPU-accelerated computations.
Using GPU in TensorFlow
TensorFlow, one of the most popular libraries for machine learning and deep learning, provides extensive support for GPU acceleration. By utilizing a GPU in TensorFlow, you can significantly speed up computational tasks and benefit from the parallel processing capabilities of GPUs. Here’s how to leverage GPU in TensorFlow:
Setting up GPU Configuration:
Prior to running your TensorFlow code, it’s important to configure the GPU settings appropriately. This can be done using the tf.config.experimental module. Here’s an example:
import tensorflow as tf

# Set a specific GPU device
gpus = tf.config.experimental.list_physical_devices("GPU")
if gpus:
    tf.config.experimental.set_visible_devices(gpus[0], "GPU")

# Set GPU memory growth
tf.config.experimental.set_memory_growth(gpus[0], True)
In the above code snippet, we obtain a list of available GPUs using tf.config.experimental.list_physical_devices("GPU"). We then set the first GPU as the visible GPU using tf.config.experimental.set_visible_devices(gpus[0], "GPU"). Enabling GPU memory growth is important to allocate GPU memory on an as-needed basis.
Using TensorFlow with GPU:
Once the GPU configuration is set up, you can ensure that your TensorFlow operations are executed on the GPU by wrapping them inside a tf.device context manager. Here’s an example:
import tensorflow as tf

with tf.device('/GPU:0'):
    # TensorFlow operations here
By specifying /GPU:0 within the tf.device context manager, you ensure that the code within the block runs on the first GPU device. If you have multiple GPUs, you can use /GPU:1, /GPU:2, and so on to assign different TensorFlow operations to different GPUs for parallel processing.
It’s important to note that not all TensorFlow operations are GPU-compatible, and some operations may need to be explicitly configured to run on the GPU. Additionally, TensorFlow automatically places GPU-compatible operations on the GPU by default if a GPU is available.
To verify that your TensorFlow code is running on the GPU, you can use the tf.test.gpu_device_name() function:
import tensorflow as tf

print("GPU device name:", tf.test.gpu_device_name())
If TensorFlow is successfully utilizing the GPU, the output will display the name of your GPU device.
By harnessing the power of the GPU, you can experience significant performance improvements when executing TensorFlow operations for machine learning, deep learning, and other computationally intensive tasks.
Using GPU in PyTorch
PyTorch, a powerful deep learning library, provides seamless GPU support to accelerate computations and leverage the parallel processing capabilities of GPUs. By utilizing a GPU in PyTorch, you can significantly speed up training and inference processes for deep neural networks. Here’s how to leverage the GPU in PyTorch:
Checking GPU Availability:
Prior to using a GPU in PyTorch, it is important to check if a GPU is available on your system. You can do this by using the torch.cuda.is_available() function. Here’s an example:
import torch

if torch.cuda.is_available():
    device = torch.device("cuda")
    print("GPU available, using", torch.cuda.get_device_name(device))
else:
    device = torch.device("cpu")
    print("No GPU available, using CPU")
The code snippet above checks if a GPU is available using torch.cuda.is_available(). If a GPU is detected, the device is set to use CUDA, and the name of the GPU device is printed. Otherwise, the code sets the device to use the CPU.
Using PyTorch with GPU:
To utilize the GPU in PyTorch, you need to ensure that your tensors and models are located on the GPU. You can do this by setting the device using the .to() method. Here’s an example:
import torch

# Set device
device = torch.device("cuda" if torch.cuda.is_available() else "cpu")

# Create tensor on GPU
tensor = torch.tensor([1, 2, 3]).to(device)

# Move model to GPU
model = Model().to(device)
In the code snippet above, the device is set to use CUDA if a GPU is available; otherwise, it falls back to using the CPU. The tensor is then created on the GPU using the .to(device) method. Similarly, the model is moved to the GPU by calling .to(device) on the instantiated model object.
By default, PyTorch operations on tensors created on the GPU will be executed on the GPU. You can ensure that a specific operation is performed on the GPU by using the .to() method on that operation.
To verify that PyTorch is utilizing the GPU, you can access the .device attribute of a tensor or model:
import torch

# Check device of a tensor
print("Tensor device:", tensor.device)

# Check device of a model
print("Model device:", model.device)
The output will display either cuda or cpu depending on the device being used.
By effectively harnessing the power of the GPU, you can accelerate training and inference processes in PyTorch, enabling faster and more efficient deep learning workflows.
Limitations and Considerations
While leveraging a GPU in Jupyter Notebook provides significant benefits for performance and computational speed, there are several limitations and considerations to keep in mind:
Hardware Requirements:
Using a GPU requires compatible hardware. Not all systems are equipped with GPUs, and some GPUs may not be suitable for certain computational tasks. Ensure that your system meets the hardware requirements necessary to utilize a GPU effectively.
Memory Constraints:
GPU memory is limited compared to system memory (RAM). Depending on the size of your data and the complexity of your computations, you may encounter memory limitations when using a GPU. It is important to manage your memory usage efficiently and be mindful of the memory requirements of your algorithms and models.
Power Consumption and Cooling:
GPUs are more power-hungry than CPUs and generate more heat during intensive computations. This increased power consumption and heat generation can lead to higher electricity bills and increased cooling requirements. Consider the power and cooling implications when using a GPU for prolonged periods or in resource-intensive tasks.
Compatibility with Libraries and Frameworks:
While major libraries and frameworks, such as TensorFlow and PyTorch, have excellent GPU support, not all libraries and packages may be GPU-compatible. It is essential to verify GPU compatibility with the specific libraries and frameworks you plan to use beforehand to ensure a smooth integration.
Code Optimization:
Although GPUs can significantly accelerate computations, not all algorithms and code are optimized to fully exploit the parallel processing capabilities of GPUs. To achieve maximum performance gains, it may be necessary to optimize your code, structure computations to maximize parallelism, and utilize GPU-specific features and optimizations provided by the libraries or frameworks you are using.
Data Transfer Overhead:
Data transfer between the CPU and GPU can introduce overhead and impact overall performance. It is crucial to minimize unnecessary data transfers and optimize your code to effectively utilize the GPU memory and minimize data movement between the CPU and GPU.
By understanding these limitations and considerations, you can make informed decisions when using GPUs in Jupyter Notebook and devise strategies to maximize performance while mitigating any potential challenges that may arise.
Conclusion
Utilizing a GPU in Jupyter Notebook can greatly enhance the performance and efficiency of various computational tasks. By harnessing the parallel processing capabilities of a GPU, you can achieve faster execution times, accelerate machine learning and deep learning workflows, perform complex mathematical calculations, and visualize data more effectively.
In this article, we explored the reasons why using a GPU in Jupyter Notebook is beneficial. We discussed the installation process for GPU support, including the installation of the CUDA Toolkit and the cuDNN library. Additionally, we covered how to import the necessary libraries for GPU usage in popular frameworks such as TensorFlow and PyTorch.
We also examined different methods for checking GPU availability, ensuring that our code can gracefully handle situations where a GPU may not be accessible. Moreover, we explored the steps involved in configuring Jupyter Notebook to utilize the GPU, as well as how to verify that GPU acceleration is being utilized.
It is important to keep in mind certain limitations and considerations, such as hardware requirements, memory constraints, power consumption, and code optimization requirements when using a GPU in Jupyter Notebook. Being aware of these factors will help you determine the optimal settings and make the most of your GPU-accelerated computations.
By leveraging the power of a GPU in Jupyter Notebook, you can significantly speed up computations, improve the performance of machine learning and deep learning models, and explore more complex problems in scientific computing. Whether you are a data scientist, researcher, or developer, utilizing a GPU in Jupyter Notebook can unlock new possibilities and help you achieve better results in your work.