Introduction
Streaming content has become the norm in today’s digital age, and the Firestick has revolutionized the way we enjoy entertainment. With its compact size and easy setup, the Firestick has become a popular choice for streaming movies, TV shows, and more. But what if you want to take your viewing experience to the next level by connecting your Firestick to a projector?
Using a projector allows you to enjoy your favorite content on a big screen, providing a more immersive and cinematic experience. Whether you’re hosting a movie night or giving a presentation, connecting your Firestick to a projector is a simple and effective way to enhance your viewing experience.
In this guide, we’ll walk you through the step-by-step process of using a Firestick on a projector. From connecting the hardware to adjusting the settings, we’ll cover everything you need to know to get started. So grab your Firestick, dust off your projector, and let’s dive in!
Getting Started
Before we dive into the process of connecting your Firestick to a projector, there are a few things you’ll need to ensure a smooth setup. Here’s a list of the essential items:
- A Firestick device
- A projector with HDMI input
- An HDMI cable
- A power source for both the Firestick and the projector
- A stable surface to place the projector
Once you have gathered all the necessary items, you’re ready to proceed to the next steps.
It’s important to note that the specific instructions may vary based on your projector and Firestick model. So be sure to refer to the user manuals provided with your devices for any additional information or troubleshooting steps.
Now that you have everything you need, let’s move on to the step-by-step process of connecting your Firestick to a projector.
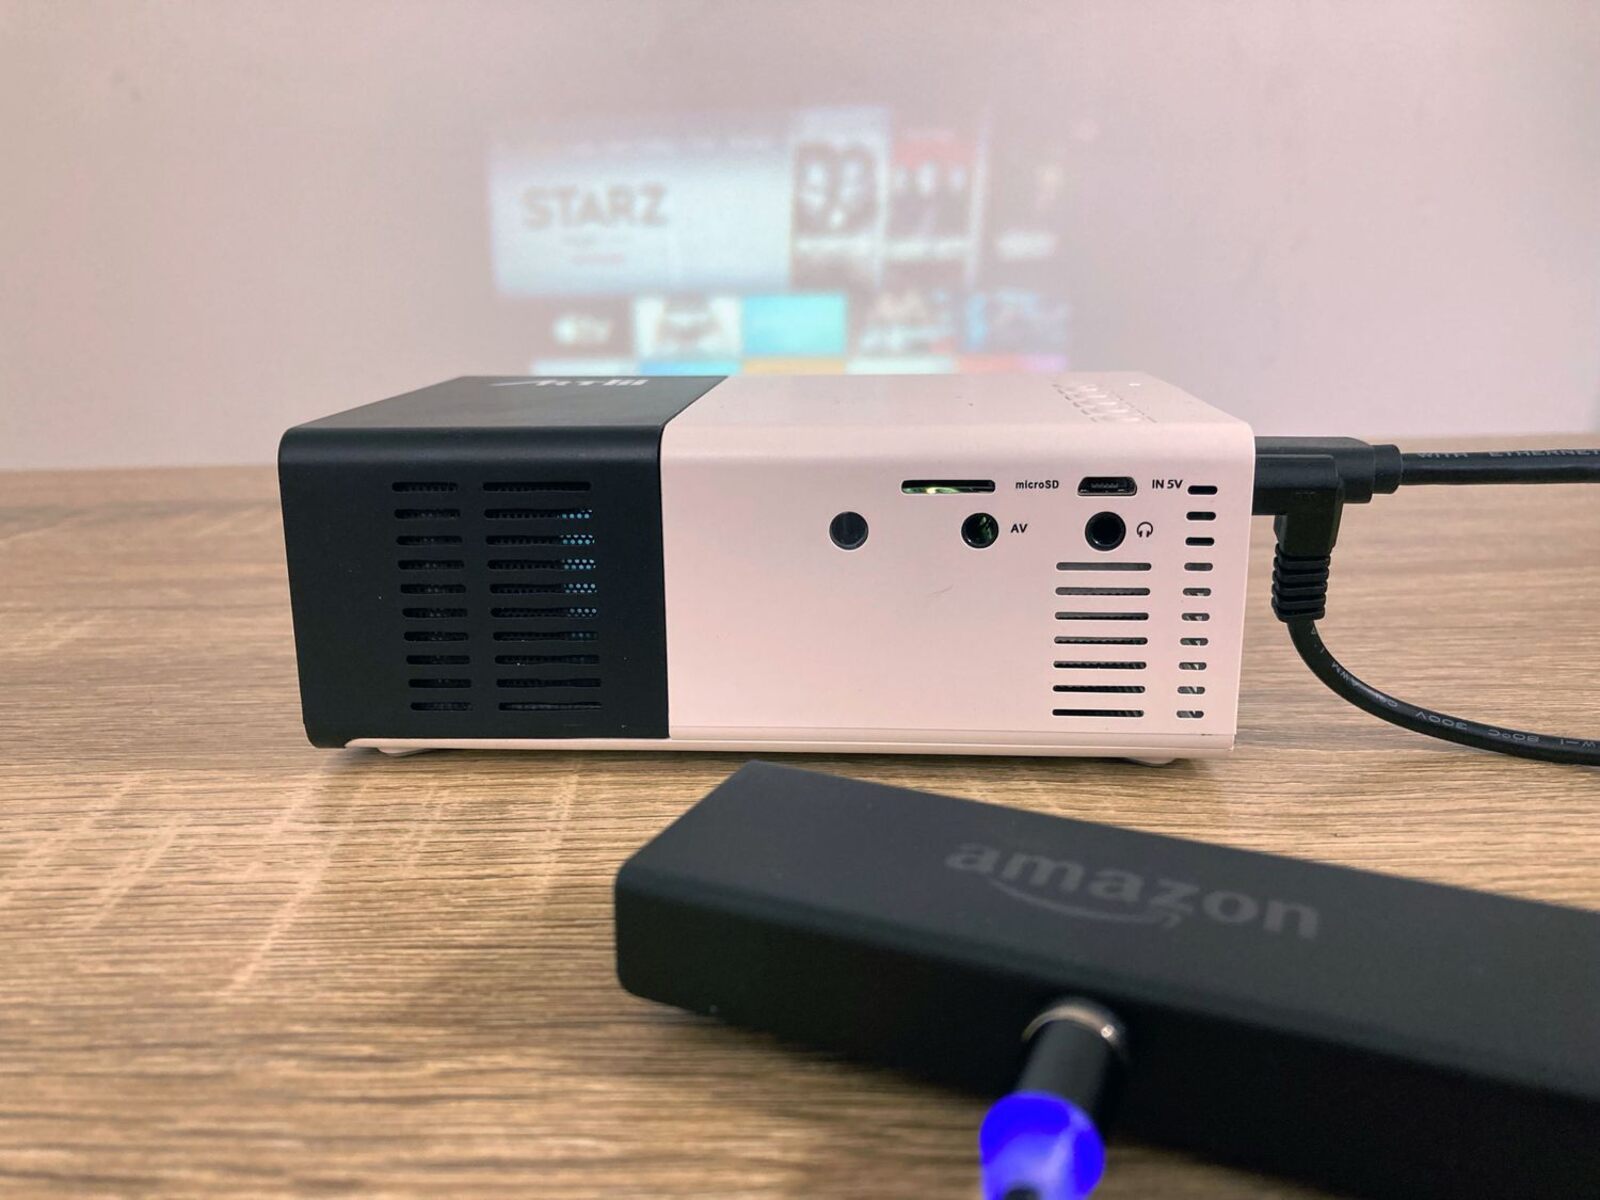
Step 1: Connect Firestick to Projector
To begin the process, make sure both your Firestick and projector are turned off. Locate the HDMI port on your projector and connect one end of the HDMI cable to it. Then, connect the other end of the HDMI cable to the HDMI output port on your Firestick.
Next, plug the Firestick’s power adapter into an outlet and connect it to the power input on the Firestick. Ensure that the projector is also plugged into a power source.
Once all the connections are in place, turn on your projector and select the appropriate HDMI input on the projector’s menu. This will allow you to display the content from your Firestick on the projector screen.
If you’re using a wireless Firestick model, you can skip the HDMI cable connection step. Instead, make sure your projector supports wireless screen mirroring, also known as “Miracast” or “Screen Mirroring.” Enable the screen mirroring feature on your projector and follow the instructions provided by the Firestick to connect the two devices wirelessly.
With the Firestick successfully connected to your projector, you’re now ready to move on to the next step of the setup process.
Step 2: Set Up Firestick
After connecting your Firestick to the projector, it’s time to set it up. Follow these steps to get your Firestick up and running:
- Turn on your projector and ensure that it’s set to the correct HDMI input where the Firestick is connected.
- On your Firestick remote, press the Home button to power on the device.
- Follow the on-screen instructions to select your preferred language and connect to your Wi-Fi network. If you’re using a wireless Firestick, ensure that your projector is connected to the same Wi-Fi network.
- Once connected, you’ll be prompted to sign in to your Amazon account or create a new one. Sign in with your existing Amazon account credentials or create a new account if you don’t have one.
- After signing in, your Firestick will automatically download and install the latest software updates. This may take a few minutes, so be patient.
- Once the updates are installed, you’ll be prompted to set up your display preferences, such as the display resolution and screen mirroring settings. Adjust these settings according to your preference.
- Finally, you’ll reach the Firestick home screen, where you can access various apps and content. Take some time to explore the interface and familiarize yourself with the features and navigation options.
With the Firestick set up and ready to go, you’re one step closer to enjoying your favorite content on the big screen. In the next step, we’ll discuss how to adjust the projector settings for optimal viewing.
Step 3: Adjust Projector Settings
After setting up your Firestick, it’s important to adjust the projector settings to ensure the best possible viewing experience. Here are a few key settings to consider:
Aspect Ratio: Check the aspect ratio settings on your projector and match it with the aspect ratio supported by your Firestick. The most common aspect ratios are 16:9 (widescreen) and 4:3 (standard).
Display Mode: You may have different display modes available on your projector, such as Standard, Cinema, or Dynamic. Experiment with these modes to find the one that suits your preferences and the content you’re watching.
Keystone Correction: Keystone correction is used to correct any distortion in the projected image caused by the angle of the projector. Use the keystone correction feature on your projector to adjust the image and make it rectangular.
Brightness and Contrast: Adjust the brightness and contrast settings on your projector to achieve optimal picture quality. This will ensure that the colors are vibrant and the image is clear and crisp.
Projection Distance and Size: Determine the desired projection distance and size before mounting or placing your projector. Refer to the user manual or projection calculator of your projector to find the optimal distance and size for your setup.
By fine-tuning these settings, you can maximize the quality of the projected image and tailor it to your preferences. Take the time to experiment and adjust the settings until you achieve the desired results.
Once you’ve adjusted the projector settings, you’re ready to move on to the next step and pair the Firestick remote with your projector for convenient control.
Step 4: Pair Firestick Remote
Having control over your Firestick is essential for navigating through menus, launching apps, and adjusting settings. To pair your Firestick remote with your projector, follow these steps:
- Make sure your Firestick is turned on and that the remote has fresh batteries.
- Point the Firestick remote towards the Firestick device and press the Home button for approximately 10 seconds or until the pairing prompt appears on the screen.
- Once the pairing prompt appears, release the Home button and wait for the remote to pair with the Firestick. This process may take a few seconds.
- Once the remote is paired, a confirmation message will appear on the screen, indicating that the pairing is successful.
- Test the remote by navigating through the Firestick interface and ensuring that all the buttons function properly.
If the pairing process doesn’t work, make sure that the remote is within range of the Firestick and that there are no obstructions blocking the signal. You may also try replacing the batteries in the remote.
Having successfully paired your Firestick remote, you can now easily control your Firestick and navigate through the various apps and options available on the big screen of your projector.
In the next step, we’ll explore how to customize the settings on your Firestick to further enhance your streaming experience.
Step 5: Customize Firestick Settings
Customizing the settings on your Firestick allows you to personalize your streaming experience and optimize it to your preferences. Here are a few key settings you can customize:
Display Settings: Access the display settings on your Firestick to adjust the screen resolution, overscan, and color depth. This ensures that the content is displayed in the best possible quality on your projector.
Audio Settings: Customize the audio settings to match your audio setup. You can select the audio output format and adjust the volume levels to your preference.
Parental Controls: If you have children or want to restrict certain content, you can set up parental controls on your Firestick. This allows you to restrict access to specific apps or content based on their rating.
Notifications: Manage the notifications you receive on your Firestick. You can choose whether to receive app notifications, system updates, or promotional messages.
Apps and Permissions: Review and manage the apps installed on your Firestick, as well as the permissions they have. You can uninstall unwanted apps or revoke certain permissions if desired.
Screensaver and Display Options: Customize the screensaver that appears when your Firestick is idle, as well as the display options such as screen mirroring preferences and HDMI CEC control.
Accessibility Options: Take advantage of the accessibility options available on your Firestick. Adjust the font size, enable closed captions, or use the VoiceView feature for visually impaired users.
By customizing these settings, you can tailor your Firestick experience to your liking and ensure that it accommodates your specific needs and preferences.
Now that you’ve customized your Firestick settings, let’s move on to the next step and explore how to download and install apps on your Firestick.
Step 6: Download and Install Apps
One of the key advantages of using a Firestick is the ability to access a wide range of apps and streaming services. To download and install apps on your Firestick, follow these steps:
- On the Firestick home screen, navigate to the top menu and select the “Apps” option.
- Here, you’ll find various categories of apps, such as Featured, Games, Movies & TV, and more. Browse through these categories or use the search function to find specific apps.
- Highlight the app you want to install and press the select button on your Firestick remote.
- In the app description page, select the “Get” or “Download” button to initiate the installation process.
- Wait for the app to download and install on your Firestick. The download progress will be indicated by a progress bar.
- Once the installation is complete, you can either open the app directly from the app description page or access it later from the “Apps” section on the home screen.
Popular apps you may want to consider installing include Netflix, Hulu, Amazon Prime Video, YouTube, Spotify, and many more. You can also explore the Amazon Appstore to discover new apps and games.
It’s worth noting that some apps may require you to sign in with your account credentials or subscribe to a service before accessing their content. Follow the on-screen instructions to log in or create an account if necessary.
By downloading and installing apps on your Firestick, you can unlock a world of entertainment and stream your favorite movies, TV shows, music, and more directly on your projector.
Now that you’ve installed your desired apps, it’s time for the final step: streaming content on your projector using the Firestick.
Step 7: Stream Content on Projector
With your Firestick connected to the projector and all the settings configured, it’s time to start streaming your favorite content on the big screen. Follow these steps to begin:
- Ensure that your projector is turned on and set to the correct HDMI input where your Firestick is connected.
- On the Firestick home screen, navigate to the app you want to stream content from using the Firestick remote.
- Select the app by hovering over it and pressing the select button.
- Depending on the app, you may need to sign in with your account credentials. Enter the necessary information using the remote or your smartphone if the app supports casting from a second device.
- Navigate through the app to find the content you want to watch, and select it.
- Enjoy streaming your desired content on the big screen of your projector. Use the Firestick remote to control playback, adjust settings, and explore additional features of the app.
Remember, you can access various streaming services, such as Netflix, Hulu, Amazon Prime Video, YouTube, and more, directly from your Firestick. Explore the wide range of content available and make the most out of your streaming experience.
Additionally, you can also use the Firestick to stream content from your smartphone or other devices. Simply use the screen mirroring feature on your Firestick to mirror the display of your device onto the projector screen.
Now that you are all set to stream content on your projector, enjoy the immersive and cinematic experience in the comfort of your own home.
In the next section, we will provide some troubleshooting tips to help you overcome any common issues that may arise during the setup or streaming process.
Troubleshooting Tips
While setting up and using your Firestick on a projector is generally straightforward, you may encounter some common issues along the way. Here are some troubleshooting tips to help you overcome these challenges:
No Signal or Display: If you’re not getting a signal or the projected image is not displayed, make sure that the HDMI cable is securely connected to both the Firestick and the projector. Check that the projector is set to the correct HDMI input and that both devices are powered on.
Poor or Distorted Image Quality: Adjust the projector’s aspect ratio, keystone correction, brightness, and contrast settings to improve the image quality. Ensure that the projector lens is clean and free from any obstructions that may affect the image clarity.
No Audio or Low Volume: Confirm that the audio cables are properly connected between the Firestick and the projector if applicable. Check the audio output settings on the Firestick and projector to ensure they are correctly configured. Verify that the volume is not muted or too low on both devices.
Remote Control Issues: If your Firestick remote is not working or responding properly, replace the batteries with fresh ones. If you are using a wireless remote, ensure that there are no obstructions between the remote and the Firestick. You can also try restarting the Firestick by unplugging it from the power source and reconnecting it after a few seconds.
App Not Working or Crashing: If a particular app is not working or crashing frequently, try clearing the app cache and data from the Firestick settings. You can do this by navigating to Settings > Applications > Manage Installed Applications on the Firestick home screen.
Internet Connectivity Problems: If you’re experiencing slow or unstable internet connectivity, check your Wi-Fi network signal strength. Move the Firestick and/or the Wi-Fi router closer or use a Wi-Fi extender to improve the signal if needed. Restarting your router or contacting your internet service provider may also help resolve any connectivity issues.
If you’re encountering a problem that is not covered by these troubleshooting tips, refer to the user manuals of your Firestick and projector for more specific guidance. You can also visit the official support websites or forums of the respective devices for additional assistance.
By following these troubleshooting tips, you’ll be able to resolve common issues and ensure a smooth and enjoyable streaming experience with your Firestick and projector.
Conclusion
Using a Firestick on a projector allows you to transform your entertainment experience by enjoying your favorite content on a big screen. By following the step-by-step guide outlined in this article, you can seamlessly connect your Firestick to a projector and stream movies, TV shows, music, and more with ease.
We started by getting all the necessary equipment and ensuring a smooth setup process. Then, we walked through connecting the Firestick to the projector, setting up the Firestick, adjusting the projector settings, pairing the Firestick remote, customizing the Firestick settings, downloading and installing apps, and finally, streaming content on the projector.
We also provided troubleshooting tips to help you overcome common challenges that may arise during the setup or streaming process.
Remember, every setup may have its unique considerations and configurations, so be sure to consult the user manuals of your specific devices for further guidance.
Now that you have the knowledge and know-how to use your Firestick on a projector, you can create an immersive and cinematic experience in the comfort of your own home. Whether it’s a movie night with friends, a presentation for work, or simply enjoying your favorite shows on a larger scale, the combination of a Firestick and a projector opens up a world of possibilities.
So gather your Firestick, connect it to your projector, and get ready to enjoy an enhanced viewing experience like never before!