Introduction
In the world of gaming and content creation, capturing and recording high-quality gameplay or screen activities has become essential. Whether you are a streamer, a YouTuber, or simply want to share your gaming experiences with friends, having a capture card can greatly enhance your ability to create and share content.
But what exactly is a capture card? And can you use it with a Chromebook? In this article, we will explore the functionalities of a capture card and discuss its compatibility with Chromebook devices.
A capture card is an external device that allows you to capture and record video and audio signals from external sources, such as gaming consoles, PCs, or cameras. It acts as an intermediary between the source device and your computer, capturing the video and audio signals and transmitting them to your computer for processing and recording.
Now, you might be wondering if you can use a capture card with your Chromebook. Chromebooks are known for their lightweight and efficient operating system, primarily designed for online tasks and browsing. However, they do have the capability to connect and utilize external devices, including capture cards, to expand their functionality.
In the next sections, we will explore the compatibility of capture cards with Chromebook devices, how to choose the right capture card, installing the necessary drivers, connecting the capture card to your Chromebook, configuring the settings, and using it to record videos effortlessly. So, if you’re ready to level up your content creation game, let’s dive in!
What is a Capture Card?
A capture card is a hardware device that allows you to capture and record video and audio signals from external sources. It acts as a bridge between your source device, such as a gaming console or camera, and your computer. By connecting your source device to the capture card, you can capture and transfer the video and audio signals to your computer for processing and recording.
Capture cards are widely used in various applications, including gaming, content creation, live streaming, and video production. They provide the ability to capture high-quality video and audio, ensuring that you can preserve and share your experiences with others.
One of the primary use cases for capture cards is in the realm of gaming. Capture cards allow gamers to capture their gameplay footage from consoles like PlayStation, Xbox, or Nintendo Switch and stream it live on platforms like Twitch or YouTube. This enables gamers to showcase their skills, interact with their audience, and even monetize their content.
Capture cards are also popular among content creators and video producers who need to capture footage from cameras, DSLRs, or professional video equipment. By connecting the source device to the capture card, they can capture crisp and high-quality video footage directly into their editing software.
Additionally, capture cards are useful for recording screen activities on computers. Whether you’re creating tutorials, recording software demonstrations, or capturing gameplay footage from a PC, a capture card can help you capture and record the screen with ease.
Modern capture cards offer advanced features like HDMI passthrough, allowing you to play your game or view the content on your TV or monitor while recording. They also support different video resolutions and frame rates, ensuring that you can capture videos in the desired quality and format.
Now that we have a clear understanding of what a capture card is and its applications, let’s dive into whether you can use a capture card with your Chromebook.
Compatibility of Capture Card with Chromebook
Chromebooks are known for their simplicity, portability, and efficient web-based operating system. While they are primarily designed for online tasks, such as web browsing and productivity, they can also support external devices like capture cards, expanding their capabilities for content creation and gaming.
When it comes to the compatibility of capture cards with Chromebooks, it’s essential to consider a few factors. One of the crucial factors is the operating system of your Chromebook. Most Chromebooks run on Chrome OS, a lightweight and web-centric operating system based on the Linux kernel.
Luckily, many capture card manufacturers provide compatible software and drivers for Chrome OS, allowing you to connect and use their capture cards seamlessly. However, it’s important to note that not all capture cards are compatible with Chromebooks, especially those that are specifically designed for Windows or macOS.
Before purchasing a capture card, ensure that it explicitly mentions compatibility with Chromebooks in the product specifications. This will save you from potential compatibility issues and ensure a smooth user experience.
In addition to operating system compatibility, it’s crucial to consider the hardware compatibility of your Chromebook with the capture card. Most modern Chromebooks come equipped with USB ports, which are the most common connection type for capture cards. However, some high-end capture cards may require USB 3.0 or USB-C ports for optimal performance.
It’s also worth noting that the performance of a capture card on a Chromebook may vary depending on the specifications of your Chromebook. Higher-end Chromebooks with more powerful processors, ample RAM, and dedicated graphics capabilities will generally offer better performance and compatibility with capture cards.
If you’re uncertain about the compatibility of a specific capture card with your Chromebook, it’s recommended to consult the manufacturer’s documentation or reach out to their customer support for clarification.
In the next section, we will discuss how to choose the right capture card for your Chromebook, taking into account the various factors we’ve mentioned regarding compatibility.
Choosing the Right Capture Card for Chromebook
When it comes to choosing a capture card for your Chromebook, there are a few important considerations to keep in mind. These factors will help ensure compatibility, performance, and the ability to meet your specific needs for content creation or gaming.
1. Compatibility: The first and foremost consideration is compatibility with Chromebooks. Look for capture cards that explicitly mention compatibility with Chrome OS or mention support for Chromebooks in their specifications. This will ensure that the capture card is designed to work seamlessly with your Chromebook.
2. Connection Type: Most Chromebooks feature USB ports, so it’s important to choose a capture card that utilizes USB connectivity. USB 3.0 or USB-C ports are ideal for faster data transfer rates, so consider your Chromebook’s port availability and choose a capture card accordingly.
3. Resolution and Frame Rate: Depending on your requirements, consider the maximum resolution and frame rate supported by the capture card. For gaming or recording high-definition content, look for capture cards that support at least 1080p resolution at 60 frames per second (fps) or higher.
4. Features and Functionality: Capture cards come with various features and functionalities that enhance your recording and streaming experience. Some of the features to look for include HDMI passthrough, audio mixing, microphone input, and onboard encoding. Assess your specific needs and choose a capture card with the appropriate features.
5. Software Support: Check if the capture card manufacturer provides software or drivers specifically designed for Chrome OS. Having dedicated software will ensure seamless installation, easy configuration, and access to additional features or settings.
6. User Reviews and Recommendations: Before finalizing your purchase, read user reviews and recommendations to get insights into real-world experiences with the capture card. This will help you gauge the performance, reliability, and compatibility of the capture card with Chromebooks.
Remember that the right capture card for your Chromebook will ultimately depend on your specific needs and budget. Consider your intended usage, desired features, and the overall compatibility to make an informed decision.
In the next section, we will guide you through the process of installing the necessary drivers for your chosen capture card on your Chromebook.
Installing the Capture Card Drivers on Chromebook
Once you have chosen a compatible capture card for your Chromebook, the next step is to install the necessary drivers to ensure proper functionality. The steps may vary slightly depending on the specific capture card and manufacturer, but the general process is outlined below.
1. Check for Official Drivers: Visit the website of the capture card manufacturer and look for the drivers section. Check if they provide official drivers or software for Chrome OS. Download the appropriate drivers for your capture card model.
2. Enable Developer Mode: In order to install drivers that are not from the Chrome Web Store, you will need to enable Developer Mode on your Chromebook. Keep in mind that enabling Developer Mode will erase all locally stored data on your Chromebook, so make sure to back up any important files before proceeding.
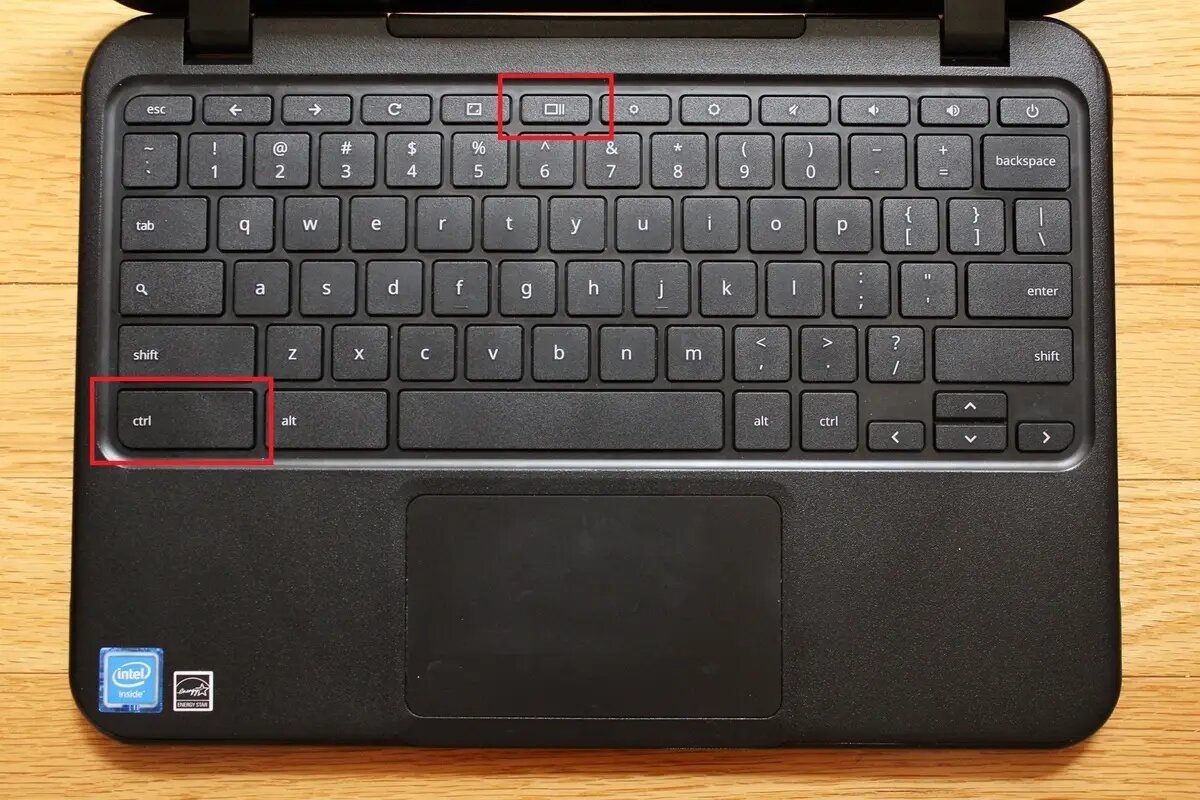
3. Access Developer Options: Once Developer Mode is enabled, press Ctrl+Alt+T to open the Chromebook’s crosh shell. Type ‘shell’ and hit Enter to access the Linux shell environment.
4. Enter Developer Mode: In the shell, type ‘sudo su’ and hit Enter. You will be prompted to enter your Chromebook password.
5. Mount the System Partition: Type ‘mount -o remount,rw /’ and hit Enter. This will mount the system partition in read-write mode, allowing you to make changes.
6. Create a Directory: Type ‘mkdir /usr/local/share/drivers’ and hit Enter. This will create a directory to store the capture card drivers.
7. Copy the Drivers: Navigate to the directory where you downloaded the capture card drivers and copy them to the ‘/usr/local/share/drivers’ directory using the ‘cp’ command. For example, if the driver file is named ‘capturedriver.tar.gz’, you would type ‘cp capturedriver.tar.gz /usr/local/share/drivers’ and hit Enter.
8. Extract the Drivers: Type ‘cd /usr/local/share/drivers’ to navigate to the drivers directory. Then, extract the driver files using the appropriate extraction command. For example, if the file is a tar.gz archive, you would type ‘tar -zxvf capturedriver.tar.gz’ and hit Enter.
9. Run the Installer: Depending on the capture card driver package, there may be an installer script included. Navigate to the extracted driver directory and run the installer script using the ‘sudo’ command. For example, you would type ‘sudo ./install.sh’ and hit Enter.
10. Follow Installation Instructions: The installer script will guide you through the installation process. Follow the on-screen instructions to complete the driver installation on your Chromebook.
Once the drivers are successfully installed, restart your Chromebook to ensure that the changes take effect. Your capture card should now be ready to use with your Chromebook.
In the next section, we will discuss how to connect your capture card to your Chromebook.
Connecting the Capture Card to Chromebook
After installing the necessary drivers for your capture card on your Chromebook, the next step is to connect the capture card to your Chromebook. Here’s a step-by-step guide on how to do it:
1. Ensure Chromebook Power: Make sure your Chromebook is powered on and running.
2. Connect the Capture Card: Take the USB cable of your capture card and connect it to an available USB port on your Chromebook. For capture cards that utilize USB 3.0 or USB-C, ensure that you connect it to a compatible port for optimal performance.
3. Wait for Detection: Your Chromebook should automatically detect the capture card. Wait for a few moments to allow the system to recognize the device.
4. Install Additional Software (if necessary): Some capture cards may require additional software or Chrome extensions to fully utilize their functionalities. If prompted, follow the on-screen instructions to install any required software or extensions.
5. Configure Capture Card Settings: Once the capture card is connected and recognized, you may need to configure its settings. This can typically be done through the capture card software or settings menu on your Chromebook. Refer to the capture card documentation or manufacturer’s website for guidance on configuring the settings.
6. Verify Connection: To ensure that the capture card is properly connected and functioning, open your desired recording or streaming software (such as OBS Studio or XSplit) on your Chromebook. Select the capture card as the video and audio input source. Test the connection by previewing or recording a video to verify that the capture card is receiving and transmitting the video and audio signals successfully.
Remember to consult the documentation that came with your particular capture card for any specific instructions or troubleshooting tips related to the connection process.
By following these steps, you should be able to connect your capture card to your Chromebook and start using it to record or stream videos with ease.
In the next section, we will discuss how to configure the capture card settings on your Chromebook.
Configuring the Capture Card Settings on Chromebook
Once you have connected your capture card to your Chromebook, it’s important to configure its settings to ensure optimal performance and desired output. The configuration process may vary depending on the capture card and software you are using, but here are some general steps to help you get started:
1. Open Capture Card Software: Launch the software or settings menu associated with your capture card on your Chromebook. This could be the official software provided by the capture card manufacturer or the settings within the recording or streaming software you are using.
2. Select Input Source: In the capture card software or settings menu, choose the appropriate input source that you want to capture. This could be the HDMI input from a gaming console, a camera, or any other external device connected to the capture card.
3. Adjust Video and Audio Settings: Depending on your preferences and requirements, you may need to adjust video and audio settings in the capture card software. This could include selecting the desired resolution, frame rate, bitrate, audio input source, and other related parameters.
4. Configure Recording Options: If you intend to record videos using your capture card, configure the recording options such as file format, storage location, and quality settings. Make sure to choose settings that are compatible with your Chromebook’s capabilities.
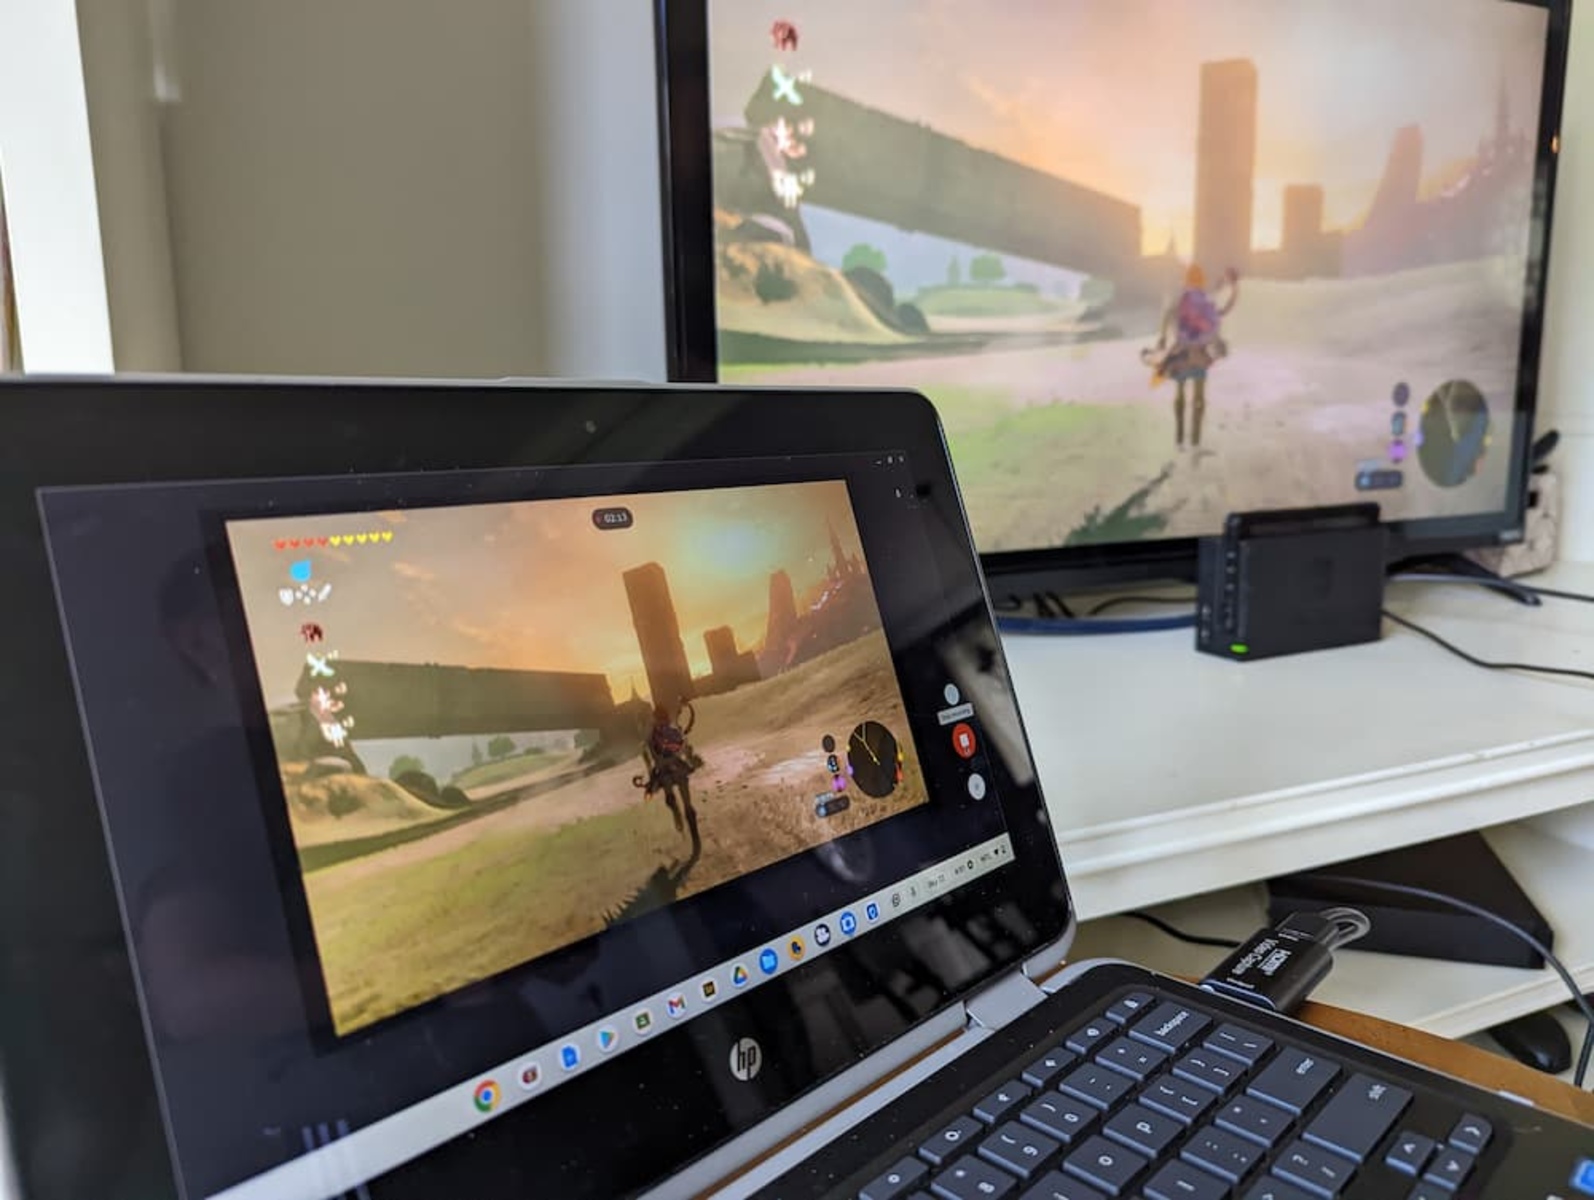
5. Enable Passthrough (if available): Many capture cards have a passthrough feature, allowing you to play your game or content on a connected display while simultaneously capturing and recording it. If your capture card supports passthrough, ensure that it is enabled in the settings.
6. Test and Adjust Settings: After making the necessary configurations, test the settings by previewing or recording a video. Check the video and audio quality, ensure that the capture card is capturing the correct input source, and make any adjustments as needed.
7. Save and Apply Settings: Once you are satisfied with the configurations, save the settings within the capture card software or settings menu. This will ensure that the capture card uses the selected settings for future recording or streaming sessions.
It’s important to refer to the documentation or user manual provided with your specific capture card for any unique settings or features that may be available.
By properly configuring the capture card settings on your Chromebook, you can fine-tune your recording or streaming experience and achieve the desired quality and output for your videos.
In the next section, we will explore how to use the capture card to record videos on your Chromebook.
Using the Capture Card to Record Videos on Chromebook
Now that you have your capture card connected and configured on your Chromebook, it’s time to start using it to record videos. Whether you want to capture gameplay, create tutorials, or record any other screen activities, the capture card makes the process seamless. Here’s how to use the capture card to record videos on your Chromebook:
1. Select Recording Software: Choose a recording software that is compatible with your Chromebook, such as OBS Studio or XSplit. These software options provide advanced features and customization options for your recordings.
2. Open Recording Software: Launch the recording software on your Chromebook and ensure that it recognizes the capture card as the video and audio input source. You may need to configure the software settings to select the capture card as the input device.
3. Adjust Recording Settings: In the recording software, configure the recording settings according to your preferences. This includes selecting the desired output format, resolution, frame rate, bitrate, and other relevant settings.
4. Start Recording: Once you have set up the recording software and adjusted the settings, you can begin recording. Simply press the record button in the software to start capturing the video and audio signals from the connected capture card.
5. Monitor the Recording: Keep an eye on the recording software’s interface to ensure that the capture card is properly capturing the desired content. Monitor the video preview and audio levels to make sure they meet your expectations.
6. End the Recording: When you are finished recording, press the stop button in the recording software to end the recording session. The software will save the recorded video file to the designated location on your Chromebook.
7. Review and Edit the Recording: Once the recording is complete, you can review the footage and make any edits or adjustments as needed. Use video editing software, like Adobe Premiere Pro or iMovie, to trim, enhance, or add effects to your recorded videos.
With your capture card and recording software working together, you can easily capture high-quality videos on your Chromebook for sharing, editing, or streaming purposes.
Remember to consult the documentation or user guides provided with your specific capture card and recording software for more detailed instructions and tips on recording videos using the capture card.
In the next section, we will discuss some common issues that you may encounter while using a capture card on your Chromebook and how to troubleshoot them.
Troubleshooting Common Issues with Capture Card on Chromebook
While using a capture card on your Chromebook can greatly enhance your recording and streaming experience, you may occasionally encounter some common issues. Here are some troubleshooting tips to help resolve these issues:
1. No Capture Card Detected: If your Chromebook does not detect the capture card, ensure that it is properly connected to a compatible USB port. Try disconnecting and reconnecting the capture card to establish a stable connection. Additionally, check if the capture card drivers are installed correctly and up to date.
2. Poor Video or Audio Quality: If you notice a degradation in the video or audio quality, ensure that you have selected the correct resolution, frame rate, and bitrate settings in the capture card software or recording software. Additionally, try using different USB ports or cables to rule out any connectivity issues.
3. Audio Sync Issues: If you experience audio sync issues, where the audio does not match the video, adjust the audio delay settings in the capture card software or recording software. This allows you to fine-tune the audio synchronization and align it with the video playback.
4. Interference or Distortion: If you notice any interference or distortion in the captured video or audio, check for any external sources that may be causing interference, such as other electronic devices or cables. Positioning your capture card away from such sources or using shielded cables may help reduce or eliminate the interference.
5. Incompatibility with Chrome OS Updates: If you encounter issues after a Chrome OS update, ensure that you have the latest capture card drivers and any required software updates installed. In some cases, you may need to reach out to the capture card manufacturer for any specific updates or patches related to compatibility with the latest Chrome OS version.
6. Insufficient System Resources: If you experience performance issues or dropped frames during recording or streaming, check the system resources of your Chromebook. Close any unnecessary applications or processes that may be putting a strain on the system. Upgrading your Chromebook’s RAM or using a more powerful model can also help alleviate such issues.
7. Unsupported Capture Card: If you inadvertently purchased a capture card that is not compatible with Chromebooks, consider returning or exchanging it for a compatible model. Check the manufacturer’s website or contact their customer support for assistance in finding a compatible capture card.
If you’re unable to resolve the issue using these troubleshooting tips, it’s recommended to contact the capture card manufacturer’s customer support for further assistance. They can provide specific guidance or troubleshooting steps based on the model of your capture card.
By addressing these common issues and following the troubleshooting steps, you can ensure a smooth and reliable experience when using a capture card on your Chromebook.
Now, with your capture card fully functional, you can unleash your creativity and create amazing videos and content on your Chromebook.
Conclusion
Using a capture card on your Chromebook opens up a world of possibilities for content creators, gamers, and anyone looking to record high-quality videos. We have explored what a capture card is and its compatibility with Chromebook devices.
By choosing the right capture card for your Chromebook and installing the necessary drivers, you can easily connect the capture card to your Chromebook and configure its settings. With the proper setup, you can record videos, capture gameplay, stream content, and engage with your audience.
During the setup process, it is important to ensure compatibility with Chrome OS, consider the connection type, resolution and frame rate support, features and functionality, as well as software support for Chromebooks.
Once the capture card is connected and the settings are configured, you can start using it to record videos on your Chromebook. By selecting compatible recording software, adjusting the settings, and monitoring the recording process, you can achieve the desired video and audio quality.
If you encounter any issues, troubleshooting tips such as reconnecting the capture card, adjusting settings, checking for updates, and considering system resource limitations can help resolve common problems.
With a properly functioning capture card, you can unleash your creativity, capture memorable moments, and share your content with others. Whether you are a gamer, a content creator, or simply want to record screen activities, a capture card on your Chromebook is a powerful tool for enhancing your recording and streaming capabilities.
So, take the leap, choose the right capture card for your Chromebook, follow the setup instructions, and start creating amazing videos that capture the attention of your audience!