Introduction
Welcome to our guide on how to snip on Chromebook! If you’re new to Chromebook or are simply looking for a way to capture and save screenshots, you’ve come to the right place. Snipping tools are invaluable tools that allow you to effortlessly take screenshots of specific portions of your screen, whether it’s a web page, an app, or any other content that you want to grab and store for later use.
Chromebook, the lightweight and efficient operating system developed by Google, offers several options for snipping that are both user-friendly and versatile. In this article, we will explore the different methods and tools available to help you snip on Chromebook.
Whether you need to capture a specific image or text from a webpage, create visual content for a presentation, or simply want to share something interesting with a friend, snipping tools on Chromebook can come in handy. We will guide you through built-in options, as well as introduce you to alternative snipping tools that expand your snipping capabilities.
But snipping is not limited to just capturing screenshots. We will also discuss how you can customize your snips to suit your preferences and needs. From selecting different snipping shapes to adjusting the quality and format of your snapshots, we’ll show you how to make your snips truly unique.
Once you have snipped your desired content, the next step is sharing and saving it. Chromebook provides various ways for you to conveniently save and share your snips. We will explore different methods, such as saving to your local storage, uploading to Google Drive, or even sharing directly with others through email or social media.
Finally, we’ll address any common issues you might encounter while snipping on Chromebook. From troubleshooting problems with the built-in snipping tool to resolving compatibility issues with alternative snipping tools, we’ll provide guidance to help you overcome any roadblocks you may face during your snipping journey.
So, whether you’re a student, professional, or casual Chromebook user, this comprehensive guide will equip you with all the knowledge and tools you need to become an expert snipper on your Chromebook. Let’s get started!
What is a snipping tool?
A snipping tool is a software application or a built-in feature that allows you to capture and save screenshots on your computer. It enables you to quickly and easily capture a portion of your screen, whether it’s a specific area, a full window, or the entire screen. Snipping tools are especially useful when you want to highlight and preserve certain information, images, or text from your screen.
On Chromebook, there are multiple ways to access and utilize snipping tools. The most common method is by using the built-in snipping tool provided by the Chrome OS. This default tool offers a simple, user-friendly interface that allows you to capture, edit, and save your screenshots with ease.
Snipping tools, such as the one on Chromebook, provide various snipping modes or shapes that you can choose from. These modes include rectangular, circular, or free-form snips, enabling you to capture the exact area you want without unnecessary clutter. Additionally, snipping tools often offer editing options, allowing you to add annotations, highlights, or blur certain parts of the captured screenshot.
The functionality of a snipping tool extends beyond just capturing static screenshots. Some advanced snipping tools also include features like scrolling capture, which enables you to capture long web pages or documents that require scrolling. This ensures that you don’t miss any crucial information when you need to capture more extensive content.
Snipping tools are versatile and can be utilized for various purposes. Whether you need to create tutorials, document software issues, share interesting content, or simply save important information for later reference, snipping tools provide a convenient and efficient way to capture and store screenshots.
Now that you have an understanding of what a snipping tool is and its significance, let’s delve into the different methods of using the built-in snipping tool on your Chromebook.
Using the built-in snipping tool on Chromebook
Chromebook comes equipped with a built-in snipping tool that allows you to capture and save screenshots with ease. To access the snipping tool on your Chromebook, follow these simple steps:
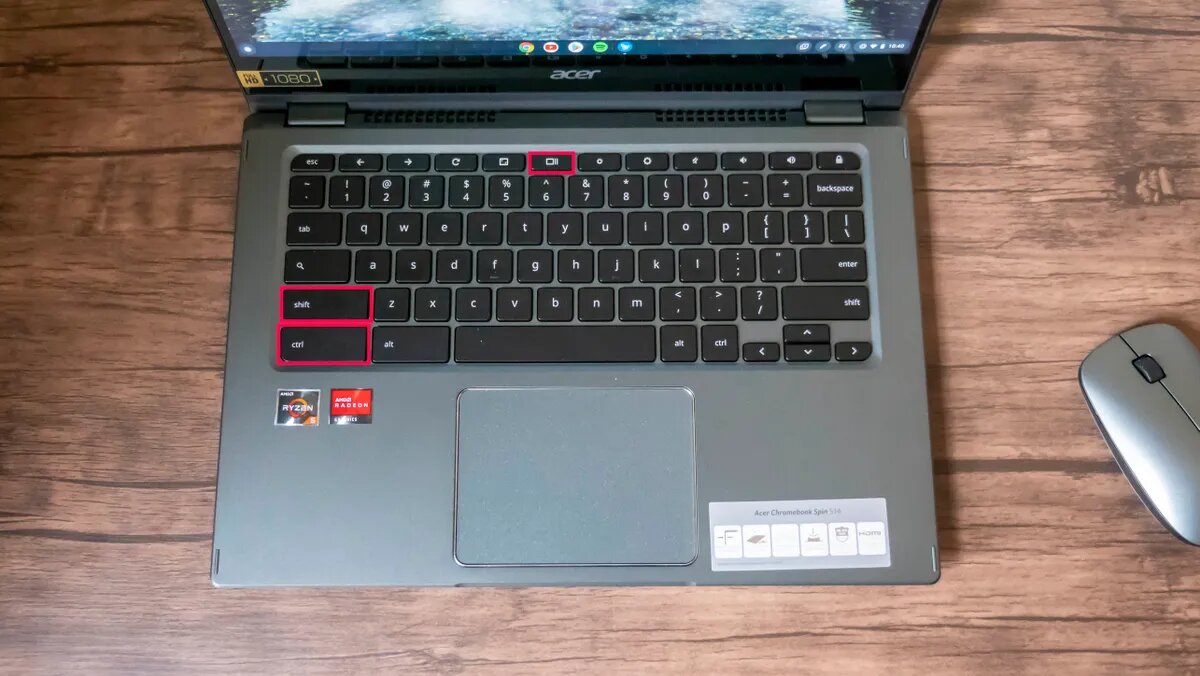
- Press the “Ctrl” and “Switch window” keys simultaneously. The “Switch window” key is typically located above the number “6” key and looks like a rectangle with two vertical lines on the right side.
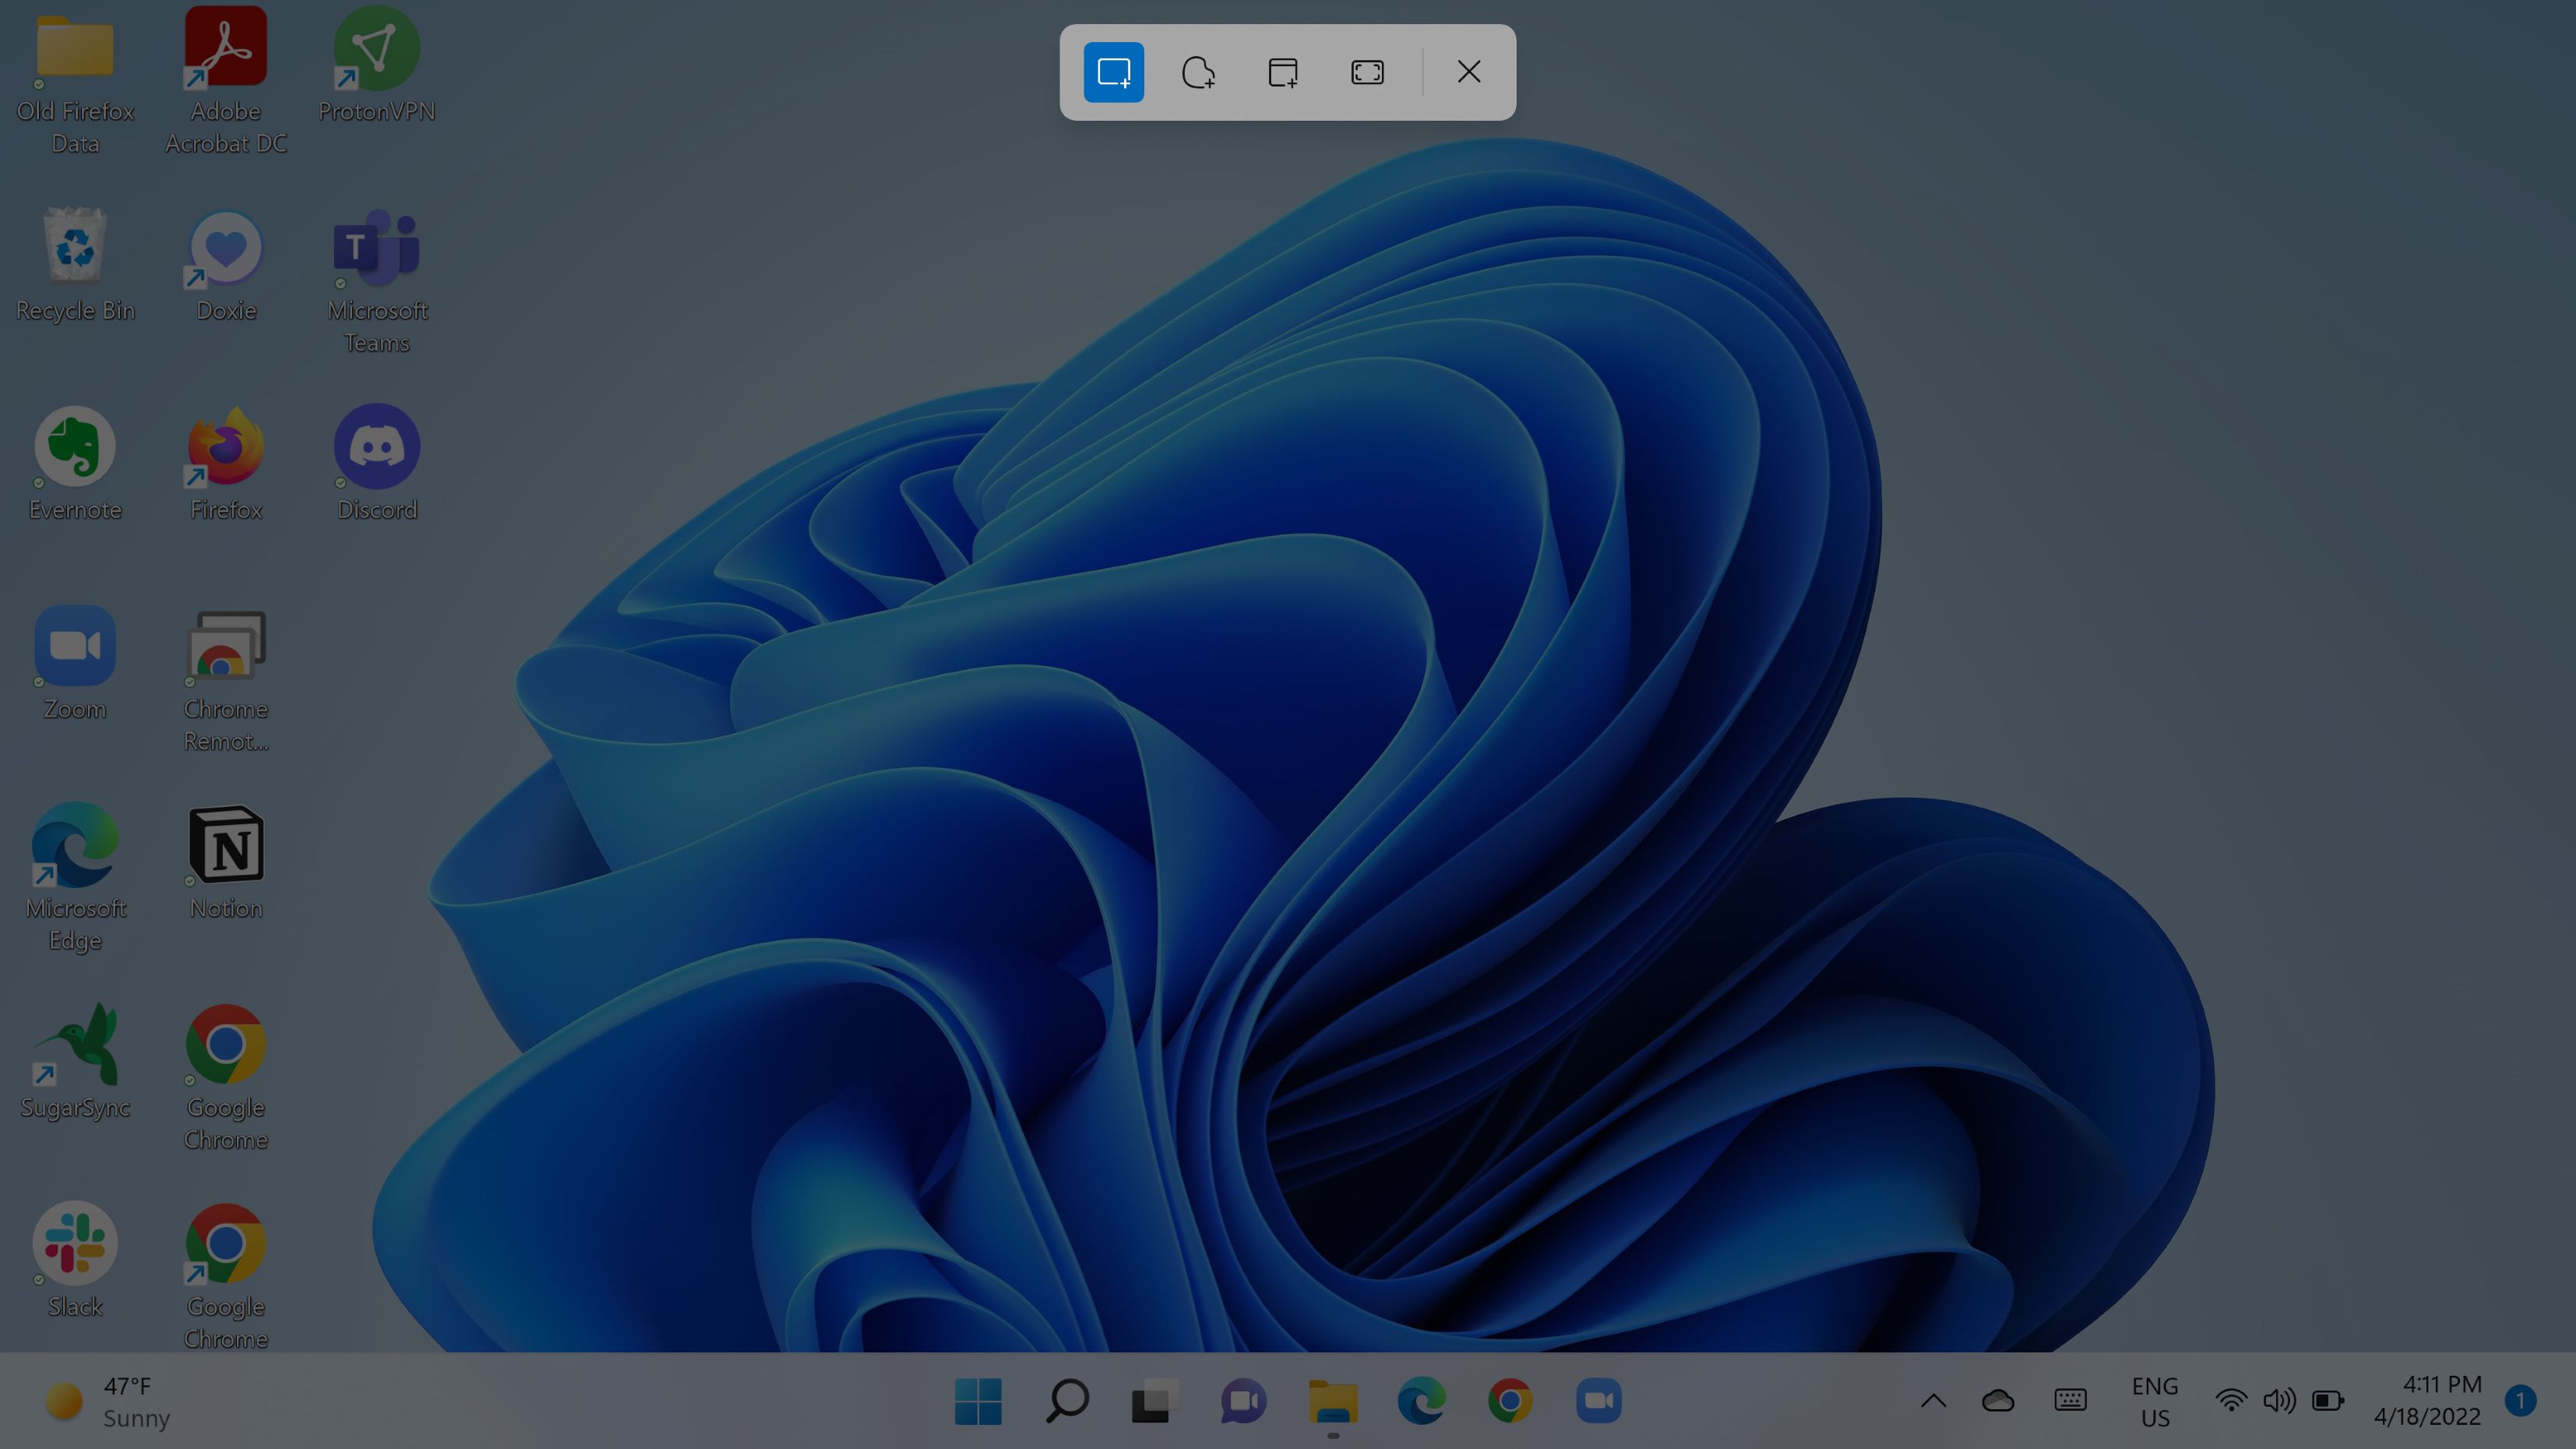
- Your screen will dim, and a toolbar will appear at the top of the screen. This toolbar contains various snipping options.
- Click on the desired snipping option. You can choose from rectangular snip, circular snip, or free-form snip.
- After selecting your desired snipping shape, the cursor will change to a crosshair. Click and drag to select the area you want to capture.
- Once you release the mouse button, the captured screenshot will open in a separate window.
- You can make additional edits or annotations to the screenshot using the toolbar options. You can add text, arrows, highlights, or even blur sensitive information.
- When you’re satisfied with your edits, click the “Save” button in the top-right corner of the window to save the snip to your device.
Using the built-in snipping tool on Chromebook is a straightforward and effective way to capture screenshots. It provides you with a variety of snipping shapes and editing options to customize your snips according to your needs.
Additionally, the built-in snipping tool on Chromebook allows you to easily share your snips. After capturing and saving the screenshot, you can choose to share it directly via email, social media platforms, or other sharing options available on your Chromebook.
Now that you’re familiar with using the built-in snipping tool on Chromebook, let’s explore alternative snipping tools that offer additional features and capabilities for your snipping needs.
Alternative snipping tools for Chromebook
While the built-in snipping tool on Chromebook provides a convenient way to capture screenshots, you may find that you need more advanced features or additional functionality. Fortunately, there are alternative snipping tools available for Chromebook that offer a range of options to enhance your snipping experience. Here are a few popular options:
- Lightshot: Lightshot is a lightweight snipping tool that offers powerful features. It allows you to capture specific areas of your screen, annotate the snip with text and shapes, and even search for similar images online. Lightshot also provides options to upload and share your snips with others.
- Awesome Screenshot: Awesome Screenshot is a versatile snipping tool that enables you to capture screenshots of web pages, including the visible area or the entire page. It offers various annotation tools, including text, arrows, shapes, and blurring. You can also save your snips locally or store them in the cloud for easy access.
- Nimbus Screenshot: Nimbus Screenshot is a comprehensive snipping tool that allows you to capture screenshots, record videos, and even create GIFs. It offers a range of editing tools, including text, arrows, and stamps. You can save your snips locally, upload them to the cloud, or share them with others via a unique link.
These are just a few examples of alternative snipping tools available for Chromebook. Each tool has its own set of features and capabilities, so it’s worth exploring and deciding which one best suits your needs.
To install alternative snipping tools on your Chromebook, follow these steps:
- Open the Chrome Web Store by clicking on the Apps Launcher in the bottom-left corner of your screen and selecting “Web Store.”
- Search for the snipping tool you want to install, such as “Lightshot” or “Awesome Screenshot.”
- Click on the desired snipping tool from the search results.
- On the app’s page, click the “Add to Chrome” button.
- Once installed, the snipping tool will appear as an app in your launcher.
By exploring alternative snipping tools, you can unlock additional features and functionalities to enhance your snipping capabilities on Chromebook.
Now that you’re aware of alternative options, let’s move on to customizing your snips to suit your preferences and needs.
Customizing your snips
One of the advantages of using snipping tools on Chromebook is the ability to customize your snips to make them visually appealing and tailored to your specific requirements. Here are some ways you can customize your snips:
- Selecting different snipping shapes: Most snipping tools offer various snipping shapes, including rectangular, circular, or free-form. Depending on the content you want to capture, you can choose the shape that best suits your needs.
- Adjusting the quality and format: Snipping tools often allow you to adjust the quality and format of your snips. You can choose between different image formats, such as JPEG, PNG, or GIF, and adjust the quality to balance image size and clarity.
- Adding annotations: Annotation tools are commonly included in snipping tools, allowing you to add text, arrows, shapes, and even freehand drawings to your snips. These annotations are useful for highlighting key points, adding explanations, or emphasizing specific areas of the captured content.
- Blurring sensitive information: In some cases, you may need to capture a screenshot that includes sensitive or personal information. Snipping tools often provide a blur tool that allows you to selectively blur or pixelate certain areas to protect privacy.
- Applying filters or effects: Some snipping tools offer filters or effects that allow you to enhance or adjust the appearance of your snips. This can be useful when you want to add a specific mood or style to your captured screenshots.
By customizing your snips, you can make them more visually appealing, informative, and suited to your specific needs. Whether you’re highlighting specific details, providing instructions, or creating visual content, customization options in snipping tools enable you to make your snips stand out.
Now that you know how to customize your snips, let’s move on to the next step: sharing and saving your snips.
Sharing and saving snips
Once you have captured and customized your snips, the next step is to save and share them. Chromebook provides several options for saving and sharing your snips, making it convenient to store and send them wherever you need. Here’s how you can save and share your snips:
Saving snips:
- After customizing your snip, look for the save button or option in the snipping tool you are using.
- Click on the save button to choose a location on your Chromebook to save the snip.
- You can create a folder to organize your snips or save them in an existing folder.
- Consider giving your snip a descriptive name so that you can easily locate it later.
Sharing snips:
- After customizing your snip, most snipping tools offer built-in sharing options.
- Look for the share button or option within the snipping tool interface.
- You can typically choose to share your snip via email, social media platforms, or even direct messages.
- Some snipping tools also allow you to generate a unique link for sharing your snip with others.
- If you have cloud storage like Google Drive, Dropbox, or OneDrive, you can save your snips directly to these platforms and share them from there.
By utilizing the saving and sharing options available, you can easily manage and distribute your snips. Whether you need to send them to colleagues, share them on social media, or store them for future reference, Chromebook makes the process effortless.
Now that you know how to save and share your snips, let’s move on to troubleshooting common issues that you may encounter while snipping on Chromebook.
Troubleshooting common issues
While snipping on Chromebook is generally a smooth and seamless experience, you may encounter some common issues along the way. Understanding these issues and knowing how to troubleshoot them can help you overcome any obstacles that may arise. Here are some common issues you may encounter while snipping on Chromebook and their potential solutions:
Issue 1: Snipping tool not opening or responding:
If the built-in snipping tool or any alternative snipping tool on your Chromebook fails to open or respond, try restarting your device. This can often resolve temporary glitches and restore the functionality of the snipping tool.
Issue 2: Snips not saving or saving in the wrong location:
If you’re experiencing issues with saving snips or find that they are saving in the wrong location, ensure that you have sufficient storage space on your Chromebook. Additionally, check the default save location settings within the snipping tool to ensure it is set to save in your desired location.
Issue 3: Snips appearing distorted or low quality:
If your snips are appearing distorted, blurry, or low in quality, consider adjusting the quality settings within the snipping tool. Increasing the quality or choosing a different image format (such as PNG instead of JPEG) can help improve the overall appearance of your snips.
Issue 4: Snipping tool not capturing the desired area:
If you’re finding it challenging to capture the precise area you want, especially with complex content or overlapping elements, consider using the free-form snip option. The free-form snip allows you to draw a custom shape around the area you wish to capture, providing more flexibility and accuracy.
Issue 5: Compatibility issues with alternative snipping tools:
In some cases, alternative snipping tools may not be fully compatible with certain Chromebook models or versions. If you’re experiencing compatibility issues with an alternative snipping tool, try updating your Chromebook’s operating system or seek out alternative snipping tools that are known to work well with your specific Chromebook model.
If you encounter any persistent issues or have further questions, consider reaching out to the support channels provided by the snipping tool you are using or consulting the Chromebook community for assistance.
By troubleshooting common issues, you can ensure a smoother snipping experience on your Chromebook and overcome any hurdles that may arise.
Conclusion
Congratulations! You’ve now become well-versed in the art of snipping on Chromebook. From understanding the concept of snipping tools to utilizing the built-in snipping tool, exploring alternative options, customizing your snips, and sharing and saving them, you’ve gained a comprehensive understanding of how to capture and manage screenshots on your device.
Snipping on Chromebook offers a range of possibilities, whether you’re a student needing to capture study materials, a professional documenting software issues, or a casual user wanting to share interesting content. With the built-in snipping tool, you have access to an easy-to-use and versatile tool that facilitates effortless snipping on your Chromebook.
However, if the built-in snipping tool doesn’t meet your specific needs, you can explore alternative snipping tools, such as Lightshot, Awesome Screenshot, and Nimbus Screenshot, which offer additional features and functionalities to enhance your snipping experience.
Remember to customize your snips by selecting different snipping shapes, adjusting the quality and format, adding annotations, and blurring sensitive information. These customization options allow you to make your snips more visually appealing and informative.
When it comes to saving and sharing your snips, Chromebook provides various options. You can save your snips locally, create folders to organize them, and easily share them with others via email, social media platforms, or even direct links. Cloud storage options like Google Drive further facilitate convenient access and sharing of your snips.
Lastly, be aware of common issues that may arise while snipping on Chromebook and know how to troubleshoot them. By understanding and resolving these issues, you can ensure a seamless snipping experience.
Now that you’re equipped with the knowledge and skills to snip on Chromebook, go ahead and capture those important moments, snippets of information, or creative visuals. Snipping has never been easier, and with your newfound expertise, you’ll be snipping like a pro in no time!