Introduction
Ever wanted to capture and save a snapshot of what’s happening on your Windows computer screen? Whether it’s an error message, an interesting article, a funny meme, or an important piece of information, taking a screenshot allows you to store and share these moments with ease. With several methods available, Windows provides various ways to capture the screen, making it simple for users of all levels of tech-savviness.
In this article, we will explore different methods to take a snapshot on Windows. From the classic use of the Print Screen key to the modern Snip & Sketch tool, you’ll have a range of options to choose from depending on your needs and preferences. So, let’s dive in and discover the different ways you can capture and save snapshots on your Windows computer.
But why would you need to take a snapshot in the first place? Well, there are numerous reasons. Maybe you want to document an error message to troubleshoot a technical issue with the help of a support team. Perhaps you’ve come across an inspiring quote or valuable information that you want to save for future reference. Or maybe you simply want to share a funny image or an interesting part of a webpage with your friends or colleagues. Whatever the reason, knowing how to take a snapshot on your Windows computer can be incredibly useful in a variety of situations.
Now, let’s explore the different methods to take a snapshot on Windows and find the one that suits your needs.
Methods to Take a Snapshot on Windows
When it comes to capturing a snapshot on your Windows computer, there are several methods available. Let’s explore five different ways you can take a screenshot on Windows:
- Using the Print Screen (PrtScn) Key: This is the most basic and widely used method to take a snapshot on Windows. Simply press the
Print Screenkey on your keyboard, and the entire screen will be captured. You can then paste the screenshot into an image editing software or directly into a document. - Using the Windows Snipping Tool: Windows comes built-in with a useful tool called the Snipping Tool. To access it, go to the
Startmenu, type “Snipping Tool” in the search bar, and open the application. The Snipping Tool allows you to capture a specific area of the screen, customize the shape, and save it as an image file. - Using Keyboard Shortcuts: Windows provides various keyboard shortcuts for taking screenshots. For example, pressing
Alt + PrtScncaptures only the active window, while pressingWindows key + PrtScnsaves the screenshot directly to your Pictures folder. These shortcuts offer quick and efficient ways to capture snapshots without any additional software. - Using the Snip & Sketch Tool: Introduced in Windows 10, the Snip & Sketch tool offers advanced screenshot capturing features. You can activate it by pressing
Windows key + Shift + Sor by searching for “Snip & Sketch” in the Start menu. This tool allows you to capture a specific area, annotate the screenshot, and save or share it with ease. - Using the Xbox Game Bar: If you’re a gamer, the Xbox Game Bar can be a convenient way to take snapshots during gameplay. Simply press
Windows key + Gto open the Game Bar, click on the camera icon, and a screenshot will be saved to your designated folder.
These methods provide a range of options for capturing snapshots on Windows, allowing you to choose the one that best suits your needs and preferences. Whether you prefer the simplicity of the Print Screen key or the advanced features of the Snip & Sketch tool, capturing screenshots on Windows has never been easier.
Using the Print Screen (PrtScn) Key
One of the simplest and most common methods to take a snapshot on Windows is by using the Print Screen key, often abbreviated as PrtScn. This key captures the entire screen and allows you to save it as an image file or paste it into an image editing software or document. Here’s how you can use the Print Screen key:
- Locate the Print Screen key on your keyboard. It is usually located in the top-right corner and may be labeled as PrtScn, PrtSc, or something similar.
- Press the Print Screen key. This will capture a screenshot of the entire screen, including all open windows and applications.
- Open an image editing software or a document where you want to paste the screenshot.
- Press
Ctrl + Vor right-click and select Paste to insert the screenshot. The captured image of your screen will appear in the document or image editing software. - Save the screenshot as an image file by choosing the desired file format and selecting the appropriate options in the image editing software.
The Print Screen key captures the entire screen, making it ideal for saving a snapshot of your entire desktop or when you want to include all open windows and applications in the screenshot. However, if you only want to capture a specific window or region, you might consider other methods like using the Snipping Tool or the Snip & Sketch tool.
Using the Print Screen key is a quick and efficient way to capture screenshots on Windows, especially when you don’t require any advanced features or editing options. It has been a staple of taking snapshots on Windows for many years and remains a popular method among users of all levels of technical expertise.
Using the Windows Snipping Tool
If you want more control over the area you capture in a screenshot, the Windows Snipping Tool is a handy built-in utility that allows you to capture specific regions or windows on your screen. With the Snipping Tool, you can easily customize the shape of the capture, annotate the screenshot, and save it for future reference. Here’s how to use the Snipping Tool:
- Open the Snipping Tool by pressing the
Startbutton, typing “Snipping Tool” in the search bar, and selecting the application from the search results. - Click on the “New” button in the Snipping Tool window.
- Your screen will fade, and a crosshair cursor will appear. Click and drag to select the region you want to capture. Once released, the captured area will appear in the Snipping Tool window.
- In the Snipping Tool window, you can use various tools to annotate the screenshot, such as highlighting or adding text. These tools can be found in the “Pen” and “Highlighter” sections of the toolbar.
- After annotating or customizing your screenshot, click on the “File” menu, and select “Save As” to save the screenshot as an image file. Choose the desired file format, provide a name and location, and click “Save”.
The Snipping Tool gives you the flexibility to capture only the specific area or window that you want, making it ideal for focused screenshots. Whether you need to capture a specific paragraph from an article, an error message, or a specific part of a webpage, the Snipping Tool allows you to do so with precision.
Keep in mind that the Snipping Tool may vary slightly depending on the version of Windows you are using. In newer versions of Windows, you may find an updated version called “Snip & Sketch” that offers additional features and a more modern interface. However, the basic functionality remains the same.
By using the Snipping Tool, you can capture precise screenshots and enhance them with annotations, which can be especially useful in documentation, troubleshooting, or sharing information with others.
Using Keyboard Shortcuts
If you prefer quick and convenient ways to take screenshots on Windows, using keyboard shortcuts can be a time-saving option. Windows provides several keyboard shortcuts that allow you to capture specific areas or windows with just a few key presses. Here are some commonly used keyboard shortcuts for taking screenshots:
- Print Screen (PrtScn) key: As mentioned earlier, pressing the Print Screen key captures the entire screen. However, if you want to capture only the active window, you can use the
Alt + PrtScnkeyboard shortcut. This is especially useful when you have multiple windows open, and you only want to capture the content of a specific window. - Windows key + PrtScn: This useful shortcut captures the entire screen and saves it directly to your Pictures folder. You don’t have to open any image editing software or paste the screenshot manually. It offers a quick and hassle-free way to capture snapshots without any additional steps.
Keyboard shortcuts are particularly handy if you frequently need to take screenshots for various tasks. They eliminate the need to navigate through menus or open additional applications. However, it’s important to note that the functionality of keyboard shortcuts may differ depending on the version of Windows you are using, so it’s always a good practice to check the specific keyboard shortcuts for your operating system.
By utilizing keyboard shortcuts, you can capture screenshots swiftly, without interrupting your workflow. Whether you opt for the traditional Print Screen key or use the Windows key + PrtScn shortcut to save screenshots directly, these shortcuts provide a convenient way to take snapshots on Windows.
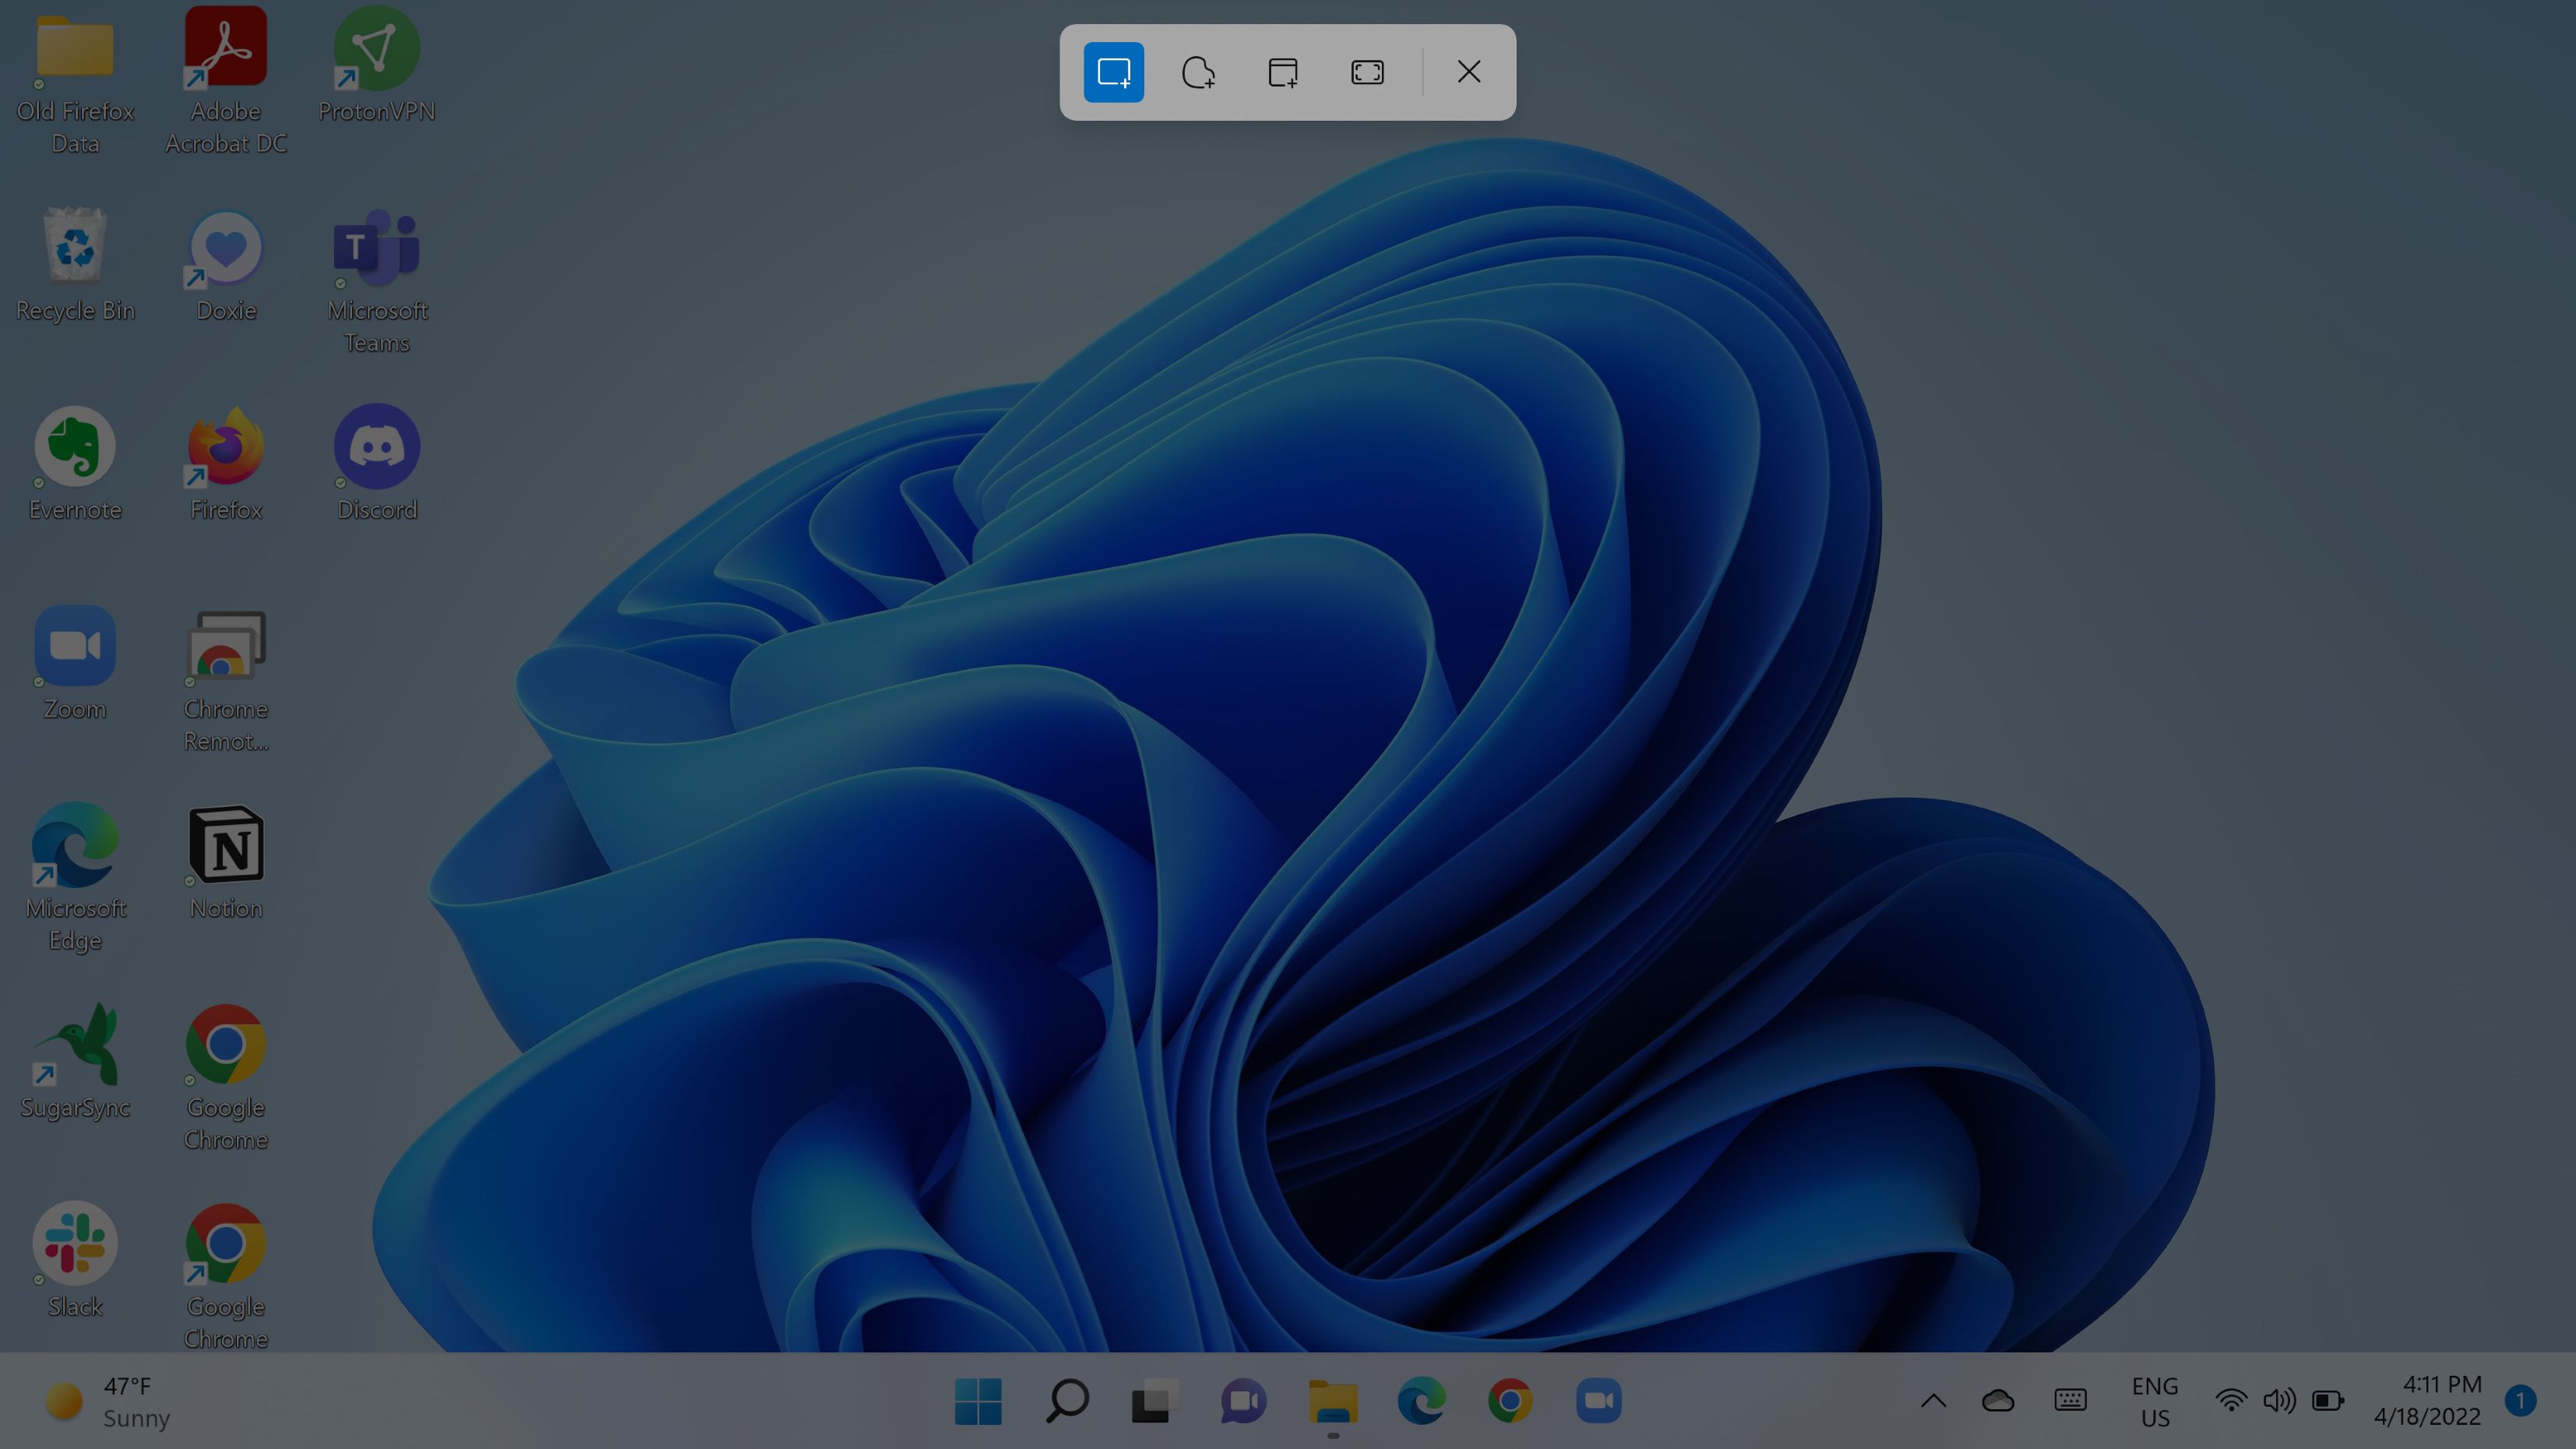
Using the Snip & Sketch Tool
With the release of Windows 10, Microsoft introduced an improved tool called Snip & Sketch for taking screenshots. The Snip & Sketch tool offers advanced features and a modern interface, allowing you to capture, annotate, and share screenshots effortlessly. Here’s how you can use the Snip & Sketch tool:
- Activate the Snip & Sketch tool by pressing the
Windows key + Shift + Skeyboard shortcut. Alternatively, you can search for “Snip & Sketch” in the Start menu and open the application from there. - Your screen will fade, and a small toolbar will appear at the top of the screen. The toolbar provides different options for capturing screenshots, such as Freeform snip, Rectangular snip, Window snip, and Fullscreen snip.
- Select the desired snipping mode. For example, if you choose the Rectangular snip, you can drag your cursor to select a specific rectangular area on your screen to capture.
- After you release the mouse button, the captured screenshot will open in the Snip & Sketch editor. Here, you can write or draw on the screenshot using various pen and highlighter tools.
- Once you have made any necessary annotations or edits, click on the “Save” button in the Snip & Sketch editor to save the screenshot as an image file. You can also directly share the screenshot using the available options.
The Snip & Sketch tool offers a user-friendly interface and additional functionalities compared to the older Snipping Tool. It provides different snipping modes, making it easy to capture specific regions, active windows, or the entire screen. The built-in editor allows you to annotate the screenshot directly, saving you the hassle of using separate image editing software.
Furthermore, the Snip & Sketch tool offers options for sharing the screenshot directly, whether it’s through email or other sharing apps. This makes it convenient for collaboration or quickly sending snapshots to colleagues or friends.
By utilizing the Snip & Sketch tool, you can capture and edit screenshots seamlessly, making it a valuable tool for various tasks, such as creating presentations, documenting information, or simply sharing interesting content.
Using the Xbox Game Bar
If you’re a gamer or frequently engage in gaming activities on your Windows computer, you can take advantage of the Xbox Game Bar for capturing screenshots during gameplay. The Xbox Game Bar is a built-in feature that provides a convenient way to capture and share snapshots without interrupting your gaming experience. Here’s how you can use the Xbox Game Bar to capture screenshots:
- While in a game or any other full-screen application, press the
Windows key + Gkeyboard shortcut. This will open the Xbox Game Bar overlay. - In the Xbox Game Bar overlay, you will see a series of icons on the top-left side. Click on the camera icon to capture a screenshot.
- The screenshot will be saved to your designated folder (usually the Captures folder in your Videos directory).
The Xbox Game Bar provides a quick and convenient way to capture snapshots during gameplay without the need for external software or additional steps. This feature is especially useful for gamers who want to capture memorable moments, achievements, or the stunning visuals in their favorite games.
Moreover, the Xbox Game Bar offers additional features beyond just taking screenshots. You can also use it to record gameplay, control audio settings, and access other gaming-related functions. It’s a versatile tool built into Windows that enhances the gaming experience and allows you to capture and share your favorite moments effortlessly.
With the Xbox Game Bar, gamers can easily capture screenshots without disrupting gameplay or needing to rely on third-party applications. It’s a valuable feature for gamers who seek a seamless way to document their gaming experiences or share impressive moments with friends and the gaming community.
Conclusion
Taking snapshots on your Windows computer is a simple yet powerful way to capture and save important information, memorable moments, or interesting content. Throughout this article, we explored various methods to take screenshots on Windows, each offering its unique advantages and functionalities.
We began with the classic method of using the Print Screen key, which allows you to capture the entire screen with a single press. This method is straightforward and ideal when you want to capture everything visible on your desktop.
We then discovered the Windows Snipping Tool, a versatile utility that enables you to capture specific regions or windows on your screen. The Snipping Tool grants you more control over what you capture and provides annotation features to enhance your screenshots.
Keyboard shortcuts offer a quick and efficient method to take screenshots without the need for additional software. Whether you want to capture the active window or save a screenshot directly to your Pictures folder, keyboard shortcuts provide convenience.
The Snip & Sketch tool, available in newer versions of Windows, elevates screenshot capturing with an intuitive interface and advanced features. With Snip & Sketch, you can capture specific areas or windows, annotate screenshots, and easily share them with others.
Lastly, the Xbox Game Bar provides a dedicated solution for gamers to capture screenshots seamlessly during gameplay. It offers a quick-access overlay, allowing gamers to capture and save memorable moments effortlessly.
Overall, Windows offers a wide range of methods to take snapshots, catering to various needs and preferences. Whether you’re a casual user, an avid gamer, or a professional capturing screenshots for work, there’s a method that suits your requirements.
So, the next time you come across something worth capturing on your Windows computer, whether it’s an error message, an inspiring quote, or a memorable gaming moment, utilize one of these methods to take a snapshot and preserve the moment with ease.