Introduction
Technology advances at a rapid pace, and with the recent launch of Windows 11, many users are eager to explore its enhanced features and functionalities. However, at times, you may encounter issues or simply want to start with a clean slate. This is where a factory reset becomes a valuable option.
A factory reset reinstalls Windows 11 to its original state, removing all personal data, installed programs, and custom settings. It’s like starting over with a brand-new PC, which can help resolve persistent problems or restore optimal performance. If you are considering a factory reset for your Windows 11 PC, this guide will walk you through the process step by step.
Before we delve into the steps, it’s important to note that a factory reset erases all data on your PC. Therefore, it’s crucial to back up any important files or documents to an external storage device or cloud service to prevent permanent loss.
Now that we’ve covered the essential groundwork, let’s jump into the process of factory resetting your Windows 11 PC.
Step 1: Backup Your Important Files
Before proceeding with a factory reset of your Windows 11 PC, it is vital to back up any important files or documents that you don’t want to lose. This step ensures that your valuable data remains safe and accessible even after the reset.
There are various ways to back up your files. One common method is to use an external storage device, such as a USB drive or an external hard drive. Simply connect the device to your PC and copy and paste your important files into the device. You can also use cloud storage services like Google Drive or Microsoft OneDrive to upload and store your files securely online.
When backing up your files, it’s crucial to prioritize the data that is most important to you. This could include documents, photos, videos, music, or any other personal files. Organize your files into folders to make the backup process easier and more organized.
It’s a good idea to double-check your backup to ensure that all your important files have been successfully copied. Take a few moments to verify that everything you want to keep has been transferred to the external storage device or uploaded to the cloud. This way, you can have peace of mind knowing that your files are safe and accessible even if something goes wrong during the factory reset process.
Once you have confirmed that your important files are securely backed up, you can proceed with confidence to the next step of factory resetting your Windows 11 PC.
Step 2: Access the Settings Menu
To begin the factory reset process on your Windows 11 PC, the first step is to access the Settings menu. This menu is where you will find the necessary options to perform the reset.
To access the Settings menu, you can start by clicking on the Start button located in the bottom left corner of the taskbar. This will open the Start menu, where you will see various icons and options.
Next, locate and click on the Settings icon, which resembles a gear. This will open the Settings window, where you can customize and adjust various aspects of your Windows 11 PC.
Alternatively, you can use the keyboard shortcut Windows key + I to directly open the Settings menu.
Once the Settings menu is open, you will see a list of categories on the left-hand side. These categories include System, Display, Personalization, and many more. Take a moment to familiarize yourself with the layout of the Settings menu.
Now that you have successfully accessed the Settings menu, you are one step closer to initiating the factory reset process. In the next steps, we will explore the specific options and settings required to reset your Windows 11 PC.
Step 3: Open the Recovery Options
After accessing the Settings menu, the next step in the factory reset process for your Windows 11 PC is to open the Recovery options. This will allow you to access the necessary settings to initiate the reset.
To open the Recovery options, begin by clicking on the System category in the left-hand side menu of the Settings window. This will open the System settings, where you can manage various aspects of your PC’s configuration.
Next, look for the “Recovery” option in the list of settings on the left-hand side and click on it. In the Recovery settings, you will find different options related to system recovery and reset.
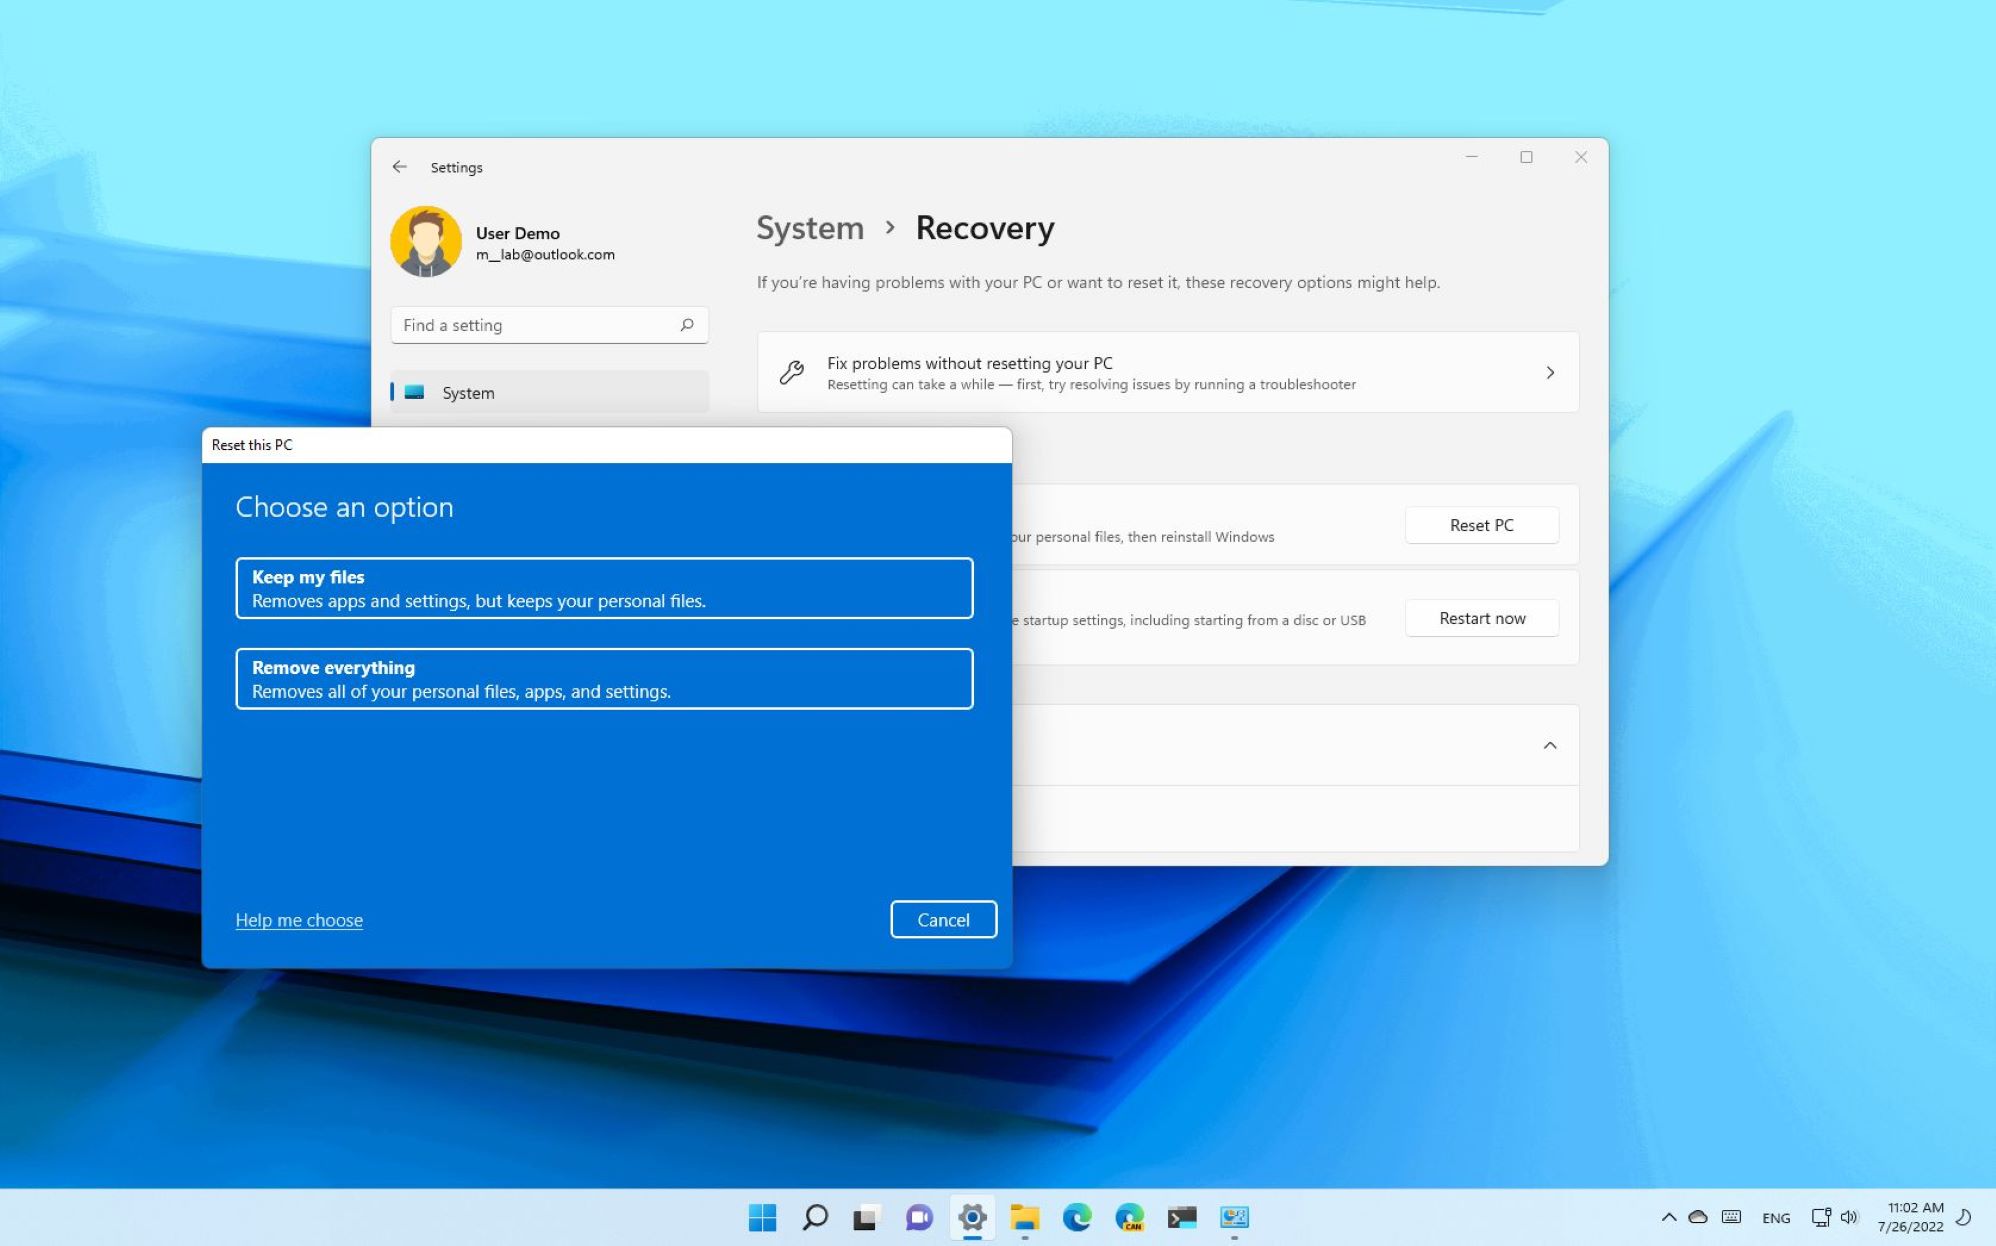
Once you have opened the Recovery options, you will see a section titled “Reset this PC” on the right-hand side. This section provides the necessary settings to perform a factory reset of your Windows 11 PC.
Within the “Reset this PC” section, you will find two options: “Keep my files” and “Remove everything”. The “Keep my files” option allows you to reset your PC while keeping your personal files intact. However, installed apps and settings will be removed. On the other hand, the “Remove everything” option completely wipes your PC, including all files, apps, and settings.
Choose the option that aligns with your preference and requirements for the factory reset. It’s important to note that selecting the “Remove everything” option will result in the permanent deletion of your files and cannot be undone. Ensure that all important data is backed up before proceeding.
Now that you have opened the Recovery options and familiarized yourself with the available reset options, you are ready to move on to the next step and choose the reset method for your Windows 11 PC.
Step 4: Choose the Reset Option
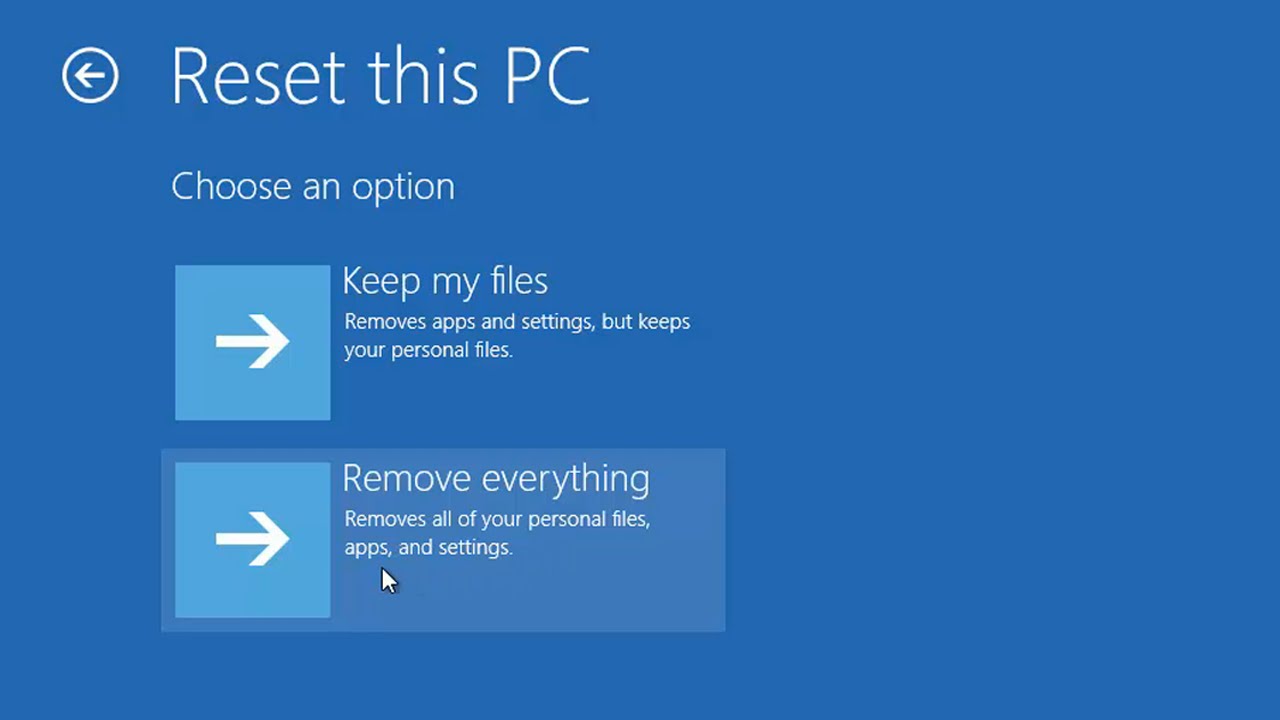
After accessing the Recovery options in your Windows 11 PC’s Settings menu, the next step is to choose the reset option that best suits your needs. Windows 11 offers two reset options: “Keep my files” and “Remove everything”.
The first option, “Keep my files”, is ideal if you want to perform a factory reset while retaining your personal files. This option removes all installed apps and settings but preserves your documents, photos, videos, and other personal data. It’s a convenient choice if you want a fresh start without losing your important files.
The second option, “Remove everything”, is more comprehensive and wipes your PC completely. This means that all your files, apps, and settings will be deleted, returning your PC to its original state. This option is recommended if you want to start from scratch or if you plan to sell or donate your PC.
When deciding which reset option to choose, consider your specific needs and preferences. If you have important files that you want to retain, go with the “Keep my files” option. However, if you want a clean slate and don’t mind losing all your data, the “Remove everything” option is the way to go.
Regardless of the option you choose, it’s essential to ensure that you have backed up all your important files before proceeding. This will prevent any permanent loss of data during the factory reset process.
Once you have made your decision, proceed to the next step, where you will select the reset method to initiate the factory reset process on your Windows 11 PC.
Step 5: Select the Reset Method
After choosing the reset option that aligns with your preferences, the next step in the factory reset process for your Windows 11 PC is to select the reset method. Windows 11 offers two methods: “Cloud download” and “Local reinstall”.
The first method, “Cloud download”, allows you to reset your PC by downloading a fresh copy of Windows 11 from the Microsoft servers. This method requires a stable internet connection and may take longer as it involves downloading a large amount of data. However, it ensures that you have the latest version of Windows 11 installed on your PC.
The second method, “Local reinstall”, uses the system files already present on your PC to perform the reset. This method is faster and does not require an internet connection. However, it may result in an older version of Windows 11 being installed, and you may need to update it later.
Choose the reset method based on your internet connectivity, the availability of system files, and your preference for the latest version of Windows 11.
Keep in mind that regardless of the method you choose, the factory reset process will remove all your installed apps, settings, and personal files (unless you selected the “Keep my files” option earlier). It is crucial to have a backup of any important data to avoid permanent loss.
Once you have selected the reset method, you are ready to move on to the next step: initiating the reset process on your Windows 11 PC.
Step 6: Begin the Reset Process
With the reset option and reset method chosen, it’s time to begin the factory reset process on your Windows 11 PC. This step will initiate the reset and restore your PC to its original state.
Before proceeding, ensure that you have completed the necessary preparations, such as backing up important files and confirming your reset preferences. Once you are ready, follow the steps below to begin the reset process:
- On the Recovery options page in the Settings menu, click on the “Reset” button. You may be prompted to confirm your choice and provide your administrator password.
- A warning message will appear, informing you that your personal files will be removed and your PC settings will be restored. Carefully read through the information and make sure you understand the consequences of the reset.
- If you are ready to proceed, click on the “Next” button to initiate the reset process.
- Depending on the reset method you selected, your PC will either download the necessary files from the cloud or use the local system files to perform the reset.
- The reset process may take some time to complete, so be patient and avoid interrupting it. Your PC may restart multiple times during the process.
- Once the reset is finished, your Windows 11 PC will be restored to its original state, free from any installed apps, settings, and personal data (unless you chose the “Keep my files” option earlier).
After the reset is complete, you will be guided through the initial setup of your Windows 11 PC, similar to when you first purchased or set up the device. Follow the on-screen instructions to configure your preferred settings and personalize your PC.
Congratulations! You have successfully initiated the factory reset process for your Windows 11 PC. Now, you can proceed with the final step, which involves following the on-screen instructions to complete the setup and configuration of your reset PC.
Step 7: Follow the On-Screen Instructions
After completing the factory reset process on your Windows 11 PC, the final step is to follow the on-screen instructions to complete the setup and configuration of your reset PC.
Once your PC restarts after the reset, you will be greeted with the Windows 11 setup screen. This screen will guide you through various options and settings to customize your PC according to your preferences.
Here are some of the key on-screen instructions you may encounter during the setup process:
- Language and region selection: Choose your preferred language and region settings.
- Keyboard layout: Select the keyboard layout that matches your keyboard.
- Network setup: Configure your internet connection settings, such as connecting to a Wi-Fi network.
- Microsoft account: Sign in with your Microsoft account or create a new one. This step is optional, and you can choose to skip it if you prefer using a local account.
- Privacy settings: Customize your privacy preferences, such as location access and diagnostic data sharing.
- Cortana setup: Set up Cortana, Microsoft’s virtual assistant, to personalize and enhance your Windows 11 experience.
- Agree to the license terms: Review and accept the license terms and conditions to continue with the setup.
Follow the on-screen instructions carefully, providing the necessary information and making selections based on your preferences.
Once you have completed the setup and configuration process, your Windows 11 PC will be ready to use. Take some time to explore the new features and functionalities of Windows 11 and reinstall any desired apps or software.
Remember to reinstall any backed-up personal files from your external storage device or cloud services to restore your important data to your freshly reset PC.
With the setup complete, you can now enjoy a clean and refreshed Windows 11 experience.
Conclusion
Performing a factory reset on your Windows 11 PC can be a valuable solution to resolve persistent issues or start fresh with a clean slate. The process may seem daunting at first, but by following the step-by-step guide outlined in this article, you can easily navigate through the reset process and restore your PC to its original state.
Remember, before initiating the factory reset, always back up your important files to prevent permanent loss of data. Choose the reset option and method that best suits your needs, whether it’s preserving your personal files or starting anew. Follow the on-screen instructions during the reset process and take the time to configure and personalize your PC after the reset is complete.
By performing a factory reset, you can rid your Windows 11 PC of any persistent issues, optimize its performance, and have a fresh start with a clean and responsive operating system. It can also be beneficial if you plan to sell or donate your PC, as it ensures that your personal data is securely wiped.
Remember to reinstall any necessary software, update your apps, and restore your backed-up files to complete the reset process. As you explore the new features and functionalities of Windows 11, consider taking proactive steps to keep your PC optimized and secure, such as regularly updating your operating system, using reliable antivirus software, and practicing safe online habits.
With a successfully completed factory reset, you can now enjoy a rejuvenated Windows 11 PC, free from any lingering issues and ready for new adventures.


![[Full Guide] How to Bypass Google Account Verification After Reset](https://robots.net/wp-content/uploads/2023/11/How-to-Bypass-Google-Account-Verification-After-Reset-300x180.png)