Introduction
Welcome to this guide on how to upgrade the SSD on your Macbook Air. If you’ve been using your Macbook Air for a while and find that your storage is filling up, replacing the SSD (Solid State Drive) can be a great option to increase your storage capacity and boost your device’s performance. Whether you’re a student, professional, or just a casual user of your Macbook Air, upgrading the SSD is a relatively simple process that can be done at home with the right tools and a little bit of patience.
The SSD is an essential component of your Macbook Air, responsible for storing your operating system, applications, and files. As time goes on, you may find that your current SSD is reaching its capacity limits, resulting in slower performance and limited storage space. By upgrading to a larger SSD, not only can you improve performance but also ensure that you have ample space for all your files and applications.
In this guide, we will walk you through each step of the process, from backing up your data to reinstalling macOS and restoring your files. We will also provide you with tips on selecting the right SSD for your Macbook Air model and the necessary tools you will need for the upgrade. By the end of this guide, you will have a deeper understanding of how to upgrade the SSD on your Macbook Air and be well on your way to enjoying improved storage and performance.
Please note that upgrading the SSD on your Macbook Air may void any existing warranty, so it’s important to check with Apple or your authorized service provider before proceeding. Additionally, it’s always a good idea to backup your data before making any hardware changes to ensure you don’t lose any important files. With that said, let’s dive into the prerequisites you need to consider before starting the upgrade process.
Prerequisites
Before you begin the process of upgrading the SSD on your Macbook Air, there are a few prerequisites you need to consider. Taking these steps will ensure a smooth and successful upgrade process.
1. Backup your data: It’s essential to create a backup of all your important data before making any changes to your Macbook Air. You can use Time Machine or any other reliable backup solution to create a backup on an external storage device or the cloud. This step is crucial to prevent any data loss during the upgrade process.
2. Check your Macbook Air model: Different Macbook Air models may have varying upgrade requirements and limitations. Before purchasing a new SSD, it’s crucial to identify your specific Macbook Air model. You can find this information by clicking on the Apple logo in the top-left corner of your screen, selecting “About This Mac,” and viewing the model information. This will help ensure compatibility with the new SSD you plan to purchase.
3. Purchase a compatible SSD: Once you know your Macbook Air model, you can research and purchase a compatible SSD. Look for SSDs that are specifically designed for Macbook Air and are compatible with your model. You can find SSDs with different storage capacities, so consider your needs and choose accordingly.
4. Gather the necessary tools: To successfully replace the SSD on your Macbook Air, you will need a few tools. These may include a screwdriver set (typically a Phillips or Torx screwdriver), an antistatic wristband (to prevent static electricity damage), and a soft cloth or grounding mat to work on. Having these tools ready before you begin will make the process much easier.
With these prerequisites in place, you are now ready to proceed with upgrading the SSD on your Macbook Air. The next section will guide you through the first step: backing up your data. Remember to follow each step carefully and take your time to ensure a seamless upgrade process without any data loss or damage to your device.
Step 1: Back up your data
Before you start the process of upgrading the SSD on your Macbook Air, it is crucial to create a backup of all your important data. This ensures that even if something goes wrong during the upgrade, you won’t lose any valuable files or documents. There are a few methods you can use to back up your data, and we will explore two popular options below.
1. Time Machine Backup: If you already have Time Machine set up on your Macbook Air, this is the easiest and most convenient way to create a backup. Time Machine allows you to automatically back up your entire system, including your files, applications, and settings, to an external storage device such as an external hard drive or a network-connected storage (NAS) device. Simply connect the external drive and follow the on-screen prompts to set up Time Machine. Once the backup is complete, you can proceed with confidence, knowing that your data is safely stored.
2. Manual Backup: If you don’t have Time Machine set up or prefer a more manual approach, you can manually copy your important files and documents to an external storage device or cloud storage. This method gives you more control over which specific files and folders you want to back up. Simply create a new folder on your external device or cloud storage and manually copy and paste your important files into it. Make sure to organize your files in a way that makes it easy to restore them later.
Regardless of the method you choose, always double-check that your backup is complete and error-free before proceeding with the SSD upgrade. It’s also a good idea to make a note of where you stored your backup and to keep it in a safe place.
By backing up your data, you have taken a significant step towards ensuring a smooth and worry-free SSD upgrade process. The next section will guide you through checking your Macbook Air model to determine the appropriate SSD upgrade.
Step 2: Check your Macbook Air model
In order to proceed with upgrading the SSD on your Macbook Air, it’s crucial to verify the exact model of your device. Different Macbook Air models have different specifications and may require specific SSDs for the upgrade. Checking your Macbook Air model is a straightforward process and can be done within your device’s settings.
To check your Macbook Air model, follow these steps:
- Click on the Apple logo in the top-left corner of your screen.
- Select “About This Mac” from the dropdown menu.
- A window will appear showing your Macbook Air’s model name, processor, and memory.
Make a note of the model name, as this information will be essential when purchasing a compatible SSD for the upgrade. For example, your Macbook Air might be labeled as “Macbook Air (13-inch, Early 2015)” or “Macbook Air (Retina, 13-inch, 2020)”. This information will help you find the appropriate SSD that fits your specific model.
Once you have determined your Macbook Air model, it’s time to move on to the next step: purchasing a compatible SSD. Having the correct SSD will ensure that the upgrade process goes smoothly and that the new drive is compatible with your Macbook Air. In the next section, we will provide guidance on how to choose the right SSD for your device.
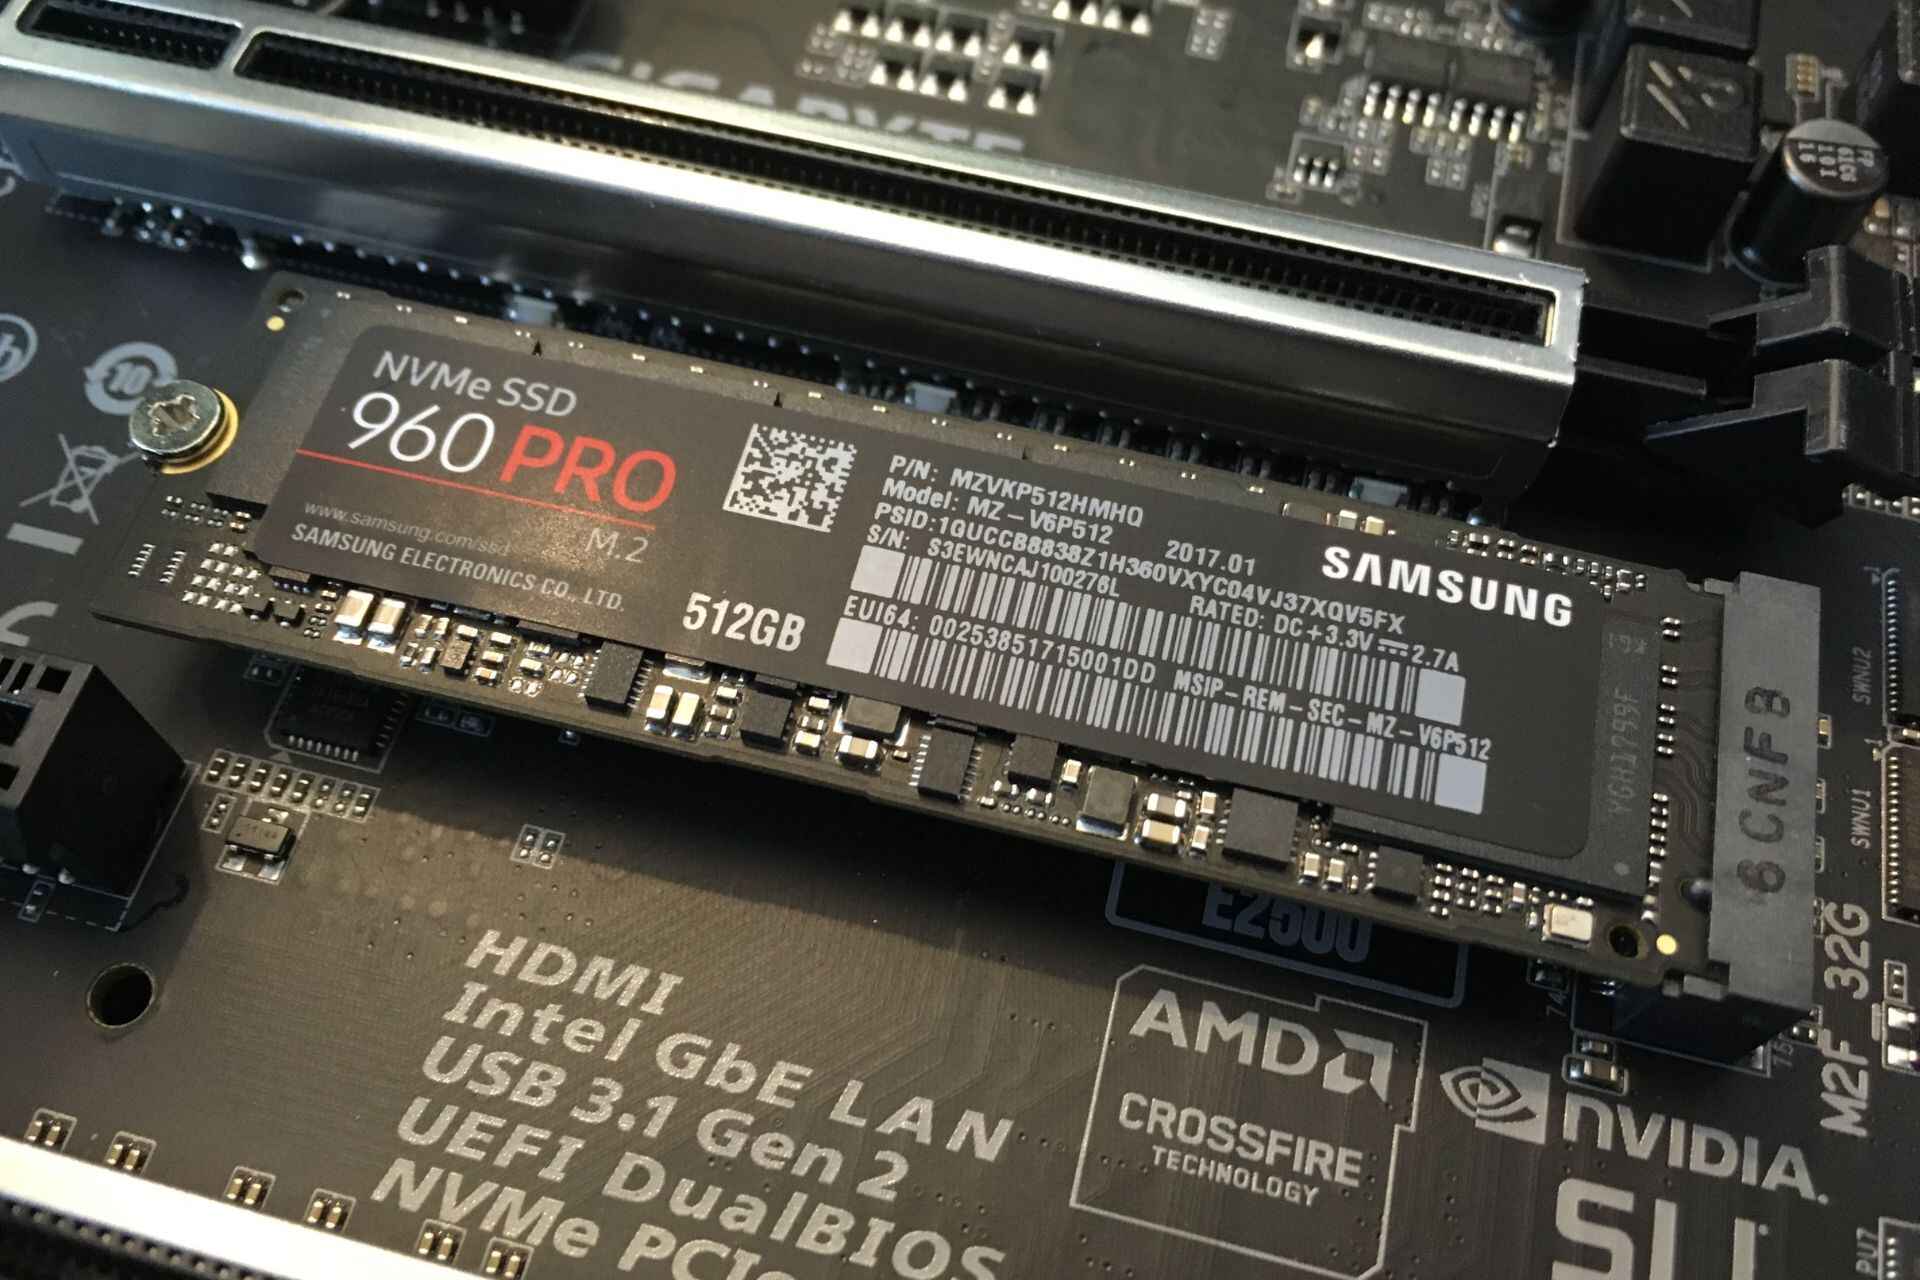
Step 3: Purchase a compatible SSD
Now that you have identified the model of your Macbook Air, it’s time to purchase a compatible SSD for the upgrade. Upgrading the SSD will not only increase your storage capacity but also improve the overall performance of your Macbook Air. When selecting a new SSD, it’s crucial to ensure compatibility with your specific Macbook Air model.
Here are a few important factors to consider when purchasing a compatible SSD:
1. Capacity: Determine how much storage space you need. Assess your current storage usage and consider any future storage requirements. SSDs are available in various capacities, ranging from 128GB to 2TB or more.
2. Form factor: Macbook Airs have different SSD form factors, so it’s important to choose an SSD that matches the form factor of your device. The most common form factors for Macbook Air SSDs are PCIe (M.2) and SATA.
3. Interface: The interface of the SSD needs to match the interface supported by your Macbook Air. Some models support PCIe (NVMe) interface, while others support SATA. Check your Macbook Air’s specifications to determine the appropriate interface.
4. Brand and reliability: Choose a reputable brand to ensure a reliable and high-quality SSD. Popular SSD brands known for their performance and reliability include Samsung, Crucial, Western Digital, and Kingston.
5. Reviews and compatibility: Read reviews and check user feedback to ensure the SSD you choose is compatible with your Macbook Air model. Look for reviews from users who have performed similar upgrades on their devices.
When purchasing the SSD, you can either buy it directly from an Apple authorized dealer or from reputable online retailers or computer stores. Ensure that the SSD you select meets the required specifications for your Macbook Air model.
Once you have purchased the compatible SSD for your Macbook Air, you are ready to move on to the next step: gathering the necessary tools for the upgrade. In the following section, we will discuss the tools you will need to successfully replace the SSD in your Macbook Air.
Step 4: Gather the necessary tools
Before you begin the process of upgrading the SSD on your Macbook Air, it’s important to gather all the necessary tools. Having the right tools readily available will make the upgrade process much smoother and more efficient. Here’s a list of the tools you’ll need:
1. Screwdriver set: You will need a screwdriver to open the Macbook Air case and remove the old SSD. The type of screwdriver needed will depend on the specific model of your Macbook Air. Most Macbook Airs require a small Phillips or Torx screwdriver. Refer to your Macbook Air’s user manual or online resources to determine the correct screwdriver size.
2. Antistatic wristband: It’s recommended to wear an antistatic wristband during the upgrade process. This helps prevent electrostatic discharge (ESD) that can damage sensitive electronic components. An antistatic wristband will help ensure that you don’t accidentally damage your Macbook Air or the new SSD.
3. Soft cloth or grounding mat: A soft cloth or grounding mat is useful to protect the Macbook Air’s delicate components from scratches and static electricity. Place the Macbook Air on the cloth or mat during the upgrade process to ensure a safe and clean working surface.
4. Tweezers or plastic prying tools: These tools can be helpful when removing delicate connectors or cables during the SSD replacement process. They allow for easy and precise maneuvering without the risk of damaging any components.
It’s important to note that some SSD upgrade kits, particularly those designed for Macbook Airs, may come with their own set of tools. Be sure to check the contents of the kit you purchased to ensure you have all the necessary tools before starting the upgrade process.
By having these tools ready, you’ll be well-prepared to open your Macbook Air, replace the old SSD, and install the new one. In the next step, we will guide you through preparing your Macbook Air for the SSD upgrade.
Step 5: Prepare the Macbook Air for upgrade
Before you begin the process of upgrading the SSD on your Macbook Air, it’s essential to properly prepare your device. Taking the time to prepare your Macbook Air will help ensure a smooth and successful upgrade process. Follow the steps below to prepare your Macbook Air for the SSD upgrade:
1. Power off your Macbook Air: Make sure your Macbook Air is completely powered off before you begin the upgrade process. Disconnect any power cables, peripherals, or accessories connected to your Macbook Air.
2. Ground yourself: It’s important to ground yourself to prevent any buildup of static electricity, which can potentially damage the sensitive electronic components of your Macbook Air. Wear an antistatic wristband or touch a grounded metal surface to discharge any static electricity before handling the internal components.
3. Find a clean and well-lit workspace: Choose a clean and well-lit workspace to perform the upgrade. A clutter-free environment will help you keep track of the small screws and components during the process. Ensure there is enough light to clearly see the internal components of your Macbook Air.
4. Remove any existing external storage: If you have any external storage devices connected to your Macbook Air, such as USB drives or SD cards, remove them before proceeding with the upgrade. This will prevent any accidental data loss or interference during the process.
5. Take note of the current SSD location: Observe the location and orientation of the current SSD inside your Macbook Air. This will help you correctly install the new SSD later on. You can take a picture or make a note to help you remember the orientation and connection points.
Taking these steps to prepare your Macbook Air will ensure that the upgrade process goes smoothly and minimizes the risk of any damage to your device. With your Macbook Air prepared, you are ready to move on to the next step: opening the Macbook Air case. This step will require careful attention and the proper use of tools, so make sure you have familiarized yourself with the process before proceeding.
Step 6: Open the Macbook Air case
Opening the case of your Macbook Air is a crucial step in the upgrade process. It will grant you access to the internal components, including the SSD. However, it’s important to note that opening the case of your Macbook Air requires caution and precision to avoid damaging any delicate components. Follow the steps below to open the Macbook Air case safely:
1. Turn your Macbook Air upside down: Flip your Macbook Air upside down, so the bottom panel is facing upwards. Place it on a soft cloth or grounding mat to protect its surface from scratches and static electricity.
2. Locate and remove the screws: Depending on your Macbook Air model, there will be a series of screws securing the bottom panel. Use the appropriate screwdriver (Phillips or Torx) to carefully remove these screws. Keep them in a safe place to avoid losing them.
3. Gently remove the bottom panel: Once all the screws are removed, gently lift the bottom panel of your Macbook Air. Be cautious and use a plastic prying tool or your fingertips to carefully detach any clips or connectors holding the panel in place.
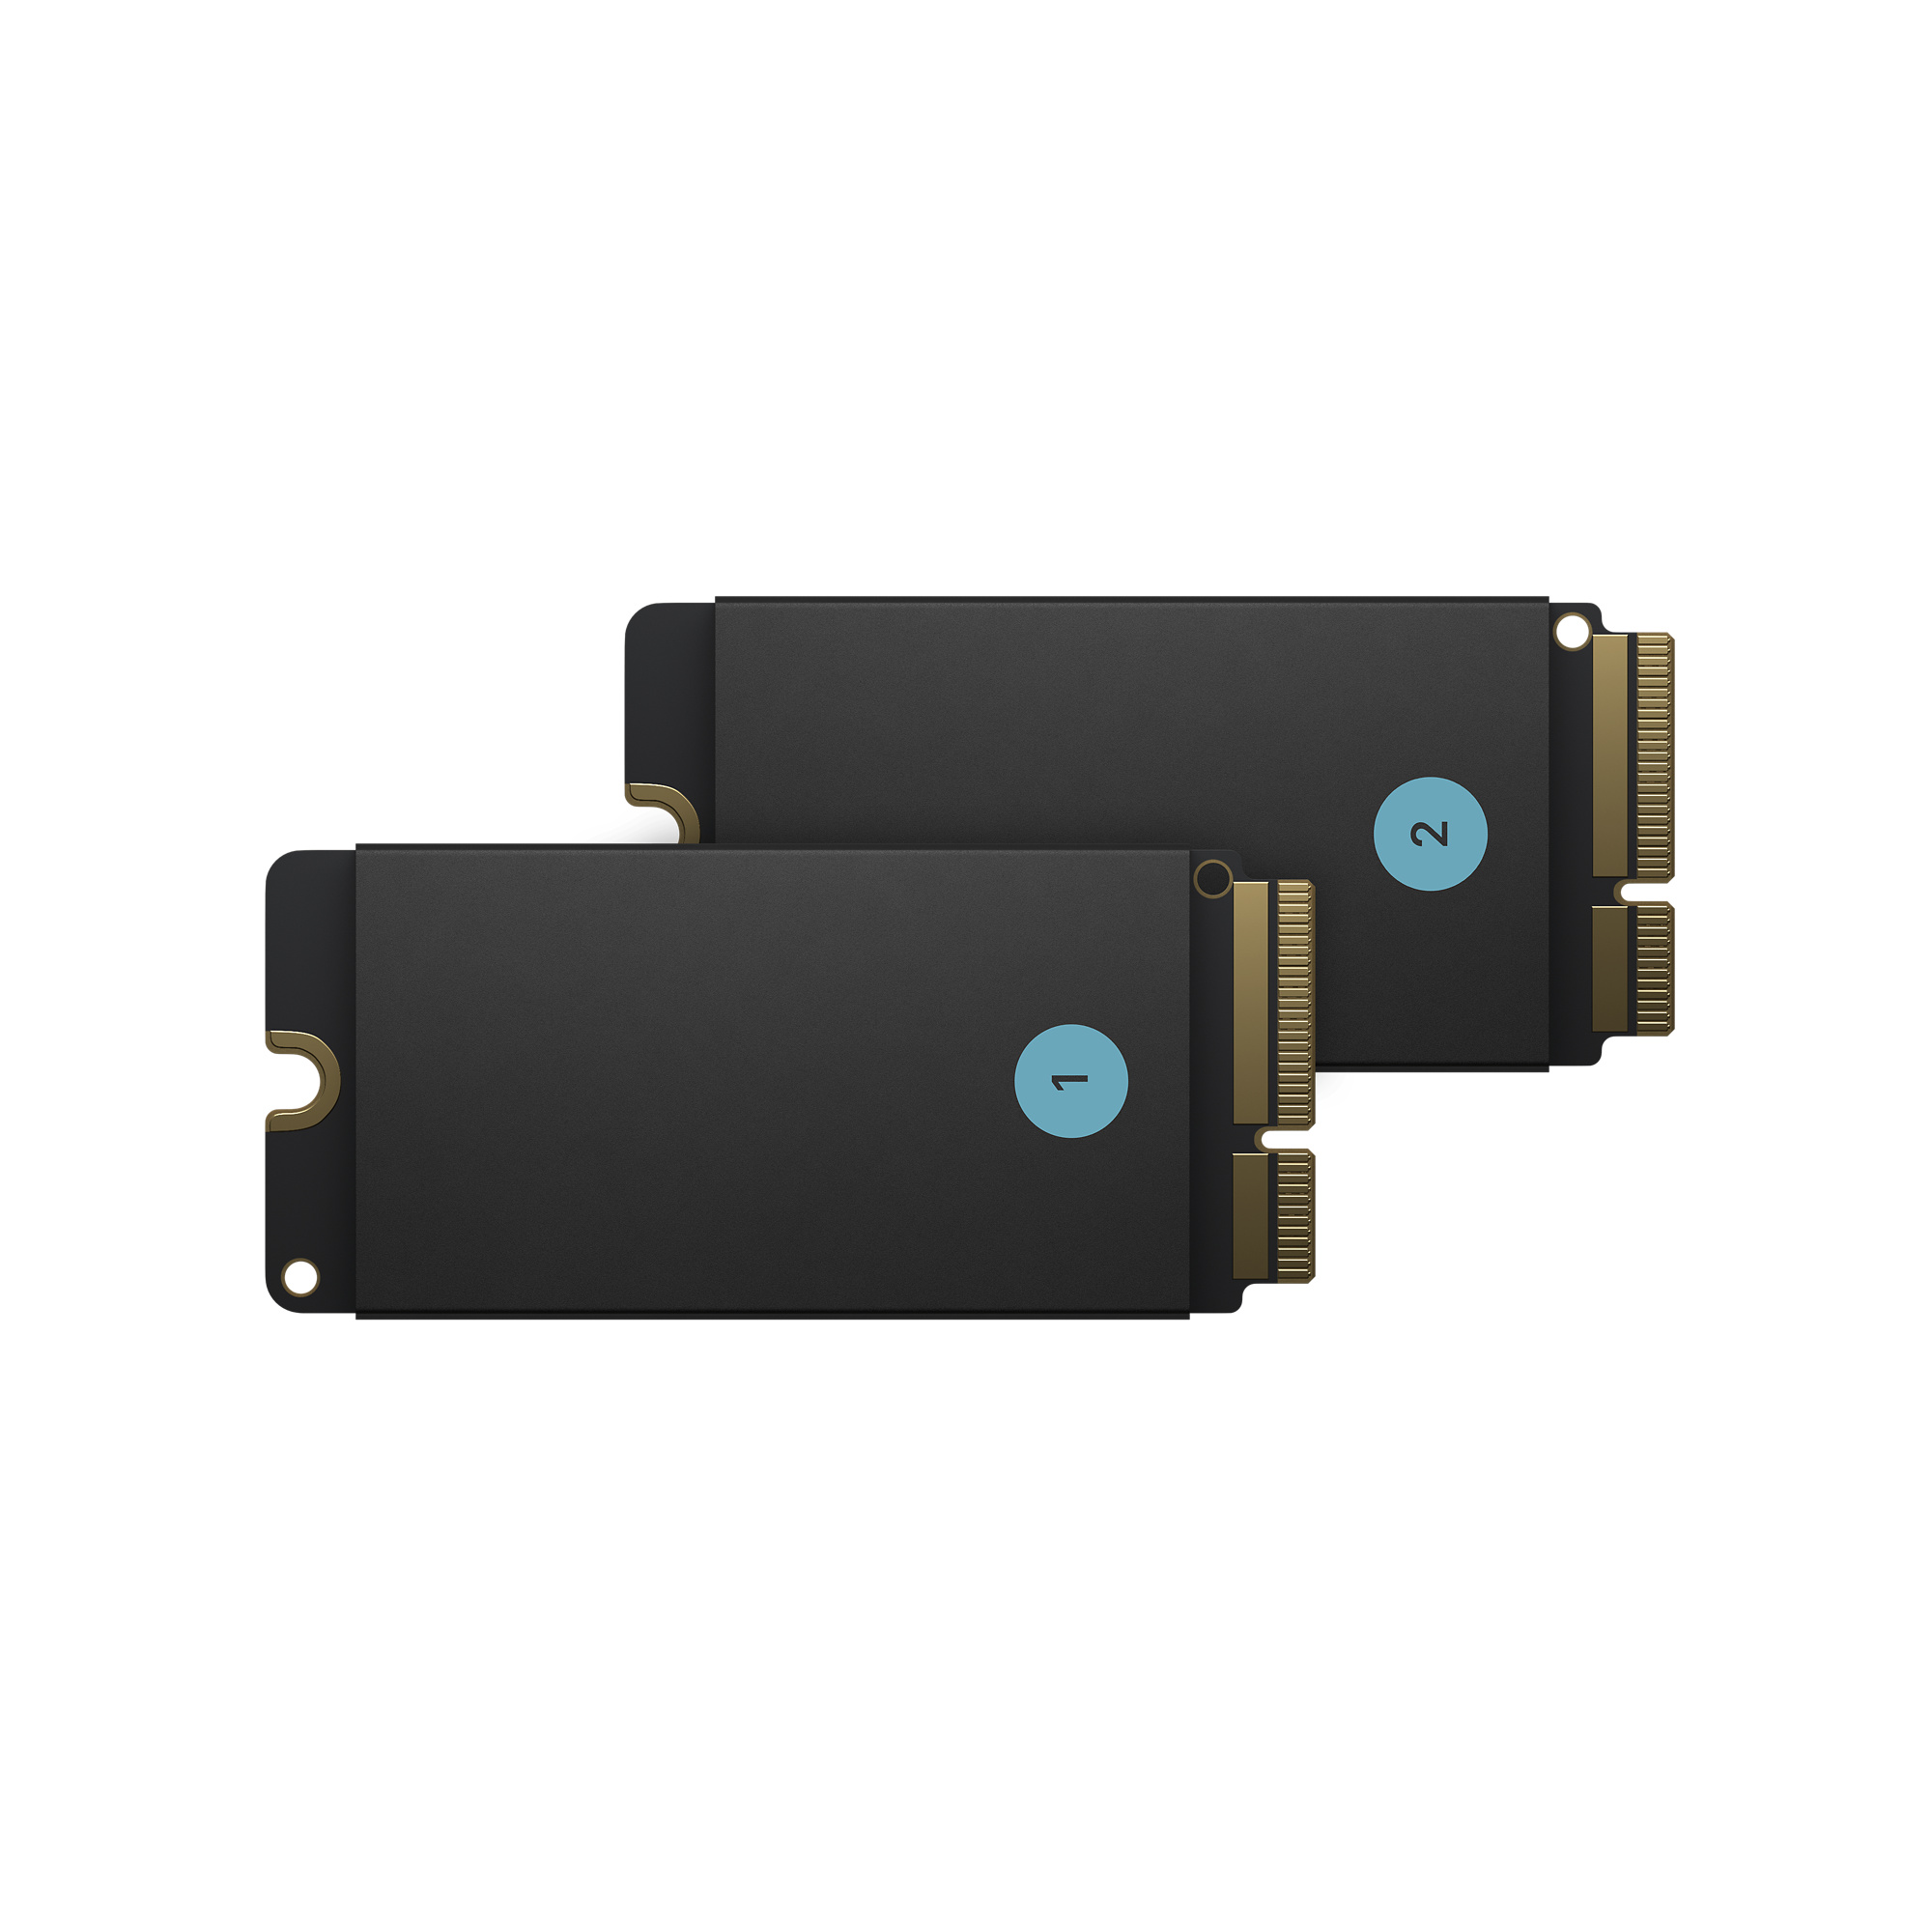
4. Locate the SSD: Inside your Macbook Air, you will find the existing SSD. It is typically a small rectangular circuit board. Take note of its location and orientation, ensuring you don’t accidentally disconnect any other components.
It’s important to perform this step carefully and avoid using excessive force to prevent any damage to the internal components of your Macbook Air. If you encounter any resistance or have difficulty removing the bottom panel, double-check that you’ve removed all the screws and that there are no hidden clips holding it in place.
By successfully opening the Macbook Air case, you have gained access to the internal components, including the SSD. In the next step, we will guide you through the process of replacing the old SSD with the new one, ensuring compatibility and proper installation for optimal performance.
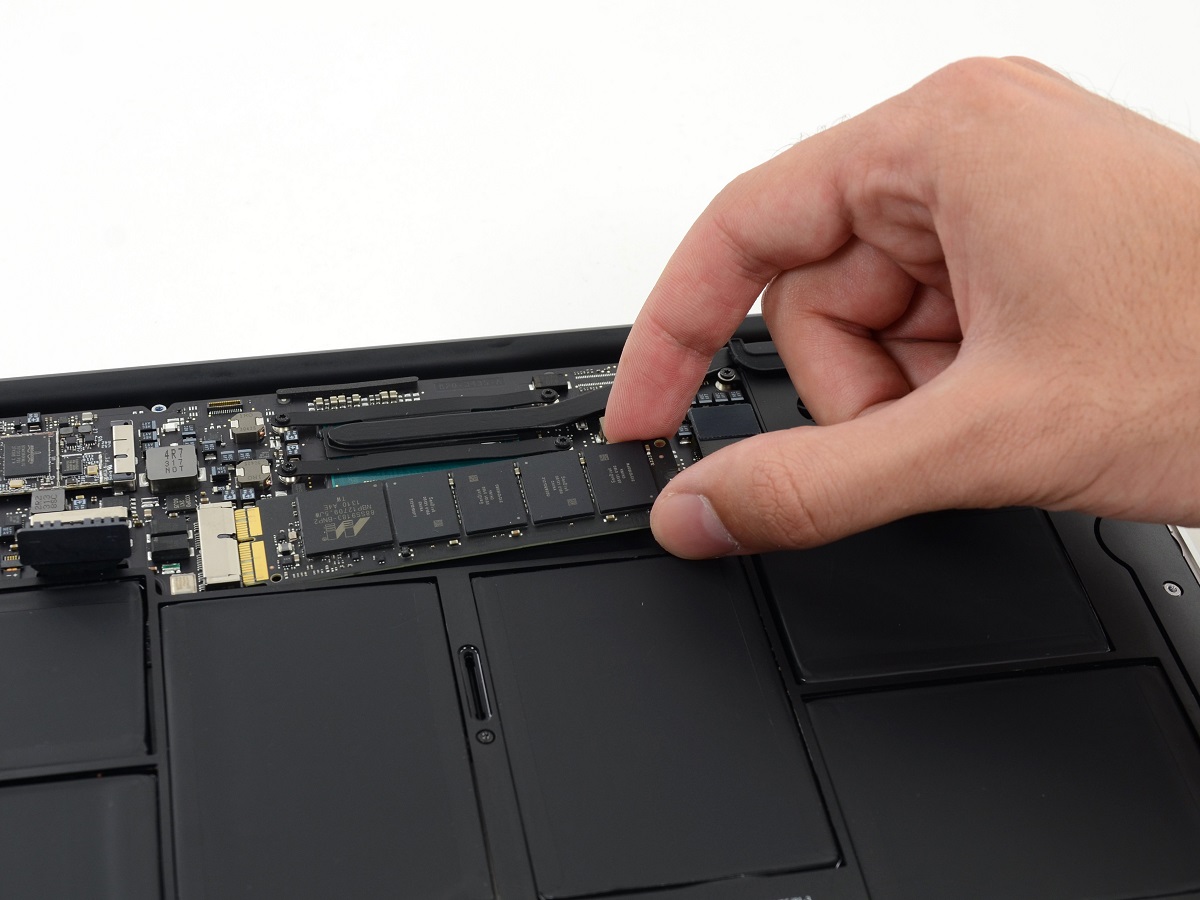
Step 7: Replace the old SSD with the new one
Now that you have successfully opened the case of your Macbook Air, it’s time to replace the old SSD with the new one. Follow the steps below to ensure a smooth and proper installation of the new SSD:
1. Disconnect the old SSD: Carefully disconnect any cables or connectors attached to the old SSD. Take note of how the cables are connected as you will need to reconnect them to the new SSD later on. Use a plastic prying tool or tweezers to gently detach the connectors.
2. Remove the old SSD: Once the cables are disconnected, remove the old SSD from its slot. Depending on the model, it may be secured with screws or held in place by clips. Keep the screws or clips safely aside and set the old SSD aside as well.
3. Install the new SSD: Take the new SSD and align it carefully with the slot previously occupied by the old SSD. Ensure the connectors on the new SSD match those on the Macbook Air. Gently press the new SSD into place, making sure it is securely seated.
4. Reconnect the cables: Reattach the cables and connectors to the new SSD in the same manner they were connected to the old SSD. Ensure a secure and proper connection, but be gentle to avoid damaging the connectors or SSD.
5. Secure the new SSD: If the new SSD came with screws or clips, use them to secure the new SSD in place. Tighten the screws carefully but do not over-tighten as it may damage the SSD or the Macbook Air’s casing.
With the new SSD properly installed, you have successfully completed the crucial step of replacing the old SSD with the new one. Ensure that all connections are secure and the SSD is seated properly in its slot. In the next step, we will guide you through closing the Macbook Air case and preparing to reinstall macOS.
Step 8: Close the Macbook Air case
After replacing the old SSD with the new one, it’s time to close the case of your Macbook Air. Closing the case properly is important to ensure the internal components are protected and secure. Follow the steps below to close the Macbook Air case:
1. Align the bottom panel: Carefully position the bottom panel back onto the Macbook Air, ensuring it is aligned properly with the edges of the device. Take your time to ensure a precise fit.
2. Press down and secure the panel: Apply gentle pressure to the bottom panel to ensure it is fully seated. Use your fingertips to press along the edges, ensuring all the clips and connectors click into place.
3. Reinsert and tighten the screws: Retrieve the screws you set aside earlier and reinsert them into their respective holes on the bottom panel. Use the appropriate screwdriver to gently tighten the screws until they are snug. Avoid over-tightening as it may damage the screws or the Macbook Air’s casing.
4. Verify the panel is securely fastened: Double-check that all the screws are in place and the bottom panel is securely fastened. Gently press on different areas of the panel to ensure there are no loose or uneven sections.
With the Macbook Air case closed, you have successfully completed the hardware part of the SSD upgrade. The next step will involve reinstalling macOS to ensure your Macbook Air is fully functional with the new SSD. Keep following the guide to proceed with the software aspect of the upgrade.
Step 9: Reinstall macOS
After successfully replacing the SSD in your Macbook Air, it’s time to reinstall macOS to ensure that your device is fully functional and ready to use with the new SSD. Follow the steps below to reinstall macOS:
1. Connect your Macbook Air to power: Make sure your Macbook Air is connected to a power source to ensure uninterrupted power during the reinstallation process. This will prevent any issues caused by a sudden loss of power.
2. Turn on your Macbook Air: Press the power button on your Macbook Air to turn it on. As it starts up, immediately press and hold the Command (⌘) and R keys on your keyboard. Release the keys once you see the Apple logo or a spinning globe indicating Internet Recovery mode.
3. Enter Recovery mode: Your Macbook Air will enter Recovery mode, giving you access to various tools and utilities. From the macOS Utilities window, select “Reinstall macOS” or “Reinstall OS X” and click “Continue.”
4. Follow the on-screen instructions: The macOS installer window will appear, guiding you through the reinstallation process. Read the instructions carefully and follow the prompts to reinstall macOS. You may be asked to select a destination disk – choose the new SSD you installed.
5. Wait for the reinstallation to complete: The reinstallation process may take some time, so be patient and allow it to complete. Your Macbook Air may restart multiple times during the process.
6. Set up macOS: Once the reinstallation is complete, your Macbook Air will restart into a fresh installation of macOS. Follow the on-screen prompts to set up your Macbook Air, including selecting your language, signing in with your Apple ID, and configuring preferences.
Congratulations! You have successfully reinstalled macOS on your Macbook Air with the new SSD. Take some time to familiarize yourself with the new setup and settings. In the next step, we will guide you through restoring your data from the backup you created earlier.
Step 10: Restore your data
With macOS reinstalled on your Macbook Air and the new SSD in place, it’s time to restore your data from the backup you created earlier. Follow the steps below to successfully restore your data:
1. Connect your backup device: If you used an external storage device or cloud backup, connect or sign in to the backup device or service you used during Step 1. Ensure that it is accessible and ready for data transfer.
2. Open Migration Assistant: On your Macbook Air, go to the Applications folder, then Utilities, and open Migration Assistant. You can also access it through Spotlight Search by pressing Command + Spacebar and typing “Migration Assistant”.
3. Follow the on-screen prompts: Migration Assistant will guide you through the process of transferring your data. Select the option to transfer data from a Time Machine backup or other backup source, depending on how you backed up your data. Follow the on-screen prompts and select the backup source to proceed.
4. Customize your migration: Migration Assistant allows you to customize which files, settings, and applications you want to transfer. Review the options and choose the data you want to restore. You can select specific files, applications, and even user accounts to transfer to your Macbook Air.
5. Start the migration: Once you have selected your desired settings, click “Continue” to start the data restoration process. Migration Assistant will begin transferring your data from the backup source to your Macbook Air. The time it takes will depend on the amount of data being transferred.
6. Complete the setup: Once the migration is complete, follow any remaining on-screen prompts to finish the setup process. This may include signing in with your Apple ID, configuring preferences, and setting up any necessary accounts or services.
After the data restoration is complete, your Macbook Air will be ready to use with all your personal files, settings, and applications restored. Take some time to ensure everything transferred successfully, and double-check that your important files are in the correct locations.
Remember to disconnect your backup device and ensure it is safely stored or disconnected from your Macbook Air. With the SSD upgrade and data restoration complete, you are now ready to enjoy the improved storage and performance of your Macbook Air.
Conclusion
Congratulations on successfully upgrading the SSD on your Macbook Air! By following the steps outlined in this guide, you have expanded your storage capacity and improved the performance of your device. Upgrading the SSD allows you to store more files and applications, as well as enjoy faster boot times and data access speeds.
Throughout this process, you learned the importance of backing up your data, checking your Macbook Air model, purchasing a compatible SSD, gathering the necessary tools, preparing the Macbook Air, opening the case, replacing the old SSD, closing the case, reinstalling macOS, and restoring your data. Each step was crucial in ensuring a smooth and successful upgrade experience.
It’s important to note that if you encounter any difficulties during the upgrade process or are unsure about any specific steps, it’s always recommended to seek assistance from a professional or consult official documentation from Apple. This will help ensure a safe and accurate SSD upgrade for your Macbook Air.
Now that your Macbook Air is equipped with a new SSD and your data has been successfully restored, take some time to explore the improved performance and expanded storage capacity. Utilize the additional space to store your important files, applications, and media. Enjoy faster access to your data and a more efficient overall experience with your upgraded Macbook Air.
Remember to keep track of your data and periodically backup your Macbook Air to prevent any potential loss. Regularly maintaining your device, including managing your storage and performing software updates, will also contribute to its long-term performance and longevity.
Thank you for following this guide, and we hope you found it helpful in upgrading the SSD on your Macbook Air. Here’s to a seamless upgrade and an enhanced user experience!