Introduction
Uninstalling GPU drivers is a crucial step when it comes to troubleshooting graphics-related issues or upgrading your graphics card. One popular brand of GPU drivers is AMD, and knowing how to properly uninstall AMD GPU drivers is essential for a smooth and successful uninstallation process.
AMD GPU drivers play a crucial role in the functioning of your graphics card. They are responsible for translating instructions from your operating system into information that your graphics card can understand. Over time, outdated or faulty drivers can cause performance issues, stability problems, or even prevent your graphics card from functioning altogether.
Uninstalling AMD GPU drivers can help resolve these issues by removing any conflicting or outdated files, allowing you to start fresh with a clean installation. Additionally, if you are upgrading to a new AMD graphics card, uninstalling the old drivers is necessary to ensure compatibility and optimal performance for the new card.
While uninstalling AMD GPU drivers may seem like a daunting task, there are several methods available to make the process as smooth and straightforward as possible. In this article, we will explore different methods for uninstalling AMD GPU drivers, providing step-by-step instructions to guide you through each method. From uninstalling through the Control Panel to using specialized software like the AMD Clean Uninstall Utility and Display Driver Uninstaller (DDU), we will cover all the essential techniques.
Before we dive into the methods of uninstalling AMD GPU drivers, it’s important to note that it’s always a good idea to create a backup of your important files and make sure you have the latest drivers available for your graphics card. This way, you can easily reinstall the drivers after the uninstallation process is complete.
Now, let’s explore the different methods for uninstalling AMD GPU drivers and get you on your way to resolving any graphics-related issues or upgrading your graphics card.
Why Uninstalling GPU Drivers is Important
Uninstalling GPU drivers, such as AMD GPU drivers, is essential for several reasons. Let’s explore why it is important to uninstall GPU drivers before troubleshooting or upgrading your graphics card.
1. Resolving Performance Issues:
Over time, GPU drivers can become outdated or corrupted, leading to performance issues with your graphics card. By uninstalling the existing drivers, you can remove any conflicting files or settings that may be causing performance problems. This allows you to start fresh with a clean installation of the latest drivers, which can significantly enhance the performance of your graphics card.
2. Ensuring System Stability:
Outdated or incompatible GPU drivers can cause system instability, leading to crashes, freezes, or even the dreaded blue screen of death (BSOD). Uninstalling the problematic drivers and installing updated versions can help stabilize your system and prevent these issues from occurring.
3. Compatibility with New Hardware:
When upgrading your graphics card or adding new hardware to your system, it is crucial to uninstall the previous GPU drivers. This ensures that the new hardware is compatible with your system and eliminates any conflicts that might occur when using outdated drivers. By uninstalling the old drivers, you can pave the way for a seamless installation of the new hardware.
4. Troubleshooting Graphics-related Problems:
If you are experiencing graphics-related problems, such as display glitches, artifacts, or poor performance in games or applications, uninstalling the GPU drivers can be a valuable troubleshooting step. By removing the current drivers and performing a clean installation, you can eliminate any driver-related issues that might be causing the problem.
5. Security and Reliability:
Outdated GPU drivers may have security vulnerabilities that can put your system at risk. Uninstalling the old drivers and installing the latest versions ensures that you have the most secure and reliable drivers installed, protecting your system from potential threats.
By understanding the importance of uninstalling GPU drivers, particularly AMD GPU drivers, you can take the necessary steps to optimize your system’s performance, stability, and compatibility. In the following sections, we will explore various methods for uninstalling AMD GPU drivers, guiding you through the process step-by-step.
Precautions before Uninstalling AMD GPU Drivers
Before diving into the process of uninstalling AMD GPU drivers, it is important to take some precautions to ensure a smooth and successful uninstallation. These precautions will help you avoid any potential issues and ensure that you can easily reinstall the drivers if needed. Let’s take a look at some important precautions to keep in mind:
1. Create a Backup:
Prior to uninstallation, create a backup of any important files, documents, or settings related to your graphics card. This will ensure that you can restore your settings if any issues arise during or after the uninstallation process. You can easily create a backup by copying the files to an external storage device or using a cloud backup service.
2. Download Latest Drivers:
Visit the official AMD website and download the latest drivers for your specific graphics card model. Having the latest drivers on hand will allow you to quickly reinstall them after the uninstallation process. This step also ensures that you have the most up-to-date features and performance improvements for your graphics card.
3. Disconnect from the Internet:
Before proceeding with the uninstallation, disconnect your computer from the internet. This prevents the system from automatically downloading and installing drivers during the uninstallation process, which could interfere with the procedure.
4. Disable Anti-virus Software:
Temporarily disable any anti-virus or security software running on your computer. Antivirus programs may interfere with the uninstallation process and falsely detect certain driver files as threats. Disabling antivirus software ensures a smooth uninstallation process without any unnecessary disruptions.
5. Restart in Safe Mode:
Consider restarting your computer in safe mode before uninstalling AMD GPU drivers. Safe mode loads a minimal set of drivers and services, which can help avoid conflicts and ensure a cleaner uninstallation process. To enter safe mode, restart your computer and press the appropriate key (usually F8 or Shift + F8) during the boot process.
6. Read the Release Notes:
Take the time to read the release notes or documentation provided with the latest AMD drivers. These notes often contain important information regarding specific installation or uninstallation instructions, known issues, and any additional steps you should follow. Staying informed will help you navigate the uninstallation process with ease.
By following these precautions, you can ensure a smooth and successful uninstallation of AMD GPU drivers. Now that you are prepared, let’s explore the different methods for uninstalling AMD GPU drivers and resolving any graphics-related issues you may be experiencing.
Method 1: Uninstall from the Control Panel
The Control Panel is the built-in utility in Windows that allows you to manage various aspects of your computer, including installed programs. Uninstalling AMD GPU drivers through the Control Panel is a straightforward method that works well for most users. Follow these steps to uninstall AMD GPU drivers using the Control Panel:
Step 1: Open the Control Panel:
Click on the Windows Start menu, search for “Control Panel,” and open it.
Step 2: Navigate to “Programs and Features”:
In the Control Panel window, locate and click on the “Programs” or “Programs and Features” option. This will display a list of installed programs on your computer.
Step 3: Locate AMD GPU Drivers:
In the list of installed programs, locate the entry related to AMD GPU drivers. It may be labeled as “AMD Catalyst Control Center,” “AMD Radeon Software,” or something similar. Select the entry by clicking on it.
Step 4: Uninstall the Drivers:
With the AMD GPU drivers selected, click on the “Uninstall” or “Change/Remove” button at the top of the window. Follow the on-screen instructions to proceed with the uninstallation process.
Step 5: Restart Your Computer:
After the uninstallation process is complete, restart your computer to fully remove the AMD GPU drivers.
Step 6: Install New Drivers:
If you intend to reinstall AMD GPU drivers, visit the official AMD website and download the latest drivers for your graphics card model. Follow the provided instructions to install the new drivers.
Important Note:
While the Control Panel method is generally effective, it may not completely remove all files and registry entries associated with AMD GPU drivers. If you encounter any issues or if remnants of the drivers still appear, consider using alternative methods, such as the AMD Clean Uninstall Utility or Display Driver Uninstaller (DDU), which we will discuss in later sections.
By following these steps, you can easily uninstall AMD GPU drivers using the Control Panel. This method allows for a relatively simple and straightforward uninstallation process, making it suitable for most users. However, if you encounter any difficulties or if the drivers are not fully uninstalled, don’t worry. We have more methods to explore that can help you achieve a clean and thorough removal of the AMD GPU drivers.
Method 2: Use the AMD Clean Uninstall Utility
The AMD Clean Uninstall Utility is a specialized tool provided by AMD to ensure a comprehensive removal of their GPU drivers. This utility is designed to remove all traces of the drivers, including files, registry entries, and settings. Follow these steps to uninstall AMD GPU drivers using the AMD Clean Uninstall Utility:
Step 1: Download the AMD Clean Uninstall Utility:
Visit the official AMD website and search for the AMD Clean Uninstall Utility. Download the utility to your computer.
Step 2: Run the Utility:
Locate the downloaded AMD Clean Uninstall Utility file and run it as an administrator. This ensures that the utility has the necessary permissions to make changes to your system.
Step 3: Accept the License Agreement:
Read and accept the license agreement presented by the utility. This agreement outlines the terms and conditions for using the AMD Clean Uninstall Utility.
Step 4: Start the Uninstallation Process:
Once the utility is launched, click on the “Clean Uninstall” or “Start” button to initiate the uninstallation process. The utility will automatically detect the installed AMD GPU drivers and begin removing them.
Step 5: Follow the On-Screen Prompts:
During the uninstallation process, the AMD Clean Uninstall Utility will display on-screen prompts and instructions. Follow these instructions to proceed with the removal of the drivers. The utility may require you to restart your computer to complete the uninstallation.
Step 6: Install New Drivers:
If you plan to reinstall AMD GPU drivers, visit the official AMD website and download the latest drivers for your graphics card model. Follow the provided instructions to install the new drivers.
Important Note:
The AMD Clean Uninstall Utility is a powerful tool that ensures a thorough removal of AMD GPU drivers. However, it is recommended to create a backup of your important files and settings before running the utility. This will allow you to restore your settings if needed.
By following these steps, you can utilize the AMD Clean Uninstall Utility to completely remove AMD GPU drivers from your system. This method ensures a comprehensive uninstallation and is particularly useful if you encounter any difficulties with the Control Panel method or want to ensure a thorough removal of the drivers.
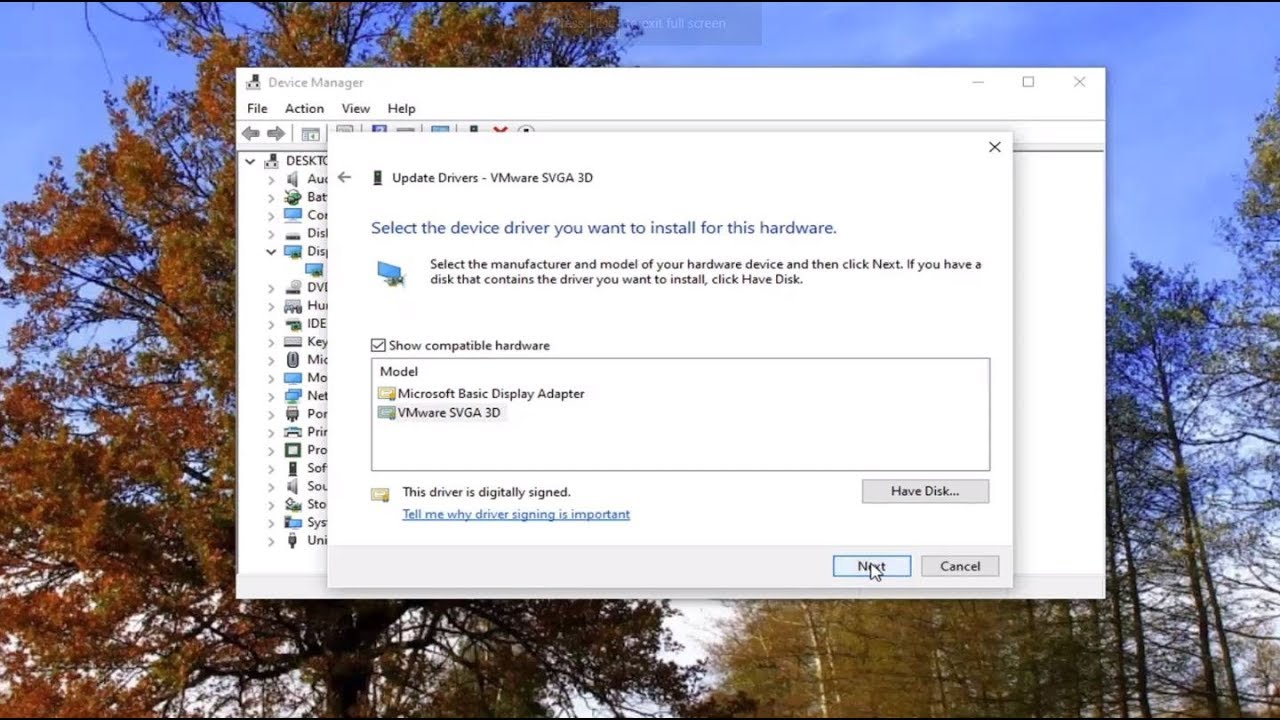
Method 3: Uninstall Using Device Manager
The Device Manager is a Windows utility that allows you to manage and control the devices connected to your computer. Uninstalling AMD GPU drivers using the Device Manager can be a quick and effective method. Follow these steps to uninstall AMD GPU drivers using the Device Manager:
Step 1: Open Device Manager:
Right-click on the Windows Start button and select “Device Manager” from the menu. The Device Manager window will open, displaying a list of hardware devices installed on your computer.
Step 2: Locate the Graphics Card:
In the Device Manager window, expand the “Display Adapters” category. This category will show the graphics card(s) installed on your computer. Right-click on your AMD graphics card and select “Uninstall device” from the context menu.
Step 3: Confirm Uninstallation:
A confirmation dialog box will appear, asking if you want to uninstall the device. Check the box that says “Delete the driver software for this device” to ensure that the AMD GPU driver software is completely removed. Click “Uninstall” to proceed.
Step 4: Restart Your Computer:
After the uninstallation process is complete, restart your computer to fully remove the AMD GPU drivers.
Step 5: Install New Drivers:
If you plan to reinstall AMD GPU drivers, visit the official AMD website and download the latest drivers for your graphics card model. Follow the provided instructions to install the new drivers.
Important Note:
While uninstalling AMD GPU drivers using the Device Manager can be effective, it may not remove all associated files and registry entries. If you encounter any issues or remnants of the drivers remain, consider using alternative methods like the AMD Clean Uninstall Utility or Display Driver Uninstaller (DDU).
By following these steps, you can uninstall AMD GPU drivers using the Device Manager. This method is relatively quick and can be useful if you prefer using built-in Windows utilities for managing your hardware devices.
Method 4: Use Display Driver Uninstaller (DDU)
Display Driver Uninstaller (DDU) is a third-party software designed to completely remove GPU drivers from your system. It is particularly useful when the standard methods, such as using the Control Panel or Device Manager, are not effective in removing all traces of the drivers. To uninstall AMD GPU drivers using DDU, follow these steps:
Step 1: Download and Extract DDU:
Go to the official DDU website and download the latest version of the software. Extract the downloaded file to a convenient location on your computer.
Step 2: Restart in Safe Mode:
Before running DDU, restart your computer in safe mode. Safe mode loads a minimal set of drivers and services, which helps to avoid conflicts during the uninstallation process. To enter safe mode, restart your computer and press the appropriate key (usually F8 or Shift + F8) during the boot process.
Step 3: Run DDU:
Locate the extracted DDU folder and run the DDU application as an administrator. Accept any prompts or warnings that may appear from the operating system.
Step 4: Select GPU and Clean Uninstall:
In the DDU interface, select the GPU vendor, which in this case is AMD. Click on the “Clean and Restart” button to start the uninstallation process. DDU will remove all AMD GPU drivers and associated files from your system.
Step 5: Install New Drivers:
After the restart, if you wish to reinstall AMD GPU drivers, visit the official AMD website and download the latest drivers for your graphics card model. Follow the provided instructions to install the new drivers.
Important Note:
DDU is a powerful tool, and it is crucial to follow the instructions carefully. Back up any important files or settings before running DDU, as it will remove all GPU drivers from your system. Make sure to download the latest AMD GPU drivers to have them on hand for installation after running DDU.
By following these steps, you can use Display Driver Uninstaller (DDU) to completely remove AMD GPU drivers from your system. DDU offers a more thorough uninstallation process and is helpful when standard methods don’t fully remove the drivers or when encountering persistent issues.
Conclusion
Uninstalling AMD GPU drivers is an important step when troubleshooting graphics-related issues or upgrading your graphics card. By properly uninstalling the drivers, you can resolve performance problems, ensure system stability, and maintain compatibility with new hardware.
In this article, we explored four different methods for uninstalling AMD GPU drivers:
- Uninstalling from the Control Panel: A straightforward method that works well for most users.
- Using the AMD Clean Uninstall Utility: A specialized tool provided by AMD for a comprehensive removal of their GPU drivers.
- Uninstalling using the Device Manager: A quick and effective method using the built-in Windows utility for managing hardware devices.
- Using Display Driver Uninstaller (DDU): A third-party software that ensures a complete removal of GPU drivers, helpful when standard methods fall short.
Remember, before uninstalling AMD GPU drivers, take precautions such as creating backups, downloading the latest drivers, disconnecting from the internet, disabling antivirus software, and restarting in safe mode if necessary.
Each method has its advantages, and the best choice depends on your specific needs and circumstances. If one method doesn’t work as expected or leaves remnants of the drivers, don’t hesitate to try another method for a more thorough removal.
After uninstalling the AMD GPU drivers, you can proceed with reinstalling the latest drivers to ensure optimal performance, compatibility, and security.
Now that you have learned various methods to uninstall AMD GPU drivers, you are empowered to manage your graphics card efficiently and effectively. Whether you are troubleshooting issues or upgrading your graphics card, these methods will guide you in achieving a clean and successful uninstallation process.