Introduction
Destiny is an action-packed video game that takes players on an epic journey through immersive worlds and thrilling missions. As a player, you want to fully experience the captivating storyline and dialogue, including any important details that may be spoken by characters. That’s where subtitles come in. Subtitles provide written captions of the dialogue, allowing you to follow along with the game’s story even if you can’t hear or understand the spoken words clearly.
In this guide, we will walk you through the steps to turn on subtitles in Destiny, ensuring that you never miss a word of the game’s dialogue. Whether you are playing on a console or a computer, these steps will help you activate and customize the subtitles according to your preferences.
Before we dive into the details, make sure you have your gaming device and controller ready. It’s time to start your adventure in Destiny, fully equipped with the ability to read and understand all the spoken words!
Step 1: Accessing the Game Settings
The first step to turn on subtitles in Destiny is to access the game settings. To do this, start by launching Destiny on your gaming device and reaching the game’s main menu. This is usually the first screen you encounter when starting the game.
Once you’re on the main menu, look for an option that says “Settings” or “Options.” The exact location of this option may vary depending on the platform you are playing on, but it is typically found in a menu bar at the top or bottom of the screen.
Using your controller or mouse, navigate to the “Settings” or “Options” option and select it. This will open a submenu where you can make various adjustments and customization to your game settings.
Note that if you are playing Destiny on a console, the game settings can also be accessed through the console’s main menu. Look for a dedicated “Settings” section or a gear icon that represents the game’s settings. Selecting this option will take you to the same submenu where you can adjust the game settings.
Now that you’ve successfully accessed the game settings, you’re one step closer to turning on subtitles in Destiny. In the next step, we’ll guide you through navigating to the audio settings, where the subtitle option is usually located. Keep reading to proceed with enabling subtitles and enhancing your gaming experience!
Step 2: Navigating to the Audio Settings
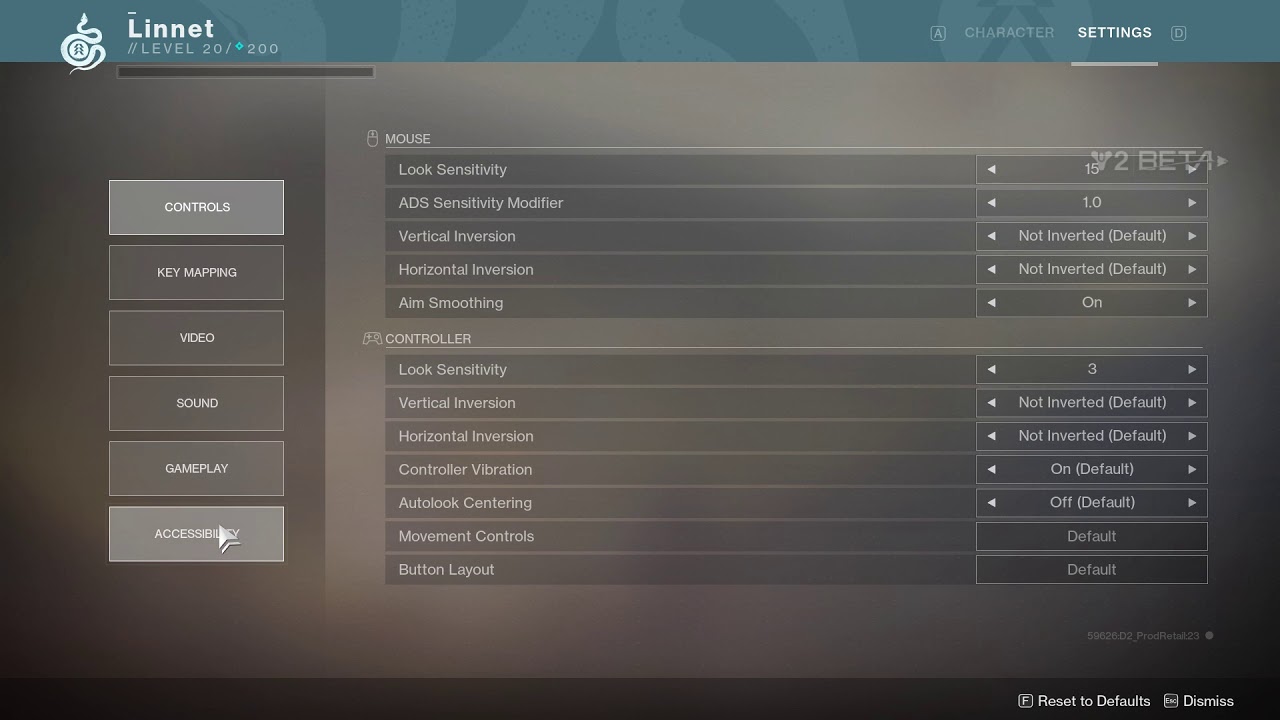
With the game settings menu opened, the next step in enabling subtitles in Destiny is to navigate to the audio settings. The audio settings menu is where you can find options related to sound, including the subtitle feature.
Look for a tab or option labeled “Audio” within the game settings submenu. Using your controller or mouse, select the “Audio” option to access the audio settings. In some cases, the audio settings may be further categorized into sections such as “Sound,” “Audio Options,” or “Settings.”
Once you are in the audio settings menu, you will likely see a variety of options related to sound effects, voice volume, and other audio-related settings. Your goal is to locate the option that controls the display of subtitles in Destiny.
Depending on the game or platform, the subtitle option may be labeled as “Subtitles,” “Captioning,” or something similar. Sometimes, it may be grouped under an “Accessibility” or “Display” section within the audio settings menu. Take your time to carefully browse through the available options until you find the one specific to subtitles.
If you are unsure which option controls the subtitles, consult the game’s manual or website for more information. Additionally, you can search online forums or communities dedicated to Destiny where fellow players may have shared their experiences or provided instructions for enabling subtitles.
Once you’ve located the subtitle option within the audio settings, you are ready to proceed to the next step and activate the display of subtitles in Destiny. Hang in there, and soon you’ll have subtitles appearing on your screen, making it easier to follow the in-game dialogue!
Step 3: Activating Subtitle Display
In this step, we will guide you through the process of activating the display of subtitles in Destiny. Now that you have accessed the audio settings menu, it’s time to turn on the subtitles and ensure that they appear on your screen during gameplay.
Within the audio settings menu, locate the option that controls the display of subtitles. It may be labeled as “Subtitles,” “Captioning,” or something similar. Once you have found the option, select it using your controller or mouse to activate the subtitle display.
Depending on the game and platform, the subtitle option may have different activation methods. For most games, it’s usually a toggle switch that you can turn on or off. Switch it to the “On” position to enable subtitles.
Keep in mind that some games may offer additional customization options for subtitles, such as the ability to change the subtitle language or adjust the text size. If such options are available, take the time to explore and customize the settings according to your preferences.
Once you have activated the subtitle display, you’re one step closer to fully enjoying the game with subtitles. In the next step, we will guide you through selecting the type of subtitles to ensure they fit your preferences and needs. Stick around to learn how to customize your subtitle experience in Destiny!
Step 4: Choosing the Subtitle Type
After activating the display of subtitles in Destiny, you have the option to choose the type of subtitles that best suit your preferences. Different games may offer different subtitle types, so it’s important to explore the available options and select the one that enhances your gaming experience.
In the audio settings menu, look for a section that allows you to choose the subtitle type. This section may be labeled as “Subtitle Style,” “Subtitle Options,” or something similar. Select this option using your controller or mouse to access the available subtitle types.
Depending on the game and platform, you may have various subtitle types to choose from. Common subtitle types include:
- Captions: These subtitles display both the dialogue and any relevant sound effects or music cues.
- Dialogue Only: This option displays only the spoken dialogue, omitting sound effects and music cues.
- Full Subtitles: Full subtitles include not only the spoken dialogues but also additional details like character names and environmental sounds.
Some games may offer additional subtitle customization options, such as transparency, background color, or font style. Explore the available options and adjust them according to your preferences.
Take your time to test different subtitle types and see which one provides the best experience for you. You can always go back to the audio settings and change the subtitle type if needed.
Now that you have chosen the subtitle type that suits your needs, let’s move on to the next step and learn how to adjust the subtitle size and position for optimal visibility during gameplay. Stay with us to enhance your subtitle experience in Destiny!
Step 5: Adjusting Subtitle Size and Position
Now that you have chosen the subtitle type, it’s time to ensure that the subtitles are displayed in the right size and position for optimal visibility during gameplay. Each player has different preferences and viewing conditions, so it’s important to customize the subtitle size and position to make them comfortable to read.
In the audio settings menu, look for an option that allows you to adjust the subtitle size and position. This option may be labeled as “Subtitle Settings,” “Subtitle Customization,” or something similar. Select this option using your controller or mouse.
When customizing the subtitle size, you’ll usually have a slider or numerical values to increase or decrease the font size. Adjust the size until the subtitles are legible and easy to read without obstructing the gameplay or other important visual elements.
In addition to size, you may also be able to adjust the position of the subtitles on the screen. Some games offer preset positions such as top, bottom, or centered subtitles, while others may allow you to manually adjust the position using an on-screen grid or arrow keys.
Take the time to test different sizes and positions, keeping in mind your viewing habits and screen size. You want to find the perfect balance where the subtitles are noticeable but not distracting from the game’s visuals.
Remember, the goal is to make the subtitles comfortable for you to read without compromising your gameplay experience. Experiment with different settings until you find the right combination that suits your preferences.
With the subtitle size and position adjusted to your liking, you are now ready to move on to the final step and confirm your subtitle settings to ensure they are saved for future gameplay sessions. Let’s continue to the next step and finalize your subtitle customization in Destiny!
Step 6: Confirming and Saving Subtitle Settings
After adjusting the subtitle size and position to your liking, it’s important to confirm and save your subtitle settings in Destiny. By doing so, you can ensure that your customized subtitle settings are applied every time you start the game.
In the audio settings menu, look for an option that allows you to confirm and save your subtitle settings. This option may be labeled as “Save Settings,” “Apply Changes,” or something similar. Select this option using your controller or mouse.
Once you’ve selected the option to save your settings, you will usually see a confirmation prompt asking if you want to save the changes. Choose “Yes” or “Confirm” to proceed and save your subtitle settings.
After confirming and saving your settings, you can exit the game settings menu and begin your gameplay with the newly enabled subtitles. From now on, the subtitles will be automatically displayed according to your customized settings each time you start the game.
It’s always a good idea to double-check your subtitle settings after enabling them to ensure they are working as expected. Play through a few dialogue-heavy sections of the game to see if the subtitles appear correctly, and adjust any settings if necessary.
If you ever want to make further changes to your subtitle settings in the future, simply access the game settings menu again and navigate to the audio settings. From there, you can modify the subtitle settings based on your evolving preferences.
Congratulations! You have successfully turned on subtitles in Destiny and customized them to your liking. Enjoy your gameplay with the added convenience of subtitles, and never miss out on important dialogue or story elements again!
Conclusion
Enabling subtitles in Destiny can greatly enhance your gaming experience, allowing you to fully immerse yourself in the captivating world and story of the game. In this guide, we walked you through the step-by-step process of how to turn on subtitles in Destiny and customize them to your preferences.
We started by accessing the game settings and navigating to the audio settings, where the subtitle options are usually located. Then, we guided you through activating the subtitle display and choosing the subtitle type that best suits your needs.
Next, we explored how to adjust the subtitle size and position, ensuring they are comfortably visible on your screen without hindering your gameplay. Finally, we learned how to confirm and save your subtitle settings, making them apply every time you start the game.
With subtitles enabled, you can now fully enjoy the rich dialogue and intricate storytelling that Destiny has to offer. No longer will you miss out on important details or struggle to comprehend the in-game conversations.
Remember, subtitles not only benefit players with hearing impairments, but they can also be useful in noisy environments or when playing without sound. They provide a visual aid that ensures you don’t miss any vital information or dialogue.
We hope this guide has been helpful in enabling subtitles in Destiny and customizing them to your preferences. Now, go forth and delve into the adventure, knowing that you have the ability to fully understand and appreciate the narrative of the game.
Happy gaming!