Enable Notifications in Slack
Slack is a popular communication and collaboration tool used by many teams and organizations. By enabling notifications on your iPhone, you can stay up to date with important messages, mentions, and updates from your Slack channels. Here’s how to enable notifications in Slack on your iPhone:
1. Launch the Slack app: Start by opening the Slack app on your iPhone. If you haven’t already, sign in to your Slack account or create a new one.
2. Access Slack Settings: Once you’re in the Slack app, tap on the “More” tab located at the bottom-right corner of the screen. This will open the Slack settings menu.
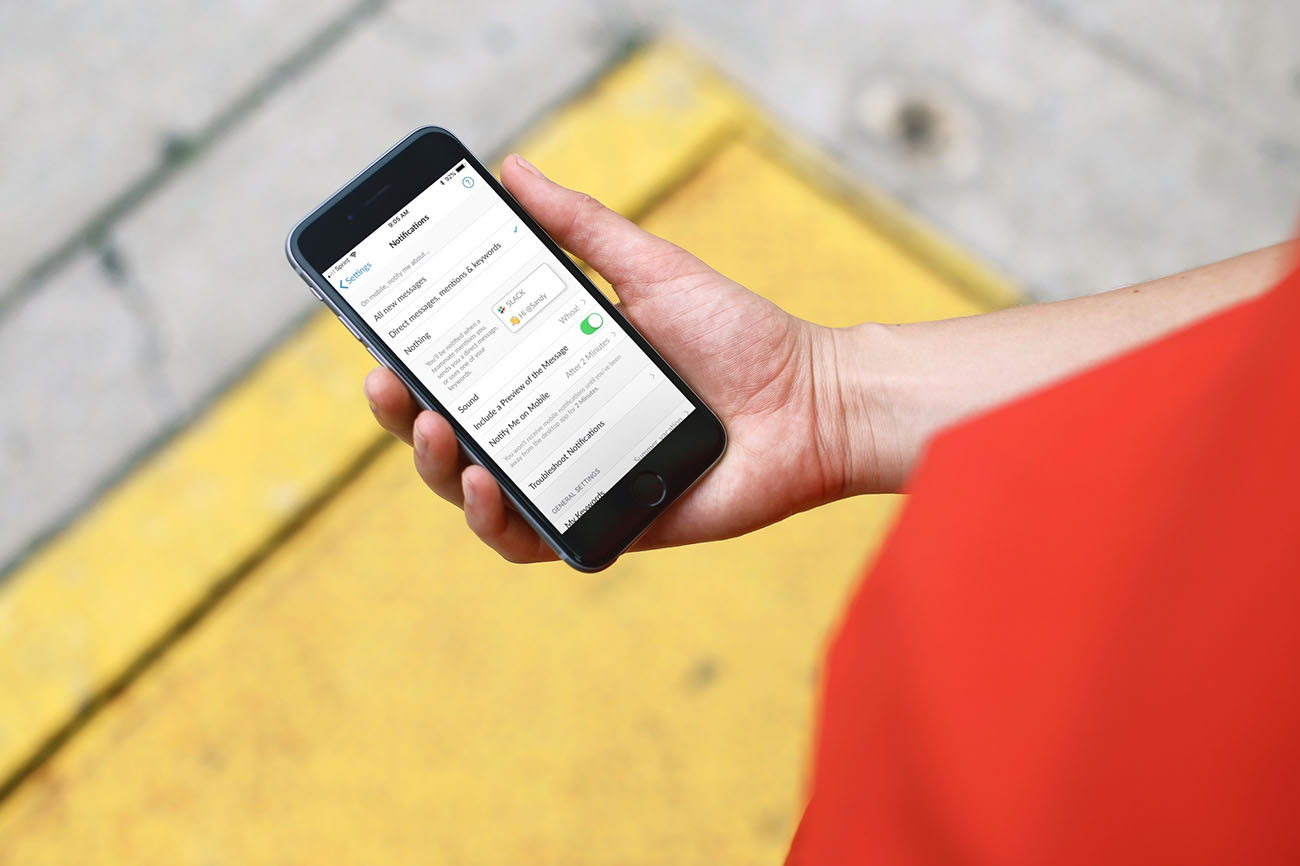
3. Customize Notification Preferences: In the settings menu, tap on “Notifications & Sounds.” Here, you will find various notification preferences that you can customize according to your preferences.
4. Manage Channel Notifications: To manage notifications for specific channels, tap on “Channels” under the “Notification Preferences” section. From here, you can toggle the notifications on or off for each individual channel, based on your needs.
5. Set Up Priority Notifications: Slack allows you to prioritize certain channels or users’ messages. To do this, go back to the main settings menu and tap on “Priority Channel” or “Priority Users.” Choose the channels or users you want to receive priority notifications for.
6. Customize Do Not Disturb Settings: If you want to set specific hours or days when you don’t want to receive any Slack notifications, go to the “Do Not Disturb” section in the settings menu. Here, you can enable “Do Not Disturb” mode and set the desired time range.
7. Enable Badge App Icon: If you want to see the number of unread messages on Slack’s app icon, toggle on the “Badge App Icon” option in the settings menu.
8. Customize Sound Settings: Slack allows you to choose a specific sound for incoming notifications. To customize the sound, tap on “Sounds” in the settings menu and select the desired sound.
9. Enable Banners: Banners are a type of notification that appears at the top of your screen. To enable banners, go to the settings menu and tap on “Banners.” You can choose between temporary banners or persistent banners.
10. Enable Notification Previews: If you want to see a glimpse of the message content in the notification itself, toggle on the “Notification Previews” option in the settings menu.
11. Turn on Lock Screen Notifications: To receive Slack notifications on your iPhone’s lock screen, make sure to enable the “Lock Screen” option in the settings menu.
12. Enable Notification Center: Lastly, toggle on the “Notification Center” option in the settings menu to ensure that Slack notifications appear in your iPhone’s notification center.
By following these steps, you can easily enable notifications for Slack on your iPhone, allowing you to stay connected and informed with your team and conversations wherever you go.
Access Slack Settings on iPhone
Accessing the Slack settings on your iPhone allows you to customize various aspects of your Slack experience, including notification preferences, appearance settings, and account details. Here’s how you can access the Slack settings on your iPhone:
1. Launch the Slack app: To access the settings, start by opening the Slack app on your iPhone. The app icon resembles a colorful hashtag on a white background. If you haven’t logged in already, enter your Slack workspace credentials to proceed.
2. Navigate to the workspace menu: After launching the app, you’ll be directed to your workspace. Tap on the workspace name, located at the top left corner of the screen, to access the workspace menu.
3. Access the settings: In the workspace menu, scroll down until you find the “Settings” option. Tap on it to open the Slack settings menu.
4. Explore the settings options: Once you’re in the settings menu, you’ll see a list of different categories, such as Notifications & Sounds, Appearance, Preferences, and more. Tap on any of these categories to explore and modify the corresponding settings.
5. Customize notification preferences: Under the “Notifications & Sounds” category, you can customize your notification settings, including enabling or disabling notifications, managing channel-specific notifications, setting up priority notifications, and configuring Do Not Disturb settings.
6. Modify appearance settings: The “Appearance” category allows you to personalize the visual appearance of Slack. You can choose a theme (light or dark mode), adjust the font size, enable compact mode, and customize the app icon badge according to your preferences.
7. Manage preferences: In the “Preferences” category, you can further customize your Slack experience. Here, you can toggle on or off options like showing unread message badges, enabling emoji reactions, setting your status, enabling keyboard shortcuts, and more.
8. Update account details: The “Account” category provides options to manage your Slack account settings. You can update your profile information, change your display name and avatar, manage connected apps, and configure other account-related settings.
9. Explore other settings options: In addition to the main settings categories, Slack offers additional options such as Analytics & Feedback, Privacy & Data, Accessibility, and About. Feel free to explore these sections to access more in-depth information and further customize your Slack experience.
By following these steps, you can easily access the Slack settings on your iPhone and customize various aspects of Slack according to your preferences. Whether you want to adjust notification settings, personalize the appearance, or update your account details, the settings menu provides the necessary options to fine-tune your Slack experience.
Customize Notification Preferences in Slack
Customizing notification preferences in Slack allows you to fine-tune how you receive and interact with notifications on your iPhone. Whether you want to enable or disable notifications for specific channels, set priority notifications, or configure Do Not Disturb settings, Slack offers a range of options to tailor your notification experience. Here’s how you can customize notification preferences in Slack:
1. Access the Slack settings: Start by launching the Slack app on your iPhone and accessing the settings menu. You can do this by tapping on the “More” tab located at the bottom-right corner of the screen, and then selecting “Notifications & Sounds” from the settings menu.
2. Enable or disable notifications: In the “Notifications” section of the settings menu, you can toggle the “Allow Notifications” option on or off. This will globally enable or disable Slack notifications on your iPhone.
3. Manage channel-specific notifications: To customize notifications for specific channels, tap on the “Channels” option under the “Notification Preferences” section. From here, you can toggle notifications on or off for individual channels, ensuring you only receive alerts for the channels you’re most interested in.
4. Set up priority notifications: Slack allows you to prioritize certain channels or users’ messages. To set up priority notifications, go back to the main settings menu and tap on the “Priority Channel” or “Priority Users” option. Select the channels or users you want to receive priority notifications for, ensuring that you never miss important messages.
5. Configure Do Not Disturb settings: If you want to set specific hours or days when you don’t want to receive any Slack notifications, go to the “Do Not Disturb” section in the settings menu. Enable the “Do Not Disturb” mode and set the desired time range, giving you uninterrupted focus during specific periods.
6. Customize sound settings: Slack allows you to choose a specific sound for incoming notifications. To customize the sound, tap on the “Sounds” option in the settings menu. From there, select the desired sound from the available options or even upload your own custom alert sound.
7. Enable or disable badge app icon: If you want to see the number of unread messages on Slack’s app icon, toggle on the “Badge App Icon” option in the settings menu. This will provide a visual indicator on the app icon, ensuring you’re aware of any unread messages at a glance.
8. Manage other notification preferences: In addition to the above customization options, Slack also provides additional settings for configuring message and call notifications, email notifications, and more. Explore the different sections in the “Notifications & Sounds” menu to customize these preferences according to your needs.
By customizing your notification preferences in Slack, you can ensure that you stay informed, receive alerts for important messages, and have better control over your notification experience. Tailor your Slack notifications to suit your work style and preferences, allowing you to stay focused and engaged with your team conversations.
Manage Slack Channel Notifications on iPhone
Managing Slack channel notifications on your iPhone allows you to control which channels you receive notifications from, ensuring that you stay up to date with the conversations that matter most to you. Slack provides flexible options to customize channel notifications, allowing you to toggle notifications on or off for individual channels. Here’s how to manage Slack channel notifications on your iPhone:
1. Access the Slack settings: Start by launching the Slack app on your iPhone and accessing the settings menu. You can do this by tapping on the “More” tab located at the bottom-right corner of the screen, and then selecting “Notifications & Sounds” from the settings menu.
2. Tap on “Channels”: In the settings menu, under the “Notification Preferences” section, tap on “Channels.” This will open the channel notification settings.
3. Individual channel settings: Here, you’ll see a list of all the channels you’re a member of. Each channel will have a toggle switch next to it.
4. Enable or disable notifications: To enable notifications for a specific channel, simply toggle on the switch next to the channel name. This ensures that you receive notifications whenever there are new messages in that channel.
5. Disable notifications for a channel: If you want to disable notifications for a specific channel, toggle off the switch next to the channel name. This will prevent notifications from appearing on your iPhone when there is activity in that particular channel.
6. Manage multiple channels: You can manage notifications for multiple channels simultaneously by toggling the switch on or off for each channel as desired. This way, you have complete control over which channels you receive notifications from, allowing you to prioritize your focus and attention.
7. Control notifications across workspaces: If you’re a member of multiple workspaces in Slack, you can switch between workspaces using the dropdown menu at the top of the channel settings screen. This allows you to manage channel notifications separately for each workspace.
8. Fine-tune channel notification preferences: In addition to toggling notifications on or off for individual channels, you can further customize notification preferences for specific channels. This includes selecting preferences for mentions, replies, threads, and other activity within the channel.
By managing Slack channel notifications on your iPhone, you can streamline your notification experience and ensure that you receive alerts for the channels that are most relevant to you. By selectively enabling or disabling notifications for individual channels, you can focus on the conversations that matter, improving your productivity and engagement within Slack.
Set Up Priority Notifications in Slack
Setting up priority notifications in Slack allows you to receive alerts for important messages and conversations from specific channels or users on your iPhone. By prioritizing notifications, you can ensure that you never miss critical updates, ensuring efficient communication within your team. Here’s how to set up priority notifications in Slack:
1. Access the Slack settings: Start by launching the Slack app on your iPhone and accessing the settings menu. You can do this by tapping on the “More” tab located at the bottom-right corner of the screen, and then selecting “Notifications & Sounds” from the settings menu.
2. Tap on “Priority Channel” or “Priority Users”: In the settings menu, you’ll find options for setting up priority notifications. Tap on either “Priority Channel” or “Priority Users” to proceed with the configuration.
3. Select channels or users: Once you’ve chosen the option, you’ll be presented with a list of channels or users in Slack. Tap on the desired channels or users that you want to prioritize for notifications.
4. Save your selections: After selecting the channels or users, tap on “Save” to confirm and save your priority notification preferences.
5. Receive priority notifications: Once you’ve set up priority notifications, you’ll receive alerts for messages and updates from the selected channels or users. These notifications will be distinct and stand out from regular notifications, ensuring that you don’t miss important information.
6. Manage priority notifications: To modify or update your priority notification settings, revisit the “Priority Channel” or “Priority Users” section in the settings menu. From there, you can add or remove channels or users as needed, fine-tuning your priority notifications to align with changing project requirements or team dynamics.
7. Combine with other customization options: Priority notifications can be combined with other notification preferences to further refine your notification experience in Slack. For example, you can customize the sound, enable banners, or set up different notification formats for priority notifications, ensuring that they stand out and grab your attention.
8. Regularly review your priorities: It’s essential to periodically review your priority notification settings and adjust them based on evolving needs or changing priorities. Regularly reassessing your priority channels and users will help you stay focused on crucial conversations and streamline your workflow.
By setting up priority notifications in Slack, you can ensure that key messages and updates are promptly communicated to you on your iPhone. This feature helps streamline your communication and prioritize your attention, enabling you to stay engaged with critical discussions and deliver timely responses.
Customize Do Not Disturb Settings in Slack
Customizing the Do Not Disturb settings in Slack allows you to define specific hours or days when you don’t want to receive any notifications on your iPhone. This feature helps you maintain uninterrupted focus during dedicated periods, ensuring that you can work without distractions. Here’s how to customize Do Not Disturb settings in Slack:
1. Access the Slack settings: Begin by launching the Slack app on your iPhone and accessing the settings menu. Tap on the “More” tab located at the bottom-right corner of the screen, and then select “Notifications & Sounds” from the settings menu.
2. Tap on “Do Not Disturb”: In the settings menu, you’ll find an option called “Do Not Disturb.” Tap on it to proceed with customizing the Do Not Disturb settings.
3. Enable Do Not Disturb mode: Toggle on the “Do Not Disturb” switch to activate the feature. Once enabled, Slack notifications will be silenced during the defined time range.
4. Set the time range: To define the specific hours or days when you want to activate Do Not Disturb mode, tap on the “Set a Schedule” option. From there, you can choose the starting and ending time for Do Not Disturb mode. You can also select specific days of the week when this feature should be active, such as weekends or non-working days.
5. Customize repeat options: If you want the Do Not Disturb mode to repeat daily or on specific days, tap on the “Repeat” option. This allows you to fine-tune the days when the feature should be automatically enabled.
6. Save your settings: Once you’ve defined the time range and repeat options, tap on “Save” to confirm your Do Not Disturb settings. Slack will now automatically silence notifications during the specified periods.
7. Temporary Do Not Disturb: In addition to the scheduled Do Not Disturb mode, Slack offers a temporary option. To enable temporary Do Not Disturb, tap on the “Do Not Disturb” switch in the settings menu. From there, you can choose a predefined time range or manually specify the duration to activate temporary Do Not Disturb mode.
8. Flexibility with status settings: Slack also provides flexibility with status settings. You can update your status to let your team know that you are in a focused work mode or not available for immediate responses, further reinforcing your Do Not Disturb preferences.
9. Adjusting Do Not Disturb settings: If you need to make changes to your Do Not Disturb settings, revisit the “Do Not Disturb” section in the settings menu. You can modify the time range, repeat options, or disable the feature altogether based on your evolving needs.
By customizing the Do Not Disturb settings in Slack, you can create dedicated periods free from interruptions on your iPhone. This feature empowers you to focus on deep work, enhance productivity, and establish healthy communication boundaries within your workflow.
Enable Badge App Icon for Slack Notifications on iPhone
Enabling the badge app icon for Slack notifications on your iPhone allows you to see the number of unread messages directly on the Slack app icon. This feature provides a visual indicator of your unread notifications, helping you stay on top of your Slack conversations. Here’s how to enable the badge app icon for Slack notifications on your iPhone:
1. Launch Slack on your iPhone: Start by opening the Slack app on your iPhone. You can find the Slack app icon, which resembles a colorful hashtag on a white background, on your home screen or in the app drawer.
2. Access Slack settings: Once you’re in the Slack app, tap on the “More” tab located at the bottom-right corner of the screen. This will open the Slack settings menu.
3. Navigate to Notifications & Sounds: In the settings menu, tap on “Notifications & Sounds.” Here, you will find various notification preferences that you can customize according to your preferences.
4. Enable Badge App Icon: In the “Badge App Icon” section of the settings menu, toggle on the switch next to “Badge app icon.” This will enable the badge app icon feature for Slack notifications.
5. Observe the badge app icon: Once enabled, the Slack app icon will now display a badge with a number indicating the count of unread messages. This badge will update in real-time as you receive new messages in your Slack channels.
6. Customize notification preferences: Along with enabling the badge app icon, you can further customize your notification preferences in the “Notifications & Sounds” menu. You can choose to enable or disable notifications, manage channel-specific notifications, set up priority notifications, and configure Do Not Disturb settings according to your desired Slack experience.
7. Disable the badge app icon: If you no longer wish to see the badge app icon for Slack notifications, simply go back to the “Badge App Icon” section in the settings menu and toggle off the switch next to “Badge app icon.”
By enabling the badge app icon for Slack notifications on your iPhone, you can easily keep track of your unread messages without even opening the Slack app. This visual indicator ensures that you don’t miss any important conversations or updates within your Slack channels, enhancing your communication and productivity on the go.
Customize Sound Settings for Slack Notifications on iPhone
Customizing the sound settings for Slack notifications on your iPhone allows you to personalize the audio alerts you receive when there are new messages or updates in your Slack channels. By selecting a sound that suits your preferences, you can enhance your notification experience and differentiate Slack notifications from other alerts on your device. Here’s how to customize sound settings for Slack notifications on your iPhone:
1. Launch Slack on your iPhone: Start by opening the Slack app on your device. The Slack app icon resembles a colorful hashtag on a white background.
2. Access Slack settings: Once you’re in the Slack app, tap on the “More” tab located at the bottom-right corner of the screen. This will open the Slack settings menu.
3. Navigate to Notifications & Sounds: In the settings menu, tap on “Notifications & Sounds.” This section allows you to customize various notification preferences.
4. Choose Sound: In the “Sounds” section, you’ll find a list of available sound options for Slack notifications. Tap on “Sound” to open a menu of different sounds.
5. Select a Sound: From the list of sound options, tap on the sound you prefer for your Slack notifications. You can preview each sound by tapping on it, allowing you to choose the one that best suits your preferences.
6. Test the Sound: After selecting a sound, you can test it by tapping on the “Test Sound” button. This allows you to hear how the chosen sound will play when you receive a Slack notification.
7. Save the Sound Settings: If you’re satisfied with the chosen sound, tap on “Save” to save your sound settings. From now on, whenever you receive a Slack notification, the selected sound will play.
8. Adjust Sound Volume: You can also adjust the volume level of the Slack notification sound by using the volume buttons on the side of your iPhone. Make sure to test and set the appropriate volume for your notifications.
9. Customize Additional Sound Settings: In addition to selecting a sound, Slack provides options to customize other sound-related settings. You can choose to enable or disable vibrate, enable sound for call notifications, and adjust other sound-related preferences according to your needs.
10. Restore Default Sound Settings: If you want to revert to the default sound settings for Slack notifications, you can tap on the “Restore Defaults” option in the sound settings menu. This will reset the sound settings to the original Slack notification sound.
By customizing the sound settings for Slack notifications on your iPhone, you can personalize your notification experience and ensure that you can differentiate Slack alerts from other notifications on your device. Choose a sound that resonates with you and enhances your awareness of incoming Slack messages and updates.
Enable Banners for Slack Notifications on iPhone
Enabling banners for Slack notifications on your iPhone provides visual alerts at the top of your screen when there are new messages or updates in your Slack channels. Banners allow you to quickly glance at incoming notifications without interrupting your current task, ensuring you stay informed and responsive. Here’s how to enable banners for Slack notifications on your iPhone:
1. Launch Slack on your iPhone: Begin by opening the Slack app on your device. The Slack app icon looks like a colorful hashtag on a white background.
2. Access Slack settings: Once you’re in the Slack app, tap on the “More” tab located at the bottom-right corner of the screen. This will open the Slack settings menu.
3. Navigate to Notifications & Sounds: In the settings menu, tap on “Notifications & Sounds.” This section allows you to customize various notification preferences.
4. Enable Banners: In the “Banners” section, toggle on the switch next to “Banners.” This enables the banner feature for Slack notifications.
5. Choose Banner Style: Slack offers two types of banner styles: Temporary and Persistent. Temporary banners appear momentarily and then disappear, while Persistent banners stay on the screen until dismissed. Tap on “Temporary” or “Persistent” based on your preferred banner style.
6. Test the Banners: To see how the banners will appear, you can send a test notification by tapping the “Test Banner” button. This allows you to observe the banners’ style and behavior before saving the settings.
7. Save the Banner Settings: If you’re satisfied with the chosen banner style, tap on “Save” to confirm and save your banner settings.
8. Customize Additional Banner Settings: In addition to enabling banners, you can further customize banner-related settings. For example, you can choose to show previews or disable previews for Slack notification banners, depending on your privacy preferences.
9. Adjust Banner Position: By default, Slack notification banners appear at the top of your screen. If you prefer a different position, you can customize the banner position in the general notification settings of your iPhone’s Settings app, under the “Notifications” section.
10. Disable Banners: If you no longer want to see banners for Slack notifications, you can revisit the “Banners” section in the Slack settings and toggle off the switch next to “Banners.”
With banners enabled for Slack notifications on your iPhone, you can quickly and conveniently stay updated on important messages without having to navigate away from your current task. Customize the display style and explore additional banner settings to create a notification experience that suits your preferences and workflow.
Enable Preview for Slack Notifications on iPhone
Enabling preview for Slack notifications on your iPhone allows you to see a glimpse of the message content directly in the notification itself. This feature provides a convenient way to quickly preview Slack messages without having to open the app, improving efficiency and allowing you to stay informed on the go. Here’s how to enable preview for Slack notifications on your iPhone:
1. Launch Slack on your iPhone: Start by opening the Slack app on your device. The app icon resembles a colorful hashtag on a white background.
2. Access Slack settings: Once you’re in the Slack app, tap on the “More” tab located at the bottom-right corner of the screen. This will open the Slack settings menu.
3. Navigate to Notifications & Sounds: In the settings menu, tap on “Notifications & Sounds.” This section allows you to customize various notification preferences.
4. Enable Notification Previews: In the “Notification Previews” section, toggle on the switch next to “Notification Previews.” This enables the preview feature for Slack notifications.
5. Observe the Notification Previews: Once enabled, Slack notifications will now display a preview of the message content directly in the notification itself. This allows you to read a portion of the message without having to open the app.
6. Customize Additional Preview Settings: In addition to enabling notification previews, Slack provides options to customize other preview-related settings. You can choose to show or hide message senders, enable or disable images in previews, and adjust other preview-related preferences according to your needs.
7. Test the Notification Preview: To see how the notification previews will appear, you can send a test notification by tapping the “Test Preview” button. This allows you to observe the preview in action before saving the settings.
8. Adjust Preview Display Time: By default, Slack notification previews appear for a few seconds before disappearing. If you prefer a longer or shorter display time, you can customize it in the general notification settings of your iPhone’s Settings app, under the “Notifications” section.
9. Disable Notification Previews: If you prefer not to see previews for Slack notifications, you can revisit the “Notification Previews” section in the Slack settings and toggle off the switch next to “Notification Previews.”
With notification previews enabled for Slack on your iPhone, you can quickly glance at message content without interrupting your current task or opening the app. Customize the preview settings to align with your preferences and enhance your efficiency in managing Slack communications.
Turn on Lock Screen Notifications for Slack on iPhone
Turning on lock screen notifications for Slack on your iPhone allows you to see incoming message alerts and updates from Slack directly on your device’s lock screen. This feature enables you to stay informed even when your iPhone is locked, providing quick access to important Slack communications. Here’s how to turn on lock screen notifications for Slack on your iPhone:
1. Launch Slack on your iPhone: Begin by opening the Slack app on your device. The Slack app icon resembles a colorful hashtag on a white background.
2. Access Slack settings: Once you’re in the Slack app, tap on the “More” tab located at the bottom-right corner of the screen. This will open the Slack settings menu.
3. Navigate to Notifications & Sounds: In the settings menu, tap on “Notifications & Sounds.” This section allows you to customize various notification preferences.
4. Enable Lock Screen Notifications: In the “Lock Screen” section, toggle on the switch next to “Lock Screen.” This enables lock screen notifications for Slack on your iPhone.
5. Review Additional Lock Screen Options: Below the lock screen toggle switch, you’ll find additional options to customize your lock screen experience. For example, you can choose to show or hide message previews on the lock screen, adjust the number of recent notifications displayed, or disable notification grouping.
6. Test the Lock Screen Notification: To see how the lock screen notifications will appear, you can send a test notification by tapping the “Test Lock Screen Notification” button. This allows you to preview the lock screen notification before saving the settings.
7. Adjust Notification Settings: If you want to further customize how Slack notifications appear on your lock screen, you can navigate to your iPhone’s settings by tapping “Settings” > “Notifications.” From there, scroll through the list of apps, find Slack, and tap on it to access advanced notification settings.
8. Manage Notification Settings: In the “Notifications” settings for Slack on your iPhone, you can customize various aspects, such as notification style, sounds, alerts, and whether to show notifications as banners, alerts, or in the notification center.
9. Disable Lock Screen Notifications: If you no longer want to see Slack notifications on your iPhone’s lock screen, revisit the “Lock Screen” section in the Slack settings and toggle off the switch next to “Lock Screen.”
By turning on lock screen notifications for Slack on your iPhone, you can easily stay updated with important messages and updates even when your device is locked. This feature allows for immediate visibility and quick access to Slack communications, ensuring you never miss out on critical information or conversations.
Enable Notification Center for Slack on iPhone
Enabling Notification Center for Slack on your iPhone allows you to view and access Slack notifications in the centralized Notification Center. This feature provides a convenient way to see all your Slack alerts at a glance, making it easier to stay on top of your messages and notifications. Here’s how to enable Notification Center for Slack on your iPhone:
1. Launch Slack on your iPhone: Start by opening the Slack app on your device. The Slack app icon resembles a colorful hashtag on a white background.
2. Access Slack settings: Once you’re in the Slack app, tap on the “More” tab located at the bottom-right corner of the screen. This will open the Slack settings menu.
3. Navigate to Notifications & Sounds: In the settings menu, tap on “Notifications & Sounds.” This section allows you to customize various notification preferences.
4. Enable Notification Center: In the “Notification Center” section, toggle on the switch next to “Notification Center.” This enables Notification Center for Slack on your iPhone.
5. Customize Additional Notification Center Options: Depending on your preferences, you can further customize the Notification Center settings for Slack. For example, you can choose to show or hide message previews, adjust the order of notifications, or group notifications by app.
6. Test the Notification Center: To see how Slack notifications will appear in the Notification Center, you can send a test notification by tapping the “Test Notification Center” button. This allows you to preview how Slack notifications will be displayed.
7. Access the Notification Center: To view Slack notifications in the Notification Center, swipe down from the top of your iPhone’s screen. This will reveal the Notification Center, where you can see a list of your recent Slack alerts.
8. Adjust Notification Center Settings: If you want to customize how Slack notifications are organized and displayed in the Notification Center, you can do so in the general notification settings of your iPhone’s Settings app, under the “Notifications” section. Find Slack in the list of apps and tap on it to access additional notification options.
9. Disable Notification Center: If you prefer not to see Slack notifications in the Notification Center, revisit the “Notification Center” section in the Slack settings and toggle off the switch next to “Notification Center.”
By enabling Notification Center for Slack on your iPhone, you can easily access and review all your Slack notifications in one centralized location. This streamlines your workflow and helps you stay organized, ensuring that you never miss important messages or updates from your Slack channels.


