Introduction
Slack is a popular communication and collaboration tool used by teams and organizations worldwide. It offers a wide range of features and settings to customize your Slack experience and ensure you stay connected and informed. One essential feature that Slack provides is the ability to receive notifications. Notifications keep you updated on new messages, mentions, and activities happening in your Slack channels and direct messages.
In this article, we will guide you on how to turn on notifications in Slack and tailor them to suit your preferences. Whether you’re using Slack on the web or through the mobile app, the process is straightforward and quick.
By enabling notifications, you can stay on top of important conversations and never miss a critical update. Whether you’re working in a team or engaging in one-on-one conversations, being notified instantly can enhance your productivity and help you respond promptly.
So let’s dive in and explore the steps to turn on notifications in Slack, ensuring that you stay in the loop and never miss out on important information.
Step 1: Open the Slack App
The first step to turning on notifications in Slack is to open the Slack app on your device. Whether you’re using a desktop computer, laptop, or mobile device, make sure you have the Slack app installed and logged in.
If you’re using Slack on a desktop computer or laptop, you can open the app by clicking on the Slack icon in your taskbar or by searching for “Slack” in your application directory. Once you locate the Slack app, simply double-click on it to launch the app.
If you’re using the mobile app, locate the Slack icon on your home screen or in your app drawer and tap on it to open the app. Make sure you’re logged in using your Slack credentials to access your workspace and notifications.
Once the Slack app is open and you’re signed in, you’ll be able to navigate to the channels or direct messages where you want to enable notifications. Let’s move on to the next step to learn how to do this.
Step 2: Navigate to the Channel or Direct Message
After opening the Slack app, the next step is to navigate to the specific channel or direct message where you want to enable notifications. Slack offers a streamlined interface that makes it easy to find and access the conversations you’re part of.
If you’re looking to enable notifications for a specific channel, click on the sidebar located on the left side of the Slack app. The sidebar will display a list of all the channels you’re a member of. Scroll through the list to find the desired channel and click on its name to open it.
On the other hand, if you want to enable notifications for a direct message or a private conversation, you can find them in the sidebar as well. Look for the section labeled “Direct Messages” or “Private Conversations” and click on the name of the person or group you want to enable notifications for.
Slack also offers a search bar at the top of the sidebar, allowing you to quickly find specific channels or direct messages by entering keywords or the names of people or groups you’re conversing with.
By effectively navigating to the desired channel or direct message, you’re now ready to access the notification preferences and customize them according to your needs. Let’s move on to the next step to learn how to do this.
Step 3: Access the Notification Preferences
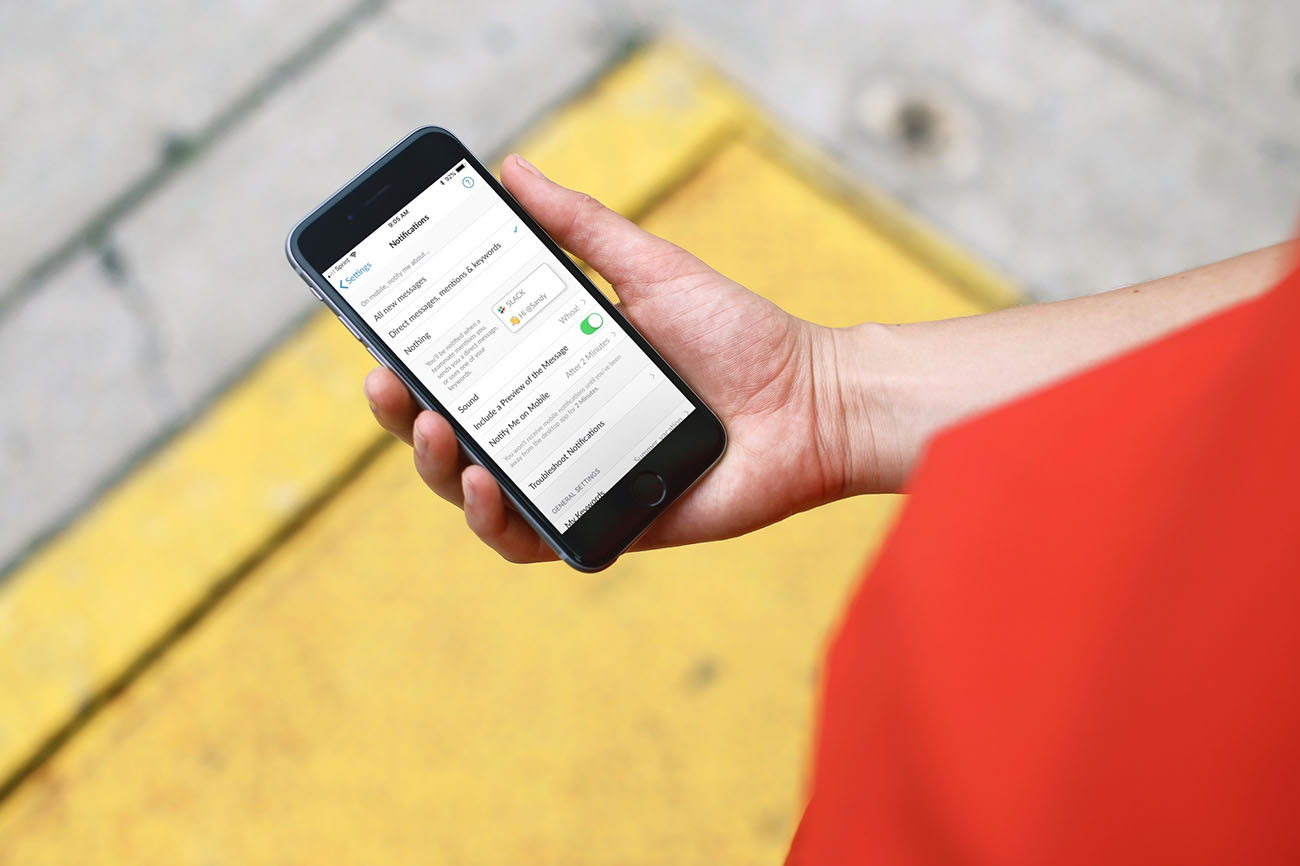
Once you have arrived at the desired channel or direct message in the Slack app, it’s time to access the notification preferences for that specific conversation. Slack allows you to customize your notification settings on a per-channel or per-direct message basis, giving you fine-grained control over your alerts.
To access the notification preferences, look for the gear icon located at the top right corner of the Slack app. This gear icon represents the settings menu. Click on it to reveal a dropdown menu.
In the dropdown menu, you’ll find an option labeled “Notification preferences” or “Preferences.” Clicking on this option will open a new window or slide-out panel that showcases the notification settings for the channel or direct message you’re currently in.
Within the notification preferences, you’ll see various options that allow you to customize how you receive notifications. These options may include:
- Mute Channel/Conversation: This option allows you to disable all notifications for that specific channel or direct message. If you don’t want to receive any alerts from this conversation, simply toggle the mute button.
- Message Notifications: Here, you can choose whether you want to receive notifications for all messages, only for direct mentions, or to be notified about absolutely nothing.
- Activity Notifications: This option determines if you want to be notified about all activity in the channel, such as reactions, file uploads, or member joining or leaving, or if you prefer to be notified only for specific types of activity.
These are just a few examples of the notification preferences you may encounter. The specific options available to you can vary depending on your Slack workspace’s settings and the app version you’re using.
Now that you’re familiar with accessing the notification preferences, let’s move on to the next step and learn how to choose your preferred notification settings.
Step 4: Choose Your Preferred Notification Settings
Once you have accessed the notification preferences for the specific channel or direct message in the Slack app, it’s time to choose your preferred notification settings. Depending on your preferences and the level of engagement you want, you can customize the notifications to suit your needs.
Firstly, you can decide whether you want to mute the channel or conversation entirely or receive notifications for specific events. If you want to mute the channel, toggle the mute button to disable all notifications. This can be useful if you want to temporarily silence a noisy channel or direct message that doesn’t require your immediate attention.
Next, you can choose the type of message notifications you want to receive. Slack offers options to receive notifications for all messages, only for direct mentions, or to opt for no notifications at all. Select the option that aligns with your workflow and ensures that you stay informed without being overwhelmed by constant notifications.
Additionally, you can customize activity notifications to receive alerts for specific types of activity or be notified about all activity in the channel or direct message. This allows you to stay updated on important events while filtering out less relevant information.
Slack may also provide additional options such as setting a “Do Not Disturb” schedule, which allows you to specify a period during which you won’t receive any notifications. This can be useful if you want uninterrupted focus during specific hours of the day or if you prefer to receive notifications only during certain times.
Remember, the goal is to strike a balance between staying informed and avoiding notification overload. Choose the notification settings that best meet your needs and work style.
Now that you have chosen your preferred notification settings, let’s move on to the final step and save your changes.
Step 5: Save Your Changes
After customizing your notification settings in Slack, it’s essential to save your changes to ensure that your preferences are applied. Fortunately, Slack makes it easy to save your settings and start receiving notifications according to your chosen preferences.
In the notification preferences window or slide-out panel, you’ll typically find a “Save” or “Apply” button. Click on this button to save your notification settings.
Once you click the “Save” button, Slack will update your settings and start delivering notifications based on your preferences. From now on, you will receive alerts for new messages, direct mentions, and other activities according to the settings you have chosen for each specific channel or direct message.
Remember that you can always come back to the notification preferences and modify your settings at any time if your needs or preferences change.
With your changes saved, you can now enjoy the benefits of receiving notifications in Slack. Stay informed, engage with your team, and never miss important conversations or updates.
Congratulations! You have successfully turned on notifications in Slack by following these steps. Take a moment to verify that your settings are accurately reflecting your preferences, and feel free to revisit these steps whenever you wish to adjust or fine-tune your notification settings.
Conclusion
Slack’s notification feature is a valuable tool for staying connected and informed in your workspace. By enabling notifications and customizing your settings, you can ensure that you receive timely alerts for important messages, mentions, and activities.
In this article, we’ve walked through the step-by-step process of turning on notifications in Slack. We started by opening the Slack app and navigating to the desired channel or direct message. Then, we accessed the notification preferences and explored the various customization options available to us. After choosing our preferred notification settings, we saved our changes to activate the notifications.
Remember, it’s important to strike a balance with your notification settings, ensuring that you stay informed without being overwhelmed by constant alerts. Customizing your settings based on your workflow and engagement levels can greatly enhance your productivity and collaboration within Slack.
Whether you’re working in a team, having one-on-one conversations, or participating in group discussions, notifications play a vital role in ensuring that you don’t miss out on important information or updates.
Now that you are familiar with the process, go ahead and turn on notifications in Slack. Explore the various settings and find the perfect balance that suits your needs.
Enjoy the benefits of staying connected, informed, and engaged in your Slack workspace with timely notifications!