Introduction
Welcome to the world of modern technology where convenience and security go hand in hand. With the rise of facial recognition technology, our smartphones and apps now offer a more seamless and secure user experience. One such popular app that has integrated this cutting-edge technology is Messenger. In this article, we will guide you step-by-step on how to turn on Face ID for Messenger.
Face ID is a biometric authentication feature that uses facial recognition to unlock your device or secure specific apps. By enabling Face ID on your Messenger app, you can add an extra layer of security to protect your private conversations and personal information. The process may vary slightly depending on your device and operating system, but we will provide general instructions applicable to most systems.
Before we begin, please ensure that you have the latest version of Messenger installed on your device. Updating the app will not only provide you with the most recent features, but it also ensures compatibility with the Face ID option.
Are you ready? Let’s dive in and learn how to enable Face ID for Messenger!
Step 1: Update your Messenger app
The first step in enabling Face ID for Messenger is to make sure that you have the latest version of the app installed on your device. Updating your Messenger app not only ensures that you have access to all the latest features and improvements but also guarantees compatibility with the Face ID option.
To update your Messenger app, follow these simple steps:
- Launch the App Store or Google Play Store on your device.
- Search for “Messenger” in the search bar.
- If an update is available, you will see an “Update” button next to the Messenger app. Tap on it to start the update process.
- Wait for the update to complete. This may take a few moments depending on your internet speed.
- Once the update is finished, you are ready to move on to the next step.
It’s important to note that if your device is set to automatically update apps, the Messenger app may have already been updated in the background. Nevertheless, it’s always a good practice to manually check for updates to ensure that you have the latest version installed.
Now that your Messenger app is up to date, let’s move on to the next step: opening the app’s settings.
Step 2: Open the app’s settings
Now that you have updated your Messenger app, it’s time to open the app’s settings. Here’s how you can do it:
- Locate the Messenger app on your device’s home screen or app drawer and tap on it to launch the app.
- Once the app is opened, make sure you are on the main screen where your recent conversations are displayed.
- Look for the profile icon or the three-lined menu icon, typically located in the top left or top right corner of the screen, respectively.
- Tap on the profile icon or the menu icon to access the Messenger settings.
Opening the app’s settings will allow you to access various options and features that are available for customization. It is from here that you can navigate to the privacy settings, where the Face ID option is located.
If you are having trouble finding the settings menu or if it looks different on your device, you can refer to the Messenger app’s official documentation or search for specific instructions for your device model and operating system version.
Now that you have successfully opened the app’s settings, it’s time to proceed to the next step: accessing the privacy settings.
Step 3: Access the Privacy settings
Now that you have opened the Messenger app’s settings, it’s time to navigate to the Privacy settings where you can enable the Face ID option. Follow these steps to access the Privacy settings:
- In the app’s settings menu, look for the “Privacy” option. It is usually located towards the top or bottom of the menu.
- Tap on the “Privacy” option to open the Privacy settings.
- Within the Privacy settings, you may see various options related to your account and app permissions.
- Look for the option that mentions Face ID or Biometric Authentication. This option may vary depending on your device and operating system.
If you are unable to find the Face ID or Biometric Authentication option within the Privacy settings, make sure that your device’s operating system supports this feature and check if you have the latest version of the Messenger app installed.
Once you have located the Face ID or Biometric Authentication option within the Privacy settings, you are ready to move on to the next step: enabling Face ID for Messenger.
Accessing the Privacy settings is crucial as it allows you to control and manage the privacy-related features of the Messenger app. By enabling Face ID, you are adding an extra layer of security to protect your conversations and personal information from unauthorized access.
With the Privacy settings accessed, let’s move on to the next step: enabling Face ID within the Messenger app.
Step 4: Enable Face ID
Now that you have accessed the Privacy settings, it’s time to enable Face ID for Messenger. Follow these steps to enable Face ID:
- Within the Privacy settings, locate the Face ID or Biometric Authentication option that you identified in the previous step.
- Tap on the Face ID or Biometric Authentication option to enter the settings.
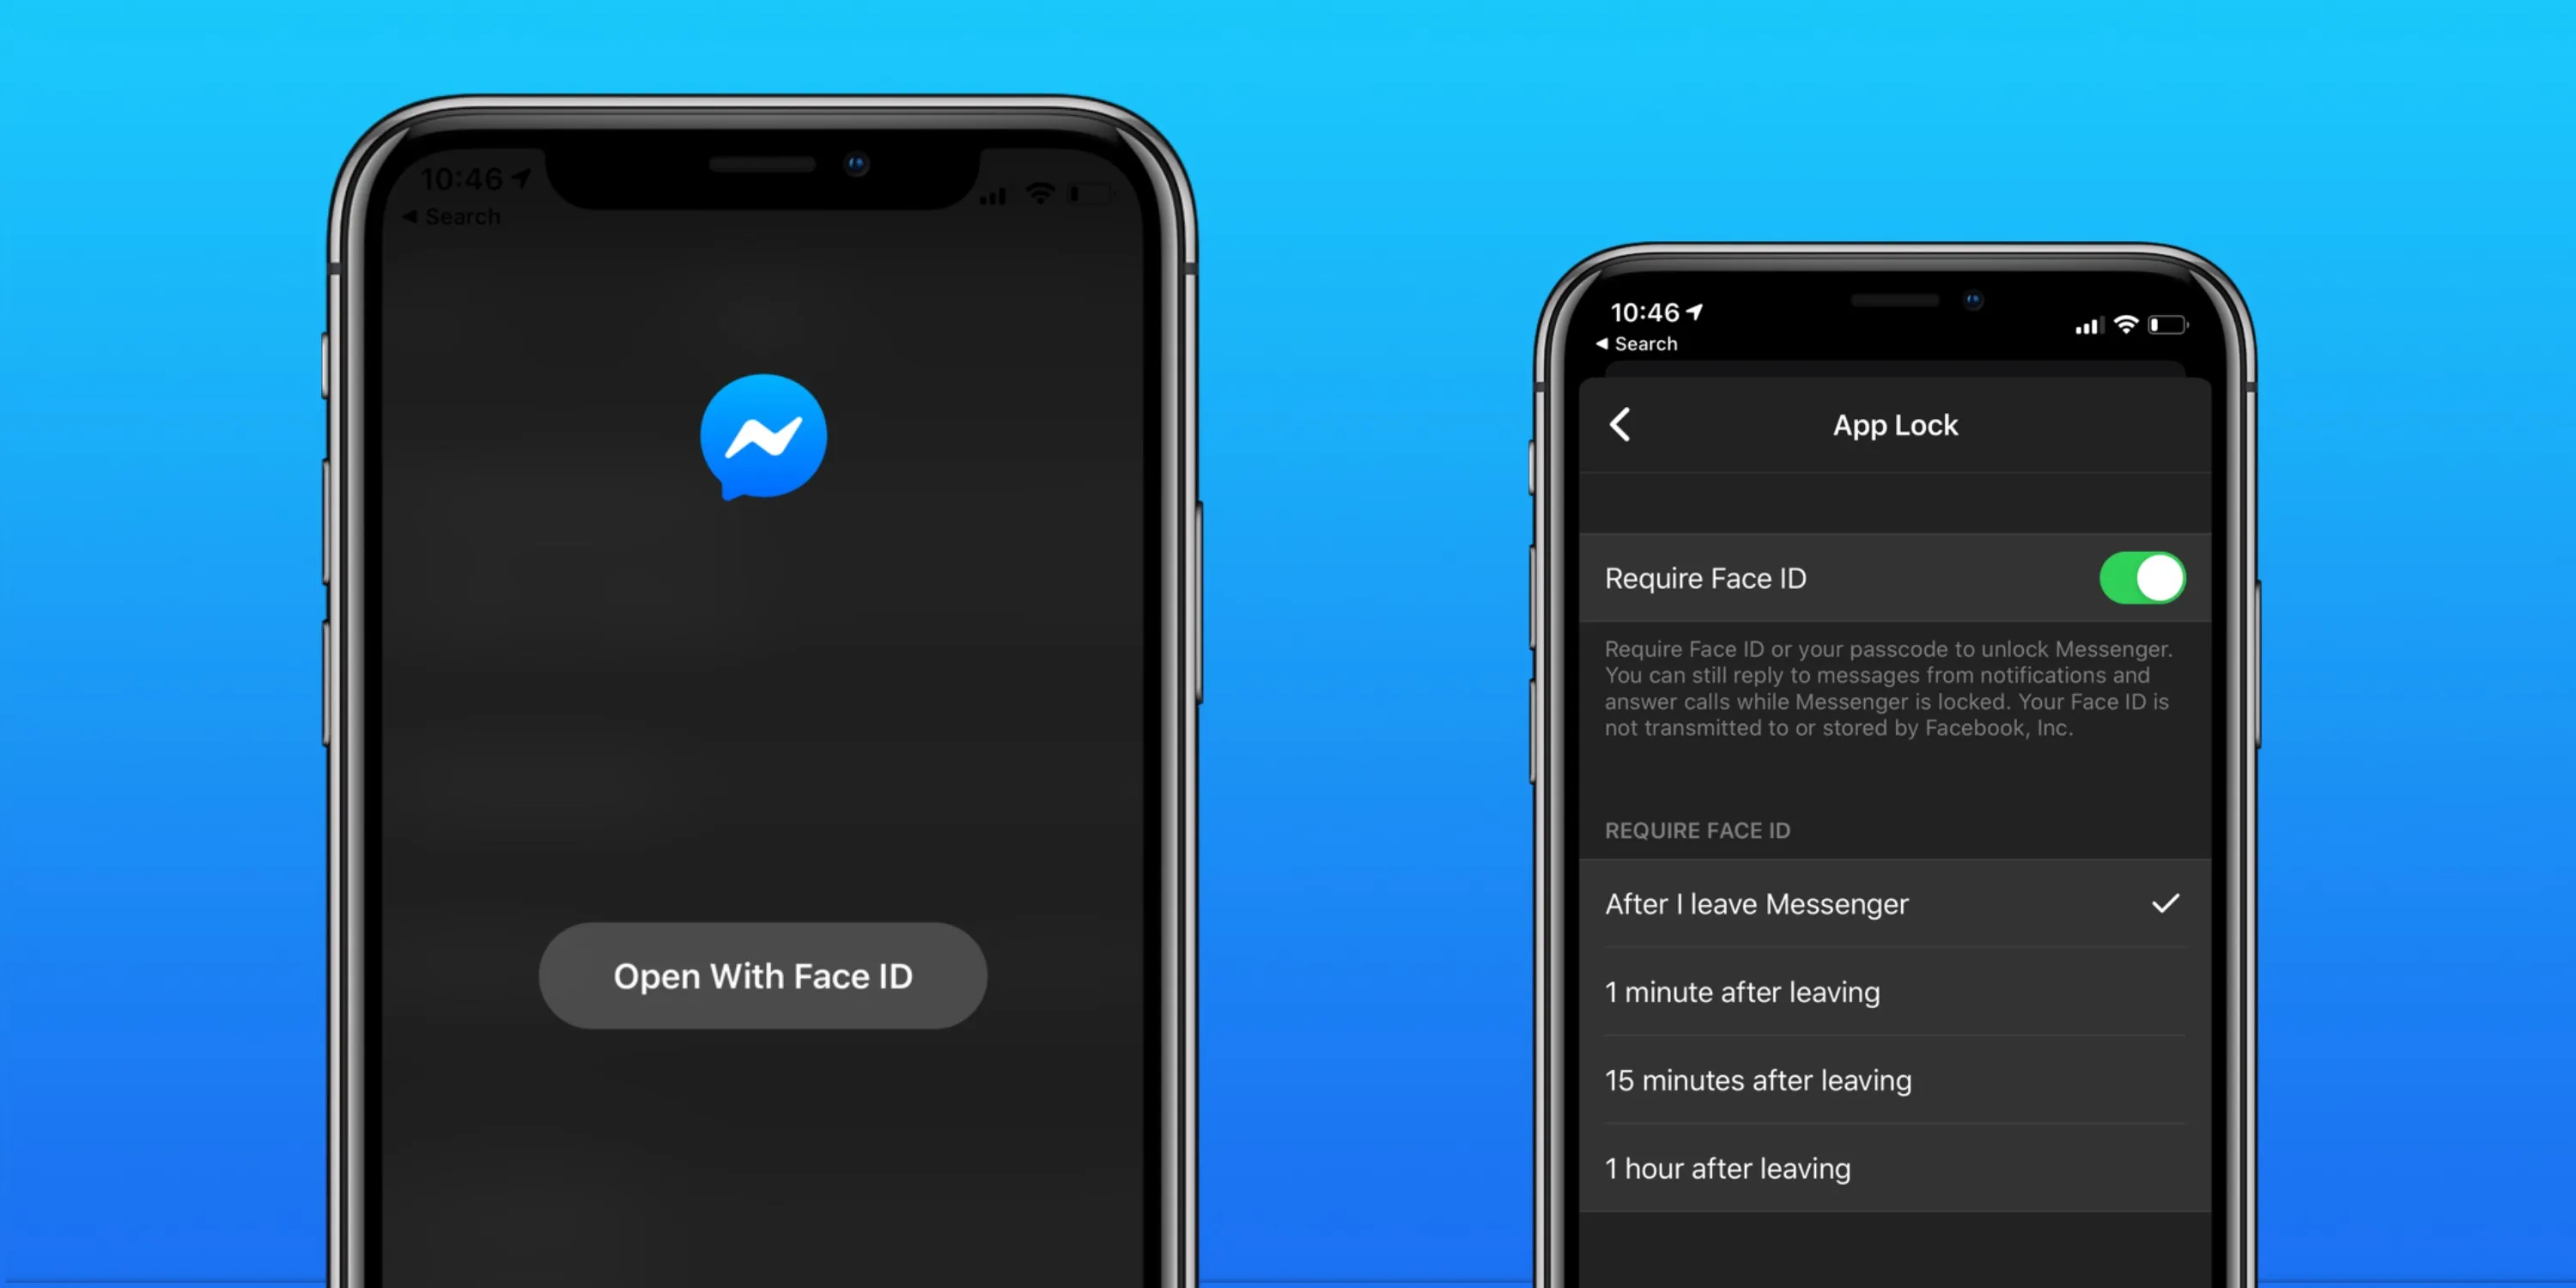
- Toggle the switch to enable Face ID for Messenger. The switch may be labeled as “Enable Face ID” or something similar.
Once you have enabled Face ID, the Messenger app will now require your face to be recognized before granting access to your conversations and personal information. This adds an extra layer of security, ensuring that only you can access your Messenger app.
It’s worth noting that enabling Face ID for Messenger may require you to grant certain permissions, such as camera access, to allow the app to scan and recognize your face. Make sure to review and grant these permissions if prompted to ensure that Face ID works seamlessly.
Congratulations! You have successfully enabled Face ID for Messenger. But wait, there’s more you can do. Let’s move on to the next step: adjusting Face ID settings.
Step 5: Adjust Face ID settings
Now that you have enabled Face ID for Messenger, you may want to explore and adjust the Face ID settings according to your preferences. Follow these steps to adjust the Face ID settings:
- Within the Face ID or Biometric Authentication settings, you may find additional options related to Face ID customization.
- These options may include toggles for features like “Require Attention for Face ID” or “Automatic Face ID Recognition.”
- Review these options and adjust them based on your preferences for convenience and security.
For example, the “Require Attention for Face ID” option requires you to look at your device for Face ID to unlock. This adds an extra layer of security by ensuring that someone cannot unlock your Messenger app by simply pointing it at your face while you are not paying attention.
On the other hand, the “Automatic Face ID Recognition” option allows the Messenger app to recognize your face automatically without requiring you to manually initiate the Face ID process each time you open the app.
These settings may enhance the user experience and make Face ID more efficient and seamless for you, but they also depend on personal preferences and the level of security you desire.
Once you have adjusted the Face ID settings according to your preferences, you are all set! Your Face ID for Messenger is now customized and ready to use.
With the Face ID settings adjusted, you have successfully completed all the necessary steps to enable and customize Face ID for your Messenger app. Enjoy the added convenience and security that facial recognition technology brings to your messaging experience.
Remember to keep your device and Messenger app updated to ensure you have access to the latest features, including any enhancements or improvements related to Face ID.
Now that you are well-versed in enabling and adjusting Face ID for Messenger, you can confidently protect your conversations and personal information with the power of facial recognition technology.
Conclusion
Congratulations! You have successfully learned how to enable Face ID for Messenger, adding an extra layer of security to protect your private conversations and personal information. By following the step-by-step instructions in this guide, you have taken advantage of the convenience and power of facial recognition technology.
Throughout this process, we discussed the importance of updating your Messenger app to ensure compatibility with the Face ID option. We also explored how to access the app’s settings, navigate to the Privacy settings, and enable Face ID for Messenger.
Furthermore, we highlighted the significance of adjusting the Face ID settings according to your preferences. This includes options such as requiring attention for Face ID or enabling automatic face recognition.
Now, with Face ID enabled and customized to your liking, you can rest assured knowing that your Messenger app is protected from unauthorized access.
Remember to periodically check for updates to ensure that you have the latest version of Messenger installed, as updates often bring new features and improvements related to Face ID and overall app security.
Face ID not only provides convenience by allowing you to access the app quickly but also ensures that only you can unlock and view your conversations. Enjoy the seamless and secure messaging experience that Face ID brings to your fingertips.
Thank you for following this guide! Now go ahead and explore the amazing benefits of Face ID in your Messenger app.