Introduction
Welcome to the world of Android phones! If you’re new to the Android operating system or just got your hands on a brand new Android device, turning it on for the first time can be an exciting experience. In this article, we will guide you through the simple process of turning on your Android phone.
Android phones are known for their user-friendly interface and vast range of features. Whether you’re using a popular brand like Samsung, Google, or OnePlus, or a lesser-known brand, the basic steps for turning on an Android phone remain the same. So, let’s get started!
Before we begin, make sure you have a charged battery in your Android phone. If your phone is brand new, it should come with a partially charged battery. If not, connect your phone to a power source and let it charge for a few minutes before proceeding.
Once you have a charged battery, you’re ready to turn on your Android phone and embark on a journey filled with apps, games, communication, and endless possibilities. So let’s dive into the simple process of turning on your Android phone!
Step 1: Locate the power button
The power button is a key component of your Android phone that allows you to turn it on and off. The exact location of the power button may vary depending on the make and model of your device, but it is typically located on the side or the top of the phone.
To locate the power button, start by examining the sides and top of your Android phone. Look for a small button that stands out from the rest of the buttons or controls. It is often marked with the symbol of a circle enclosed within a line or a simple power symbol.
Once you have identified the power button, take a moment to familiarize yourself with its location and feel. This will make it easier for you to locate and press the button without looking at it directly.
It’s important to note that some Android phones have a power button integrated into the fingerprint sensor or the volume buttons. If this is the case with your device, pay attention to the specific location mentioned in the phone’s user manual or consult the manufacturer’s website for guidance.
If you’re still having trouble finding the power button, a quick online search for your specific phone model along with the phrase “locating power button” can provide helpful visual guides or videos to assist you.
Once you have located the power button, you’re ready to move on to the next step of turning on your Android phone. So let’s continue our journey!
Step 2: Press and hold the power button
Now that you’ve located the power button on your Android phone, it’s time to turn it on. To do this, simply press and hold the power button for a few seconds. You will feel a slight vibration or see the screen light up as the device begins to power on.
It’s important to note that the duration of holding the power button may vary depending on the specific device. In most cases, holding it for about 2 to 3 seconds should be sufficient to initiate the booting process.
While pressing and holding the power button, make sure to maintain steady contact and apply a gentle but firm pressure. Avoid pressing too hard, as this could damage the button or the internal components of your phone.
If you’re having trouble pressing the power button due to physical limitations or a malfunctioning button, try using a small pointed object, such as a paperclip or a pen tip, to press and hold the button. Alternatively, consult the phone’s user manual or contact the manufacturer’s support for assistance.
It’s important to note that if your Android phone has been turned off for a long period of time, it may take a few extra seconds for the device to power on. This is normal and nothing to worry about. Just be patient, and soon you’ll see your Android phone come to life.
Congratulations! You’ve successfully pressed and held the power button to turn on your Android phone. Now let’s move on to the next step, where we’ll wait for the device to finish booting up.
Step 3: Wait for the device to turn on
After pressing and holding the power button on your Android phone, you need to give it some time to go through the booting process. The duration of this process may vary depending on the device and the current state of the operating system.
During this time, you may see the manufacturer’s logo or a loading screen on your phone’s display. This is normal and indicates that the device is initializing its hardware and loading the necessary software to bring your Android phone to life.
It’s important to be patient and avoid pressing any buttons or attempting to restart the device during this process. If you interrupt the booting process, it could lead to software errors or even damage to the operating system.
Typically, the booting process should take anywhere from a few seconds to a minute or two. However, if your phone has been turned off for an extended period, or if it has low battery power, it may take a bit longer for the device to fully turn on.
While you wait for your Android phone to turn on, take a moment to ensure that you have a stable internet connection and that your SIM card is properly inserted. These factors will play a role in the setup process, which we’ll cover in the next step.
Once the booting process is complete, you will be greeted with the familiar Android home screen, indicating that your device is ready to be set up and customized according to your preferences. So, let’s move on to the next step and get your Android phone all set up!
Step 4: Set up your Android phone
Now that your Android phone has turned on, it’s time to set it up and personalize it according to your preferences. The setup process will guide you through essential tasks such as connecting to a Wi-Fi network, signing in with your Google account, and configuring privacy settings.
Follow the on-screen prompts and provide the necessary information as instructed. Here are some common tasks you may encounter during the setup process:
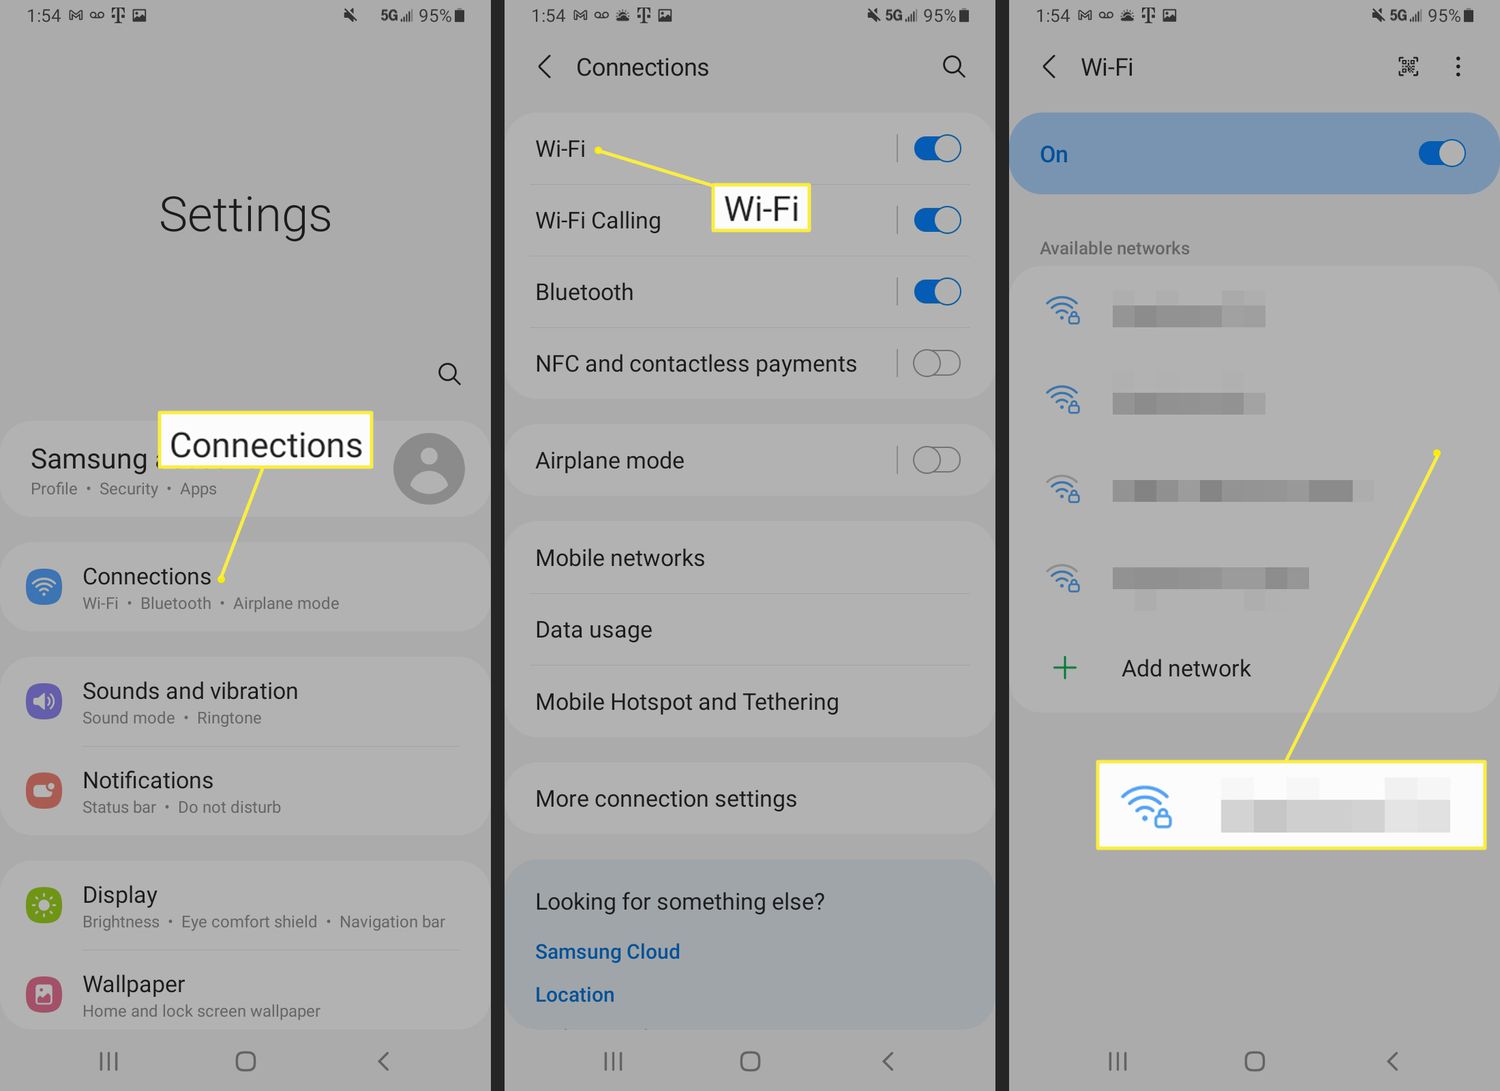
- Connect to Wi-Fi: Select your preferred Wi-Fi network from the available options and enter the password if required. This will enable your phone to connect to the internet, allowing you to download apps and access online services.
- Sign in or create a Google account: If you already have a Google account, sign in with your credentials. If not, you can create a new account directly from your Android phone. Having a Google account will enable you to access various Google services like Gmail, Google Play Store, and Google Drive.
- Restore from backup: If you have previously backed up your data from another Android device, you may be given the option to restore your apps, contacts, and other settings during the setup process. This can be done using your Google account or other backup methods.
- Set up security features: It is essential to protect your Android phone and personal information. You will be prompted to set up a secure lock screen method, such as a PIN, pattern, or fingerprint. This adds an extra layer of security to your device.
- Configure privacy settings: Android offers various privacy settings that allow you to control how your phone collects and uses your data. Take a few minutes to review and adjust these settings based on your preferences.
- Customize your home screen: Explore the options to customize your home screen with wallpapers, widgets, and app shortcuts. This allows you to personalize your Android phone and make it reflect your unique style.
Once you have completed the setup process, your Android phone will be ready to use. You can now explore the vast world of apps, widgets, settings, and features that Android has to offer.
Remember to keep your phone updated with the latest system software and apps to ensure optimal performance and security. Enjoy your Android phone and make the most out of its capabilities!
Conclusion
Congratulations! You have successfully learned how to turn on your Android phone. We covered the simple steps of locating the power button, pressing and holding it, waiting for the device to turn on, and setting up your Android phone according to your preferences.
Turning on an Android phone is an exciting moment as it marks the beginning of your journey into the world of apps, communication, productivity, and entertainment. With its user-friendly interface and customizable features, Android offers a seamless and personalized experience.
Remember to familiarize yourself with the specific location of the power button on your device to ensure quick and easy access. Take the time to go through the setup process, connect to Wi-Fi, sign in with your Google account, and customize your home screen to make your Android phone truly your own.
As you explore your Android phone, don’t forget to stay updated with the latest system updates and app versions. This will ensure that your device runs smoothly, and you have access to the latest security features and enhancements.
Now that you have successfully turned on your Android phone and set it up, the possibilities are endless. Dive into the Play Store to discover and download a wide range of apps, from productivity tools to games and everything in between. Use your Android phone to stay connected, get creative, and simplify your daily life.
Enjoy your new Android phone and make the most of its capabilities. Embrace the world of endless possibilities that Android has to offer and have a fantastic journey with your device!