Introduction
Welcome to our step-by-step guide on how to turn on 4G on your iPhone XR! The iPhone XR is a powerful and feature-packed device, and enabling 4G can enhance your browsing and streaming experience by providing faster data speeds and improved network connectivity.
Whether you’re a new iPhone XR user or simply looking to switch to 4G, we’ve got you covered. In this guide, we will walk you through the process of enabling 4G on your iPhone XR, from accessing the settings to selecting your preferred 4G options.
Before we dive into the steps, it’s important to note that enabling 4G requires a compatible cellular network and an active data plan with your network provider. Ensure that you have a 4G-enabled SIM card and contact your network provider if you need assistance or have any questions regarding your data plan or network compatibility.
Now, let’s get started and explore the simple steps to turn on 4G on your iPhone XR!
Step 1: Open the Settings
The first step to turning on 4G on your iPhone XR is to access the Settings menu. From the home screen of your iPhone, locate and tap on the “Settings” app. It is represented by a gear icon and is usually found on the first page of your home screen.
Once you tap on the “Settings” app, the Settings menu will open, offering a wide range of options to customize your iPhone XR’s settings. You will find options to modify various aspects of your device, including network settings, display settings, and more.
Take a moment to familiarize yourself with the Settings menu. You will notice that the options are grouped into sections such as “General,” “Display & Brightness,” “Sounds & Haptics,” and more. We will be accessing the “Cellular” settings, which is where you can enable 4G on your iPhone XR.
Scroll down or use the search bar at the top of the screen to quickly find the “Cellular” menu. It may also be labeled as “Mobile Data” or “Data Usage” depending on your iPhone’s operating system version or regional settings.
Once you locate the “Cellular” menu, tap on it to proceed to the next step.
Step 2: Select Cellular
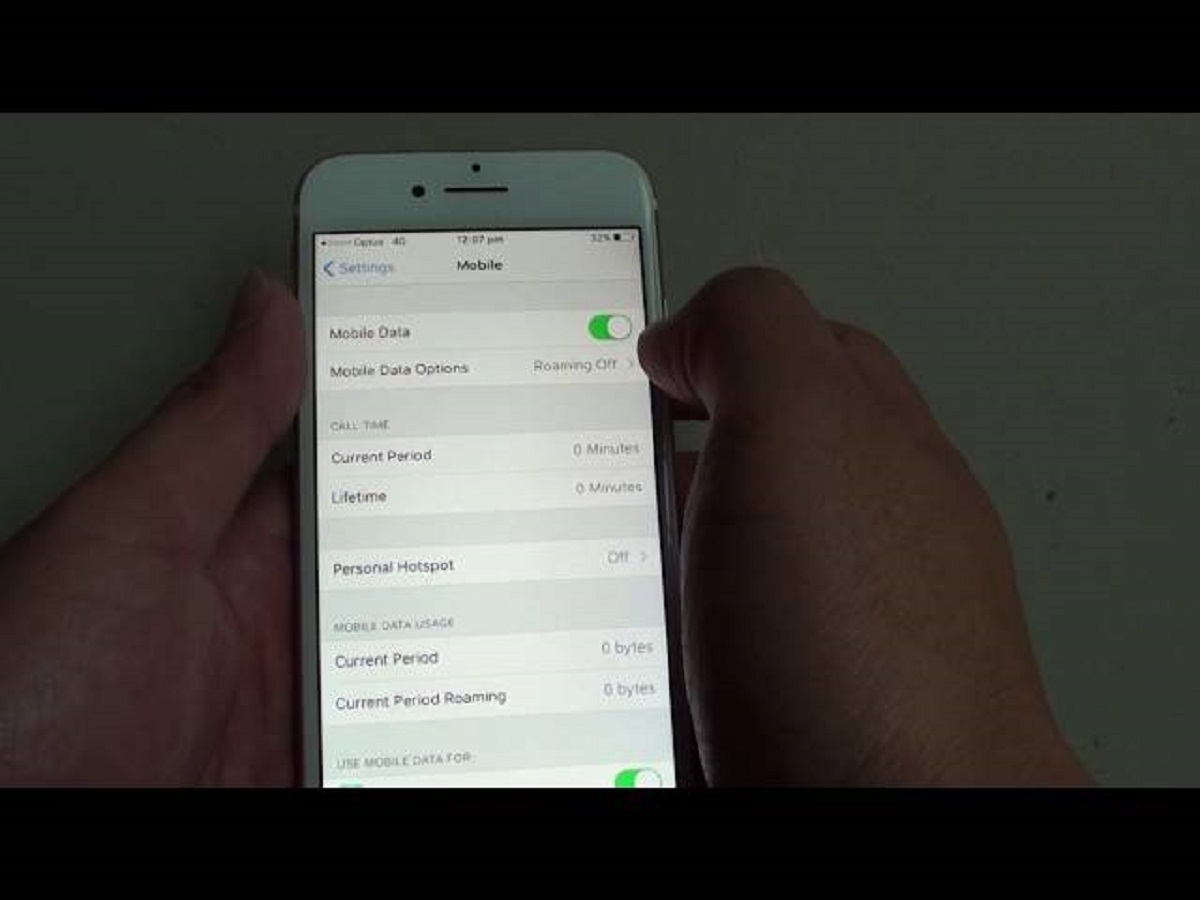
After opening the Settings menu on your iPhone XR, you need to select the “Cellular” option to access the cellular settings. This menu allows you to manage your cellular network connections, data usage, and other related settings.
Upon tapping on the “Cellular” option, you will be presented with a variety of settings related to your cellular network. These settings may include options to view your data usage, manage cellular data for specific apps, enable or disable roaming, and more.
While in the “Cellular” section, you can also view information about your network provider, such as the carrier name, data plan details, and even set up your personal hotspot if needed.
It’s worth mentioning that if you’re using a dual SIM iPhone XR, you will see two sets of cellular settings, one for each SIM card slot. Make sure to select the cellular settings for the SIM card you wish to enable 4G on.
Take a moment to explore the different options within the “Cellular” menu and familiarize yourself with the available features. Once you’ve familiarized yourself with the menu, proceed to the next step to enable 4G on your iPhone XR.
Step 3: Enable 4G LTE
Now that you’ve navigated to the “Cellular” menu on your iPhone XR, it’s time to enable 4G LTE, which stands for Long Term Evolution, a high-speed wireless communication standard that offers faster data speeds and enhanced network performance.
Within the “Cellular” menu, you should see an option labeled “Cellular Data Options” or similar. Tap on this option to access further settings related to your cellular data connection.
Inside the “Cellular Data Options” menu, you will find various settings related to data usage, including 4G LTE. Look for the toggle switch or button next to “Enable 4G” or “Enable LTE” and turn it on.
Enabling 4G LTE on your iPhone XR will activate the high-speed data connection for your device. Once enabled, your iPhone will prioritize 4G LTE network connectivity and provide you with faster internet speeds.
It’s important to note that the availability of 4G LTE depends on your network provider and the cellular infrastructure in your area. If 4G LTE is not available or supported by your network, you may see alternative options such as 3G or 2G in this menu.
After enabling 4G LTE, you can now proceed to the next step to select the voice and data options that best suit your needs.
Step 4: Choose Voice & Data Options
Once you have enabled 4G LTE on your iPhone XR, it’s time to select your preferred voice and data options. This step allows you to customize how your device uses cellular data for voice calls and internet connectivity.
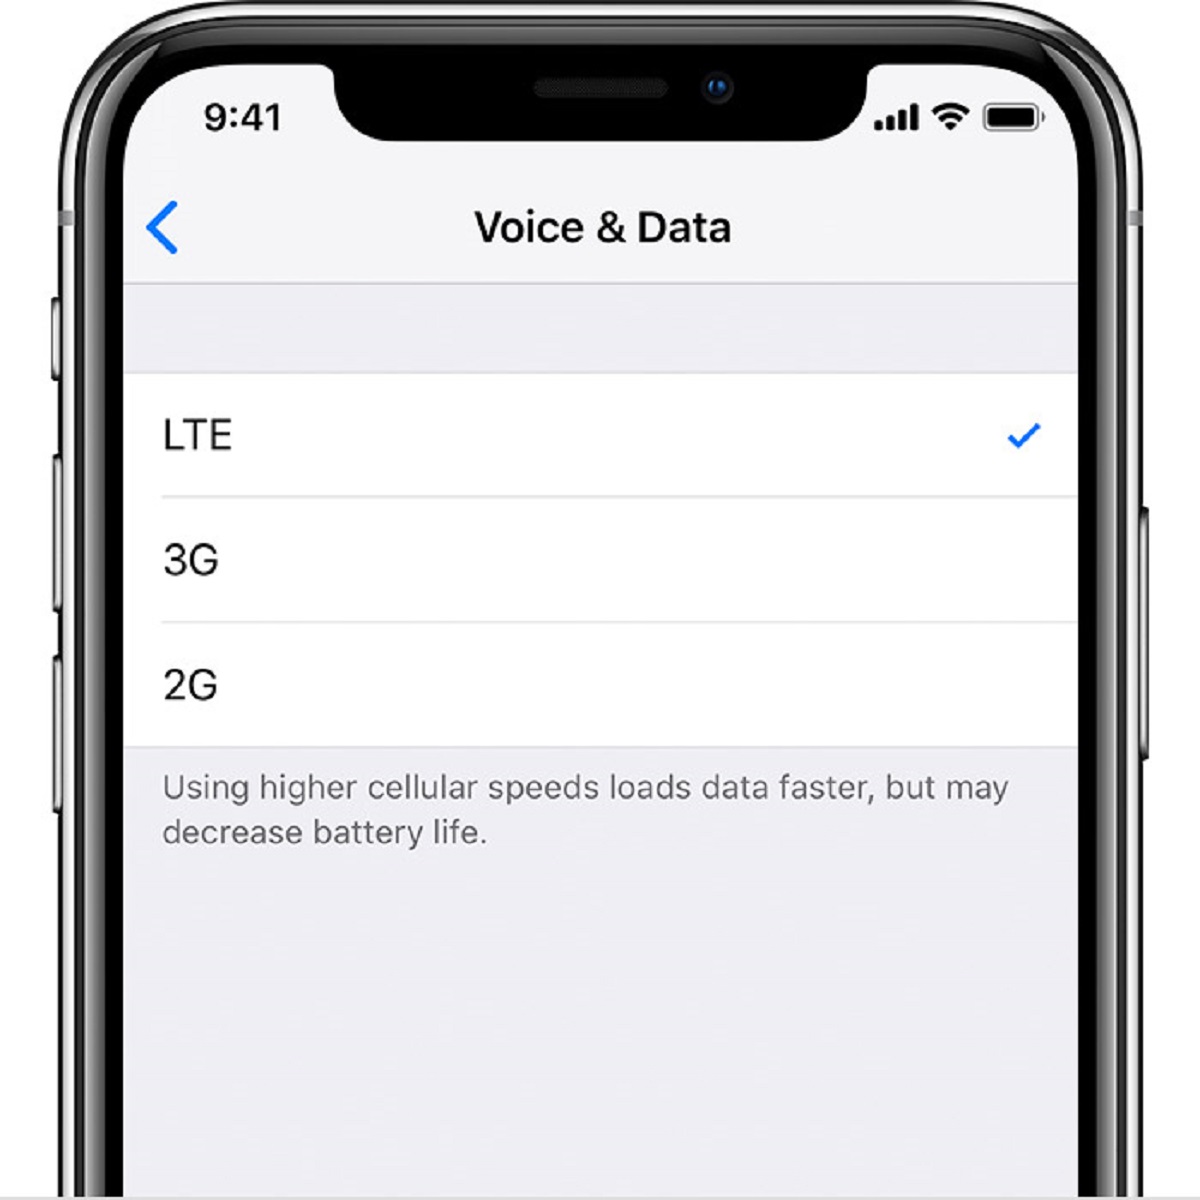
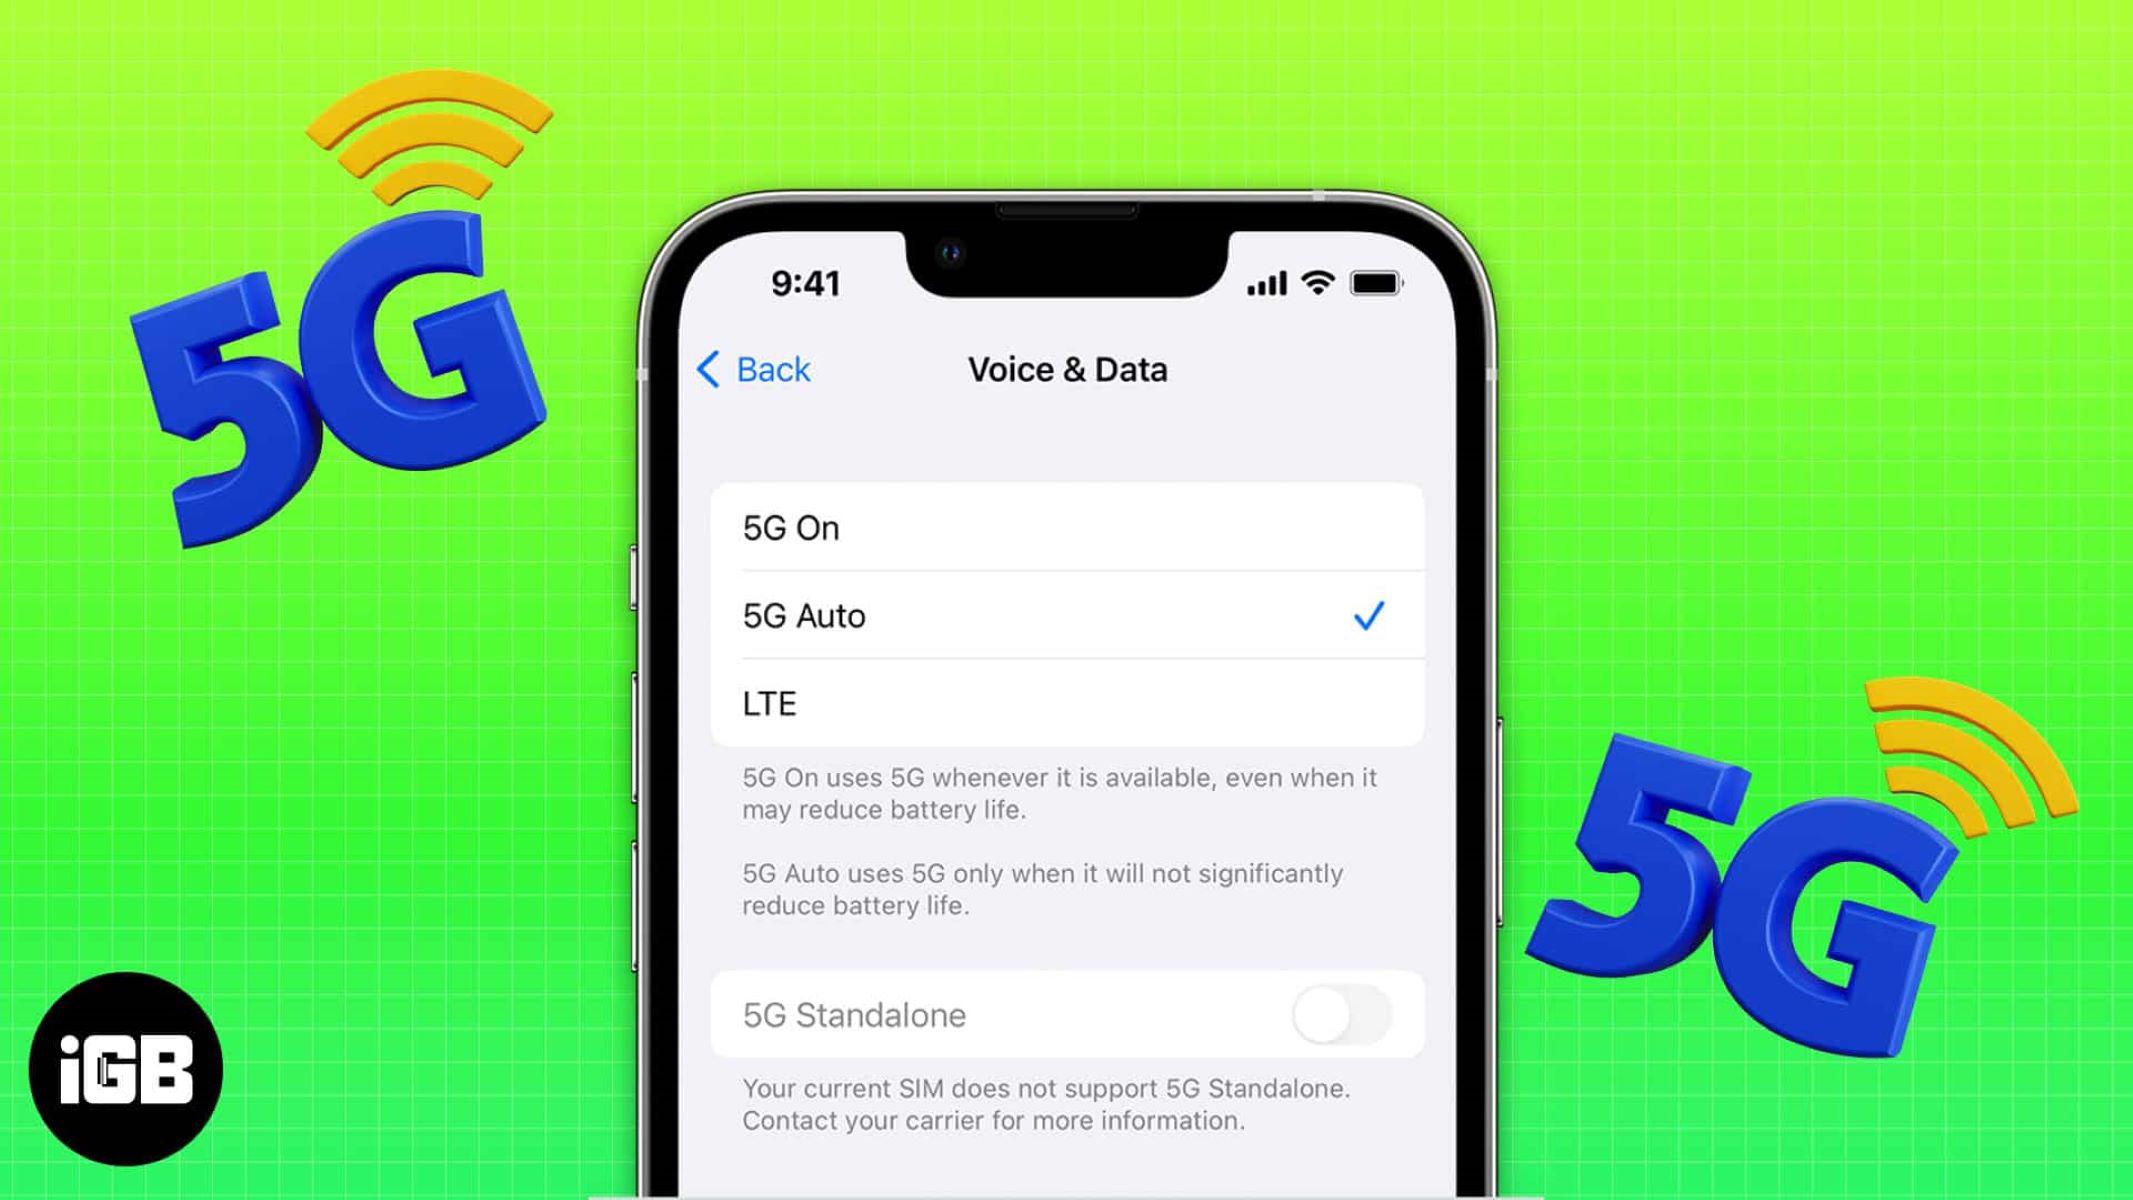
Within the “Cellular Data Options” or similar menu, you should find an option labeled “Voice & Data” or “Voice & Data Roaming.” Tap on this option to access the available voice and data settings.
Here, you will see a list of voice and data options. The options may vary depending on your network provider and the features available in your area. Some common options include:
- Voice & Data: This option allows you to use both voice calls and data over the 4G LTE network. It provides seamless connectivity for voice calls and internet usage simultaneously.
- Data Only: Selecting this option will prioritize data usage over voice calls. It is ideal for users who primarily use their iPhone for browsing, streaming, and other data-intensive tasks.
- Voice & Wi-Fi: If you prefer to use Wi-Fi for voice calls while utilizing 4G LTE for data, this option enables that functionality. It can be helpful in areas with weak cellular reception but a stable Wi-Fi connection.
Choose the voice and data option that best suits your needs and preferences by tapping on the corresponding option. Your selection will be saved, and your iPhone XR will adjust its network settings accordingly.
It’s important to note that certain voice and data options may incur additional charges or require specific plans from your network provider. Be sure to review your data plan and any associated fees or limitations before selecting a voice and data option.
With the voice and data options set, you’re now ready to experience the benefits of 4G on your iPhone XR. Enjoy faster browsing, smoother streaming, and improved network performance!
Step 5: Choose Your Preferred 4G Option
After enabling 4G LTE and selecting your voice and data options, the final step is to choose your preferred 4G option on your iPhone XR. This step allows you to specify the preferred network type for your device, ensuring that it stays connected to the fastest available network.
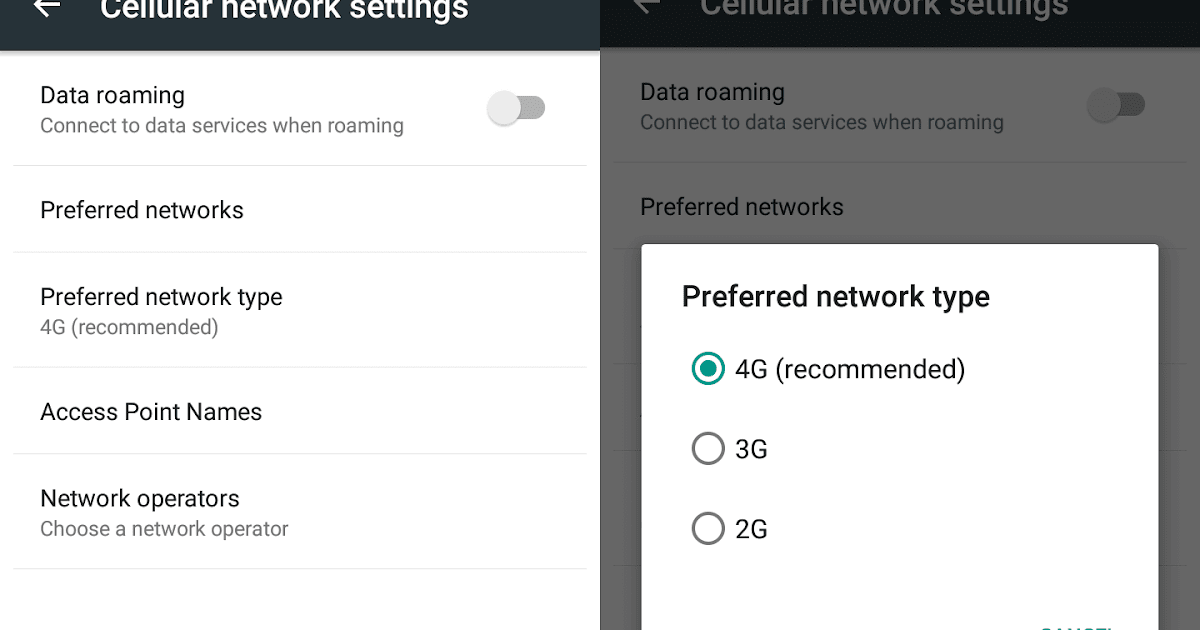
To access the preferred 4G options, go back to the “Cellular” or “Cellular Data Options” menu in your iPhone XR’s settings. Look for an option called “Preferred Network Type” or “Preferred LTE” and tap on it.
Within the preferred 4G options menu, you will usually find the following choices:
- 4G LTE: This option enables your iPhone XR to stay connected to the fastest available 4G LTE network. It ensures that you receive the best possible data speeds and network performance.
- 3G: If you prefer a more reliable and stable network connection, you can choose the 3G option. This may come in handy in areas with weak 4G LTE coverage.
- 2G: The 2G option is the slowest network type available, but it can be useful in areas with very low network coverage where maintaining a basic connection is essential.
- Automatic: Selecting the automatic option allows your iPhone XR to switch between available network types based on signal strength and availability. This ensures the most optimized network experience at all times.
Choose the preferred 4G option that best suits your needs by tapping on the corresponding option. Your selection will be saved, and your iPhone XR will use the chosen network type whenever possible.
It’s important to note that the availability of different network types may vary based on your network provider and the cellular infrastructure in your area. If you do not see all the options mentioned above, it means that they are not supported by your network.
Congratulations! You have successfully enabled 4G on your iPhone XR and customized your preferred 4G option. Enjoy faster data speeds and improved network performance on your device!
Conclusion
Congratulations! You have successfully learned how to turn on 4G on your iPhone XR. By following the steps outlined in this guide, you can enhance your browsing and streaming experience by enjoying faster data speeds and improved network connectivity.
Remember, before enabling 4G on your iPhone XR, ensure that you have a compatible cellular network and an active data plan with your network provider. It’s also essential to familiarize yourself with the available voice and data options and select the ones that best meet your needs.
Enabling 4G LTE on your iPhone XR not only provides faster data speeds but also allows you to take advantage of advanced features and services that require a high-speed network connection. Whether you’re browsing the web, streaming videos, or using data-intensive apps, 4G will provide a smooth and seamless experience.
Keep in mind that the availability of 4G LTE and the preferred network options may vary depending on your network provider and the cellular infrastructure in your area. In some cases, you may encounter areas with weak or no 4G coverage, and your device will automatically switch to alternative network types.
If you experience any issues or have further questions about enabling 4G on your iPhone XR, don’t hesitate to reach out to your network provider or refer to the official Apple support resources for additional assistance.
Now that you have enabled 4G on your iPhone XR, you can enjoy faster internet speeds, smoother streaming, and improved network performance. Stay connected and make the most out of your iPhone XR’s capabilities!