Introduction
In today’s digital era, staying connected is more important than ever. Mobile devices like iPhones have become an integral part of our lives, allowing us to access information, communicate with others, and stay updated on the go. One of the key features of modern smartphones is their ability to connect to high-speed internet networks, such as LTE (Long-Term Evolution).
However, there may be instances where you might want to change LTE to 4G on your iPhone. This could be due to various reasons, such as network compatibility issues or a preference for a different network technology. While LTE and 4G are often used interchangeably, they are technically different, with LTE being a faster and advanced version of 4G.
In this article, we will explore the methods to change LTE to 4G on your iPhone. We will provide you with step-by-step instructions and tips to help you successfully make this switch. Whether you are experiencing network issues or simply want to experiment with different network technologies, we’ve got you covered.
It’s essential to note that the methods mentioned in this article are specific to iPhones. The exact steps may vary slightly depending on the iOS version and model of your device. It is always a good idea to backup your iPhone before making any changes to your network settings.
So, if you’re ready to take control of your iPhone’s network settings, let’s dive into the step-by-step guide to changing LTE to 4G on your iPhone.
Why would you want to change LTE to 4G on your iPhone?
While LTE offers faster internet speeds and improved network performance, there are a few reasons why you might want to change LTE to 4G on your iPhone:
- Network compatibility: In some cases, certain carriers or regions may have limited LTE coverage or compatibility issues. Switching to 4G can help ensure a more stable and reliable network connection in such situations.
- Battery life: LTE consumes more power compared to 4G. If you find that your iPhone’s battery drains quickly while connected to LTE, switching to 4G can help conserve battery life and allow you to use your device for a longer time.
- Data usage: Using LTE can result in faster data consumption, especially when streaming high-quality videos or downloading large files. By opting for 4G, you can manage and reduce your data usage, which may be particularly useful if you have a limited data plan.
- Compatibility with older devices: Older iPhone models may not support LTE or may have limited LTE bands. Switching to 4G ensures seamless connectivity for these devices, allowing you to make calls, send messages, and browse the internet without any issues.
- Improved call quality: While LTE provides faster data speeds, it may not always translate to better call quality. In some cases, switching to 4G can result in clearer voice calls and reduced call dropouts.
It’s important to note that the benefits of switching from LTE to 4G will vary depending on your specific circumstances and location. If you are experiencing network problems, limited coverage, or concerns about battery life and data usage, changing to 4G may be a viable solution for you.
Now that we’ve explored the reasons why you might want to make this change, let’s move on to the step-by-step guide on how to change LTE to 4G on your iPhone.
Step-by-step guide to changing LTE to 4G on iPhone
Now that you have a clear understanding of why you might want to change LTE to 4G on your iPhone, let’s dive into the step-by-step guide to help you make this switch:
- Method 1: Reset network settings
- Go to the ‘Settings’ app on your iPhone.
- Select ‘General’ and then tap on ‘Reset’.
- Choose ‘Reset Network Settings’ and enter your device passcode if prompted.
- Your iPhone will restart, and the network settings will be reset to their default values, including the option to switch between LTE and 4G.
- Method 2: Turn off LTE
- Open the ‘Settings’ app on your iPhone.
- Navigate to ‘Cellular’ or ‘Mobile Data’ settings.
- Look for the option to enable or disable LTE or 4G. Toggle the switch to turn off LTE.
- Your iPhone will now connect to the available 4G network instead of LTE.
- Method 3: Use a carrier-specific code
- Method 4: Contact your carrier for assistance
The first method involves resetting your iPhone’s network settings. This can help resolve any network configuration issues and revert your device to the default network settings. To do this:
If resetting the network settings doesn’t give you the option to switch from LTE to 4G, you can try turning off LTE manually. Here’s how:
In some cases, carriers provide specific codes that allow users to switch between different network modes. You can contact your carrier’s customer support or visit their website to find out if such codes are available for your iPhone model and carrier.
If the above methods don’t work or you’re not comfortable making the changes yourself, you can always reach out to your carrier’s customer support for assistance. They can guide you through the process of changing LTE to 4G on your iPhone or provide any necessary settings or updates.
It’s important to note that the availability of options to switch from LTE to 4G may vary depending on your carrier, iOS version, and iPhone model. If one method doesn’t work for you, try the alternative methods or seek support from your carrier.
Now that you know the step-by-step process, let’s move on to some tips and considerations when changing LTE to 4G on your iPhone.
Method 1: Reset network settings
If you’re experiencing network issues or don’t have the option to switch from LTE to 4G on your iPhone, resetting the network settings can often resolve these issues. Follow these steps to reset your network settings:
- Open the ‘Settings’ app on your iPhone.
- Select ‘General’ and then tap on ‘Reset’.
- Choose ‘Reset Network Settings’ and enter your device passcode if prompted.
- Your iPhone will display a warning message stating that this action will delete all network settings, including Wi-Fi passwords and VPN configurations.
- Tap on ‘Reset Network Settings’ to proceed with the reset.
Once the reset process is complete, your iPhone will restart, and the network settings will be restored to their default values. This includes the option to switch between LTE and 4G if supported by your carrier and network.
It’s important to note that resetting network settings will remove any saved Wi-Fi passwords and other network-related configurations. After the reset, you will need to reconnect to Wi-Fi networks and reconfigure any VPN settings on your iPhone.
If your device supports both LTE and 4G, the option to switch between the two should be available in the ‘Cellular’ or ‘Mobile Data’ settings. However, if this method doesn’t give you the desired results, don’t worry. There are alternative methods you can try to change LTE to 4G on your iPhone.
Now that you’re familiar with method 1, let’s move on to method 2, which involves turning off LTE manually on your iPhone.
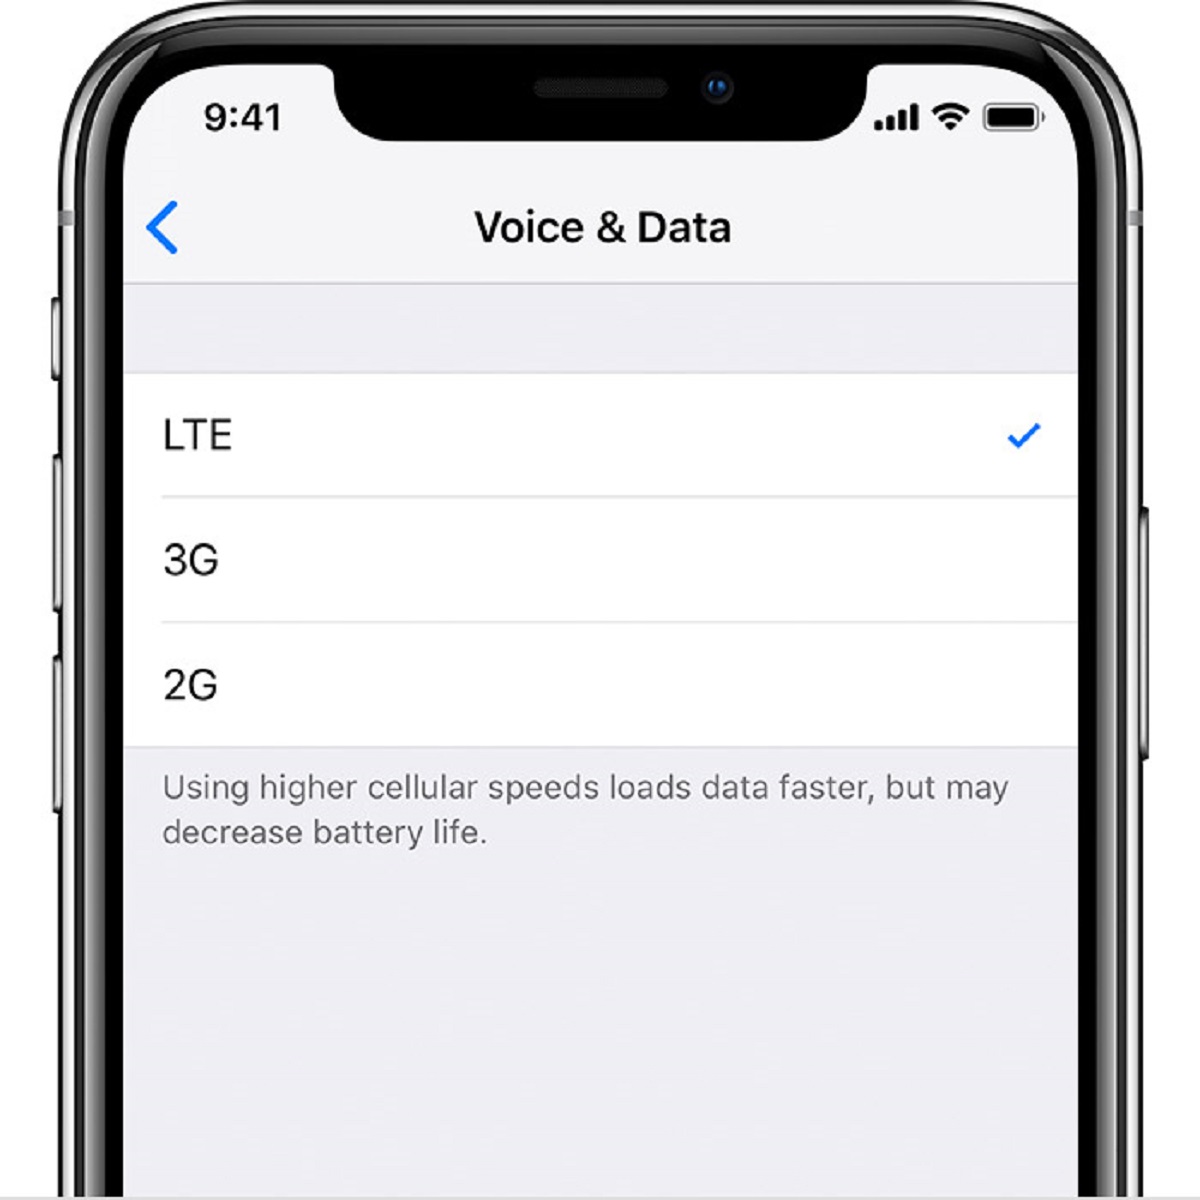
Method 2: Turn off LTE
If resetting the network settings didn’t provide you with the option to switch from LTE to 4G on your iPhone, you can try manually turning off LTE. Here’s how you can do it:
- Open the ‘Settings’ app on your iPhone.
- Navigate to the ‘Cellular’ or ‘Mobile Data’ settings.
- Look for the option to enable or disable LTE or 4G.
- Toggle the switch to turn off LTE.
- Your iPhone will now connect to the available 4G network instead of LTE.
By turning off LTE, your iPhone will prioritize connecting to the 4G network instead. This method can be useful if you’re in an area with weak LTE coverage or if you’re experiencing issues with your LTE connection.
It’s important to note that the exact steps and terminology may vary slightly depending on your iPhone model and iOS version. Some devices may label the option as ‘Enable 4G’ instead of LTE. If you can’t find the option in your cellular settings, it’s possible that your carrier doesn’t allow manual control over LTE and 4G settings.
If method 2 doesn’t give you the desired results or if you have difficulty finding the LTE toggle, don’t worry. There are additional methods you can explore to change LTE to 4G on your iPhone, which we will discuss in the following sections.
Now that you’re familiar with method 2, let’s move on to method 3, which involves using carrier-specific codes to change network settings.
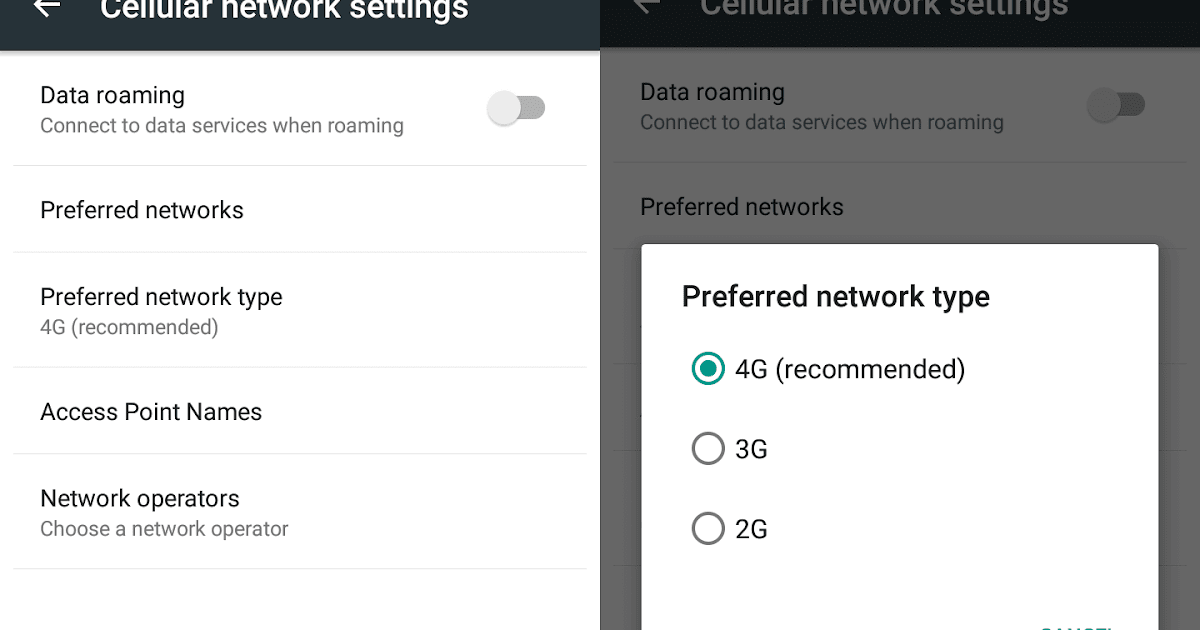
Method 3: Use a carrier-specific code
In some cases, carriers provide specific codes that allow users to switch between different network modes, including LTE and 4G. These codes are often carrier-specific and may vary depending on your iPhone model and iOS version.
If you’re interested in using a carrier-specific code to change LTE to 4G on your iPhone, follow these steps:
- Contact your carrier’s customer support or visit their website for information on any available codes or options to switch network modes.
- Provide your device information, such as the iPhone model and carrier, to the customer support representative or follow the instructions on the website.
- Once you receive the code or instructions, enter it in the designated field or dial the specified number on your iPhone.
- Follow any further prompts or instructions provided by your carrier to complete the process.
Please note that not all carriers offer these codes, and the availability may vary depending on your location and carrier. Additionally, some carriers may require additional verification or account information to process the request.
Using a carrier-specific code can be a convenient option as it allows you to change network modes directly without going through complex settings or resets. However, it’s essential to keep in mind that the code availability and functionality may differ from carrier to carrier.
If you’re unable to find or use a carrier-specific code, don’t worry. There is one more method you can try to change LTE to 4G on your iPhone, which we will cover in the next section.
Now that you’re familiar with method 3, let’s move on to method 4, which involves contacting your carrier for assistance.
Method 4: Contact your carrier for assistance
If the previous methods haven’t enabled you to change LTE to 4G on your iPhone, or if you’re unsure about making the changes yourself, reaching out to your carrier for assistance is a recommended option. Carrier customer support can provide guidance and help you navigate any specific settings or configurations required to change network modes.
Here are the steps to follow when contacting your carrier for assistance:
- Locate the customer support contact details for your carrier. This information can usually be found on their website or on your billing statement.
- Reach out to the customer support team via phone, live chat, or email. Explain that you want to change LTE to 4G on your iPhone and need their guidance.
- Provide the necessary information, such as your iPhone model, iOS version, and any other details the customer support representative may require.
- Follow the instructions and guidance provided by the customer support representative to make the necessary changes to your network settings.
Customer support representatives are knowledgeable and trained to handle various network-related inquiries. They can help diagnose any issues you may be facing and guide you through the process of changing LTE to 4G on your iPhone.
While contacting your carrier for assistance may take a bit more time and effort, it’s a reliable option that ensures you receive accurate guidance tailored to your specific carrier and iPhone model.
Now that you’re familiar with method 4, you have covered all the available methods to change LTE to 4G on your iPhone. But before you proceed, let’s go over some essential tips and considerations to keep in mind throughout this process.
Tips and considerations when changing LTE to 4G on iPhone
When changing LTE to 4G on your iPhone, it’s important to keep the following tips and considerations in mind:
- Compatibility: Ensure that your iPhone model and carrier support 4G connectivity. Some older iPhone models may not have 4G capabilities, in which case you may not be able to switch to 4G.
- Carrier restrictions: Some carriers may limit user control over network settings, including the ability to switch between LTE and 4G. Contact your carrier or refer to their website to confirm if such options are available.
- iOS version: The availability and location of network settings may vary depending on your iOS version. Make sure you are using the latest iOS version and refer to your device’s user guide or the manufacturer’s website for specific instructions.
- Network coverage: Keep in mind that the availability and strength of LTE and 4G networks may vary depending on your location. Your iPhone will automatically connect to the best available network in your area.
- Battery life and data usage: Turning off LTE or switching to 4G may help conserve battery life and reduce data usage, particularly if you have limited data plans or experience battery drain issues while connected to LTE.
- Resetting network settings: When performing a network settings reset, be aware that it will delete Wi-Fi passwords and other network-related configurations. Take note of any important settings or passwords before proceeding.
- Updating carrier settings: In some cases, carrier-specific settings or updates may be required to enable 4G connectivity on your iPhone. Check for any available carrier updates in your device’s settings or contact your carrier for assistance.
- Seeking professional assistance: If you’re unsure about making changes to your network settings or encountering difficulties, don’t hesitate to seek help from your carrier’s customer support or visit an authorized service center for guidance.
By considering these tips and keeping these factors in mind, you can ensure a smooth transition from LTE to 4G on your iPhone, enabling you to have a more optimized network experience.
Now that you’re armed with these tips, you’re ready to make the necessary changes and enjoy the benefits of switching to 4G on your iPhone.
Conclusion
In this article, we have explored the various methods to change LTE to 4G on your iPhone. Whether you’re experiencing network issues, concerned about battery life and data usage, or simply prefer using 4G over LTE, these methods provide you with the flexibility to make the switch.
We started by discussing the reasons why you might want to change LTE to 4G on your iPhone. From network compatibility and battery life concerns to data usage management and improved call quality, there are several factors that may drive this decision.
We then provided a step-by-step guide, outlining four methods to change LTE to 4G on your iPhone. From resetting network settings and turning off LTE manually to using carrier-specific codes and seeking assistance from your carrier, we have covered the range of options available.
Additionally, we offered tips and considerations to keep in mind throughout the process, such as checking compatibility, considering carrier restrictions, and being mindful of battery life and data usage. These tips will help ensure a smooth transition and optimal usage of your iPhone’s network capabilities.
Remember, the exact steps and availability of options may vary depending on your iPhone model, iOS version, and carrier. It’s always a good idea to reach out to your carrier for assistance or consult the device’s user guide or manufacturer’s website for specific instructions.
Now that you have the knowledge and tools to change LTE to 4G on your iPhone, you can customize your network settings to suit your preferences and needs. Enjoy a reliable connection, conserve battery life, and take control of your data usage as you navigate the digital world on your iPhone.