Introduction
Welcome to the guide on how to transfer your Google Authenticator codes to Microsoft Authenticator. In this digital era, online security is of utmost importance, and enabling two-factor authentication (2FA) adds an extra layer of protection to your accounts. Google Authenticator has long been a popular choice for generating 2FA codes, but if you’re considering switching to the Microsoft Authenticator app, this guide is for you.
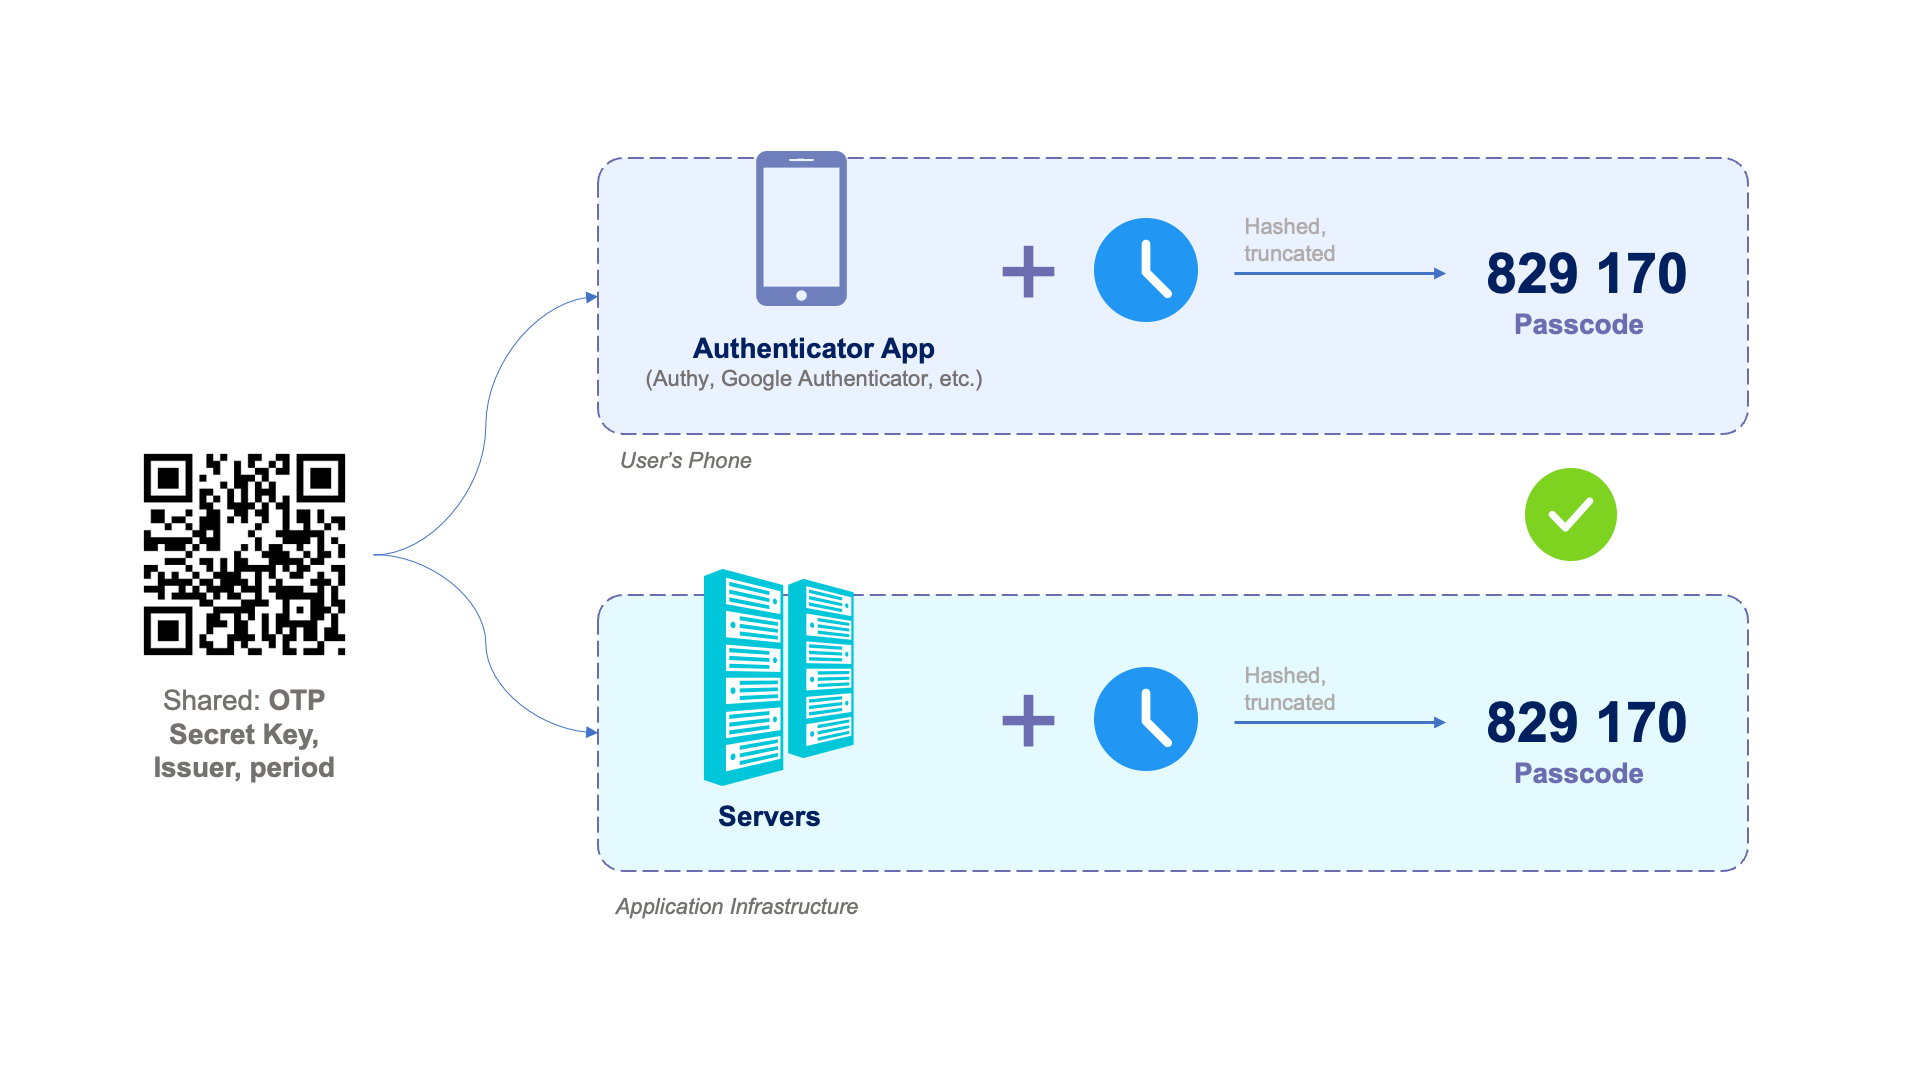
Microsoft Authenticator is a robust 2FA app that allows you to secure your online accounts using time-based one-time passwords (TOTP) or push notifications for added convenience. By centralizing all your 2FA codes in one place, using Microsoft Authenticator simplifies the authentication process and provides a seamless user experience.
In this guide, we’ll walk you through the step-by-step process of transferring your Google Authenticator codes to Microsoft Authenticator. By following these instructions, you’ll be able to migrate your 2FA accounts smoothly and maintain the same level of security across your various online platforms.
Before we dive into the steps, it’s important to note that this guide assumes you already have Google Authenticator installed on your device and have set up and enabled 2FA on your accounts. If you haven’t done so, make sure to set up Google Authenticator and enable 2FA on your accounts before proceeding with the transfer process.
Now, let’s get started with the transfer process to ensure a seamless transition from Google Authenticator to Microsoft Authenticator while maintaining the security of your online accounts.
Step 1: Download and Install Microsoft Authenticator
The first step in transferring your Google Authenticator codes to Microsoft Authenticator is to download and install the Microsoft Authenticator app on your device. Microsoft Authenticator is available for both iOS and Android devices, so make sure to choose the appropriate version for your device.
To download Microsoft Authenticator, follow these steps:
- Open the App Store (iOS) or Google Play Store (Android) on your device.
- Search for “Microsoft Authenticator” in the search bar.
- Select the official Microsoft Authenticator app from the search results.
- Tap the “Install” or “Get” button to start the download and installation process.
- Once the app is installed, you can find it on your home screen or app drawer.
Alternatively, you can use the following direct download links for Microsoft Authenticator:
After downloading and installing Microsoft Authenticator, you’re ready to proceed to the next step, which is setting up the app.
Step 2: Set up Microsoft Authenticator
Now that you have Microsoft Authenticator installed on your device, it’s time to set up the app. Follow these instructions to complete the initial setup:
- Open Microsoft Authenticator from your home screen or app drawer.
- Tap the “Get Started” button on the welcome screen.
- Choose whether you want to sign in with a personal or work or school account. Select the option that best suits your needs.
- If you’re signing in with a work or school account, enter your email address and password. If you’re signing in with a personal account, you may be prompted to set up a PIN or use biometric authentication for added security.
- Follow the on-screen prompts to complete the initial setup process.
- Once the setup is complete, you’ll be taken to the main screen of Microsoft Authenticator.
During the setup process, Microsoft Authenticator may ask for permissions to access your camera, notifications, and other features. Grant the necessary permissions to ensure the app can function properly and generate 2FA codes.
It’s worth noting that Microsoft Authenticator also offers the option to enable cloud backup, which allows you to restore your account credentials if you switch devices or need to reinstall the app. Enabling cloud backup is highly recommended to ensure you don’t lose access to your accounts in case of device loss or damage.
With Microsoft Authenticator set up on your device, it’s time to move on to the next step and add your accounts to the app.
Step 3: Add Accounts to Microsoft Authenticator
Once you have Microsoft Authenticator set up on your device, the next step is to add your accounts to the app. Adding accounts to Microsoft Authenticator allows the app to generate 2FA codes for those accounts, providing an added layer of security.
Here’s how you can add accounts to Microsoft Authenticator:
- Open Microsoft Authenticator on your device.
- Tap the “Add Account” button, usually represented by a “+” or “Add” icon.
- Select the type of account you want to add. This can be a personal account, work or school account, or even a third-party account like Facebook or Dropbox.
- Follow the prompts to add the account to Microsoft Authenticator.
- In most cases, you’ll need to scan a QR code provided by the service you want to add. This QR code contains the necessary information to link the account to Microsoft Authenticator.
- If scanning the QR code isn’t an option, you can manually enter the account details by selecting the appropriate option and providing the required information.
Once you’ve successfully added an account, Microsoft Authenticator will start generating 2FA codes for that account. To view the code, simply open the app and navigate to the specific account. The code will refresh periodically, ensuring security and preventing unauthorized access to your account.
You can add multiple accounts to Microsoft Authenticator, including accounts from different services and platforms. This centralized approach allows for easy access to all your 2FA codes within a single app, reducing the need to switch between different authenticator apps.
With your accounts added to Microsoft Authenticator, you’re one step closer to transferring your Google Authenticator codes. The next step involves disabling Two-Step Verification for each account on Google Authenticator, which we’ll cover in the next section.
Step 4: Disable Two-Step Verification for Each Account on Google Authenticator
Before you can transfer your Google Authenticator codes to Microsoft Authenticator, it’s important to disable Two-Step Verification (2SV) for each account on Google Authenticator. This will ensure a smooth transition and prevent any conflicts between the two authenticator apps.
Follow these steps to disable 2SV for each account on Google Authenticator:
- Open the Google Authenticator app on your device.
- For each account, go to the app or service’s website where you have enabled 2SV.
- Access the account settings or security settings section.
- Locate the option to disable 2SV or remove Google Authenticator as your chosen method.
- Confirm the action and follow any additional instructions provided by the service.
It’s crucial to disable 2SV on each account individually to ensure a seamless transition to Microsoft Authenticator. Keep in mind that the steps may vary slightly for different services, but the general process remains the same.
Once you have disabled 2SV for all your accounts on Google Authenticator, you’re ready to proceed to the next step and enable 2SV using Microsoft Authenticator.
Note: As best practice, it is recommended to keep a backup of recovery codes or alternative 2SV methods provided by the services before disabling 2SV on Google Authenticator. This will ensure you have a fallback option in case you encounter any issues during the transition process.
Step 5: Enable Two-Step Verification Using Microsoft Authenticator
Now that you have successfully disabled Two-Step Verification (2SV) on Google Authenticator, it’s time to enable 2SV using Microsoft Authenticator. By doing so, you’ll be able to generate 2FA codes using Microsoft Authenticator, ensuring the security of your accounts.
Follow these steps to enable 2SV using Microsoft Authenticator:
- Go to the website or app for each account where you want to enable 2SV.
- Access the account settings or security settings section.
- Select the option to enable 2SV or add a new authentication method.
- Choose the option to use an authenticator app.
- Follow the on-screen instructions provided by the service to add an authenticator app.
- When prompted, scan the QR code displayed by the service using the Microsoft Authenticator app.
- Verify the addition of the account in Microsoft Authenticator by entering the generated code or approving the notification.
- Repeat these steps for each account you want to enable 2SV with using Microsoft Authenticator.
By enabling 2SV using Microsoft Authenticator, you’re ensuring an added layer of security for your accounts. Microsoft Authenticator will now generate unique time-based one-time passwords (TOTP) for each account, providing an extra level of protection against unauthorized access.
Remember to securely store your device or backup your Microsoft Authenticator app to avoid any potential loss of access to your accounts.
With 2SV enabled using Microsoft Authenticator, you have successfully made the transition from Google Authenticator. You can now enjoy the convenience and enhanced security of managing all your 2FA codes in one centralized app.
Step 6: Troubleshooting and Common Issues
During the process of transferring your Google Authenticator codes to Microsoft Authenticator, you might encounter some issues or face common challenges. In this section, we will address some troubleshooting tips and solutions to help you overcome these obstacles.
Here are some common issues you may come across and the solutions to resolve them:
- Invalid QR Code: If you encounter an invalid QR code while trying to add an account to Microsoft Authenticator, double-check the code and ensure that it matches the one provided by the service. You may also try manually entering the account details if scanning the QR code does not work.
- Syncing Issues: If you are experiencing syncing issues between devices or after switching to a new device, make sure you have enabled cloud backup within Microsoft Authenticator. This will allow you to restore your account credentials and settings on a new device.
- Account Discrepancies: If you notice discrepancies or missing accounts between Google Authenticator and Microsoft Authenticator after the transfer, verify that you have successfully disabled 2SV for each account on Google Authenticator before enabling it on Microsoft Authenticator. If the issue persists, try removing and re-adding the accounts to Microsoft Authenticator.
- Backup and Recovery: To prevent any loss of access to your accounts, it’s important to back up your Microsoft Authenticator app periodically. This can be done through the cloud backup feature within the app or by storing recovery codes provided by the services you have enabled 2SV for.
If you encounter any other issues or have specific questions during the transfer process, refer to the support documentation of the services or reach out to their customer support for assistance. Keep in mind that each service may have unique requirements and steps for enabling 2SV with an authenticator app.
By troubleshooting common issues and taking the necessary precautions, you can ensure a smooth transition from Google Authenticator to Microsoft Authenticator while maintaining the security of your accounts.
Conclusion
Congratulations! You have successfully transferred your Google Authenticator codes to Microsoft Authenticator. By following the step-by-step process outlined in this guide, you have now centralized all your two-step verification (2SV) accounts in the Microsoft Authenticator app, while maintaining the security of your online accounts.
Microsoft Authenticator provides a convenient and secure way to generate time-based one-time passwords (TOTP) or receive push notifications for your accounts. With all your 2FA codes in one app, you no longer need to switch between different authenticator apps, simplifying the authentication process and enhancing your online security.
Throughout the process, you learned how to download and install Microsoft Authenticator, set up the app, add accounts, disable 2SV on Google Authenticator, and enable 2SV using Microsoft Authenticator. By addressing common issues and troubleshooting tips, you were able to overcome potential challenges and ensure a seamless transition.
Remember to regularly back up your Microsoft Authenticator app or store recovery codes provided by the services you enable 2SV for. This will ensure that you have a backup of your accounts in case of device loss or damage.
As technology continues to advance, it’s vital to prioritize the security of our online accounts. By embracing two-factor authentication and utilizing trusted authenticator apps like Microsoft Authenticator, you have taken an important step in safeguarding your personal information and digital presence.
We hope this guide has been helpful in transferring your Google Authenticator codes to Microsoft Authenticator. If you have any further questions or need assistance, reach out to the support documentation of the services or consult their customer support.
Thank you for following this guide, and congratulations once again on enhancing the security of your online accounts with Microsoft Authenticator!