Introduction
Transferring files from Dropbox to Google Workspace can be a seamless process if you know the right steps to follow. Whether you’re migrating your files to the Google ecosystem or simply want to have a backup in Google Drive, this guide will walk you through the process efficiently. Dropbox is a popular cloud storage service known for its ease of use and collaboration features, while Google Workspace offers a comprehensive suite of productivity tools. By transferring your files, you can take advantage of Google’s powerful applications, such as Docs, Sheets, and Slides, to enhance your workflow and collaboration.
In this guide, we will break down the steps you need to follow to transfer your files from Dropbox to Google Workspace. We’ll cover signing in to both accounts, selecting the files you want to transfer, downloading them from Dropbox, signing in to your Google Workspace account, uploading the files to Google Drive, and organizing them once they are transferred.
Before we dive into the step-by-step process, it’s important to note that you will need a reliable internet connection and active accounts on both Dropbox and Google Workspace. Additionally, ensure that you have enough storage space available on your Google Drive to accommodate the transferred files.
Now, let’s get started with the first step: signing in to your Dropbox account.
Step 1: Sign in to Your Dropbox Account
The first step in transferring files from Dropbox to Google Workspace is to sign in to your Dropbox account. If you already have a Dropbox account, you can skip this step and proceed to the next one. If not, you will need to create a new account before you can access your files.
To sign in to your Dropbox account, follow these steps:
- Open a web browser and go to the Dropbox website (www.dropbox.com).
- Click on the “Sign In” button located at the top right corner of the homepage.
- Enter your Dropbox email address and password in the respective fields.
- Click on the “Sign In” button to access your Dropbox account.
Once you are signed in to your Dropbox account, you will have access to all your files and folders stored in Dropbox. Take a moment to familiarize yourself with the Dropbox interface and locate the files you want to transfer to Google Workspace.
If you’re unable to sign in to your Dropbox account, make sure you’ve entered the correct email address and password. If you’ve forgotten your password, click on the “Forgot your password?” link on the sign-in page and follow the instructions to reset it.
It’s worth noting that if you’re using a shared computer or a public device, it’s important to sign out of Dropbox after you’re done to ensure the security of your files and account.
Now that you’re signed in to your Dropbox account, let’s move on to the next step where we’ll learn how to select the files you want to transfer.
Step 2: Select the Files You Want to Transfer
Now that you are signed in to your Dropbox account, it’s time to select the files you want to transfer to Google Workspace. Whether you have a few specific files or an entire folder that needs to be transferred, Dropbox makes it easy to choose exactly what you need.
Here’s how you can select the files you want to transfer:
- Navigate to the folder or location in your Dropbox account where the files you want to transfer are located.
- Scroll through the list of files and identify the ones you want to transfer.
- To select individual files, click on the checkbox next to each file’s name. The checkbox will be located either to the left or right of the file name, depending on your Dropbox interface.
- If you want to select all the files in a folder, click on the checkbox that appears at the top of the file list. This will automatically select all the files in that folder. Take caution when selecting all files, especially if the folder contains a large number of files.
- Once you have selected the files you want to transfer, you can proceed to the next step.
It’s a good idea to review your selections before proceeding to ensure that you have selected all the necessary files. If you accidentally select a file that you don’t want to transfer, simply click on the checkbox again to deselect it.
If you have files located in different folders within Dropbox, you can repeat the process for each folder to select all the files you want to transfer. Alternatively, if you want to transfer an entire folder and its contents, make sure to select the main folder, and Dropbox will automatically transfer all the files and subfolders within it.
Now that you have successfully selected the files you want to transfer, let’s move on to the next step, where we’ll learn how to download the selected files from Dropbox.
Step 3: Download the Selected Files from Dropbox
Once you have selected the files you want to transfer from your Dropbox account, the next step is to download them to your computer. This will allow you to have a local copy of the files before transferring them to Google Workspace.
Here’s how you can download the selected files from Dropbox:
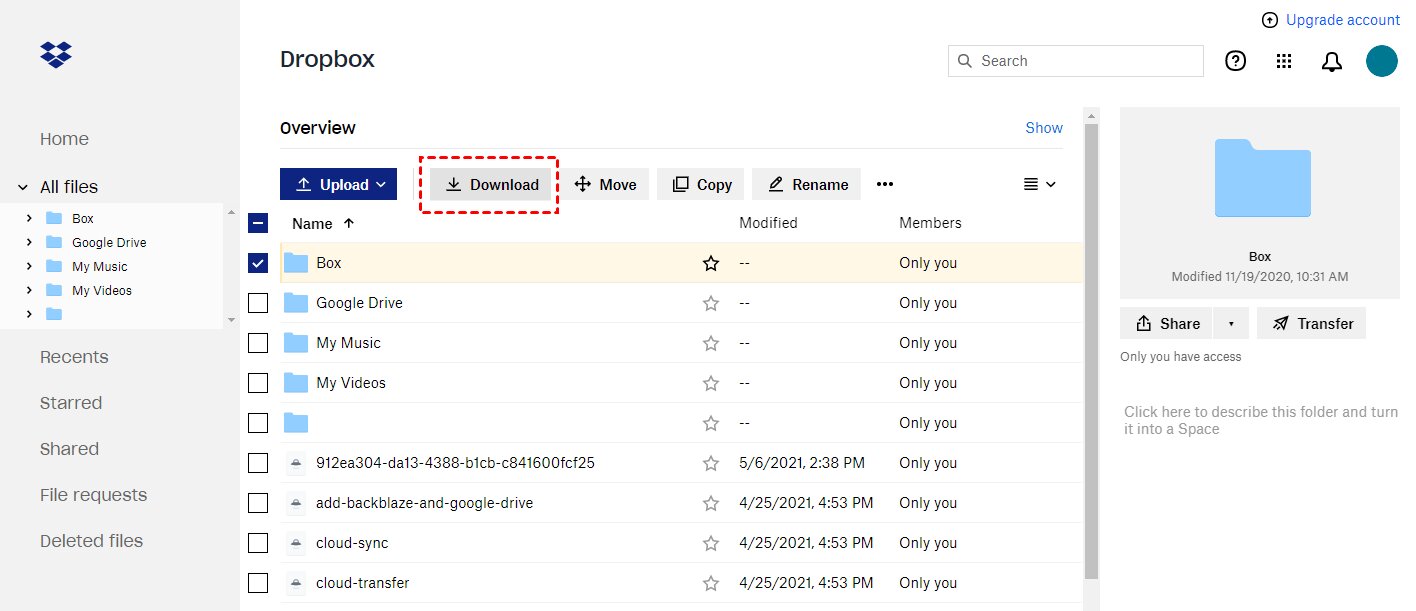
- In your Dropbox account, navigate to the folder where the selected files are located.
- Make sure all the desired files are selected by checking the checkboxes next to their names.
- Once you have confirmed your selections, right-click on any of the selected files.
- A dropdown menu will appear. Click on the “Download” option.
- Depending on your browser settings, the files will either be downloaded automatically to your default download folder, or a prompt will appear asking you to specify a location to save the files.
- Choose a suitable location on your computer to save the files, and click “Save” or “OK”.
- Repeat the process for each selected file if you have multiple files to download.
While the download is in progress, it’s important to ensure that you have a stable internet connection. The speed of the download will depend on the file size and your internet speed.
Once the files are downloaded to your computer, you can proceed to the next step, where we’ll guide you on how to sign in to your Google Workspace account.
Step 4: Sign in to Your Google Workspace Account
After downloading the selected files from your Dropbox account, it’s time to sign in to your Google Workspace account. If you don’t have a Google Workspace account yet, you can create one by visiting the Google Workspace website and following the signup process.
Here are the steps to sign in to your Google Workspace account:
- Open a web browser and go to the Google Workspace login page (https://workspace.google.com).
- Click on the “Sign In” button located at the top right corner of the page.
- Enter your Google Workspace email address and password in the respective fields.
- Click on the “Next” button to proceed to the next step.
- If you have enabled two-step verification for your Google Workspace account, you will be prompted to enter the verification code sent to your mobile device or generated by an authentication app.
- Once you have successfully signed in to your Google Workspace account, you will be redirected to the Google Workspace dashboard.
Make sure to double-check that you are signing in to the correct Google Workspace account to ensure that the transferred files end up in the right place.
If you encounter any issues during the sign-in process, such as forgetting your password or experiencing problems with two-step verification, follow the instructions on the login page to troubleshoot and regain access to your account.
Now that you are signed in to your Google Workspace account, you are ready for the next step: uploading the downloaded files to Google Drive.
Step 5: Upload the Downloaded Files to Google Drive
With your downloaded files in hand, it’s time to upload them to your Google Drive. Google Drive provides a convenient and secure cloud storage solution to keep your files accessible from anywhere and easily shareable with others.
Follow these steps to upload the downloaded files to Google Drive:
- Go to the Google Drive website (https://drive.google.com) and sign in to your Google Workspace account, if you haven’t done so already.
- Once signed in, click on the “+ New” button located on the left side of the screen.
- A dropdown menu will appear. Click on “File upload”.
- Locate the downloaded files on your computer by navigating to the folder where they were saved.
- Select the files you want to upload by clicking on them, or use the Ctrl or Shift key on your keyboard to select multiple files at once.
- Click on the “Open” button to start the upload process.
- Google Drive will then begin uploading the selected files to your Drive storage.
- The progress of the upload will be displayed, and you can monitor it in the bottom right corner of the screen.
- Once the upload is complete, the files will be available in your Google Drive.
It’s important to note that the time taken to upload the files will depend on their size and your internet connection speed. Large files may take longer to upload, so it’s best to ensure a stable and fast internet connection during the process.
If you have multiple files or folders to upload, you can repeat the above steps for each set of files or organize them into folders within Google Drive to keep them organized and easily accessible.
Now that you have successfully uploaded the downloaded files to Google Drive, you can move on to the final step: organizing the transferred files in Google Drive.
Step 6: Organize the Transferred Files in Google Drive
Now that you have successfully transferred and uploaded your files from Dropbox to Google Drive, it’s time to organize them within Google Drive to maintain a neat and structured file system. By organizing your files, you can easily locate and access them whenever you need them.
Follow these steps to organize the transferred files in Google Drive:
- Open your Google Drive by visiting the Google Drive website (https://drive.google.com) and signing in to your Google Workspace account if necessary.
- Locate the transferred files in your Google Drive. They will be located in the root directory unless you specified a destination folder during the upload process.
- Review the transferred files and identify any files that need to be grouped together or organized into folders.
- To create a new folder, click on the “+ New” button located on the left side of the screen and select “Folder” from the dropdown menu.
- Give the folder a descriptive name that accurately represents its contents.
- Drag and drop the relevant files into the newly created folder or click on the checkboxes of the files and select the “Move to” option to move them to the desired folder.
- If you have a large number of transferred files, consider creating subfolders within the main folders to further organize your files.
- You can also rename the transferred files to make them more identifiable and add relevant tags or labels to facilitate easier searching in the future.
By organizing your files in Google Drive, you can quickly navigate through your folders, locate specific files, and maintain a systematic structure that suits your workflow or project requirements.
Remember to periodically review and update your folder organization as new files are added, and old files are no longer needed to ensure optimal file management within Google Drive.
Congratulations, you have successfully completed the process of transferring files from Dropbox to Google Workspace. Your files are now securely stored in Google Drive, accessible from anywhere, and ready to be utilized in collaboration and productivity tasks using the powerful Google Workspace tools.
Conclusion
Transferring files from Dropbox to Google Workspace can be a straightforward process that allows you to take advantage of the powerful productivity tools provided by Google. By following the steps outlined in this guide, you can successfully migrate your files to Google Drive and seamlessly continue your work in the Google Workspace ecosystem.
In this guide, we covered the essential steps involved in the file transfer process:
- Signing in to your Dropbox account
- Selecting the files you want to transfer
- Downloading the selected files from Dropbox
- Signing in to your Google Workspace account
- Uploading the downloaded files to Google Drive
- Organizing the transferred files in Google Drive
Remember to ensure a stable internet connection and have sufficient storage space available in both your Dropbox and Google Drive accounts. Double-check your selections and be mindful of any specific settings or configurations required during the transfer process.
Once your files are transferred and organized in Google Drive, you can enjoy the benefits of Google Workspace’s collaborative tools, such as Docs, Sheets, and Slides, to enhance your productivity and collaboration with team members or clients.
Keep in mind that the process of transferring files is not limited to a one-time event. You can repeat these steps whenever you need to transfer additional or updated files from Dropbox to Google Drive.
Now that you have a comprehensive understanding of how to transfer files from Dropbox to Google Workspace, you can take advantage of the robust capabilities of Google’s productivity suite and make the most of your cloud storage solution.
Start the process today and experience the convenience and enhanced collaboration that Google Workspace and Google Drive offer.